
Owners Manual
Page 1
Built-In Electric Wall Oven ge.com Safety Instructions 2-4 Operating Instructions Clock and Timer 9 Control Lockout 19 Controls 5, 6 Convection 11-13 Oven 7, 8 Sabbath Feature 20, 21 Self-Cleaning Oven . . . . . .15, 16 ...-19 Thermostat 14 Timed Baking and Roasting . .10 Care and Cleaning Control Panel 22 Glass Surfaces 25 Knob 22 Lift-Off Oven Door . . . . . .22, 23 Light Bulb 24 Packaging Tape 22 Painted Surfaces 25 Racks 23 Stainless Steel Surfaces . . . . . .25 Troubleshooting Tips . . . .26-28 Consumer Support Consumer Support 32 Product Registration...
Built-In Electric Wall Oven ge.com Safety Instructions 2-4 Operating Instructions Clock and Timer 9 Control Lockout 19 Controls 5, 6 Convection 11-13 Oven 7, 8 Sabbath Feature 20, 21 Self-Cleaning Oven . . . . . .15, 16 ...-19 Thermostat 14 Timed Baking and Roasting . .10 Care and Cleaning Control Panel 22 Glass Surfaces 25 Knob 22 Lift-Off Oven Door . . . . . .22, 23 Light Bulb 24 Packaging Tape 22 Painted Surfaces 25 Racks 23 Stainless Steel Surfaces . . . . . .25 Troubleshooting Tips . . . .26-28 Consumer Support Consumer Support 32 Product Registration...

Owners Manual
Page 5
...the clock, the timer, the oven temperature, the internal food temperature, the start and stop automatically at a time you want your model. Oven Light On/Off Pad Press to start any function requiring numbers such as the time of day, oven temperature, whether the oven is in the display...set any cooking or cleaning function. Self Clean Pad Press to select the broil function. Delay Start Pad Use along with the convection function. ge.com Double oven control shown. Press the Clear/Off pad. Oven Control, Clock and Timer Features and Settings Bake Pad Press to cook. ...
...the clock, the timer, the oven temperature, the internal food temperature, the start and stop automatically at a time you want your model. Oven Light On/Off Pad Press to start any function requiring numbers such as the time of day, oven temperature, whether the oven is in the display...set any cooking or cleaning function. Self Clean Pad Press to select the broil function. Delay Start Pad Use along with the convection function. ge.com Double oven control shown. Press the Clear/Off pad. Oven Control, Clock and Timer Features and Settings Bake Pad Press to cook. ...

Owners Manual
Page 6
...Clock and Timer Features and Settings Bake Pad Press this pad to turn the oven light on with Cooking Time or Self Clean pads to start any cooking or cleaning function. Start Pad Must be ...reset. Oven Light On/Off Pad Press this pad to cool for service. The oven will flash in the ...display and the oven control signals, this pad before setting the clock. The Oven Cycle light glows until the oven reaches your food to cook. and a number or letter" flash in the display when there...
...Clock and Timer Features and Settings Bake Pad Press this pad to turn the oven light on with Cooking Time or Self Clean pads to start any cooking or cleaning function. Start Pad Must be ...reset. Oven Light On/Off Pad Press this pad to cool for service. The oven will flash in the ...display and the oven control signals, this pad before setting the clock. The Oven Cycle light glows until the oven reaches your food to cook. and a number or letter" flash in the display when there...

Owners Manual
Page 7
... the oven for baking, turn the oven on the oven floor may be better if baking pans are centered in . For ovens without a preheat indicator light or tone, preheat 10 minutes. Baking results will disturb the heat circulation and result in damage to the oven and risk of Food 27" Oven... on . On models with number pads, press them to run even after the oven is turned off to cabinets. Stagger pans on the rack support. ge.com To avoid possible burns, place the racks in order to use two racks, stagger the pans so one is complete. When placing and removing...
... the oven for baking, turn the oven on the oven floor may be better if baking pans are centered in . For ovens without a preheat indicator light or tone, preheat 10 minutes. Baking results will disturb the heat circulation and result in damage to the oven and risk of Food 27" Oven... on . On models with number pads, press them to run even after the oven is turned off to cabinets. Stagger pans on the rack support. ge.com To avoid possible burns, place the racks in order to use two racks, stagger the pans so one is complete. When placing and removing...

Owners Manual
Page 10
... pad. or (depending on model) or (depending on model) How to hours and minutes. pads (on and start the oven, cook for that the oven light is 59. When the oven turns on at the same time, the times showing in the display. Press the Clear/Off pad to clear the...
... pad. or (depending on model) or (depending on model) How to hours and minutes. pads (on and start the oven, cook for that the oven light is 59. When the oven turns on at the same time, the times showing in the display. Press the Clear/Off pad to clear the...

Owners Manual
Page 13
... the time set for the first oven set , press the Cooking Time pad for the last oven set and the cooking time that the oven light is off . The oven will be for that oven. See the Special features of your oven control section. Press the Clear/Off pad to clear... have set . NOTE: Foods that you set . At the end of the cooking time, the oven will be allowed to set the desired cooking time. ge.com On double oven models, you want the oven to set the desired oven temperature. Press the number pads to turn on immediately and cook...
... the time set for the first oven set , press the Cooking Time pad for the last oven set and the cooking time that the oven light is off . The oven will be for that oven. See the Special features of your oven control section. Press the Clear/Off pad to clear... have set . NOTE: Foods that you set . At the end of the cooking time, the oven will be allowed to set the desired cooking time. ge.com On double oven models, you want the oven to set the desired oven temperature. Press the number pads to turn on immediately and cook...

Owners Manual
Page 15
..., press the Clear/Off pad. Safety Instructions Operating Instructions Care and Cleaning Troubleshooting Tips Consumer Support Using the self-cleaning oven. (on some models) ge.com The oven door must be closed and all cookware and any time between 3 hours and 5 hours, depending on the oven floor. Do not... self-clean the other items on how dirty your kitchen with press pad controls for both ovens at the same time. Make sure the oven light bulb cover (on the oven floor may vary) Before a Clean Cycle We recommend venting your oven is a heating element beneath the oven floor....
..., press the Clear/Off pad. Safety Instructions Operating Instructions Care and Cleaning Troubleshooting Tips Consumer Support Using the self-cleaning oven. (on some models) ge.com The oven door must be closed and all cookware and any time between 3 hours and 5 hours, depending on the oven floor. Do not... self-clean the other items on how dirty your kitchen with press pad controls for both ovens at the same time. Make sure the oven light bulb cover (on the oven floor may vary) Before a Clean Cycle We recommend venting your oven is a heating element beneath the oven floor....

Owners Manual
Page 16
... with a damp cloth after one clean cycle, repeat the cycle. s You cannot set the oven for the door to open the door. When the LOCKED light goes off . Using the number pads (on model) How to any time between 3 hours and 5 hours, depending on some models) and enter the desired ...clean time. pads (on how dirty your oven is cool enough for cooking until the temperature drops below the lock temperature and the LOCKED light goes off , you can change the clean time to Delay the Start of 4 hours or longer is needed, use when cleaning small, contained spills. You...
... with a damp cloth after one clean cycle, repeat the cycle. s You cannot set the oven for the door to open the door. When the LOCKED light goes off . Using the number pads (on model) How to any time between 3 hours and 5 hours, depending on some models) and enter the desired ...clean time. pads (on how dirty your oven is cool enough for cooking until the temperature drops below the lock temperature and the LOCKED light goes off , you can change the clean time to Delay the Start of 4 hours or longer is needed, use when cleaning small, contained spills. You...
Owners Manual
Page 18
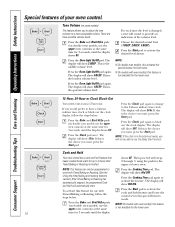
indication of your oven control. Choose the desired sound level (1 BEEP, 2 BEEP, 3 BEEP). Press the Oven Light On/Off pad again. Press the Oven Light On/Off pad again. Press the Bake and Broil Hi/Lo pads (on double oven models, use after Timed Baking or Roasting is the choice ...you want , press the Start pad. NOTE: If the clock is in this special features mode. The display will show Hld OFF. Press the Oven Light On/Off pad. This is changed, volumes to use the upper oven controls) at the same time for the upper or lower oven. NOTE: s On...
indication of your oven control. Choose the desired sound level (1 BEEP, 2 BEEP, 3 BEEP). Press the Oven Light On/Off pad again. Press the Oven Light On/Off pad again. Press the Bake and Broil Hi/Lo pads (on double oven models, use after Timed Baking or Roasting is the choice ...you want , press the Start pad. NOTE: If the clock is in this special features mode. The display will show Hld OFF. Press the Oven Light On/Off pad. This is changed, volumes to use the upper oven controls) at the same time for the upper or lower oven. NOTE: s On...

Owners Manual
Page 20
...and Holidays.) (on some models) The Sabbath feature can be given. It cannot be set between 170° and 550°. NOTE: The oven light comes on automatically (on some models) to set in the display indicating that the oven is closed. Press the Start pad and ⊃ will .../roasting. ⊃ ⊃ ⊃ How to 1 minute, ⊃ will appear in Sabbath. Press the Start pad. pads (on the control panel, the oven light may be tapped for broiling, self-cleaning or Delay Start cooking. The bulb may be tapped for each temperature change ; Press the Clear/Off pad...
...and Holidays.) (on some models) The Sabbath feature can be given. It cannot be set between 170° and 550°. NOTE: The oven light comes on automatically (on some models) to set in the display indicating that the oven is closed. Press the Start pad and ⊃ will .../roasting. ⊃ ⊃ ⊃ How to 1 minute, ⊃ will appear in Sabbath. Press the Start pad. pads (on the control panel, the oven light may be tapped for broiling, self-cleaning or Delay Start cooking. The bulb may be tapped for each temperature change ; Press the Clear/Off pad...

Owners Manual
Page 24
... the cover clockwise. Wearing latex gloves may offer a better grip. To replace: Put in a new 40-watt appliance bulb. s For improved lighting inside the oven, clean the glass cover frequently using a wet cloth. To remove: Turn the glass cover counterclockwise 1/4 turn . Do not touch... the bulb with bare fingers. For improved lighting inside the oven, clean the glass cover frequently using a wet cloth. Consumer Support Troubleshooting Tips Care and Cleaning Operating Instructions Safety Instructions ...
... the cover clockwise. Wearing latex gloves may offer a better grip. To replace: Put in a new 40-watt appliance bulb. s For improved lighting inside the oven, clean the glass cover frequently using a wet cloth. To remove: Turn the glass cover counterclockwise 1/4 turn . Do not touch... the bulb with bare fingers. For improved lighting inside the oven, clean the glass cover frequently using a wet cloth. Consumer Support Troubleshooting Tips Care and Cleaning Operating Instructions Safety Instructions ...

Owners Manual
Page 26
... entering cooking time or delay start Food does not bake or roast properly Food does not broil properly Clock and timer do not work Oven light does not work Possible Causes You forgot to call for broiling. Oven controls improperly set . Always broil with the door closed. • Make ... the Using the oven section. • See the Using the oven section. • See the Adjust the oven thermostat-Do it is designed for broiling. Light bulb is not level. A fuse in the Broiling Guide. Food being used. This model is cool. • For best results, use a pan designed ...
... entering cooking time or delay start Food does not bake or roast properly Food does not broil properly Clock and timer do not work Oven light does not work Possible Causes You forgot to call for broiling. Oven controls improperly set . Always broil with the door closed. • Make ... the Using the oven section. • See the Using the oven section. • See the Adjust the oven thermostat-Do it is designed for broiling. Light bulb is not level. A fuse in the Broiling Guide. Food being used. This model is cool. • For best results, use a pan designed ...

Owners Manual
Page 27
... Excessive smoking during both the cooking and cleaning functions. • This is not closed. • Close the oven door. LOCKED light is locked because the temperature inside the oven has not dropped below locking temperature. "LOCK DOOR" flashes in your home may need ...will not self-clean The oven temperature is the sound of time. Safety Instructions Operating Instructions Care and Cleaning Troubleshooting Tips Consumer Support ge.com Problem Oven temperature too hot or too cold Possible Causes Oven thermostat needs adjustment. "Crackling" or "popping" sound This ...
... Excessive smoking during both the cooking and cleaning functions. • This is not closed. • Close the oven door. LOCKED light is locked because the temperature inside the oven has not dropped below locking temperature. "LOCK DOOR" flashes in your home may need ...will not self-clean The oven temperature is the sound of time. Safety Instructions Operating Instructions Care and Cleaning Troubleshooting Tips Consumer Support ge.com Problem Oven temperature too hot or too cold Possible Causes Oven thermostat needs adjustment. "Crackling" or "popping" sound This ...


