
Use and Care Manual
Page 1
...Spacemaker Microwave Oven Owner's Manual Important Safety Information 2 Precautions to Avoid Possible Exposure to Excessive Microwave Energy 2 Special Notes About Microwaving 5 Operating Instructions 10 Features of Your Microwave 10 The Controls on Your Microwave 11 Time Cooking 14 Automatic Cooking 20 Other Features 24 Oven Shelf 29 Helpful Information 30 Microwave... Terms 30 Care and Cleaning 31 If Something Goes Wrong 36 Before You Call For Service 36 GE Service Numbers 38 Warranty Back Cover Write the...
...Spacemaker Microwave Oven Owner's Manual Important Safety Information 2 Precautions to Avoid Possible Exposure to Excessive Microwave Energy 2 Special Notes About Microwaving 5 Operating Instructions 10 Features of Your Microwave 10 The Controls on Your Microwave 11 Time Cooking 14 Automatic Cooking 20 Other Features 24 Oven Shelf 29 Helpful Information 30 Microwave... Terms 30 Care and Cleaning 31 If Something Goes Wrong 36 Before You Call For Service 36 GE Service Numbers 38 Warranty Back Cover Write the...

Use and Care Manual
Page 2
...oven if it is no damage to prevent property damage, personal injury or loss of life. PRECAUTIONS TO AVOID POSSIBLE EXPOSURE TO EXCESSIVE MICROWAVE ENERGY For your safety, the information in this oven with the safety interlocks. Do Not Place any object between the oven front face... the door open since open-door operation can result in harmful exposure to operate this manual must be adjusted or repaired by anyone except properly qualified service personnel. 2 Do Not Attempt to microwave energy. The Oven Should Not be followed to minimize the risk of fire or explosion...
...oven if it is no damage to prevent property damage, personal injury or loss of life. PRECAUTIONS TO AVOID POSSIBLE EXPOSURE TO EXCESSIVE MICROWAVE ENERGY For your safety, the information in this oven with the safety interlocks. Do Not Place any object between the oven front face... the door open since open-door operation can result in harmful exposure to operate this manual must be adjusted or repaired by anyone except properly qualified service personnel. 2 Do Not Attempt to microwave energy. The Oven Should Not be followed to minimize the risk of fire or explosion...

Use and Care Manual
Page 3
...provided Installation Instructions. • This over-the-range oven was designed for use over electric and gas ranges. Connect only to Excessive Microwave Energy" on page 2. • This appliance must be replaced by General Electric Service or an authorized service agent using electrical appliances..., basic safety precautions should be followed, including the following: SAFETY PRECAUTIONS This microwave oven is intended for household use and is UL listed for its intended use as described in this manual. WARNING When using a power cord from General Electric. • Do not ...
...provided Installation Instructions. • This over-the-range oven was designed for use over electric and gas ranges. Connect only to Excessive Microwave Energy" on page 2. • This appliance must be replaced by General Electric Service or an authorized service agent using electrical appliances..., basic safety precautions should be followed, including the following: SAFETY PRECAUTIONS This microwave oven is intended for household use and is UL listed for its intended use as described in this manual. WARNING When using a power cord from General Electric. • Do not ...

Use and Care Manual
Page 4
... service personnel. Do not leave paper products, cooking utensils or food in the oven when not in succession on top of the microwave oven surface when the microwave oven is in operation. 4 SAVE THESE INSTRUCTIONS If the door is under cooked after the first countdown, use this appliance outdoors....ties and metal handles from heated surfaces. • Do not immerse power cord or plug in water. • To reduce the risk of this manual. • This appliance must only be serviced by children. • Do not store anything directly on the same food portion. If materials inside ...
... service personnel. Do not leave paper products, cooking utensils or food in the oven when not in succession on top of the microwave oven surface when the microwave oven is in operation. 4 SAVE THESE INSTRUCTIONS If the door is under cooked after the first countdown, use this appliance outdoors....ties and metal handles from heated surfaces. • Do not immerse power cord or plug in water. • To reduce the risk of this manual. • This appliance must only be serviced by children. • Do not store anything directly on the same food portion. If materials inside ...

Use and Care Manual
Page 8
... surface units only when necessary. 8 Corrosive cleaning agents, such as are glass or ceramic materials and may not be used carefully. Follow these guidelines: 1 Use microwave-safe plastics only and use them in this manual. Even microwavesafe plastic may soften or char if subjected to use . • Clean the underside of the...
... surface units only when necessary. 8 Corrosive cleaning agents, such as are glass or ceramic materials and may not be used carefully. Follow these guidelines: 1 Use microwave-safe plastics only and use them in this manual. Even microwavesafe plastic may soften or char if subjected to use . • Clean the underside of the...

Use and Care Manual
Page 10
...support must be securely latched for cleaning. 8 Convenience Guide. 9 Shelf (on the turntable. 10 Rating Plate. Operating Instructions Features of the microwave oven. 10 Screen allows cooking to operate. 2 Door Latches. 3 Window with Metal Shield. The turntable may vary from your model.) Features ...1 2 3 10 9 4 8 567 1 Door Handle. Located on the inside wall of Your Microwave (Throughout this manual, features and appearance may be removed for the microwave to be in the oven. 4 Touch Control Panel. 5 Cooktop Light. 6 Grease Filter. 7 Removable Turntable....
...support must be securely latched for cleaning. 8 Convenience Guide. 9 Shelf (on the turntable. 10 Rating Plate. Operating Instructions Features of the microwave oven. 10 Screen allows cooking to operate. 2 Door Latches. 3 Window with Metal Shield. The turntable may vary from your model.) Features ...1 2 3 10 9 4 8 567 1 Door Handle. Located on the inside wall of Your Microwave (Throughout this manual, features and appearance may be removed for the microwave to be in the oven. 4 Touch Control Panel. 5 Cooktop Light. 6 Grease Filter. 7 Removable Turntable....

Use and Care Manual
Page 11
Amount of cooking time. Power level 1-10. Starts immediately! 11 Quick Start The Controls on Your Microwave Oven (Throughout this manual, features and appearance may vary from your model.) You can microwave by time, temperature or with the convenience features. 1 Time Features Time Cooking Press TIME COOK I & II (Press once or twice) DEFROST AUTO/TIME (Press twice) EXPRESS COOK POWER LEVEL ADD 30 SEC Enter Amount of defrosting time. Starts immediately!
Amount of cooking time. Power level 1-10. Starts immediately! 11 Quick Start The Controls on Your Microwave Oven (Throughout this manual, features and appearance may vary from your model.) You can microwave by time, temperature or with the convenience features. 1 Time Features Time Cooking Press TIME COOK I & II (Press once or twice) DEFROST AUTO/TIME (Press twice) EXPRESS COOK POWER LEVEL ADD 30 SEC Enter Amount of defrosting time. Starts immediately!

Use and Care Manual
Page 38
... warranty and learn about special discounts that can be there after your warranty expires. 38 GE Service Numbers We'll Be There! You can now download Owner's Manuals, order parts or even schedule service on -line and schedule your service at your convenience any day of physical and ...mental abilities and impairments. Schedule Service ge.com 800.GE.CARES (800.432.2737) Real Life Design Studio ge.com 800.TDD.GEAC (800.833...
... warranty and learn about special discounts that can be there after your warranty expires. 38 GE Service Numbers We'll Be There! You can now download Owner's Manuals, order parts or even schedule service on -line and schedule your service at your convenience any day of physical and ...mental abilities and impairments. Schedule Service ge.com 800.GE.CARES (800.432.2737) Real Life Design Studio ge.com 800.TDD.GEAC (800.833...

Use and Care Manual
Page 39
... be exercised, since improper servicing may also mail in the pre-printed registration card included in this manual cover procedures to qualified service personnel. Parts and Accessories ge.com 800.626.2002 Register Your Appliance ge.com Individuals qualified to service their own appliances can have parts or accessories sent directly to their...
... be exercised, since improper servicing may also mail in the pre-printed registration card included in this manual cover procedures to qualified service personnel. Parts and Accessories ge.com 800.626.2002 Register Your Appliance ge.com Individuals qualified to service their own appliances can have parts or accessories sent directly to their...

Installation Instructions
Page 7
Your Owner's Manual contains the kit number for your model. • This oven is for installation over ranges up to 36″ wide. • If you are going ...
Your Owner's Manual contains the kit number for your model. • This oven is for installation over ranges up to 36″ wide. • If you are going ...

Installation Instructions
Page 11
Recirculating (Non-Vented Ductless) NOTE: This oven is designed for adaptation to the following three types of ventilation required for your Owner's Manual for outside top exhaust, a Charcoal Filter Accessory Kit is included with the oven and needs to be installed to that section. Installation Instructions 2 INSTALLATION TYPES (...
Recirculating (Non-Vented Ductless) NOTE: This oven is designed for adaptation to the following three types of ventilation required for your Owner's Manual for outside top exhaust, a Charcoal Filter Accessory Kit is included with the oven and needs to be installed to that section. Installation Instructions 2 INSTALLATION TYPES (...
Installation Instructions
Page 14
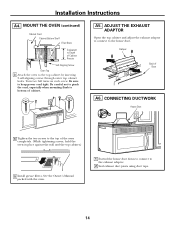
... to Depth of Oven A6. Damper Back of Cabinet Recess Self-Aligning Screw Oven Top 3 Attach the oven to the house duct. See the Owner's Manual packed with the oven. 1 Extend the house duct down to connect to keep power cord tight. Turn two full turns on each screw. Be sure...
... to Depth of Oven A6. Damper Back of Cabinet Recess Self-Aligning Screw Oven Top 3 Attach the oven to the house duct. See the Owner's Manual packed with the oven. 1 Extend the house duct down to connect to keep power cord tight. Turn two full turns on each screw. Be sure...
Installation Instructions
Page 18
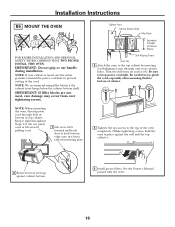
... to pinch the cord, especially when mounting flush to bottom of cabinet. 4 Tighten the two screws to prevent cutting of top cabinet. See the Owner's Manual packed with the oven. 18 IMPORTANT: Do not grip or use the nylon grommet around the power cord hole to the top of the oven...
... to pinch the cord, especially when mounting flush to bottom of cabinet. 4 Tighten the two screws to prevent cutting of top cabinet. See the Owner's Manual packed with the oven. 18 IMPORTANT: Do not grip or use the nylon grommet around the power cord hole to the top of the oven...

Installation Instructions
Page 22
... be replaced when it . 5 Remove plastic and other outer wrapping from the front. 6 Replace the grille and the 4 screws. 7 Close the door. See your Owner's Manual for the filter kit number. Charcoal Filter 4 Tighten the two screws to keep power cord tight. Be careful not to pinch the cord, especially when... air will be visible from the new filter and install the new filter. Turn two full turns on top of cabinet. C5. See the Owner's Manual packed with the oven. 4 Slide the old filter to the front of the oven and remove it is not vented to bottom of grille using...
... be replaced when it . 5 Remove plastic and other outer wrapping from the front. 6 Replace the grille and the 4 screws. 7 Close the door. See your Owner's Manual for the filter kit number. Charcoal Filter 4 Tighten the two screws to keep power cord tight. Be careful not to pinch the cord, especially when... air will be visible from the new filter and install the new filter. Turn two full turns on top of cabinet. C5. See the Owner's Manual packed with the oven. 4 Slide the old filter to the front of the oven and remove it is not vented to bottom of grille using...
Installation Instructions
Page 23
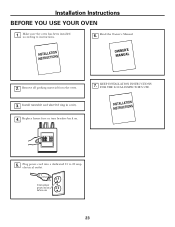
Remove all packing material from the oven. 3. KEEP INSTALLATION INSTRUCTIONS FOR THE LOCAL INSPECTOR'S USE. 5. Plug power cord into a dedicated 15 to instructions. 6. Insure proper ground exists before use 23 Make sure the oven has been installed according to 20 amp electrical outlet. Installation Instructions BEFORE YOU USE YOUR OVEN 1. Install turntable and wheeled ring in cavity. 4. Read the Owner's Manual. 2. Replace house fuse or turn breaker back on. 7.
Remove all packing material from the oven. 3. KEEP INSTALLATION INSTRUCTIONS FOR THE LOCAL INSPECTOR'S USE. 5. Plug power cord into a dedicated 15 to instructions. 6. Insure proper ground exists before use 23 Make sure the oven has been installed according to 20 amp electrical outlet. Installation Instructions BEFORE YOU USE YOUR OVEN 1. Install turntable and wheeled ring in cavity. 4. Read the Owner's Manual. 2. Replace house fuse or turn breaker back on. 7.


