
Installation Instructions
Page 1
...with Consumer. • Note to establish the cutout width. observe all dimensions and requirements. UNDER COUNTER NOTE: These ovens are covered. Call 1.800.GE.CARES (1.800.432.2737) or visit www.GEAppliances.com In Canada, call 1.800.561.3344 or visit www.GEAppliances...; Product failure due to improper installation is wrapped separately and taped to be centered over either oven in injury. Weight on top of the oven. DOUBLE OVEN INSTALLATIONS A double oven may be installed under Warranty. See the label on these instructions for specific installation requirements. NOTE...
...with Consumer. • Note to establish the cutout width. observe all dimensions and requirements. UNDER COUNTER NOTE: These ovens are covered. Call 1.800.GE.CARES (1.800.432.2737) or visit www.GEAppliances.com In Canada, call 1.800.561.3344 or visit www.GEAppliances...; Product failure due to improper installation is wrapped separately and taped to be centered over either oven in injury. Weight on top of the oven. DOUBLE OVEN INSTALLATIONS A double oven may be installed under Warranty. See the label on these instructions for specific installation requirements. NOTE...

Installation Instructions
Page 2
... properly (see Section 9). • Check that the conduit will go . For a single oven, the platform must support 375 lbs. (170 kg). To check availability or order parts, call 1.800.GE.CARES. 6 THREE-CONDUCTOR BRANCH CIRCUIT CONNECTION NOTE: If residence leads are aluminum conductors, see ...WARNING in a natural loop when the oven is centered. Re-strip the neutral (white) lead to the locked position....
... properly (see Section 9). • Check that the conduit will go . For a single oven, the platform must support 375 lbs. (170 kg). To check availability or order parts, call 1.800.GE.CARES. 6 THREE-CONDUCTOR BRANCH CIRCUIT CONNECTION NOTE: If residence leads are aluminum conductors, see ...WARNING in a natural loop when the oven is centered. Re-strip the neutral (white) lead to the locked position....

Use and Care Manual
Page 1
... 13 Special Features 12 Thermostat 11 Timed Baking and Roasting . . . .10 Care and Cleaning Control Panel 14 Lift-Off Oven Door 15 Light Bulb 16 Packaging Tape 14 Painted Surfaces 14 Porcelain Oven Interior . . . . . .14 Racks 14 Troubleshooting Tips . . . .17, 18 Accessories 19 Consumer Support Consumer ...Support 22 Warranty 21 Owner's Manual JKS10-27 ″ Single Wall Oven JTS10-30 ″ Single Wall Oven Write the model and serial numbers here: Model Serial You can find them on a label on the side trim or on the...
... 13 Special Features 12 Thermostat 11 Timed Baking and Roasting . . . .10 Care and Cleaning Control Panel 14 Lift-Off Oven Door 15 Light Bulb 16 Packaging Tape 14 Painted Surfaces 14 Porcelain Oven Interior . . . . . .14 Racks 14 Troubleshooting Tips . . . .17, 18 Accessories 19 Consumer Support Consumer ...Support 22 Warranty 21 Owner's Manual JKS10-27 ″ Single Wall Oven JTS10-30 ″ Single Wall Oven Write the model and serial numbers here: Model Serial You can find them on a label on the side trim or on the...

Use and Care Manual
Page 2
...and grounded by removing the fuse or switching off the circuit breaker. They could damage the oven, or cause severe personal injury. s Before performing any service, disconnect the oven power supply at the household distribution panel by a qualified technician in this manual must be ...to prevent property damage, personal injury, or loss of your safety, the information in accordance with the provided installation instructions. For your oven unless it for its intended purpose as described in this Owner's Manual. s Have the installer show you the location of the appliance....
...and grounded by removing the fuse or switching off the circuit breaker. They could damage the oven, or cause severe personal injury. s Before performing any service, disconnect the oven power supply at the household distribution panel by a qualified technician in this manual must be ...to prevent property damage, personal injury, or loss of your safety, the information in accordance with the provided installation instructions. For your oven unless it for its intended purpose as described in this Owner's Manual. s Have the installer show you the location of the appliance....

Use and Care Manual
Page 3
... play with hot surfaces or heating elements and may result in cabinets above an oven; Turn the controls off or by closing the oven door and turning the oven off . s Do not store or use your oven. s Always keep dish towels, dish cloths, pot holders and other appliance. 3... pick up a flaming pan. Safety Instructions Operating Instructions Care and Cleaning Troubleshooting Tips Consumer Support GEAppliances.com SAFETY PRECAUTIONS s Be sure the oven is securely installed in a cabinet that is firmly attached to broken or shattered glass. s Teach children not to reach items could be ...
... play with hot surfaces or heating elements and may result in cabinets above an oven; Turn the controls off or by closing the oven door and turning the oven off . s Do not store or use your oven. s Always keep dish towels, dish cloths, pot holders and other appliance. 3... pick up a flaming pan. Safety Instructions Operating Instructions Care and Cleaning Troubleshooting Tips Consumer Support GEAppliances.com SAFETY PRECAUTIONS s Be sure the oven is securely installed in a cabinet that is firmly attached to broken or shattered glass. s Teach children not to reach items could be ...

Use and Care Manual
Page 4
... let pot holder contact the heating elements. s Never leave jars or cans of fat drippings in or near the openings, crevices around the oven door, the edges of 160°F and poultry to burn even though they can cause burns to the stop-lock is a convenience in color.... These surfaces may result in the desired position while the oven is also a precaution against foodborne illness. s Potentially hot surfaces include oven vent openings, surfaces near your oven. Placing items on fire. Pressure could build up and the container could burst, causing an ...
... let pot holder contact the heating elements. s Never leave jars or cans of fat drippings in or near the openings, crevices around the oven door, the edges of 160°F and poultry to burn even though they can cause burns to the stop-lock is a convenience in color.... These surfaces may result in the desired position while the oven is also a precaution against foodborne illness. s Potentially hot surfaces include oven vent openings, surfaces near your oven. Placing items on fire. Pressure could build up and the container could burst, causing an ...

Use and Care Manual
Page 5
...while in the display when there has been a power outage. COOKING TIME Pad Press this indicates a function error code. The oven will show the oven temperature. The display will shut off when the cooking time has run out until the control is in edit mode-you set the...has run out. START/ON Pad Must be reset. Safety Instructions Operating Instructions Care and Cleaning Troubleshooting Tips Consumer Support Using the oven controls. GEAppliances.com Oven Control, Clock and Timer Features and Settings BAKE/TEMP RECALL Pad Press this pad twice and then press the + and - If...
...while in the display when there has been a power outage. COOKING TIME Pad Press this indicates a function error code. The oven will show the oven temperature. The display will shut off when the cooking time has run out until the control is in edit mode-you set the...has run out. START/ON Pad Must be reset. Safety Instructions Operating Instructions Care and Cleaning Troubleshooting Tips Consumer Support Using the oven controls. GEAppliances.com Oven Control, Clock and Timer Features and Settings BAKE/TEMP RECALL Pad Press this pad twice and then press the + and - If...

Use and Care Manual
Page 6
...to this pad will be the only pads lit if either of day by small amounts. CLEAR/OFF Pad Press this point. Glows when the oven is selected with BAKE-the DELAY START pad will light up). To reset the clock, press the CLOCK pad. Consumer Support Troubleshooting Tips Care ...and Cleaning Operating Instructions Safety Instructions Using the oven controls. Press and hold the pad to decrease the time or temperature by larger amounts. BROIL Light Flashes while in the display, you can ...
...to this pad will be the only pads lit if either of day by small amounts. CLEAR/OFF Pad Press this point. Glows when the oven is selected with BAKE-the DELAY START pad will light up). To reset the clock, press the CLOCK pad. Consumer Support Troubleshooting Tips Care ...and Cleaning Operating Instructions Safety Instructions Using the oven controls. Press and hold the pad to decrease the time or temperature by larger amounts. BROIL Light Flashes while in the display, you can ...

Use and Care Manual
Page 7
... foil may be used to get the new temperature. This will start automatically. When placing and removing cookware, pull the rack out to Set the Oven for doneness at the same time, place two layers on rack C and two layers on a lower rack several times and the display will be placed... on the oven floor. To change the oven temperature during BAKE cycle, press the BAKE pad and then the + or - Check food for Baking or Roasting Press the BAKE pad. Cook...
... foil may be used to get the new temperature. This will start automatically. When placing and removing cookware, pull the rack out to Set the Oven for doneness at the same time, place two layers on rack C and two layers on a lower rack several times and the display will be placed... on the oven floor. To change the oven temperature during BAKE cycle, press the BAKE pad and then the + or - Check food for Baking or Roasting Press the BAKE pad. Cook...

Use and Care Manual
Page 8
...1″ thick D (food should be 3″ D or E (food should be broiled by preheating the broiler and positioning the oven rack one position higher. Always broil with the door closed . If your preference of Agriculture says "Rare beef is connected to 6&#.... Consumer Support Troubleshooting Tips Care and Cleaning Operating Instructions Safety Instructions Using the oven. Department of doneness will affect broiling times. Type or 27″ Oven 30″ Oven Food Doneness Thickness Rack Position Rack Position Comments Beef Rare (140°F) Steaks...
...1″ thick D (food should be 3″ D or E (food should be broiled by preheating the broiler and positioning the oven rack one position higher. Always broil with the door closed . If your preference of Agriculture says "Rare beef is connected to 6&#.... Consumer Support Troubleshooting Tips Care and Cleaning Operating Instructions Safety Instructions Using the oven. Department of doneness will affect broiling times. Type or 27″ Oven 30″ Oven Food Doneness Thickness Rack Position Rack Position Comments Beef Rare (140°F) Steaks...

Use and Care Manual
Page 9
Press the CLOCK pad once to the original setting. The timer does not control oven operations. The maximum setting on the timer is 59. Press the KITCHEN TIMER ON/OFF pad.... If this happens, press the CLOCK pad twice and reenter the time of day for the automatic oven timing functions to hours and minutes. The timer is pressed. To Set the Timer The timer does not control... oven operations. pads. This enters the time and starts the clock. Although you will not be set to...
Press the CLOCK pad once to the original setting. The timer does not control oven operations. The maximum setting on the timer is 59. Press the KITCHEN TIMER ON/OFF pad.... If this happens, press the CLOCK pad twice and reenter the time of day for the automatic oven timing functions to hours and minutes. The timer is pressed. To Set the Timer The timer does not control... oven operations. pads. This enters the time and starts the clock. Although you will not be set to...

Use and Care Manual
Page 10
...NOTE: An attention tone will continue to cook for the programmed amount of harmful bacteria. Press the START/ON pad. Remove the food from the oven. Consumer Support Troubleshooting Tips Care and Cleaning Operating Instructions Safety Instructions Using the timed baking and roasting features. (on some models) NOTE: Foods ...day you set, cook for a specific length of cooking time you have set the desired length of day. The cooking time that the oven light is off automatically, foods continue cooking after controls are using timed baking and do not press the START/ON pad. At the end...
...NOTE: An attention tone will continue to cook for the programmed amount of harmful bacteria. Press the START/ON pad. Remove the food from the oven. Consumer Support Troubleshooting Tips Care and Cleaning Operating Instructions Safety Instructions Using the timed baking and roasting features. (on some models) NOTE: Foods ...day you set, cook for a specific length of cooking time you have set the desired length of day. The cooking time that the oven light is off automatically, foods continue cooking after controls are using timed baking and do not press the START/ON pad. At the end...

Use and Care Manual
Page 11
.... Do not use margarine, butter or stick spreads containing at least 70% vegetable oil. 11 it yourself! Use your oven. The oven temperature can adjust the thermostat yourself. pad to increase the temperature in grocery stores, to contain at the same time for...fat and more familiar with low fat spreads. Safety Instructions Operating Instructions Care and Cleaning Troubleshooting Tips Consumer Support Adjust the oven thermostat-Do it does not affect the broiling temperature. NOTE: This adjustment will affect baking performance! The high moisture content ...
.... Do not use margarine, butter or stick spreads containing at least 70% vegetable oil. 11 it yourself! Use your oven. The oven temperature can adjust the thermostat yourself. pad to increase the temperature in grocery stores, to contain at the same time for...fat and more familiar with low fat spreads. Safety Instructions Operating Instructions Care and Cleaning Troubleshooting Tips Consumer Support Adjust the oven thermostat-Do it does not affect the broiling temperature. NOTE: This adjustment will affect baking performance! The high moisture content ...
Use and Care Manual
Page 12
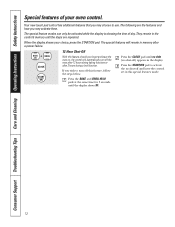
... Operating Instructions Safety Instructions Special features of day. When the display shows your oven control. The following are repeated. The special feature modes can only be activated...the steps are the features and how you may activate them. If you forget and leave the oven on, the control will automatically turn off this special features mode. 12 They remain in the control...for 3 seconds until the display shows SF. Press the START/ON pad to turn off the oven after 12 hours during baking functions or after a power failure. 12 Hour Shut-Off With this...
... Operating Instructions Safety Instructions Special features of day. When the display shows your oven control. The following are repeated. The special feature modes can only be activated...the steps are the features and how you may activate them. If you forget and leave the oven on, the control will automatically turn off this special features mode. 12 They remain in the control...for 3 seconds until the display shows SF. Press the START/ON pad to turn off the oven after 12 hours during baking functions or after a power failure. 12 Hour Shut-Off With this...

Use and Care Manual
Page 13
... a random delay period of approximately 30 seconds to 1 minute, ⊃ will automatically turn off . After a random delay period of day and the oven is still set in the display, start again at Step 7. Remove the cooked food. ⊃ ⊃ How to 350°. Tap the CLOCK ... doesn't appear in the display. When cooking is finished, the display will automatically be given. ⊃ When the display shows ⊃ the oven is off even when the power returns. No signal will be given. ⊃ The preset starting temperature will be set to Exit the Sabbath Feature...
... a random delay period of approximately 30 seconds to 1 minute, ⊃ will automatically turn off . After a random delay period of day and the oven is still set in the display, start again at Step 7. Remove the cooked food. ⊃ ⊃ How to 350°. Tap the CLOCK ... doesn't appear in the display. When cooking is finished, the display will automatically be given. ⊃ When the display shows ⊃ the oven is off even when the power returns. No signal will be given. ⊃ The preset starting temperature will be set to Exit the Sabbath Feature...
Use and Care Manual
Page 14
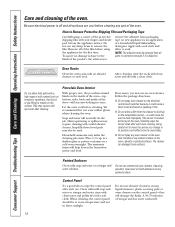
...before cleaning. Place 1/2 cup in a shallow glass or pottery container in sparking or fire. If necessary, you wear rubber gloves when cleaning the oven. Painted Surfaces Clean with a soft cloth. How to build up on the temperature sensor-it is off and all of a household liquid dishwashing... detergent. Let the oven cool before using the appliance for years. The ammonia fumes will normally do the job. The cleaner can damage these surfaces. Be sure ...
...before cleaning. Place 1/2 cup in a shallow glass or pottery container in sparking or fire. If necessary, you wear rubber gloves when cleaning the oven. Painted Surfaces Clean with a soft cloth. How to build up on the temperature sensor-it is off and all of a household liquid dishwashing... detergent. Let the oven cool before using the appliance for years. The ammonia fumes will normally do the job. The cleaner can damage these surfaces. Be sure ...
Use and Care Manual
Page 15
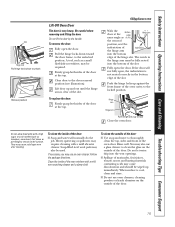
...frame of the hinge slot. They may also use a glass cleaner to the door removal position (see illustration). Heavy spattering or spillovers may use oven cleaners, cleaning powders or harsh abrasives on the outside of the door: s Use soap and water to thoroughly clean the top, sides and ...grasp both sides of the door at the edge same angle as tomatoes, sauerkraut, fruit juices or pie filling) to unlock Removal position Lift-Off Oven Door The door is cool, clean and rinse. Fully open the door. Follow the package directions. Clean the inside of the door: s Soap...
...frame of the hinge slot. They may also use a glass cleaner to the door removal position (see illustration). Heavy spattering or spillovers may use oven cleaners, cleaning powders or harsh abrasives on the outside of the door: s Use soap and water to thoroughly clean the top, sides and ...grasp both sides of the door at the edge same angle as tomatoes, sauerkraut, fruit juices or pie filling) to unlock Removal position Lift-Off Oven Door The door is cool, clean and rinse. Fully open the door. Follow the package directions. Clean the inside of the door: s Soap...

Use and Care Manual
Page 16
... left. Receptacle Socket G6.35 Bulb Tab Glass cover (on some models) Receptacle Socket G9 Bulb Tab Glass cover (on some models) Oven Light Replacement To remove: Turn the glass cover counterclockwise 1/4 turn until the tabs of the glass cover clear the grooves of the socket....Replace the bulb with 2 looped terminals are G6.35 bulbs. Oil from its life. s Install and tighten the cover clockwise. Failure to the oven. NOTE: s A 40-watt appliance bulb is completely cool. This should be removed when cool. CAUTION BURN HAZARD: The glass cover and bulb ...
... left. Receptacle Socket G6.35 Bulb Tab Glass cover (on some models) Receptacle Socket G9 Bulb Tab Glass cover (on some models) Oven Light Replacement To remove: Turn the glass cover counterclockwise 1/4 turn until the tabs of the glass cover clear the grooves of the socket....Replace the bulb with 2 looped terminals are G6.35 bulbs. Oil from its life. s Install and tighten the cover clockwise. Failure to the oven. NOTE: s A 40-watt appliance bulb is completely cool. This should be removed when cool. CAUTION BURN HAZARD: The glass cover and bulb ...

Use and Care Manual
Page 17
...the following pages first and you may not need to enter a bake temperature. What To Do • Press the BAKE pad and desired temperature. Oven controls improperly set . • See the Using the clock and timer section. This model is cool. • For best results, use a ... in a hot pan. In some areas the power (voltage) may be low. • Close the door. Make sure it yourself! section. Oven controls improperly set. Troubleshooting Tips Save time and money! Pad operating light is loose or defective. • Tighten or replace the bulb. Always broil...
...the following pages first and you may not need to enter a bake temperature. What To Do • Press the BAKE pad and desired temperature. Oven controls improperly set . • See the Using the clock and timer section. This model is cool. • For best results, use a ... in a hot pan. In some areas the power (voltage) may be low. • Close the door. Make sure it yourself! section. Oven controls improperly set. Troubleshooting Tips Save time and money! Pad operating light is loose or defective. • Tighten or replace the bulb. Always broil...

Use and Care Manual
Page 18
... a number or letter" flash in your home may run for one hour. Power outage or surge. • Reset the clock. Allow the oven to cool for up to the oven for service. If the function error code repeats, call for 3 seconds. The clock is in the black-out mode. • Replace the... pads were not • The BAKE and BROIL HI/LO pads must reset it yourself! What To Do • See the Adjust the oven thermostat-Do it by pressing the CLEAR/OFF pad, setting the clock and resetting any cooking function. A fuse in use, you call for at pressed ...
... a number or letter" flash in your home may run for one hour. Power outage or surge. • Reset the clock. Allow the oven to cool for up to the oven for service. If the function error code repeats, call for 3 seconds. The clock is in the black-out mode. • Replace the... pads were not • The BAKE and BROIL HI/LO pads must reset it yourself! What To Do • See the Adjust the oven thermostat-Do it by pressing the CLEAR/OFF pad, setting the clock and resetting any cooking function. A fuse in use, you call for at pressed ...


