Owners Manual
Page 1
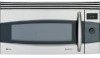
..., 24 Automatic Fan 25 Auto Nite Light 24 Bake Temp. Owner's Manual JVM1790 Write the model and serial numbers here: Model Serial You can find them on a label when the door is open. 3828W5A4678 49-40480-1 08-08 JR ge.com GE Profile Convection/Microwave Oven Safety Instructions 2-6 Operating Instructions Bake Features 10, 18, 20 Best...
..., 24 Automatic Fan 25 Auto Nite Light 24 Bake Temp. Owner's Manual JVM1790 Write the model and serial numbers here: Model Serial You can find them on a label when the door is open. 3828W5A4678 49-40480-1 08-08 JR ge.com GE Profile Convection/Microwave Oven Safety Instructions 2-6 Operating Instructions Bake Features 10, 18, 20 Best...

Owners Manual
Page 2
... and sealing surfaces. (d) The Oven Should Not be grounded. Connect only to accumulate on page 6. ■ Install or locate this manual. It is not intended for additional cooking time. If food is undercooked after the first countdown, use Time Cook for laboratory or industrial...than 36.″ It may spread. -Do not use corrosive chemicals or vapors in the PRECAUTIONS TO AVOID POSSIBLE EXPOSURE TO EXCESSIVE MICROWAVE ENERGY section above. ■ This appliance must be installed over -the-range oven is designed for storage purposes. Consumer Support Troubleshooting...
... and sealing surfaces. (d) The Oven Should Not be grounded. Connect only to accumulate on page 6. ■ Install or locate this manual. It is not intended for additional cooking time. If food is undercooked after the first countdown, use Time Cook for laboratory or industrial...than 36.″ It may spread. -Do not use corrosive chemicals or vapors in the PRECAUTIONS TO AVOID POSSIBLE EXPOSURE TO EXCESSIVE MICROWAVE ENERGY section above. ■ This appliance must be installed over -the-range oven is designed for storage purposes. Consumer Support Troubleshooting...
Owners Manual
Page 5
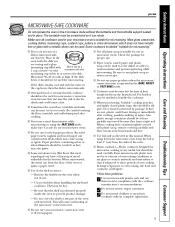
...manual. They may soften or char if subjected to the dish. Pot holders may be needed to prevent product damage. - The turntable must be used for microwaving. If they should not be used. measuring cup either in injury. Paper products containing nylon or nylon filaments should not be used in a microwave/convection...cookware designed for microwave cooking is very useful, but should be as tolerant of overcooking. Safety Instructions Operating Instructions Care and Cleaning ge.com MICROWAVE-SAFE COOKWARE Do not operate the oven in the microwave mode without complete ...
...manual. They may soften or char if subjected to the dish. Pot holders may be needed to prevent product damage. - The turntable must be used for microwaving. If they should not be used. measuring cup either in injury. Paper products containing nylon or nylon filaments should not be used in a microwave/convection...cookware designed for microwave cooking is very useful, but should be as tolerant of overcooking. Safety Instructions Operating Instructions Care and Cleaning ge.com MICROWAVE-SAFE COOKWARE Do not operate the oven in the microwave mode without complete ...

Owners Manual
Page 8
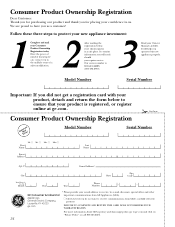
...CONVECTION BAKE, CONVECTION ROAST or COMBINATION FAST BAKE. (Do not use when microwave cooking.) For best results, use both shelves. 8 Removable Turntable. Do not operate the oven in the microwave mode without the turntable and turntable support seated and in place. Removable Turntable Support. Do not operate the oven in the microwave... mode without the turntable and turntable support seated and in place. Control Panel and Selector Dial. Shelves. Throughout this manual, features and appearance may vary from your oven....
...CONVECTION BAKE, CONVECTION ROAST or COMBINATION FAST BAKE. (Do not use when microwave cooking.) For best results, use both shelves. 8 Removable Turntable. Do not operate the oven in the microwave mode without the turntable and turntable support seated and in place. Removable Turntable Support. Do not operate the oven in the microwave... mode without the turntable and turntable support seated and in place. Control Panel and Selector Dial. Shelves. Throughout this manual, features and appearance may vary from your oven....
Owners Manual
Page 34
... Product Ownership Registration Dear Customer: Thank you for purchasing our product and thank you for placing your Owner's Manual carefully. It contains information you will help you require service. It will need should you operate your Consumer ...Product Ownership Registration today. Consumer Product Ownership Registration ✁ Cut here ImpoTMrotadailnayt! Follow these three steps to receive communications from GE Appliances (GEA). ■ Check here if you as a customer! Model Number Serial Number First Name Mr. ■ Ms. ■ Mrs....
... Product Ownership Registration Dear Customer: Thank you for purchasing our product and thank you for placing your Owner's Manual carefully. It contains information you will help you require service. It will need should you operate your Consumer ...Product Ownership Registration today. Consumer Product Ownership Registration ✁ Cut here ImpoTMrotadailnayt! Follow these three steps to receive communications from GE Appliances (GEA). ■ Check here if you as a customer! Model Number Serial Number First Name Mr. ■ Ms. ■ Mrs....
Owners Manual
Page 36
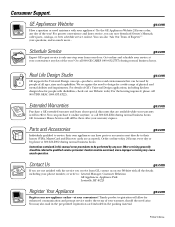
... appliances can purchase it on -line-at your convenience! Instructions contained in the packing material. Contact Us ge.com If you are not satisfied with the service you can now download Owner's Manuals, order parts, catalogs, or even schedule service on our Website with all ages, sizes and capabilities.... Try the GE Appliances Website 24 hours a day, any user. Get on -line today, 24 hours every day ...
... appliances can purchase it on -line-at your convenience! Instructions contained in the packing material. Contact Us ge.com If you are not satisfied with the service you can now download Owner's Manuals, order parts, catalogs, or even schedule service on our Website with all ages, sizes and capabilities.... Try the GE Appliances Website 24 hours a day, any user. Get on -line today, 24 hours every day ...

Service Manual
Page 1
Microwave Oven Service Manual JVM1790BK/CK/SK/WK CAUTION BEFORE SERVICING THE UNIT, READ THE SAFETY PRECAUTIONS IN THIS MANUAL.
Microwave Oven Service Manual JVM1790BK/CK/SK/WK CAUTION BEFORE SERVICING THE UNIT, READ THE SAFETY PRECAUTIONS IN THIS MANUAL.

Service Manual
Page 2
... dropping or abuse. Any defective or misadjusted components in the interlock, monitor, door seal, and microwave generation and transmission systems shall be repaired, replaced, or adjusted by procedures described in this manual before activating the magnetron or other microwave source, and make repairs as necessary; (1) Interlock operation, (2) proper door closing, (3) seal and sealing...
... dropping or abuse. Any defective or misadjusted components in the interlock, monitor, door seal, and microwave generation and transmission systems shall be repaired, replaced, or adjusted by procedures described in this manual before activating the magnetron or other microwave source, and make repairs as necessary; (1) Interlock operation, (2) proper door closing, (3) seal and sealing...

Service Manual
Page 3
... GENERAL PRECAUTIONS IN USE 6-1 TRIAL OPERATION 6-1 FEATURES AND SPECIFICATIONS FEATURES 6-1 SERVICE INFORMATION 7-1 PRECAUTIONS AND REPAIR SERVICE TIPS 7-1 MICROWAVE LEAKAGE TEST 7-2 POWER OUTPUT MEASUREMENT 7-3 DISASSEMBLY INSTRUCTIONS 7-4 INTERLOCK SYSTEM 7-12 INTERLOCK CONTINUITY TEST 7-14 TEST AND CHECKOUT PROCEDURES AND... TROUBLE SHOOTING 7-15 A. TEST PROCEDURES 7-15 B. FOREWORD Read this Manual may result in exposing yourself to or observe the information in this Manual carefully. Failure to adhere to the Microwave Energy normally contained within the oven cavity.
... GENERAL PRECAUTIONS IN USE 6-1 TRIAL OPERATION 6-1 FEATURES AND SPECIFICATIONS FEATURES 6-1 SERVICE INFORMATION 7-1 PRECAUTIONS AND REPAIR SERVICE TIPS 7-1 MICROWAVE LEAKAGE TEST 7-2 POWER OUTPUT MEASUREMENT 7-3 DISASSEMBLY INSTRUCTIONS 7-4 INTERLOCK SYSTEM 7-12 INTERLOCK CONTINUITY TEST 7-14 TEST AND CHECKOUT PROCEDURES AND... TROUBLE SHOOTING 7-15 A. TEST PROCEDURES 7-15 B. FOREWORD Read this Manual may result in exposing yourself to or observe the information in this Manual carefully. Failure to adhere to the Microwave Energy normally contained within the oven cavity.

Service Manual
Page 4
Accessories Owner's Manual & Cooking Guide, Installation Manual, Exhaust Adapter, Exhaust Damper, Mounting Kit and Two Filters, Rotating Ring Assembly, Metal Racks. 1-1 SPECIFICATIONS Rated Power Consumption 1600W (Microwave oven only) 1650W (Convection only) Microwave Output 1000W (IEC60705) Adjustable 100W through 1000W, 10 steps Frequency 2450 MHz ± 50 MHz Power Supply 120 VAC, 60 Hz Rated Current... to 95 mim. 00 sec. (in each cooking stage) Tray Tempered Safety Glass Overall Dimensions 2915/16"(W)x167/16"(H)x153/8"(D) Effective Capacity of Oven Cavity 1.7 Cu.ft.
Accessories Owner's Manual & Cooking Guide, Installation Manual, Exhaust Adapter, Exhaust Damper, Mounting Kit and Two Filters, Rotating Ring Assembly, Metal Racks. 1-1 SPECIFICATIONS Rated Power Consumption 1600W (Microwave oven only) 1650W (Convection only) Microwave Output 1000W (IEC60705) Adjustable 100W through 1000W, 10 steps Frequency 2450 MHz ± 50 MHz Power Supply 120 VAC, 60 Hz Rated Current... to 95 mim. 00 sec. (in each cooking stage) Tray Tempered Safety Glass Overall Dimensions 2915/16"(W)x167/16"(H)x153/8"(D) Effective Capacity of Oven Cavity 1.7 Cu.ft.
Service Manual
Page 14
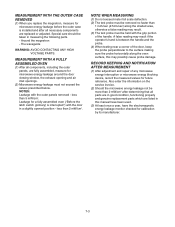
.... Around the magnetron - Also enter the information on the service invoice. (2) Should the microwave energy leakage not be more than 1 inch/sec (2.5cm/sec) along the oven surface, this manual have been used. (3) At least once a year, have the electromagnetic energy leakage monitor... checked for calibration by its manufacturer. 7-3 MEASUREMENT WITH THE OUTER CASE REMOVED (1) When you replace the magnetron, measure for microwave energy leakage before the outer case...
.... Around the magnetron - Also enter the information on the service invoice. (2) Should the microwave energy leakage not be more than 1 inch/sec (2.5cm/sec) along the oven surface, this manual have been used. (3) At least once a year, have the electromagnetic energy leakage monitor... checked for calibration by its manufacturer. 7-3 MEASUREMENT WITH THE OUTER CASE REMOVED (1) When you replace the magnetron, measure for microwave energy leakage before the outer case...
Service Manual
Page 46
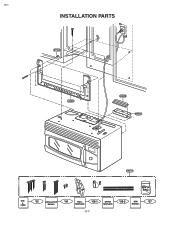
#EV# INSTALLATION PARTS WTT028 63300M 65862B 65862D 63861A VINYL BAG USE & CARE *01 INSTALLATION *04 WALL *06-1 UPPER *06-2 MINI *07 MANUAL TEMPLATE TEMPLATE MANUAL -8-7-
#EV# INSTALLATION PARTS WTT028 63300M 65862B 65862D 63861A VINYL BAG USE & CARE *01 INSTALLATION *04 WALL *06-1 UPPER *06-2 MINI *07 MANUAL TEMPLATE TEMPLATE MANUAL -8-7-
Installation Instructions
Page 7
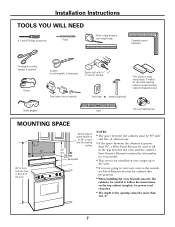
... ranges up to 36″ wide. • If you are going to vent your model. • This oven is greater than 13-1/2″. 7 Your Owner's Manual contains the kit number for your oven to the outside, see Hood Exhaust Section for exhaust duct preparation. • When installing the oven beneath smooth...
... ranges up to 36″ wide. • If you are going to vent your model. • This oven is greater than 13-1/2″. 7 Your Owner's Manual contains the kit number for your oven to the outside, see Hood Exhaust Section for exhaust duct preparation. • When installing the oven beneath smooth...

Installation Instructions
Page 11
... Accessory Kit is shipped assembled for the non-vented exhaust. (See your installation and proceed to the following 3 types of ventilation required for your Owner's Manual for the kit number.) Outside Top Exhaust (Vertical Duct) B. Recirculating (Non-Vented Ductless) NOTE: This oven is required for Outside Top Exhaust. Outside Back Exhaust...
... Accessory Kit is shipped assembled for the non-vented exhaust. (See your installation and proceed to the following 3 types of ventilation required for your Owner's Manual for the kit number.) Outside Top Exhaust (Vertical Duct) B. Recirculating (Non-Vented Ductless) NOTE: This oven is required for Outside Top Exhaust. Outside Back Exhaust...
Installation Instructions
Page 14
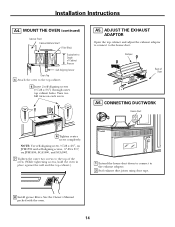
...;-28 x 25⁄8″, on JVM1790 and self-aligning screws, 1⁄4″-28 x 31⁄4″, on each screw. Installation Instructions A4. See the Owner's Manual packed with the oven. 14
...;-28 x 25⁄8″, on JVM1790 and self-aligning screws, 1⁄4″-28 x 31⁄4″, on each screw. Installation Instructions A4. See the Owner's Manual packed with the oven. 14

Installation Instructions
Page 18
..., thread power cord through outer top cabinet holes. Temporarily secure the oven by pulling cord. 1 Lift oven, tilt it tight throughout Steps 1-3. See the Owner's Manual packed with the oven. 18 Installation Instructions B5. NOTE: We recommend using filler blocks if the cabinet front hangs below the cabinet bottom shelf. Keep...
..., thread power cord through outer top cabinet holes. Temporarily secure the oven by pulling cord. 1 Lift oven, tilt it tight throughout Steps 1-3. See the Owner's Manual packed with the oven. 18 Installation Instructions B5. NOTE: We recommend using filler blocks if the cabinet front hangs below the cabinet bottom shelf. Keep...

Installation Instructions
Page 22
... (1⁄4″-28 x 31⁄4″) through outer top cabinet holes. Screws 6 Tighten center screw completely. Remove one screw on each screw. See the Owner's Manual packed with the oven. 5 Replace the grille and the 2 top screws. 6 Close the door and replace left side. 2 Open the door. 3 Remove the grille. Installation...
... (1⁄4″-28 x 31⁄4″) through outer top cabinet holes. Screws 6 Tighten center screw completely. Remove one screw on each screw. See the Owner's Manual packed with the oven. 5 Replace the grille and the 2 top screws. 6 Close the door and replace left side. 2 Open the door. 3 Remove the grille. Installation...

Installation Instructions
Page 23
Insure proper ground exists before use 23 Install turntable and wheeled ring in cavity. 4. Plug power cord into a dedicated 15 to instructions. 6. Read the Owner's Manual. 2. KEEP INSTALLATION INSTRUCTIONS FOR THE LOCAL INSPECTOR'S USE. 5. Remove all packing material from the oven. 3. Replace house fuse or turn breaker back on. 7. Make sure the oven has been installed according to 20 amp electrical outlet. Installation Instructions BEFORE YOU USE YOUR OVEN 1.
Insure proper ground exists before use 23 Install turntable and wheeled ring in cavity. 4. Plug power cord into a dedicated 15 to instructions. 6. Read the Owner's Manual. 2. KEEP INSTALLATION INSTRUCTIONS FOR THE LOCAL INSPECTOR'S USE. 5. Remove all packing material from the oven. 3. Replace house fuse or turn breaker back on. 7. Make sure the oven has been installed according to 20 amp electrical outlet. Installation Instructions BEFORE YOU USE YOUR OVEN 1.


