Owners Manual
Page 1
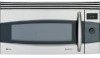
Owner's Manual JVM1790 Write the model and serial numbers here: Model Serial You can find them on a label when the door is open. 3828W5A4678 49-40480-1 08-08 JR ge.com GE Profile Convection/Microwave Oven Safety Instructions 2-6 Operating Instructions Bake Features 10, 18, 20 Best Method of Cooking Chart . . . .21 Changing Power Level 14 Cooking Options 10...
Owner's Manual JVM1790 Write the model and serial numbers here: Model Serial You can find them on a label when the door is open. 3828W5A4678 49-40480-1 08-08 JR ge.com GE Profile Convection/Microwave Oven Safety Instructions 2-6 Operating Instructions Bake Features 10, 18, 20 Best Method of Cooking Chart . . . .21 Changing Power Level 14 Cooking Options 10...
Owners Manual
Page 34
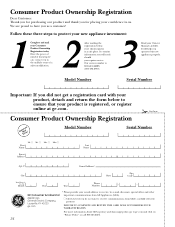
...in us. Our service number is registered, or register online at ge.com. We are proud to ensure that your product is 800.GE.CARES (800.432.2737). 3 Read your Owner's Manual carefully. Follow these three steps to ge.com and click on "Privacy Policy" or call 800.626.2224...Zip City State Code Date Placed In Use Month Day Year Phone _ _ Number GE Consumer & Industrial Appliances General Electric Company Louisville, KY 40225 ge.com * Please provide your e-mail address to receive communications from GE Appliances (GEA). ■ Check here if you in the unlikely event of knowing ...
...in us. Our service number is registered, or register online at ge.com. We are proud to ensure that your product is 800.GE.CARES (800.432.2737). 3 Read your Owner's Manual carefully. Follow these three steps to ge.com and click on "Privacy Policy" or call 800.626.2224...Zip City State Code Date Placed In Use Month Day Year Phone _ _ Number GE Consumer & Industrial Appliances General Electric Company Louisville, KY 40225 ge.com * Please provide your e-mail address to receive communications from GE Appliances (GEA). ■ Check here if you in the unlikely event of knowing ...
Owners Manual
Page 36
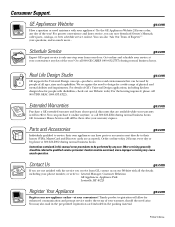
... impaired, please call 800.626.2224 during normal business hours. You can now download Owner's Manuals, order parts, catalogs, or even schedule service on -line today, 24 hours every day or by any user. Real Life Design Studio ge.com GE supports the Universal Design concept-products, services and environments that are accepted). For...
... impaired, please call 800.626.2224 during normal business hours. You can now download Owner's Manuals, order parts, catalogs, or even schedule service on -line today, 24 hours every day or by any user. Real Life Design Studio ge.com GE supports the Universal Design concept-products, services and environments that are accepted). For...

Service Manual
Page 2
... compliance with the door open. Make the following safety checks on each oven prior to release to the owner. • Proper operation of the microwave ovens requires that the magnetron gasket is properly installed. • Be sure that the magnetron be operated ...not attempt service without a thorough review of the test procedures and safety information contained in this manual. e. Before turning on microwave power for any service test or inspection within the microwave generating compartments, check the magnetron, wave guide or transmission line, and cavity for proper alignment,...
... compliance with the door open. Make the following safety checks on each oven prior to release to the owner. • Proper operation of the microwave ovens requires that the magnetron gasket is properly installed. • Be sure that the magnetron be operated ...not attempt service without a thorough review of the test procedures and safety information contained in this manual. e. Before turning on microwave power for any service test or inspection within the microwave generating compartments, check the magnetron, wave guide or transmission line, and cavity for proper alignment,...

Service Manual
Page 4
SPECIFICATIONS Rated Power Consumption 1600W (Microwave oven only) 1650W (Convection only) Microwave Output 1000W (IEC60705) Adjustable 100W through 1000W, 10 steps Frequency 2450 MHz ± 50 MHz Power Supply 120 VAC, 60 Hz Rated Current 13.5 Amp. (Microwave oven+Cook top lamp+Ventilation fan... Tray Tempered Safety Glass Overall Dimensions 2915/16"(W)x167/16"(H)x153/8"(D) Effective Capacity of Oven Cavity 1.7 Cu.ft. Accessories Owner's Manual & Cooking Guide, Installation Manual, Exhaust Adapter, Exhaust Damper, Mounting Kit and Two Filters, Rotating Ring Assembly, Metal Racks. 1-1
SPECIFICATIONS Rated Power Consumption 1600W (Microwave oven only) 1650W (Convection only) Microwave Output 1000W (IEC60705) Adjustable 100W through 1000W, 10 steps Frequency 2450 MHz ± 50 MHz Power Supply 120 VAC, 60 Hz Rated Current 13.5 Amp. (Microwave oven+Cook top lamp+Ventilation fan... Tray Tempered Safety Glass Overall Dimensions 2915/16"(W)x167/16"(H)x153/8"(D) Effective Capacity of Oven Cavity 1.7 Cu.ft. Accessories Owner's Manual & Cooking Guide, Installation Manual, Exhaust Adapter, Exhaust Damper, Mounting Kit and Two Filters, Rotating Ring Assembly, Metal Racks. 1-1
Installation Instructions
Page 7
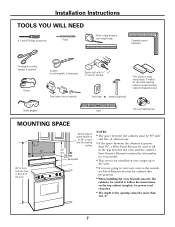
...) Filler blocks or scrap wood pieces, if needed for top cabinet spacing (used to fill in the gap between the oven and the cabinets. Your Owner's Manual contains the kit number for your oven to the outside, see Hood Exhaust Section for installation over ranges up to 36″ wide. • If...
...) Filler blocks or scrap wood pieces, if needed for top cabinet spacing (used to fill in the gap between the oven and the cabinets. Your Owner's Manual contains the kit number for your oven to the outside, see Hood Exhaust Section for installation over ranges up to 36″ wide. • If...

Installation Instructions
Page 11
Installation Instructions 2 INSTALLATION TYPES (Choose A, B or C) This oven is designed for adaptation to the following 3 types of ventilation required for your Owner's Manual for the kit number.) A OUTSIDE TOP EXHAUST (VERTICAL DUCT) Adaptor in Place for Outside Top Exhaust B OUTSIDE BACK EXHAUST (HORIZONTAL DUCT) See page 12 See ...
Installation Instructions 2 INSTALLATION TYPES (Choose A, B or C) This oven is designed for adaptation to the following 3 types of ventilation required for your Owner's Manual for the kit number.) A OUTSIDE TOP EXHAUST (VERTICAL DUCT) Adaptor in Place for Outside Top Exhaust B OUTSIDE BACK EXHAUST (HORIZONTAL DUCT) See page 12 See ...
Installation Instructions
Page 14
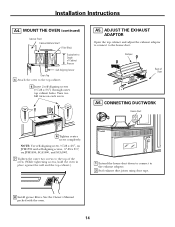
... the house duct down to connect to the exhaust adaptor. 2 Seal exhaust duct joints using duct tape. 8 Install grease filters. Installation Instructions A4. See the Owner's Manual packed with the oven. 14 MOUNT THE OVEN (continued) Cabinet Front Cabinet Bottom Shelf Filler Block Equivalent to Depth of Cabinet Recess Self-Aligning Screw...
... the house duct down to connect to the exhaust adaptor. 2 Seal exhaust duct joints using duct tape. 8 Install grease filters. Installation Instructions A4. See the Owner's Manual packed with the oven. 14 MOUNT THE OVEN (continued) Cabinet Front Cabinet Bottom Shelf Filler Block Equivalent to Depth of Cabinet Recess Self-Aligning Screw...

Installation Instructions
Page 18
.... (While tightening screws, hold the oven in bottom of oven up against cabinet bottom. 3 Insert a self-aligning screw through top center cabinet hole. See the Owner's Manual packed with the oven. 18 Keep it forward, and hook slots at least two full turns after the threads have engaged. (It will be completely...
.... (While tightening screws, hold the oven in bottom of oven up against cabinet bottom. 3 Insert a self-aligning screw through top center cabinet hole. See the Owner's Manual packed with the oven. 18 Keep it forward, and hook slots at least two full turns after the threads have engaged. (It will be completely...

Installation Instructions
Page 22
..., SCA1000, and SCA1001. 7 Tighten the outer two screws to the top of the filter should be visible from the front. 8 Install grease filters. See the Owner's Manual packed with the oven. 5 Replace the grille and the 2 top screws. 6 Close the door and replace left side. 2 Open the door. 3 Remove the grille. Remove...
..., SCA1000, and SCA1001. 7 Tighten the outer two screws to the top of the filter should be visible from the front. 8 Install grease filters. See the Owner's Manual packed with the oven. 5 Replace the grille and the 2 top screws. 6 Close the door and replace left side. 2 Open the door. 3 Remove the grille. Remove...

Installation Instructions
Page 23
Plug power cord into a dedicated 15 to instructions. 6. Replace house fuse or turn breaker back on. 7. Install turntable and wheeled ring in cavity. 4. KEEP INSTALLATION INSTRUCTIONS FOR THE LOCAL INSPECTOR'S USE. 5. Insure proper ground exists before use 23 Installation Instructions BEFORE YOU USE YOUR OVEN 1. Remove all packing material from the oven. 3. Make sure the oven has been installed according to 20 amp electrical outlet. Read the Owner's Manual. 2.
Plug power cord into a dedicated 15 to instructions. 6. Replace house fuse or turn breaker back on. 7. Install turntable and wheeled ring in cavity. 4. KEEP INSTALLATION INSTRUCTIONS FOR THE LOCAL INSPECTOR'S USE. 5. Insure proper ground exists before use 23 Installation Instructions BEFORE YOU USE YOUR OVEN 1. Remove all packing material from the oven. 3. Make sure the oven has been installed according to 20 amp electrical outlet. Read the Owner's Manual. 2.


