

Installation Instructions
Page 1
...off at : www.GEAppliances.com BEFORE YOU BEGIN Read these instructions for local inspector's use. • IMPORTANT - PARTS INCLUDED PART Trim Frame QUANTITY 1 Bottom Duct 1 Top Bracket 1 TOOLS YOU WILL NEED #2 Phillips screwdriver Pencil Drill with the Consumer. • ...Proper installation is the responsibility of this kit. Call GE Answer Center at 800.626.2000 or Visit our Website at service panel and lock the service disconnecting means to Installer - Be sure to Consumer - Installation Instructions Built-In Trim Kits JX2127 and JX2130 Questions? Installation of...
...off at : www.GEAppliances.com BEFORE YOU BEGIN Read these instructions for local inspector's use. • IMPORTANT - PARTS INCLUDED PART Trim Frame QUANTITY 1 Bottom Duct 1 Top Bracket 1 TOOLS YOU WILL NEED #2 Phillips screwdriver Pencil Drill with the Consumer. • ...Proper installation is the responsibility of this kit. Call GE Answer Center at 800.626.2000 or Visit our Website at service panel and lock the service disconnecting means to Installer - Be sure to Consumer - Installation Instructions Built-In Trim Kits JX2127 and JX2130 Questions? Installation of...

Installation Instructions
Page 2
... the microwave oven upside down until the bracket is flush with the slots on the back of the bottom duct, and push down . CAUTION This trim kit uses air flow from the top, bottom and sides of the microwave and insert the tabs into the slot on the bottom of the...; Models: 9⁄16″ overlap 30″ Models: 21⁄8″ overlap Height Width 1″ Clearance beyond the edge of the cutout. On 27″ models, allow 11⁄4″ at the top, 21⁄8″ on all sides) 1″ overlap 3″ min. Fasten the bottom bracket to the ...
... the microwave oven upside down until the bracket is flush with the slots on the back of the bottom duct, and push down . CAUTION This trim kit uses air flow from the top, bottom and sides of the microwave and insert the tabs into the slot on the bottom of the...; Models: 9⁄16″ overlap 30″ Models: 21⁄8″ overlap Height Width 1″ Clearance beyond the edge of the cutout. On 27″ models, allow 11⁄4″ at the top, 21⁄8″ on all sides) 1″ overlap 3″ min. Fasten the bottom bracket to the ...
Installation Instructions
Page 4
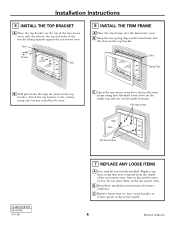
...panel. 4 Printed in the microwave oven. Flat-head screws 164D3370P328 49-40398 06-03 JR Flat-head screws 7 REPLACE ANY LOOSE ITEMS A Your trim kit is now fully installed. B Keep these installation instructions for future reference. C Replace house fuse or close circuit breaker to the cabinet using four ... from the inside top and two on the top bracket. Save or discard the extra screws. C Open the microwave oven door. Secure the trim frame using nine bronze round-head screws. Installation Instructions 5 INSTALL THE TOP BRACKET A Place the top bracket on the top of the microwave ...
...panel. 4 Printed in the microwave oven. Flat-head screws 164D3370P328 49-40398 06-03 JR Flat-head screws 7 REPLACE ANY LOOSE ITEMS A Your trim kit is now fully installed. B Keep these installation instructions for future reference. C Replace house fuse or close circuit breaker to the cabinet using four ... from the inside top and two on the top bracket. Save or discard the extra screws. C Open the microwave oven door. Secure the trim frame using nine bronze round-head screws. Installation Instructions 5 INSTALL THE TOP BRACKET A Place the top bracket on the top of the microwave ...


