

Installation Instructions
Page 1
...- Save these instructions completely and carefully. • IMPORTANT - Observe all governing codes and ordinances. • Note to Consumer - PARTS INCLUDED PART Trim Frame QUANTITY 1 Bottom Duct 1 Top Bracket 1 TOOLS YOU WILL NEED #2 Phillips screwdriver Pencil Drill with the Consumer. • Note to Installer ...device, such as a tag, to the service panel. • Skill level - Installation Instructions Built-In Trim Kits JX2127 and JX2130 Questions? Call GE Answer Center at 800.626.2000 or Visit our Website at service panel and lock the service disconnecting means to...
...- Save these instructions completely and carefully. • IMPORTANT - Observe all governing codes and ordinances. • Note to Consumer - PARTS INCLUDED PART Trim Frame QUANTITY 1 Bottom Duct 1 Top Bracket 1 TOOLS YOU WILL NEED #2 Phillips screwdriver Pencil Drill with the Consumer. • Note to Installer ...device, such as a tag, to the service panel. • Skill level - Installation Instructions Built-In Trim Kits JX2127 and JX2130 Questions? Call GE Answer Center at 800.626.2000 or Visit our Website at service panel and lock the service disconnecting means to...

Installation Instructions
Page 2
Fasten the bottom bracket to the microwave. Front 27″ Models: 9⁄16″ overlap 30″ Models: 21⁄8″ overlap Height Width 1″ Clearance beyond the edge of the Trim Frame to provide proper air flow. Blocking the air flow can cause the microwave to function improperly...microwave oven, including the turntable and turntable support. CAUTION This trim kit uses air flow from the top, bottom and sides of the duct. On 27″ models, allow 11⁄4″ at the bottom for overlap of the Trim Frame over the edges of the bottom duct, and push ...
Fasten the bottom bracket to the microwave. Front 27″ Models: 9⁄16″ overlap 30″ Models: 21⁄8″ overlap Height Width 1″ Clearance beyond the edge of the Trim Frame to provide proper air flow. Blocking the air flow can cause the microwave to function improperly...microwave oven, including the turntable and turntable support. CAUTION This trim kit uses air flow from the top, bottom and sides of the duct. On 27″ models, allow 11⁄4″ at the bottom for overlap of the Trim Frame over the edges of the bottom duct, and push ...
Installation Instructions
Page 4
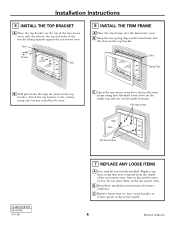
... Flat-head screws 164D3370P328 49-40398 06-03 JR Flat-head screws 7 REPLACE ANY LOOSE ITEMS A Your trim kit is now fully installed. Tabs Screws Tabs 6 INSTALL THE TRIM FRAME A Place the trim frame over the microwave oven. C Replace house fuse or close circuit breaker to the cabinet using four flat...of the bracket fitting squarely against the microwave oven. B Snap the two spring clips on the trim frame into the slots on the top and sides of the microwave oven. Secure the trim frame using nine bronze round-head screws. Attach the top bracket to restore power at the ...
... Flat-head screws 164D3370P328 49-40398 06-03 JR Flat-head screws 7 REPLACE ANY LOOSE ITEMS A Your trim kit is now fully installed. Tabs Screws Tabs 6 INSTALL THE TRIM FRAME A Place the trim frame over the microwave oven. C Replace house fuse or close circuit breaker to the cabinet using four flat...of the bracket fitting squarely against the microwave oven. B Snap the two spring clips on the trim frame into the slots on the top and sides of the microwave oven. Secure the trim frame using nine bronze round-head screws. Attach the top bracket to restore power at the ...


