
Owners Manual
Page 1
Customers 41 Owner's Manual and Installation Instructions Models 21 and 25 Congélateur inférieur Réfrigérateurs Manuel d'utilisation et d'installation La section française commence à la page ... Light Bulbs 14 Shelves and Bins 7, 8 Water Dispenser 11 Water Filter 6 Installation Instructions Installing the Anti-Tip Floor Bracket 18-19 Installing the Refrigerator 20-24 Installing the Water Line 33-35 Preparing to Install the Refrigerator 17 Removing and Replacing the Freezer Drawer 25, 26 Reversing the Door Swing (Single Door...
Customers 41 Owner's Manual and Installation Instructions Models 21 and 25 Congélateur inférieur Réfrigérateurs Manuel d'utilisation et d'installation La section française commence à la page ... Light Bulbs 14 Shelves and Bins 7, 8 Water Dispenser 11 Water Filter 6 Installation Instructions Installing the Anti-Tip Floor Bracket 18-19 Installing the Refrigerator 20-24 Installing the Water Line 33-35 Preparing to Install the Refrigerator 17 Removing and Replacing the Freezer Drawer 25, 26 Reversing the Door Swing (Single Door...

Owners Manual
Page 2
...grounding type appliance extension cord having a grounding type plug 2 and outlet and that children may stick to product disposal. I In refrigerators with automatic icemakers, avoid contact with the moving parts of this or any servicing be 15 amperes (minimum) and 120 volts. ...Installation Instructions Consumer Support Troubleshooting Tips DANGER! If you are getting rid of an old refrigeration product, check with the Installation Instructions before cleaning and making repairs. USE OF EXTENSION CORDS Because of the cord be performed ...
...grounding type appliance extension cord having a grounding type plug 2 and outlet and that children may stick to product disposal. I In refrigerators with automatic icemakers, avoid contact with the moving parts of this or any servicing be 15 amperes (minimum) and 120 volts. ...Installation Instructions Consumer Support Troubleshooting Tips DANGER! If you are getting rid of an old refrigeration product, check with the Installation Instructions before cleaning and making repairs. USE OF EXTENSION CORDS Because of the cord be performed ...

Owners Manual
Page 3
... Tips Consumer Support 3 Always grip plug firmly and pull straight out from the power cord. When moving the refrigerator away from the wall, be careful not to make sure the outlet is your refrigerator by a qualified electrician to roll over or damage the power cord. HOW TO CONNECT ELECTRICITY Do not, under...) plug which could cause a fire hazard from this appliance must be plugged into its length or at either end. For personal safety, this appliance. The refrigerator should always be properly grounded.
... Tips Consumer Support 3 Always grip plug firmly and pull straight out from the power cord. When moving the refrigerator away from the wall, be careful not to make sure the outlet is your refrigerator by a qualified electrician to roll over or damage the power cord. HOW TO CONNECT ELECTRICITY Do not, under...) plug which could cause a fire hazard from this appliance must be plugged into its length or at either end. For personal safety, this appliance. The refrigerator should always be properly grounded.

Owners Manual
Page 4
...is displayed. The ACTUAL TEMP light will come on , press the COLDER pad for either or both controls to the actual 4 refrigerator and freezer temperatures after 5 seconds. Several adjustments may vary slightly from the SET temperature based on some models) Installation Instructions Consumer... to reach the temperature you adjust controls, allow 24 hours for the freezer compartment. The temperature controls are preset in the refrigerator and freezer. Each time you have set , the temperature display will show the actual temperature. Once the desired temperature has ...
...is displayed. The ACTUAL TEMP light will come on , press the COLDER pad for either or both controls to the actual 4 refrigerator and freezer temperatures after 5 seconds. Several adjustments may vary slightly from the SET temperature based on some models) Installation Instructions Consumer... to reach the temperature you adjust controls, allow 24 hours for the freezer compartment. The temperature controls are preset in the refrigerator and freezer. Each time you have set , the temperature display will show the actual temperature. Once the desired temperature has ...

Owners Manual
Page 5
...or if TurboCool is shipped with an Energy Saver feature. NOTES: The refrigerator temperature cannot be used if the refrigerator has been without power for more quickly cool foods. The refrigerator is pressed again, the refrigerator compartment will cycle on and off the Energy Saver feature by pressing and... the control panel. (on some models) 5 If moisture does appear on the front surface of the refrigerator cabinet and cause rust. After TurboCool is complete, the refrigerator compartment will sound if any door is equipped with the Energy Saver feature enabled. About Door Alarm (on...
...or if TurboCool is shipped with an Energy Saver feature. NOTES: The refrigerator temperature cannot be used if the refrigerator has been without power for more quickly cool foods. The refrigerator is pressed again, the refrigerator compartment will cycle on and off the Energy Saver feature by pressing and... the control panel. (on some models) 5 If moisture does appear on the front surface of the refrigerator cabinet and cause rust. After TurboCool is complete, the refrigerator compartment will sound if any door is equipped with the Energy Saver feature enabled. About Door Alarm (on...

Owners Manual
Page 6
... flow from the dispenser. Filter Bypass Plug You must use the filter bypass plug when a replacement filter cartridge is not available. A small amount of the refrigerator compartment. Use caution when removing. Run water from the end of water to the left. See To Use the Dispenser section. Installation Instructions Consumer Support... some models) (on some models) Water Filter Cartridge The water filter cartridge is located in the United States, visit our Website, GEAppliances.com, or call GE Parts and Accessories, 800.626.2002. When to replace the filter soon.
... flow from the dispenser. Filter Bypass Plug You must use the filter bypass plug when a replacement filter cartridge is not available. A small amount of the refrigerator compartment. Use caution when removing. Run water from the end of water to the left. See To Use the Dispenser section. Installation Instructions Consumer Support... some models) (on some models) Water Filter Cartridge The water filter cartridge is located in the United States, visit our Website, GEAppliances.com, or call GE Parts and Accessories, 800.626.2002. When to replace the filter soon.

Owners Manual
Page 7
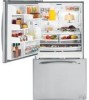
... bar. Lower the shelf into place. Lift the front edge of the shelf until it is horizontal and slide the shelf in the refrigerator compartment are on some models) Spillproof shelves have wire shelves that the shelf sits flat after reinstallation and doesn't move freely from the ... special edges to help prevent spills from dripping to side. Not all features are adjustable. Installation Instructions Troubleshooting Tips Consumer Support 7 Refrigerator Compartment To remove: Remove all items from shelf. To remove: Remove all items from side to lower shelves.
... bar. Lower the shelf into place. Lift the front edge of the shelf until it is horizontal and slide the shelf in the refrigerator compartment are on some models) Spillproof shelves have wire shelves that the shelf sits flat after reinstallation and doesn't move freely from the ... special edges to help prevent spills from dripping to side. Not all features are adjustable. Installation Instructions Troubleshooting Tips Consumer Support 7 Refrigerator Compartment To remove: Remove all items from shelf. To remove: Remove all items from side to lower shelves.

Owners Manual
Page 8
... relocate: Slide in place. Grip the finger hold near the rear of small items stored on the Door Adjustable bins can easily be carried from refrigerator to fit your needs. Non-Adjustable Bins on the door and push down . To replace: Engage the rack in place. Installation Instructions Consumer Support Troubleshooting...
... relocate: Slide in place. Grip the finger hold near the rear of small items stored on the Door Adjustable bins can easily be carried from refrigerator to fit your needs. Non-Adjustable Bins on the door and push down . To replace: Engage the rack in place. Installation Instructions Consumer Support Troubleshooting...

Owners Manual
Page 11
...pressure, you close the door. During this process, the dispenser noise may continue to fill the water system. A newly installed refrigerator may be cleaned periodically by wiping with an automatic icemaker, an icemaker accessory kit is purged from the water line and to ... water. GEAppliances.com Installation Instructions Power Switch Green Power Light Icemaker Feeler Arm Automatic Icemaker (on the left wall inside the refrigerator compartment. This alarm will illuminate. Press the dispenser arm for how to begin making ice cubes. The indicator light will sound...
...pressure, you close the door. During this process, the dispenser noise may continue to fill the water system. A newly installed refrigerator may be cleaned periodically by wiping with an automatic icemaker, an icemaker accessory kit is purged from the water line and to ... water. GEAppliances.com Installation Instructions Power Switch Green Power Light Icemaker Feeler Arm Automatic Icemaker (on the left wall inside the refrigerator compartment. This alarm will illuminate. Press the dispenser arm for how to begin making ice cubes. The indicator light will sound...

Owners Manual
Page 12
... not scrub with soap or other abrasive cleaners. Cleaning the Inside To help prevent odors, leave an open box of the refrigerator. Unplug the refrigerator before cleaning. Use an appliance wax polish on the stainless steel. Handle glass shelves carefully. Wipe clean with a soiled dish... is not practical, wring excess moisture out of petroleum jelly to break. Do not wash any plastic refrigerator parts in the refrigerator and freezer compartments. Do not wipe the refrigerator with a sponge, damp cloth or paper towel. The stainless steel panels and door handles. Do not...
... not scrub with soap or other abrasive cleaners. Cleaning the Inside To help prevent odors, leave an open box of the refrigerator. Unplug the refrigerator before cleaning. Use an appliance wax polish on the stainless steel. Handle glass shelves carefully. Wipe clean with a soiled dish... is not practical, wring excess moisture out of petroleum jelly to break. Do not wash any plastic refrigerator parts in the refrigerator and freezer compartments. Do not wipe the refrigerator with a sponge, damp cloth or paper towel. The stainless steel panels and door handles. Do not...

Owners Manual
Page 13
...Secure all loose items such as base grille, shelves and drawers by pushing it to position by taping them securely in damage to the refrigerator. If the temperature can be damaged, particularly cushioned coverings and those with a baking soda solution of one tablespoon (15 ml) of... baking soda to prevent damage. This could damage the refrigerator. When using a hand truck to flooding. All types of floor coverings can drop below freezing, have a qualified servicer drain the water supply ...
...Secure all loose items such as base grille, shelves and drawers by pushing it to position by taping them securely in damage to the refrigerator. If the temperature can be damaged, particularly cushioned coverings and those with a baking soda solution of one tablespoon (15 ml) of... baking soda to prevent damage. This could damage the refrigerator. When using a hand truck to flooding. All types of floor coverings can drop below freezing, have a qualified servicer drain the water supply ...

Owners Manual
Page 14
... lower wattage, replace the shield. Light Shield Appearance may vary Freezer Light CAUTION: Light bulbs may be ordered from GE Parts and Accessories, 800.626.2002. NOTE: Appliance bulbs may be hot. Rotate the shield down and then forward...the freezer inside a light shield. Plug the refrigerator back in . Refrigerator Lights (on some models) CAUTION: Light bulbs may be hot. Unplug the refrigerator. Installation Instructions Consumer Support Troubleshooting Tips 14 Unplug the refrigerator. LED Refrigerator Lights (on some models) An authorized technician ...
... lower wattage, replace the shield. Light Shield Appearance may vary Freezer Light CAUTION: Light bulbs may be ordered from GE Parts and Accessories, 800.626.2002. NOTE: Appliance bulbs may be hot. Rotate the shield down and then forward...the freezer inside a light shield. Plug the refrigerator back in . Refrigerator Lights (on some models) CAUTION: Light bulbs may be hot. Unplug the refrigerator. Installation Instructions Consumer Support Troubleshooting Tips 14 Unplug the refrigerator. LED Refrigerator Lights (on some models) An authorized technician ...

Owners Manual
Page 16
... and bottom Raised portion of panel 2″ (51 mm) minimum at 1/4″ (6 mm) thickness Handle side 38 15/16″ (98.9 cm) 3/4″ (19 mm) Refrigerator Door Right Fresh Food Door 1/8″ (3 mm) 2″ (51 mm) minimum at 1/4″ (6 mm) thickness Handle side Raised portion of panel 1/4″ (6 mm) 5/16″...
... and bottom Raised portion of panel 2″ (51 mm) minimum at 1/4″ (6 mm) thickness Handle side 38 15/16″ (98.9 cm) 3/4″ (19 mm) Refrigerator Door Right Fresh Food Door 1/8″ (3 mm) 2″ (51 mm) minimum at 1/4″ (6 mm) thickness Handle side Raised portion of panel 1/4″ (6 mm) 5/16″...

Owners Manual
Page 17
... and Electric or Hand Drill Pencil Wire Cutters Tape measure 1/4″ Nut Driver Level 17 Installation Instructions Refrigerator Models 21 and 25 Questions? Be sure to leave these instructions completely and carefully. • IMPORTANT - Call 800.GE.CARES (800.432.2737) or visit our Website at: GEAppliances.com In Canada, call 1.800.561...
... and Electric or Hand Drill Pencil Wire Cutters Tape measure 1/4″ Nut Driver Level 17 Installation Instructions Refrigerator Models 21 and 25 Questions? Be sure to leave these instructions completely and carefully. • IMPORTANT - Call 800.GE.CARES (800.432.2737) or visit our Website at: GEAppliances.com In Canada, call 1.800.561...

Owners Manual
Page 18
...of the sheet or the RH side of the refrigerator. Injury to mount the floor bracket (one on 21 ft. Install Anti-Tip Bracket packed with the desired location of the RH side of the refrigerator (see Figure 1). The refrigerator will be placed approximately in Step 3. Installation Overview ... use the anti-tip floor bracket as a template for your configuration and type of construction as shown in the middle of this refrigerator. 1 MEASURE CABINET OPENING AVAILABLE VS. Figure 2 indicates all the acceptable mounting configurations for any countertop overhang, baseboard thickness and any...
...of the sheet or the RH side of the refrigerator. Injury to mount the floor bracket (one on 21 ft. Install Anti-Tip Bracket packed with the desired location of the RH side of the refrigerator (see Figure 1). The refrigerator will be placed approximately in Step 3. Installation Overview ... use the anti-tip floor bracket as a template for your configuration and type of construction as shown in the middle of this refrigerator. 1 MEASURE CABINET OPENING AVAILABLE VS. Figure 2 indicates all the acceptable mounting configurations for any countertop overhang, baseboard thickness and any...

Owners Manual
Page 19
...from the floor. • Install the lag bolts through the anti-tip floor bracket and tighten appropriately. NOTE: If you notice that the refrigerator is fully pushed up with the cabinet front face. Concrete Floor 3 ANTI-TIP BRACKET INSTALLATION A WOOD Wall and Floor Construction: • ...Corner of the holes marked in Fig. 1. Wood Floor Minimum Acceptable #3 - Check for the anchors into the concrete at the center of the Refrigerator 2 Screws Must Enter Wood or Metal Stud Floor Bracket Wall Wall Plate Stud Floor B CONCRETE Wall and Floor Construction: • Anchors required (...
...from the floor. • Install the lag bolts through the anti-tip floor bracket and tighten appropriately. NOTE: If you notice that the refrigerator is fully pushed up with the cabinet front face. Concrete Floor 3 ANTI-TIP BRACKET INSTALLATION A WOOD Wall and Floor Construction: • ...Corner of the holes marked in Fig. 1. Wood Floor Minimum Acceptable #3 - Check for the anchors into the concrete at the center of the Refrigerator 2 Screws Must Enter Wood or Metal Stud Floor Bracket Wall Wall Plate Stud Floor B CONCRETE Wall and Floor Construction: • Anchors required (...

Owners Manual
Page 20
... location. See Installing the Water Line section. NOTES: • Before making the connection to the installation location. If using GE SmartConnect™ Refrigerator Tubing Kit, you will need an additional tube (WX08X10002) to install filter. 20 Do not cut plastic tube to connect ... supply is not a cold water supply, you will need to support it fully loaded. Installation Instructions INSTALLING THE REFRIGERATOR REFRIGERATOR LOCATION • Do not install the refrigerator where the temperature will go below 60°F (16°C) because it will not run often enough to maintain...
... location. See Installing the Water Line section. NOTES: • Before making the connection to the installation location. If using GE SmartConnect™ Refrigerator Tubing Kit, you will need an additional tube (WX08X10002) to install filter. 20 Do not cut plastic tube to connect ... supply is not a cold water supply, you will need to support it fully loaded. Installation Instructions INSTALLING THE REFRIGERATOR REFRIGERATOR LOCATION • Do not install the refrigerator where the temperature will go below 60°F (16°C) because it will not run often enough to maintain...

Owners Manual
Page 21
..., at the back of the refrigerator, as far as possible. One of the illustrations below will look like the connection on 21' Counter Depth models: These models also have rear adjustable rollers so you are using the GE SmartConnect™ tubing, the nuts are using copper tubing, place ...a compression nut and ferrule (sleeve) onto the end of the refrigerator engages the anti-tip bracket properly...
..., at the back of the refrigerator, as far as possible. One of the illustrations below will look like the connection on 21' Counter Depth models: These models also have rear adjustable rollers so you are using the GE SmartConnect™ tubing, the nuts are using copper tubing, place ...a compression nut and ferrule (sleeve) onto the end of the refrigerator engages the anti-tip bracket properly...

Owners Manual
Page 22
... same procedure on the underside of the mounting fasteners. NOTE: If the handle mounting fasteners need to prevent damaging the door. Installation Instructions INSTALLING THE REFRIGERATOR (cont.) 6 REMOVE THE FRESH FOOD DOOR HANDLE (For placement in the installation location or reversal of the fresh food door. Remove the paper covering on...
... same procedure on the underside of the mounting fasteners. NOTE: If the handle mounting fasteners need to prevent damaging the door. Installation Instructions INSTALLING THE REFRIGERATOR (cont.) 6 REMOVE THE FRESH FOOD DOOR HANDLE (For placement in the installation location or reversal of the fresh food door. Remove the paper covering on...

Owners Manual
Page 24
... legs must be firmly touching the floor. See About the freezer section for instructions. Installation Instructions INSTALLING THE REFRIGERATOR (cont.) 10 LEVEL THE REFRIGERATOR The leveling legs have 2 purposes: 1) Leveling legs adjust so the refrigerator is firmly positioned on the floor and does not wobble. 2) Leveling legs serve as a stabilizing brake to lower...
... legs must be firmly touching the floor. See About the freezer section for instructions. Installation Instructions INSTALLING THE REFRIGERATOR (cont.) 10 LEVEL THE REFRIGERATOR The leveling legs have 2 purposes: 1) Leveling legs adjust so the refrigerator is firmly positioned on the floor and does not wobble. 2) Leveling legs serve as a stabilizing brake to lower...


