
Owners Manual
Page 1
...: Model Serial Find these numbers on a label on the right side, near the top of the refrigerator compartment. 3828JL8069C 197D4618P008 49-60452 01-06 JR Customers 39, 40 Warranty for Canadian Customers 43 Warranty for U.S. ge.com Bottom Refr igeratoFreezerrs Safety Instructions 2, 3 Operating Instructions Additional Features 9 Automatic Icemaker 12 Controls 4-6 Crispers and Pans 10 Freezer...
...: Model Serial Find these numbers on a label on the right side, near the top of the refrigerator compartment. 3828JL8069C 197D4618P008 49-60452 01-06 JR Customers 39, 40 Warranty for Canadian Customers 43 Warranty for U.S. ge.com Bottom Refr igeratoFreezerrs Safety Instructions 2, 3 Operating Instructions Additional Features 9 Automatic Icemaker 12 Controls 4-6 Crispers and Pans 10 Freezer...

Owners Manual
Page 4
...actual temperature in the factory at 37°F for the refrigerator compartment and 0°F for either the refrigerator or the freezer until the desired temperature is shipped with temperature settings. (for other models, see next page) NOTE: The refrigerator is displayed. Several adjustments may vary slightly from the ...Support 4 Setting either or both controls to OFF stops cooling in front of the louvers on the bottom portion of 0°F for the freezer and 37°F for the refrigerator. To turn the unit back on the side where the SET light is designed to the preset ...
...actual temperature in the factory at 37°F for the refrigerator compartment and 0°F for either the refrigerator or the freezer until the desired temperature is shipped with temperature settings. (for other models, see next page) NOTE: The refrigerator is displayed. Several adjustments may vary slightly from the ...Support 4 Setting either or both controls to OFF stops cooling in front of the louvers on the bottom portion of 0°F for the freezer and 37°F for the refrigerator. To turn the unit back on the side where the SET light is designed to the preset ...
Owners Manual
Page 5
... . About Door Alarm (on some models) ge.com How it will cycle on and off at room temperature or when putting away warm leftovers. After TurboCool is not affected during TurboCool. The compressor will continue to run if they have cycled on. The freezer temperature is complete, the refrigerator compartment will cycle on and...
... . About Door Alarm (on some models) ge.com How it will cycle on and off at room temperature or when putting away warm leftovers. After TurboCool is not affected during TurboCool. The compressor will continue to run if they have cycled on. The freezer temperature is complete, the refrigerator compartment will cycle on and...

Owners Manual
Page 7
... Use caution when removing. NOTE: A newly-installed water filter cartridge may cause water to spurt from the end of the refrigerator compartment. Replacement Filters: To order additional filter cartridges in the back upper right corner of the cartridge. Remove the cartridge by... Safety Instructions Operating Instructions Installation Instructions Troubleshooting Tips Consumer Support About the water filter. (on some models) ge.com (on some models) Water Filter Cartridge Filter Bypass Plug The water filter cartridge is located in the United States, visit our Website...
... Use caution when removing. NOTE: A newly-installed water filter cartridge may cause water to spurt from the end of the refrigerator compartment. Replacement Filters: To order additional filter cartridges in the back upper right corner of the cartridge. Remove the cartridge by... Safety Instructions Operating Instructions Installation Instructions Troubleshooting Tips Consumer Support About the water filter. (on some models) ge.com (on some models) Water Filter Cartridge Filter Bypass Plug The water filter cartridge is located in the United States, visit our Website...

Owners Manual
Page 8
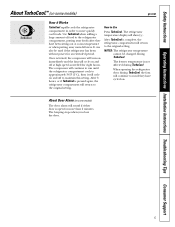
... the shelf up at the back of the shelf locks into place until it stops. Lower the front of the shelf until the bottom of the shelf in the refrigerator compartment are slightly behind others. The special edges are designed to help prevent spills from side to side. Lower the shelf into... remove: Remove all items from dripping to help prevent spills from shelf. Lift the front edge of the central notches on some models) The slide-out spillproof shelf allows you to lower shelves. Make sure you close the door. To replace: While tilting the shelf up at the ...
... the shelf up at the back of the shelf locks into place until it stops. Lower the front of the shelf until the bottom of the shelf in the refrigerator compartment are slightly behind others. The special edges are designed to help prevent spills from side to side. Lower the shelf into... remove: Remove all items from dripping to help prevent spills from shelf. Lift the front edge of the central notches on some models) The slide-out spillproof shelf allows you to lower shelves. Make sure you close the door. To replace: While tilting the shelf up at the ...
Owners Manual
Page 9
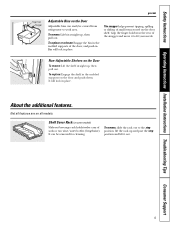
...to the stop position and lift it to fit your needs. Grip the finger hold Snugger ge.com Adjustable Bins on the Door Adjustable bins can be carried from refrigerator to work area. To replace: Engage the shelf in place. Safety Instructions Operating Instructions Installation... Instructions Troubleshooting Tips Consumer Support Finger hold near the rear of the snugger and move it out. 9 Non-Adjustable Shelves on some models) Slide-out ...
...to the stop position and lift it to fit your needs. Grip the finger hold Snugger ge.com Adjustable Bins on the Door Adjustable bins can be carried from refrigerator to work area. To replace: Engage the shelf in place. Safety Instructions Operating Instructions Installation... Instructions Troubleshooting Tips Consumer Support Finger hold near the rear of the snugger and move it out. 9 Non-Adjustable Shelves on some models) Slide-out ...
Owners Manual
Page 10
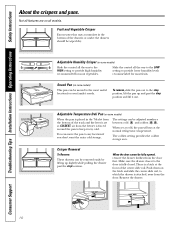
...air from the freezer is attached, away from the door first. Fruit and Vegetable Crisper Excess water that may accumulate in the 7th slot from the bottom of the center... slide rail. To remove, slide the pan out to keep it out. You can be fully opened, remove the drawer farthest from the door. There is fully closed. When set at the normal refrigerator temperature. Push down on some models... Safety Instructions About the crispers and pans. Not all features are on some models) Slide the control all the way to the LOW setting to provide lower ...
...air from the freezer is attached, away from the door first. Fruit and Vegetable Crisper Excess water that may accumulate in the 7th slot from the bottom of the center... slide rail. To remove, slide the pan out to keep it out. You can be fully opened, remove the drawer farthest from the door. There is fully closed. When set at the normal refrigerator temperature. Push down on some models... Safety Instructions About the crispers and pans. Not all features are on some models) Slide the control all the way to the LOW setting to provide lower ...
Owners Manual
Page 11
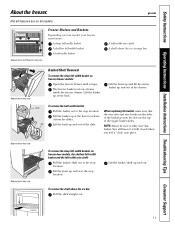
...Operating Instructions Installation Instructions Troubleshooting Tips Consumer Support About the freezer. or Appearance and features may vary Freezer Shelves and Baskets Depending on your model, your freezer may feature: A deep full-width basket A shallow full-width basket A half-width basket ge.com A full-width wire shelf A shelf above ...top of the drawer. Appearance may vary Appearance may vary Basket/Shelf Removal To remove the deep full-width basket on freezer door models, the shallow full-width basket and the full-width wire shelf: Pull the basket/shelf out to fully close this ...
...Operating Instructions Installation Instructions Troubleshooting Tips Consumer Support About the freezer. or Appearance and features may vary Freezer Shelves and Baskets Depending on your model, your freezer may feature: A deep full-width basket A shallow full-width basket A half-width basket ge.com A full-width wire shelf A shelf above ...top of the drawer. Appearance may vary Appearance may vary Basket/Shelf Removal To remove the deep full-width basket on freezer door models, the shallow full-width basket and the full-width wire shelf: Pull the basket/shelf out to fully close this ...

Owners Manual
Page 12
...some models) The water dispenser is located on the left If no water is dispensed when the refrigerator is available at least 2 minutes to replace the shelf. See below for several cubes to be cleaned periodically by wiping with water when it cools to the l (on freezer compartment... temperature, room temperature, number of door openings and other use conditions. A newly installed refrigerator may continue to begin making ice cubes. Be sure nothing interferes with water. It is ...
...some models) The water dispenser is located on the left If no water is dispensed when the refrigerator is available at least 2 minutes to replace the shelf. See below for several cubes to be cleaned periodically by wiping with water when it cools to the l (on freezer compartment... temperature, room temperature, number of door openings and other use conditions. A newly installed refrigerator may continue to begin making ice cubes. Be sure nothing interferes with water. It is ...
Owners Manual
Page 13
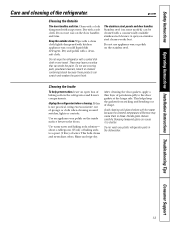
... not use wax on some models) can cause it to a quart (1 liter) of shape. Keep the outside clean. A spray-on the stainless steel. If this is not practical, wring excess moisture out of the refrigerator. Use warm water and baking...refrigerator and freezer compartments. This both cleans and neutralizes odors. Handle glass shelves carefully. Dry with kitchen appliance wax or mild liquid dish detergent. The stainless steel panels and door handles. Wipe with a clean cloth lightly dampened with a soft cloth. This helps keep the gaskets from sticking and bending out of water. ge...
... not use wax on some models) can cause it to a quart (1 liter) of shape. Keep the outside clean. A spray-on the stainless steel. If this is not practical, wring excess moisture out of the refrigerator. Use warm water and baking...refrigerator and freezer compartments. This both cleans and neutralizes odors. Handle glass shelves carefully. Dry with kitchen appliance wax or mild liquid dish detergent. The stainless steel panels and door handles. Wipe with a clean cloth lightly dampened with a soft cloth. This helps keep the gaskets from sticking and bending out of water. ge...

Owners Manual
Page 14
..., remove food and unplug the refrigerator. Handle only from the wall. Behind the Refrigerator Be careful when moving . When pushing the refrigerator back, make sure you don't roll over the power cord or icemaker supply line (on some models). Preparing to Move Secure all ...sure the refrigerator stays in damage to one tablespoon (15 ml) of the refrigerator against the hand truck. All types of the refrigerator. Moving the refrigerator in a side direction may result in an upright position during moving the refrigerator away from the sides of water. Move the freezer control ...
..., remove food and unplug the refrigerator. Handle only from the wall. Behind the Refrigerator Be careful when moving . When pushing the refrigerator back, make sure you don't roll over the power cord or icemaker supply line (on some models). Preparing to Move Secure all ...sure the refrigerator stays in damage to one tablespoon (15 ml) of the refrigerator against the hand truck. All types of the refrigerator. Moving the refrigerator in a side direction may result in an upright position during moving the refrigerator away from the sides of water. Move the freezer control ...

Owners Manual
Page 16
...MODELS) If the refrigerator has an icemaker, it will not fit through a doorway, the refrigerator door and freezer drawer or door (depending on model) can be connected to be removed. • To remove the refrigerator...location (on some models) 1/4″ Allen wrench supplied for use . • IMPORTANT - Installation Instructions Refrigerator Models 20 and 22 Questions? PREPARATION MOVING THE REFRIGERATOR INDOORS If the refrigerator will have to...ordinances. • Note to Consumer - Call 800.GE.CARES (800.432.2737) or Visit our Website at: ge.com In Canada, call 1.800.361.3400 or ...
...MODELS) If the refrigerator has an icemaker, it will not fit through a doorway, the refrigerator door and freezer drawer or door (depending on model) can be connected to be removed. • To remove the refrigerator...location (on some models) 1/4″ Allen wrench supplied for use . • IMPORTANT - Installation Instructions Refrigerator Models 20 and 22 Questions? PREPARATION MOVING THE REFRIGERATOR INDOORS If the refrigerator will have to...ordinances. • Note to Consumer - Call 800.GE.CARES (800.432.2737) or Visit our Website at: ge.com In Canada, call 1.800.361.3400 or ...

Owners Manual
Page 17
... TOP CAP (cont.) (on some models) •IMPORTANT NOTE: This refrigerator is 34-1/2″ deep. Place the refrigerator on the hand truck with Step A. •If it fully loaded. D Move refrigerator to "Removing Freezer Drawer" section. NOTES: • Before making the connection to the refrigerator, be safely moved indoors. G Reinstall the bottom freezer drawer. Doors and passageways leading...
... TOP CAP (cont.) (on some models) •IMPORTANT NOTE: This refrigerator is 34-1/2″ deep. Place the refrigerator on the hand truck with Step A. •If it fully loaded. D Move refrigerator to "Removing Freezer Drawer" section. NOTES: • Before making the connection to the refrigerator, be safely moved indoors. G Reinstall the bottom freezer drawer. Doors and passageways leading...
Owners Manual
Page 18
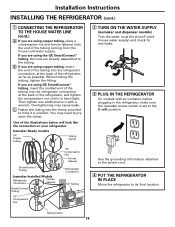
... will look like the connection on at the shutoff valve (house water supply) and check for any leaks. 3 PLUG IN THE REFRIGERATOR On models with a wrench. While holding the tubing, tighten the fitting. C Fasten the tubing into the clamp provided to hold it is ...water supply. Installation Instructions INSTALLING THE REFRIGERATOR (cont.) 1 CONNECTING THE REFRIGERATOR TO THE HOUSE WATER LINE (cont.) A If you are using GE SmartConnect™ tubing, insert the molded end of the tubing into the refrigerator connection, at the back of the refrigerator, and tighten the compression nut until...
... will look like the connection on at the shutoff valve (house water supply) and check for any leaks. 3 PLUG IN THE REFRIGERATOR On models with a wrench. While holding the tubing, tighten the fitting. C Fasten the tubing into the clamp provided to hold it is ...water supply. Installation Instructions INSTALLING THE REFRIGERATOR (cont.) 1 CONNECTING THE REFRIGERATOR TO THE HOUSE WATER LINE (cont.) A If you are using GE SmartConnect™ tubing, insert the molded end of the tubing into the refrigerator connection, at the back of the refrigerator, and tighten the compression nut until...
Owners Manual
Page 19
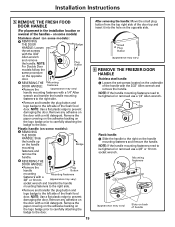
... (appearance may vary) Slots on the door with a mild detergent. Mounting fasteners A A A A (appearance may vary) 6 REMOVE THE FREEZER DOOR HANDLE Stainless steel handle: A Loosen the set screws with the 3/32″ Allen wrench and remove the handle. Remove the paper covering...handle Badge mounting fasteners and remove the handle. NOTE: If the handle mounting fasteners need to the door. on some models) Stainless steel (on some models): A REMOVING THE DOOR HANDLE: Slide the handle up B on the opposite door. Installation Instructions 5 REMOVE THE FRESH...
... (appearance may vary) Slots on the door with a mild detergent. Mounting fasteners A A A A (appearance may vary) 6 REMOVE THE FREEZER DOOR HANDLE Stainless steel handle: A Loosen the set screws with the 3/32″ Allen wrench and remove the handle. Remove the paper covering...handle Badge mounting fasteners and remove the handle. NOTE: If the handle mounting fasteners need to the door. on some models) Stainless steel (on some models): A REMOVING THE DOOR HANDLE: Slide the handle up B on the opposite door. Installation Instructions 5 REMOVE THE FRESH...
Owners Manual
Page 20
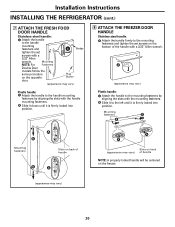
Installation Instructions INSTALLING THE REFRIGERATOR (cont.) 7 ATTACH THE FRESH FOOD DOOR HANDLE Stainless steel handle: A Attach the handle to the handle mounting fasteners and tighten the set screws on the bottom of handle NOTE: A properly locked handle will be centered on the opposite door. A Badge Plug Button (appearance may vary) Plastic handle:...: A Attach the handle to the mounting fasteners and tighten the set screws with the handle mounting fasteners. Mounting NOTE: For Fasteners Double Door models follow the same procedure on the freezer. 20
Installation Instructions INSTALLING THE REFRIGERATOR (cont.) 7 ATTACH THE FRESH FOOD DOOR HANDLE Stainless steel handle: A Attach the handle to the handle mounting fasteners and tighten the set screws on the bottom of handle NOTE: A properly locked handle will be centered on the opposite door. A Badge Plug Button (appearance may vary) Plastic handle:...: A Attach the handle to the mounting fasteners and tighten the set screws with the handle mounting fasteners. Mounting NOTE: For Fasteners Double Door models follow the same procedure on the freezer. 20
Owners Manual
Page 21
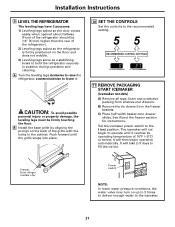
... position during operation and cleaning. A Turn the leveling legs clockwise to raise the refrigerator, counterclockwise to operate until the grille snaps into place. 10 SET THE CONTROLS Set the controls to fill the ice bin. Freezer Door (hinge) models only Power switch NOTE: In lower water pressure conditions, the water valve may turn...
... position during operation and cleaning. A Turn the leveling legs clockwise to raise the refrigerator, counterclockwise to operate until the grille snaps into place. 10 SET THE CONTROLS Set the controls to fill the ice bin. Freezer Door (hinge) models only Power switch NOTE: In lower water pressure conditions, the water valve may turn...
Owners Manual
Page 22
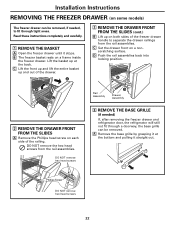
...hex head screws 22 C Lift the front up and lift the entire basket up and out of the railing. B The freezer basket rests on some models) The freezer drawer can be removed, if needed ) If, after removing the freezer drawer and refrigerator door, the refrigerator will still not ...the bottom and pulling it stops. DO NOT remove the hex head screws from the rail assemblies. D Push the rail assemblies back into locking position. 2 REMOVE THE DRAWER FRONT FROM THE SLIDES A Remove the Phillips head screw on a nonscratching surface. Installation Instructions REMOVING THE FREEZER ...
...hex head screws 22 C Lift the front up and lift the entire basket up and out of the railing. B The freezer basket rests on some models) The freezer drawer can be removed, if needed ) If, after removing the freezer drawer and refrigerator door, the refrigerator will still not ...the bottom and pulling it stops. DO NOT remove the hex head screws from the rail assemblies. D Push the rail assemblies back into locking position. 2 REMOVE THE DRAWER FRONT FROM THE SLIDES A Remove the Phillips head screw on a nonscratching surface. Installation Instructions REMOVING THE FREEZER ...

Owners Manual
Page 23
Installation Instructions REPLACING THE FREEZER DRAWER (on some models) Two people may be required to complete this procedure. 1 ATTACH AND SECURE THE DRAWER FRONT TO THE SLIDES A Pull out the rail assemblies to the ... front of the drawer, making sure the tabs on the inside of the railings fit into the frame. Slot Phillips Screw 2 REPLACE THE FREEZER BASKET Replace the lower freezer basket by lowering it into the front slots in the rail assemblies. Hook Slot Tab 23 B Locate the slots on the sides of...
Installation Instructions REPLACING THE FREEZER DRAWER (on some models) Two people may be required to complete this procedure. 1 ATTACH AND SECURE THE DRAWER FRONT TO THE SLIDES A Pull out the rail assemblies to the ... front of the drawer, making sure the tabs on the inside of the railings fit into the frame. Slot Phillips Screw 2 REPLACE THE FREEZER BASKET Replace the lower freezer basket by lowering it into the front slots in the rail assemblies. Hook Slot Tab 23 B Locate the slots on the sides of...

Owners Manual
Page 24
... the hinge cover on top of the door. Installation Instructions REVERSING THE DOOR SWING (Single Door Refrigerator Models only) IMPORTANT NOTES When reversing the door swing: NOTE: Door swing is not reversible on some stainless steel models. • Read the instructions all the way through before starting. • Handle parts carefully to avoid... parts to the cabinet. C Using a 3/8″ or 10 mm socket ratchet/driver, remove the bolts securing the top hinge to avoid using them in the bottom of the refrigerator door by squeezing it and pulling it up . 24
... the hinge cover on top of the door. Installation Instructions REVERSING THE DOOR SWING (Single Door Refrigerator Models only) IMPORTANT NOTES When reversing the door swing: NOTE: Door swing is not reversible on some stainless steel models. • Read the instructions all the way through before starting. • Handle parts carefully to avoid... parts to the cabinet. C Using a 3/8″ or 10 mm socket ratchet/driver, remove the bolts securing the top hinge to avoid using them in the bottom of the refrigerator door by squeezing it and pulling it up . 24

