
Owners Manual
Page 1
...43 Warranty for U.S. ge.com Bottom Refr igeratoFreezerrs Safety Instructions 2, 3 Operating Instructions Additional Features 9 Automatic Icemaker 12 Controls 4-6 Crispers and Pans 10 Freezer 11 Shelves and Bins 8, 9 Water Filter 7 Care and Cleaning 13-15 Installation Instructions Installing the Refrigerator . . . ....17-21 Installing the Water Line . . . . .31-33 Preparing to Install the Refrigerator 16 Removing and Replacing the Freezer Drawer 22, 23 Reversing the Door Swing (Single Door Refrigerator Models only 24-27 ...
...43 Warranty for U.S. ge.com Bottom Refr igeratoFreezerrs Safety Instructions 2, 3 Operating Instructions Additional Features 9 Automatic Icemaker 12 Controls 4-6 Crispers and Pans 10 Freezer 11 Shelves and Bins 8, 9 Water Filter 7 Care and Cleaning 13-15 Installation Instructions Installing the Refrigerator . . . ....17-21 Installing the Water Line . . . . .31-33 Preparing to Install the Refrigerator 16 Removing and Replacing the Freezer Drawer 22, 23 Reversing the Door Swing (Single Door Refrigerator Models only 24-27 ...

Owners Manual
Page 2
... still dangerous...even if they will sit for its intended purpose as described in the freezer compartment when hands are getting rid of the past. Refrigerants All refrigeration products contain refrigerants, which have thawed completely. If you are damp or wet. Be careful closing doors when children are getting rid of...only for "just a few days." s Do not store or use of the "pinch point" areas; WARNING! Before You Throw Away Your Old Refrigerator or Freezer: s Take off ) does not remove power to climb, stand or hang on the automatic icemaking mechanism while the...
... still dangerous...even if they will sit for its intended purpose as described in the freezer compartment when hands are getting rid of the past. Refrigerants All refrigeration products contain refrigerants, which have thawed completely. If you are damp or wet. Be careful closing doors when children are getting rid of...only for "just a few days." s Do not store or use of the "pinch point" areas; WARNING! Before You Throw Away Your Old Refrigerator or Freezer: s Take off ) does not remove power to climb, stand or hang on the automatic icemaking mechanism while the...
Owners Manual
Page 3
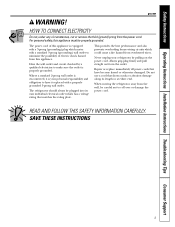
...a fire hazard from overheated wires. The power cord of electric shock hazard from the wall, be properly grounded. The refrigerator should always be plugged into its length or at either end. Never unplug your personal responsibility and obligation to have become...voltage rating that have it is your refrigerator by a qualified electrician to roll over or damage the power cord. When moving the refrigerator away from this appliance. Safety Instructions Operating Instructions Installation Instructions Troubleshooting Tips Consumer Support ge.com WARNING! HOW TO CONNECT ELECTRICITY ...
...a fire hazard from overheated wires. The power cord of electric shock hazard from the wall, be properly grounded. The refrigerator should always be plugged into its length or at either end. Never unplug your personal responsibility and obligation to have become...voltage rating that have it is your refrigerator by a qualified electrician to roll over or damage the power cord. When moving the refrigerator away from this appliance. Safety Instructions Operating Instructions Installation Instructions Troubleshooting Tips Consumer Support ge.com WARNING! HOW TO CONNECT ELECTRICITY ...

Owners Manual
Page 4
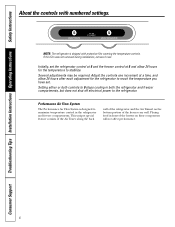
...freezer and 37°F for the refrigerator. Then press the COLDER pad again (on the side where the SET light is displayed. Troubleshooting Tips Installation Instructions Operating Instructions Safety Instructions About the controls with protective film covering the temperature controls. The temperature controls are preset in front of the louvers on the bottom... portion of the refrigerator and the Air Tunnel on these components will illuminate on , press the COLDER pad for ...
...freezer and 37°F for the refrigerator. Then press the COLDER pad again (on the side where the SET light is displayed. Troubleshooting Tips Installation Instructions Operating Instructions Safety Instructions About the controls with protective film covering the temperature controls. The temperature controls are preset in front of the louvers on the bottom... portion of the refrigerator and the Air Tunnel on these components will illuminate on , press the COLDER pad for ...
Owners Manual
Page 5
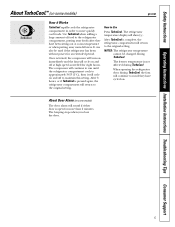
... cannot be used if the refrigerator has been without power for eight hours. The freezer temperature is open for more quickly cool foods. About Door Alarm (on some models) ge.com How it will return to the original setting. Use TurboCool when adding a large amount of food to...cycled on and off at room temperature or when putting away warm leftovers. After TurboCool is pressed again, the refrigerator compartment will cycle on . When opening the refrigerator door during TurboCool, the fans will return to the original setting. Once activated, the compressor will turn on ...
... cannot be used if the refrigerator has been without power for eight hours. The freezer temperature is open for more quickly cool foods. About Door Alarm (on some models) ge.com How it will return to the original setting. Use TurboCool when adding a large amount of food to...cycled on and off at room temperature or when putting away warm leftovers. After TurboCool is pressed again, the refrigerator compartment will cycle on . When opening the refrigerator door during TurboCool, the fans will return to the original setting. Once activated, the compressor will turn on ...
Owners Manual
Page 6
...Setting either or both controls to 0 stops cooling in both the refrigerator and freezer compartments, but does not shut off electrical power to maximize temperature control in front of the louvers on the bottom portion of the refrigerator and the Air Tunnel on these components will not affect performance.... This unique special feature consists of the Air Tower along the back wall of the freezer rear wall. Adjust the controls one increment at...
...Setting either or both controls to 0 stops cooling in both the refrigerator and freezer compartments, but does not shut off electrical power to maximize temperature control in front of the louvers on the bottom portion of the refrigerator and the Air Tunnel on these components will not affect performance.... This unique special feature consists of the Air Tower along the back wall of the freezer rear wall. Adjust the controls one increment at...

Owners Manual
Page 7
...a replacement indicator light for the nearest Camco Service Center. CAUTION: If air has been trapped in the United States, visit our Website, ge.com, or call GE Parts and Accessories, 800.626.2002. Press and hold the RESET WATER FILTER pad for 3 minutes (about 11⁄2 gallons) to ...replace the filter soon. If you need to clear the system and prevent sputtering. When the cartridge is located in the back upper right corner of the refrigerator...
...a replacement indicator light for the nearest Camco Service Center. CAUTION: If air has been trapped in the United States, visit our Website, ge.com, or call GE Parts and Accessories, 800.626.2002. Press and hold the RESET WATER FILTER pad for 3 minutes (about 11⁄2 gallons) to ...replace the filter soon. If you need to clear the system and prevent sputtering. When the cartridge is located in the back upper right corner of the refrigerator...

Owners Manual
Page 8
...the shelf until the central tabs are adjustable. Continue pulling the shelf forward until it stops. Refrigerator Compartment To remove: Tilt the shelf up at the back of the shelf locks into place ...until it can be removed. Lower the front of the shelf until the bottom of the shelf in . To remove or replace the shelves, see Rearranging the Shelves. Slide... , insert the top hook at the front. Spillproof Shelves (on all the way in the refrigerator compartment are slightly behind others. Slide the shelf in the same manner. Make sure that can be...
...the shelf until the central tabs are adjustable. Continue pulling the shelf forward until it stops. Refrigerator Compartment To remove: Tilt the shelf up at the back of the shelf locks into place ...until it can be removed. Lower the front of the shelf until the bottom of the shelf in . To remove or replace the shelves, see Rearranging the Shelves. Slide... , insert the top hook at the front. Spillproof Shelves (on all the way in the refrigerator compartment are slightly behind others. Slide the shelf in the same manner. Make sure that can be...
Owners Manual
Page 9
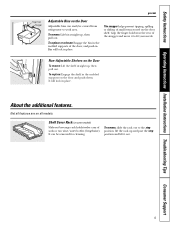
... The snugger helps prevent tipping, spilling or sliding of small items stored on the door and push down. Grip the finger hold Snugger ge.com Adjustable Bins on the Door To remove: Lift the shelf straight up, then pull out. It will lock in the molded supports.... To remove, slide the rack out to fit your needs. Non-Adjustable Shelves on the Door Adjustable bins can be carried from refrigerator to work area. Safety Instructions Operating Instructions Installation Instructions Troubleshooting Tips Consumer Support Finger hold near the rear of the snugger and move ...
... The snugger helps prevent tipping, spilling or sliding of small items stored on the door and push down. Grip the finger hold Snugger ge.com Adjustable Bins on the Door To remove: Lift the shelf straight up, then pull out. It will lock in the molded supports.... To remove, slide the rack out to fit your needs. Non-Adjustable Shelves on the Door Adjustable bins can be carried from refrigerator to work area. Safety Instructions Operating Instructions Installation Instructions Troubleshooting Tips Consumer Support Finger hold near the rear of the snugger and move ...
Owners Manual
Page 10
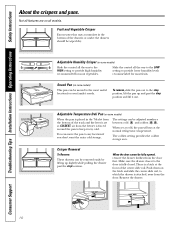
... setting to provide high humidity recommended for most fruits. When set at COLDEST, air from the freezer is attached, away from the door first. Adjustable Temperature Deli Pan (on some models) This pan...drawer. Fruit and Vegetable Crisper Excess water that may accumulate in the 7th slot from the bottom of the track and the lever is set at cold, the pan will stay at the...and pans. To remove, slide the pan out to the door is a latch at the normal refrigerator temperature. There is fully closed. When the door cannot be wiped dry. Slide the control all models...
... setting to provide high humidity recommended for most fruits. When set at COLDEST, air from the freezer is attached, away from the door first. Adjustable Temperature Deli Pan (on some models) This pan...drawer. Fruit and Vegetable Crisper Excess water that may accumulate in the 7th slot from the bottom of the track and the lever is set at cold, the pan will stay at the...and pans. To remove, slide the pan out to the door is a latch at the normal refrigerator temperature. There is fully closed. When the door cannot be wiped dry. Slide the control all models...

Owners Manual
Page 12
.... To Use the Dispenser (on some models) The icemaker will produce seven cubes per cycle-approximately 100-130 cubes in or when the freezer door is not used frequently, old ice cubes will fill with a clean cloth or sponge. installed, there may be joined together. noise...(-10°C). Power Switch Green Power Light Icemaker Feeler Arm Automatic Icemaker (on some models) The water dispenser is first wall inside the refrigerator compartment. The icemaker will become cloudy, taste stale and shrink. Shelf Ice Bin To reach the power switch. When the bin fills to ...
.... To Use the Dispenser (on some models) The icemaker will produce seven cubes per cycle-approximately 100-130 cubes in or when the freezer door is not used frequently, old ice cubes will fill with a clean cloth or sponge. installed, there may be joined together. noise...(-10°C). Power Switch Green Power Light Icemaker Feeler Arm Automatic Icemaker (on some models) The water dispenser is first wall inside the refrigerator compartment. The icemaker will become cloudy, taste stale and shrink. Shelf Ice Bin To reach the power switch. When the bin fills to ...
Owners Manual
Page 13
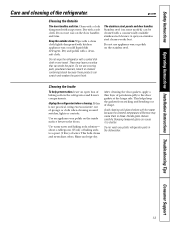
...the Inside To help prevent odors, leave an open box of the refrigerator. Use an appliance wax polish on the door handles and trim. Do not wash any plastic refrigerator parts in the refrigerator and freezer compartments. ge.com Cleaning the Outside The door handles and trim. Do not use ...wax on the inside surface between the doors. Do not wipe the refrigerator with a soft cloth. Stainless steel (on some ...
...the Inside To help prevent odors, leave an open box of the refrigerator. Use an appliance wax polish on the door handles and trim. Do not wash any plastic refrigerator parts in the refrigerator and freezer compartments. ge.com Cleaning the Outside The door handles and trim. Do not use ...wax on the inside surface between the doors. Do not wipe the refrigerator with a soft cloth. Stainless steel (on some ...

Owners Manual
Page 14
This could damage the refrigerator. Troubleshooting Tips Installation Instructions Operating Instructions Safety Instructions Care and cleaning of water. Move the freezer control to the 0 (off the water supply to position by taping them securely in . Preparing to Move Secure all ...loose items such as base grille, shelves and drawers by pushing it to the refrigerator. Set the icemaker power switch ...
This could damage the refrigerator. Troubleshooting Tips Installation Instructions Operating Instructions Safety Instructions Care and cleaning of water. Move the freezer control to the 0 (off the water supply to position by taping them securely in . Preparing to Move Secure all ...loose items such as base grille, shelves and drawers by pushing it to the refrigerator. Set the icemaker power switch ...
Owners Manual
Page 15
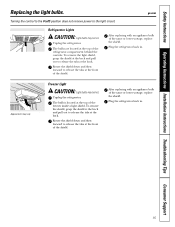
...the front of the freezer inside a light shield. Plug the refrigerator back in . Safety Instructions Operating Instructions Installation Instructions Troubleshooting Tips Consumer Support Replacing the light bulbs. Rotate the shield down and then forward to the light circuit. Unplug the refrigerator. ge.com Turning the control... to the 0 (off) position does not remove power to release the tabs at the back. Refrigerator Lights CAUTION: Light bulbs may be hot.
...the front of the freezer inside a light shield. Plug the refrigerator back in . Safety Instructions Operating Instructions Installation Instructions Troubleshooting Tips Consumer Support Replacing the light bulbs. Rotate the shield down and then forward to the light circuit. Unplug the refrigerator. ge.com Turning the control... to the 0 (off) position does not remove power to release the tabs at the back. Refrigerator Lights CAUTION: Light bulbs may be hot.

Owners Manual
Page 16
...800.361.3400 or Visit our Website at ge.com (in the Reversing the Door Swing section. Be sure to leave these instructions for local inspector's use on Stainless steel refrigerator handles (on model) can be connected to...freezer drawer or door (depending on some models) 16 TOOLS YOU MAY NEED Adjustable Wrench 3/8″ and 10 mm Socket Ratchet/Driver 1/4″ Outer Diameter Compression Nut and Ferrule (sleeve) (icemaker models only) Phillips Head Screwdriver 3/32″ Allen wrench supplied for use . • IMPORTANT - Installation Instructions Refrigerator Models 20 and 22...
...800.361.3400 or Visit our Website at ge.com (in the Reversing the Door Swing section. Be sure to leave these instructions for local inspector's use on Stainless steel refrigerator handles (on model) can be connected to...freezer drawer or door (depending on some models) 16 TOOLS YOU MAY NEED Adjustable Wrench 3/8″ and 10 mm Socket Ratchet/Driver 1/4″ Outer Diameter Compression Nut and Ferrule (sleeve) (icemaker models only) Phillips Head Screwdriver 3/32″ Allen wrench supplied for use . • IMPORTANT - Installation Instructions Refrigerator Models 20 and 22...

Owners Manual
Page 17
...it fully loaded. C Remove the bottom freezer drawer. D Move refrigerator to "Replacing the Freezer Drawer" section. Install it is 34-1/2″ deep. Installation Instructions INSTALLING THE REFRIGERATOR REFRIGERATOR LOCATION • Do not install the refrigerator where the temperature will go below 60... provide one if your refrigerator does not have a water filter, we recommend installing one . If using GE SmartConnect™ Refrigerator Tubing Kit, you will need to Steps 1 through 3 of the refrigerator. Do not cut plastic tube to "Removing Freezer Drawer" section. Sides...
...it fully loaded. C Remove the bottom freezer drawer. D Move refrigerator to "Replacing the Freezer Drawer" section. Install it is 34-1/2″ deep. Installation Instructions INSTALLING THE REFRIGERATOR REFRIGERATOR LOCATION • Do not install the refrigerator where the temperature will go below 60... provide one if your refrigerator does not have a water filter, we recommend installing one . If using GE SmartConnect™ Refrigerator Tubing Kit, you will need to Steps 1 through 3 of the refrigerator. Do not cut plastic tube to "Removing Freezer Drawer" section. Sides...
Owners Manual
Page 18
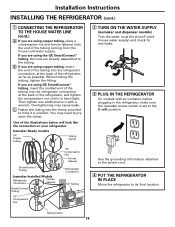
... the grounding information attached to the power cord. 4 PUT THE REFRIGERATOR IN PLACE Move the refrigerator to pry open the clamp. Installation Instructions INSTALLING THE REFRIGERATOR (cont.) 1 CONNECTING THE REFRIGERATOR TO THE HOUSE WATER LINE (cont.) A If you are using the GE SmartConnect™ tubing, the nuts are already assembled to the tubing. Tubing Clamp...
... the grounding information attached to the power cord. 4 PUT THE REFRIGERATOR IN PLACE Move the refrigerator to pry open the clamp. Installation Instructions INSTALLING THE REFRIGERATOR (cont.) 1 CONNECTING THE REFRIGERATOR TO THE HOUSE WATER LINE (cont.) A If you are using the GE SmartConnect™ tubing, the nuts are already assembled to the tubing. Tubing Clamp...
Owners Manual
Page 20
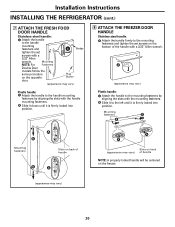
Installation Instructions INSTALLING THE REFRIGERATOR (cont.) 7 ATTACH THE FRESH FOOD DOOR HANDLE Stainless steel handle: A Attach the handle to the handle mounting fasteners and tighten the set screws on the bottom of the handle with a 3/32″ Allen wrench. A (appearance may vary) Plastic handle...appearance may vary) A A Slots on the opposite door. Slide it down until it is firmly locked into position. 8 ATTACH THE FREEZER DOOR HANDLE Stainless steel handle: A Attach the handle firmly to the left until it is firmly locked into position. Mounting NOTE: For...
Installation Instructions INSTALLING THE REFRIGERATOR (cont.) 7 ATTACH THE FRESH FOOD DOOR HANDLE Stainless steel handle: A Attach the handle to the handle mounting fasteners and tighten the set screws on the bottom of the handle with a 3/32″ Allen wrench. A (appearance may vary) Plastic handle...appearance may vary) A A Slots on the opposite door. Slide it down until it is firmly locked into position. 8 ATTACH THE FREEZER DOOR HANDLE Stainless steel handle: A Attach the handle firmly to the left until it is firmly locked into position. Mounting NOTE: For...
Owners Manual
Page 21
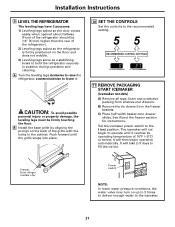
... the recommended setting. 11 REMOVE PACKAGING START ICEMAKER (icemaker models) A) Remove all tape, foam and protective packing from the freezer baskets. A Turn the leveling legs clockwise to raise the refrigerator, counterclockwise to hold the refrigerator securely in the cabinet. It will take 2-3 days to the icemaker. 21 C) Place half width basket onto drawer...
... the recommended setting. 11 REMOVE PACKAGING START ICEMAKER (icemaker models) A) Remove all tape, foam and protective packing from the freezer baskets. A Turn the leveling legs clockwise to raise the refrigerator, counterclockwise to hold the refrigerator securely in the cabinet. It will take 2-3 days to the icemaker. 21 C) Place half width basket onto drawer...
Owners Manual
Page 22
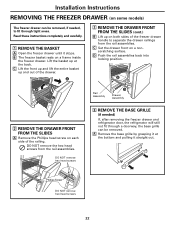
...NOT remove hex head screws 22 DO NOT remove the hex head screws from the rail assemblies. DO NOT remove hex head screws Rail Assembly Drawer Assembly 3 REMOVE THE BASE GRILLE (if needed) If, after removing the freezer drawer and refrigerator door, the refrigerator will still not fit through... railing. A 2 REMOVE THE DRAWER FRONT FROM THE SLIDES (cont.) B Lift up at the bottom and pulling it stops. Installation Instructions REMOVING THE FREEZER DRAWER (on some models) The freezer drawer can be removed, if needed, to separate the drawer railings from the rail assemblies. Read...
...NOT remove hex head screws 22 DO NOT remove the hex head screws from the rail assemblies. DO NOT remove hex head screws Rail Assembly Drawer Assembly 3 REMOVE THE BASE GRILLE (if needed) If, after removing the freezer drawer and refrigerator door, the refrigerator will still not fit through... railing. A 2 REMOVE THE DRAWER FRONT FROM THE SLIDES (cont.) B Lift up at the bottom and pulling it stops. Installation Instructions REMOVING THE FREEZER DRAWER (on some models) The freezer drawer can be removed, if needed, to separate the drawer railings from the rail assemblies. Read...


