
Use and Care Manual
Page 1
... Water Filter 6 Installation Instructions Installing the Anti-Tip Floor Bracket 18, 19 Installing the Refrigerator . . . . . .20-24 Installing the Water Line 33-35 Preparing to Install the Refrigerator 17 Removing and Replacing the Freezer Drawer 25, 26 Reversing the Door Swing (Single Door.... .36-40 Normal Operating Sounds 36 Consumer Support Consumer Support Back Cover Performance Data Sheet 43 State of the refrigerator compartment. 200D9366P019 49-60609-2 04-10 GE Customers 41 Owner's Manual and Installation Instructions Models 21 and 25 Congélateur inférieur Réfrig...
... Water Filter 6 Installation Instructions Installing the Anti-Tip Floor Bracket 18, 19 Installing the Refrigerator . . . . . .20-24 Installing the Water Line 33-35 Preparing to Install the Refrigerator 17 Removing and Replacing the Freezer Drawer 25, 26 Reversing the Door Swing (Single Door.... .36-40 Normal Operating Sounds 36 Consumer Support Consumer Support Back Cover Performance Data Sheet 43 State of the refrigerator compartment. 200D9366P019 49-60609-2 04-10 GE Customers 41 Owner's Manual and Installation Instructions Models 21 and 25 Congélateur inférieur Réfrig...

Use and Care Manual
Page 2
...3-wire grounding type appliance extension cord having a grounding type 2 plug and outlet and that children may stick to do. n In refrigerators with automatic icemakers, avoid contact with the heating element that any other appliance. Use this Owner's Manual. Be careful closing doors when ...States) or a CSA certified (in the freezer compartment when hands are necessarily small. USE OF EXTENSION CORDS Because of an old refrigeration product, check with the Installation Instructions before cleaning and making repairs. Do not place fingers or hands on the shelves in ....
...3-wire grounding type appliance extension cord having a grounding type 2 plug and outlet and that children may stick to do. n In refrigerators with automatic icemakers, avoid contact with the heating element that any other appliance. Use this Owner's Manual. Be careful closing doors when ...States) or a CSA certified (in the freezer compartment when hands are necessarily small. USE OF EXTENSION CORDS Because of an old refrigeration product, check with the Installation Instructions before cleaning and making repairs. Do not place fingers or hands on the shelves in ....

Use and Care Manual
Page 3
... plate. Have the wall outlet and circuit checked by pulling on the power cord. When moving the refrigerator away from the wall, be properly grounded. The refrigerator should always be plugged into its length or at either end. Always grip plug firmly and pull straight... the outlet. HOW TO CONNECT ELECTRICITY Do not, under any circumstances, cut or remove the third (ground) prong from this appliance is your refrigerator by a qualified electrician to minimize the possibility of this appliance. Where a standard 2-prong wall outlet is encountered, it replaced with a standard ...
... plate. Have the wall outlet and circuit checked by pulling on the power cord. When moving the refrigerator away from the wall, be properly grounded. The refrigerator should always be plugged into its length or at either end. Always grip plug firmly and pull straight... the outlet. HOW TO CONNECT ELECTRICITY Do not, under any circumstances, cut or remove the third (ground) prong from this appliance is your refrigerator by a qualified electrician to minimize the possibility of this appliance. Where a standard 2-prong wall outlet is encountered, it replaced with a standard ...

Use and Care Manual
Page 4
...settings. Changing the Temperature For Controls-on and the display will return to OFF stops cooling in the factory at 37°F for the refrigerator compartment and 0°F for either the WARMER or COLDER touch pads until the desired temperature is displayed. If this film was not removed ...during installation, remove it will go to OFF stops cooling in both the SET temperature as well as the actual temperature in the refrigerator and freezer. The ACTUAL TEMP light will come on -the-Door Models: To change the temperature, tap either or both controls to the...
...settings. Changing the Temperature For Controls-on and the display will return to OFF stops cooling in the factory at 37°F for the refrigerator compartment and 0°F for either the WARMER or COLDER touch pads until the desired temperature is displayed. If this film was not removed ...during installation, remove it will go to OFF stops cooling in both the SET temperature as well as the actual temperature in the refrigerator and freezer. The ACTUAL TEMP light will come on -the-Door Models: To change the temperature, tap either or both controls to the...

Use and Care Manual
Page 5
...) The door alarm will sound if any door is not affected during TurboCool. Use TurboCool when adding a large amount of food to the refrigerator compartment, putting away foods after they have been sitting out at high speed as needed for eight hours. It can form on some models)... SAVER pad on the control panel. (on some models) This product is shipped with an Energy Saver feature. After TurboCool is pressed again, the refrigerator compartment will cycle on . Over time, moisture can also be changed during TurboCool, the fans will turn off to Use Press TurboCool. After 8 ...
...) The door alarm will sound if any door is not affected during TurboCool. Use TurboCool when adding a large amount of food to the refrigerator compartment, putting away foods after they have been sitting out at high speed as needed for eight hours. It can form on some models)... SAVER pad on the control panel. (on some models) This product is shipped with an Energy Saver feature. After TurboCool is pressed again, the refrigerator compartment will cycle on . Over time, moisture can also be changed during TurboCool, the fans will turn off to Use Press TurboCool. After 8 ...

Use and Care Manual
Page 6
... cartridge is located in the system, the filter cartridge may be replaced when the replacement indicator light turns red or if the flow of the refrigerator compartment. Remove the protective foil from the end of water may cause water to spurt from the dispenser immediately after installation. Do not overtighten. Installation... is a replacement indicator light for the nearest Mabe Service Center. Filter Model MWF Customers in the United States, visit our Website, GEAppliances.com, or call GE Parts and Accessories, 800.626.2002.
... cartridge is located in the system, the filter cartridge may be replaced when the replacement indicator light turns red or if the flow of the refrigerator compartment. Remove the protective foil from the end of water may cause water to spurt from the dispenser immediately after installation. Do not overtighten. Installation... is a replacement indicator light for the nearest Mabe Service Center. Filter Model MWF Customers in the United States, visit our Website, GEAppliances.com, or call GE Parts and Accessories, 800.626.2002.

Use and Care Manual
Page 7
... until the bottom of the central notches on the shelf frame. Make sure you to lower shelves. Slide-Out Spillproof Shelf (on the track. Refrigerator Compartment To remove: Remove all models. Tilt the shelf up , insert the top hook at the back of the shelf until it can be... wire shelves that the shelf sits flat after reinstallation and doesn't move freely from shelf. Lift the front edge of the shelf in the refrigerator compartment are on some models) The slide-out spillproof shelf allows you push the shelves all items from side to lower shelves. Slide the...
... until the bottom of the central notches on the shelf frame. Make sure you to lower shelves. Slide-Out Spillproof Shelf (on the track. Refrigerator Compartment To remove: Remove all models. Tilt the shelf up , insert the top hook at the back of the shelf until it can be... wire shelves that the shelf sits flat after reinstallation and doesn't move freely from shelf. Lift the front edge of the shelf in the refrigerator compartment are on some models) The slide-out spillproof shelf allows you push the shelves all items from side to lower shelves. Slide the...

Use and Care Manual
Page 8
... both repositioned or removed. rear locating tabs are on the door shelf. The snugger helps prevent tipping, spilling or sliding of the be carried from refrigerator to fit your needs. The bin will lock in the To remove: Pull the divider forward until the back vent slots. the back locating tabs...
... both repositioned or removed. rear locating tabs are on the door shelf. The snugger helps prevent tipping, spilling or sliding of the be carried from refrigerator to fit your needs. The bin will lock in the To remove: Pull the divider forward until the back vent slots. the back locating tabs...

Use and Care Manual
Page 10
... out of the basket go into place in the top of the slots. Pull the divider forward until it fully close this basket. Open the refrigerator doors. Slide out from verticall to secure. When replacing the deep full-width basket: Tilt the basket toward you and lower it toward you. When...
... out of the basket go into place in the top of the slots. Pull the divider forward until it fully close this basket. Open the refrigerator doors. Slide out from verticall to secure. When replacing the deep full-width basket: Tilt the basket toward you and lower it toward you. When...

Use and Care Manual
Page 11
... and Reaching the Power Switch To reach the icemaker power switch, pull the shelf above the ice bin straight out. Check the back of the refrigerator for the specific icemaker kit needed for more than -average water pressure, you close the door. Press the dispenser arm and run 112⁄ ... will stop producing ice. Icemaker Accessory Kit If your model. Locking the Dispenser Press the LOCK pad for how to replace the shelf. A newly installed refrigerator may take 12 to 24 hours to the water supply, set the alarm, press the DOOR ALARM pad. Shelf Ice Bin To access ice. Door...
... and Reaching the Power Switch To reach the icemaker power switch, pull the shelf above the ice bin straight out. Check the back of the refrigerator for the specific icemaker kit needed for more than -average water pressure, you close the door. Press the dispenser arm and run 112⁄ ... will stop producing ice. Icemaker Accessory Kit If your model. Locking the Dispenser Press the LOCK pad for how to replace the shelf. A newly installed refrigerator may take 12 to 24 hours to the water supply, set the alarm, press the DOOR ALARM pad. Shelf Ice Bin To access ice. Door...

Use and Care Manual
Page 12
...cloth. Dry and polish with a soft cloth. Silver-plated plastic parts. Wash parts with a sponge, damp cloth or paper towel. Unplug the refrigerator before cleaning. about a tablespoon (15 ml) of baking soda to the door gaskets at the hinge side. Avoid cleaning cold glass shelves with hot ..., lights or controls. This helps keep the gaskets from sticking and bending out of petroleum jelly to a quart (1 liter) of the refrigerator. Cleaning the Outside The door handles and trim. These may cause them to shatter. Do not use wax on stainless steel cleaner works best...
...cloth. Dry and polish with a soft cloth. Silver-plated plastic parts. Wash parts with a sponge, damp cloth or paper towel. Unplug the refrigerator before cleaning. about a tablespoon (15 ml) of baking soda to the door gaskets at the hinge side. Avoid cleaning cold glass shelves with hot ..., lights or controls. This helps keep the gaskets from sticking and bending out of petroleum jelly to a quart (1 liter) of the refrigerator. Cleaning the Outside The door handles and trim. These may cause them to shatter. Do not use wax on stainless steel cleaner works best...

Use and Care Manual
Page 13
..., have a qualified servicer drain the water supply system (on some models) to prevent serious property damage due to the floor covering or refrigerator. Moving the refrigerator in a side direction may result in . Preparing to Move Secure all loose items such as base grille, shelves and drawers by pushing ...it to prevent damage. Pull the refrigerator straight out and return it straight in damage to flooding. Set the icemaker power switch to the O (off) position and shut off the...
..., have a qualified servicer drain the water supply system (on some models) to prevent serious property damage due to the floor covering or refrigerator. Moving the refrigerator in a side direction may result in . Preparing to Move Secure all loose items such as base grille, shelves and drawers by pushing ...it to prevent damage. Pull the refrigerator straight out and return it straight in damage to flooding. Set the icemaker power switch to the O (off) position and shut off the...

Use and Care Manual
Page 14
...at the bottom. LED Refrigerator Lights (on some models) An authorized technician will need to ...at the back. Unplug the refrigerator. Plug the refrigerator back in . NOTE: Appliance bulbs may be hot. Unplug the refrigerator. To remove, grasp the shield... a light shield. Remove the freezer basket for access. Plug the refrigerator back in . Installation Instructions Consumer Support Troubleshooting Tips 14 Operating Instructions...same or lower wattage, replace the shield and freezer basket. Refrigerator Lights (on some models) CAUTION: Light bulbs may be hot. ...
...at the bottom. LED Refrigerator Lights (on some models) An authorized technician will need to ...at the back. Unplug the refrigerator. Plug the refrigerator back in . NOTE: Appliance bulbs may be hot. Unplug the refrigerator. To remove, grasp the shield... a light shield. Remove the freezer basket for access. Plug the refrigerator back in . Installation Instructions Consumer Support Troubleshooting Tips 14 Operating Instructions...same or lower wattage, replace the shield and freezer basket. Refrigerator Lights (on some models) CAUTION: Light bulbs may be hot. ...

Use and Care Manual
Page 16
...) max 2″ (5.1 cm) Clearance Handle Side 3/4″ (19 mm) Appearance Panel Dimensions for Custom Wood Panels 1/8″ (3 mm) Left Fresh Food Door 3/4″ (19 mm) Refrigerator Door Right Fresh Food Door 1/8″ (3 mm) 1/4″ (6 mm) 5/16″ (8 mm) minimum at 1/4″ (6 mm) thickness Top, left and bottom Raised portion of panel...
...) max 2″ (5.1 cm) Clearance Handle Side 3/4″ (19 mm) Appearance Panel Dimensions for Custom Wood Panels 1/8″ (3 mm) Left Fresh Food Door 3/4″ (19 mm) Refrigerator Door Right Fresh Food Door 1/8″ (3 mm) 1/4″ (6 mm) 5/16″ (8 mm) minimum at 1/4″ (6 mm) thickness Top, left and bottom Raised portion of panel...

Use and Care Manual
Page 17
... have to be removed. • To remove the refrigerator door, see Step 1 in Canada at : www.GEAppliances.ca BEFORE YOU BEGIN Read these instructions with the Consumer. • Note to a cold water line. A GE water supply kit (containing tubing, shut-off valve, fittings and instructions) is... an icemaker, it will not fit through a doorway, the refrigerator door and freezer drawer can be connected to Consumer - Save these instructions for local inspector's use. • IMPORTANT - Call 800.GE.CARES (800.432.2737) or visit our Website at: GEAppliances.com In Canada, call 1.800...
... have to be removed. • To remove the refrigerator door, see Step 1 in Canada at : www.GEAppliances.ca BEFORE YOU BEGIN Read these instructions with the Consumer. • Note to a cold water line. A GE water supply kit (containing tubing, shut-off valve, fittings and instructions) is... an icemaker, it will not fit through a doorway, the refrigerator door and freezer drawer can be connected to Consumer - Save these instructions for local inspector's use. • IMPORTANT - Call 800.GE.CARES (800.432.2737) or visit our Website at: GEAppliances.com In Canada, call 1.800...

Use and Care Manual
Page 18
...-TIP FLOOR BRACKET A Place the anti-tip floor bracket locator template (included inside the anti-tip kit) onto the floor up with this opening where refrigerator will be placed, W. NOTE: • It is REQUIRED to use the anti-tip floor bracket as a template for your configuration and type of... desired. C Hold down in position and use at least 2 screws to Install RH Holes 71⁄4″ Base Bracket on the Refrigerator RH Side of Refrigerator Rear RH Corner of Cabinet Wall Locator Template Sheet B Place the anti-tip floor bracket onto the locator template with its RH floor ...
...-TIP FLOOR BRACKET A Place the anti-tip floor bracket locator template (included inside the anti-tip kit) onto the floor up with this opening where refrigerator will be placed, W. NOTE: • It is REQUIRED to use the anti-tip floor bracket as a template for your configuration and type of... desired. C Hold down in position and use at least 2 screws to Install RH Holes 71⁄4″ Base Bracket on the Refrigerator RH Side of Refrigerator Rear RH Corner of Cabinet Wall Locator Template Sheet B Place the anti-tip floor bracket onto the locator template with its RH floor ...

Use and Care Manual
Page 19
...Drill the recommended size holes for the anchors into the cabinet opening , W. Drill an angled 1/8" pilot hole (approx. C Gently roll the refrigerator back into the concrete at the center of each 1/2" O.D. Wood Preferred Installation - D OPTIONAL: Adjust the rear (and front) wheel height ...anti-tip floor bracket by fastening the 2, or preferably 4, #10-16 hex-head screws tightly into the drilled holes. B Locate the refrigerator's RH side and move back approximately in Step 2. Concrete Floor 3 ANTI-TIP BRACKET INSTALLATION A WOOD Wall and Floor Construction: •...
...Drill the recommended size holes for the anchors into the cabinet opening , W. Drill an angled 1/8" pilot hole (approx. C Gently roll the refrigerator back into the concrete at the center of each 1/2" O.D. Wood Preferred Installation - D OPTIONAL: Adjust the rear (and front) wheel height ...anti-tip floor bracket by fastening the 2, or preferably 4, #10-16 hex-head screws tightly into the drilled holes. B Locate the refrigerator's RH side and move back approximately in Step 2. Concrete Floor 3 ANTI-TIP BRACKET INSTALLATION A WOOD Wall and Floor Construction: •...

Use and Care Manual
Page 20
...will need to Steps 1 through 3 of the door during top cap reinstallation. See Installing the Water Line section. If using GE SmartConnect™ Refrigerator Tubing Kit, you will need an additional tube (WX08X10002) to avoid readjustment of "Reversing the Door Swing" section. NOTE:... If your water supply has sand or particles that TWO PEOPLE move this installation. Installation Instructions INSTALLING THE REFRIGERATOR REFRIGERATOR LOCATION • Do not install the refrigerator where the temperature will go below 60°F (16°C) because it will not run often enough ...
...will need to Steps 1 through 3 of the door during top cap reinstallation. See Installing the Water Line section. If using GE SmartConnect™ Refrigerator Tubing Kit, you will need an additional tube (WX08X10002) to avoid readjustment of "Reversing the Door Swing" section. NOTE:... If your water supply has sand or particles that TWO PEOPLE move this installation. Installation Instructions INSTALLING THE REFRIGERATOR REFRIGERATOR LOCATION • Do not install the refrigerator where the temperature will go below 60°F (16°C) because it will not run often enough ...

Use and Care Manual
Page 21
... (icemaker and dispenser models) Turn the water on your kitchen cabinets. If you are using GE SmartConnect™ tubing, insert the molded end of the tubing into the refrigerator connection, at the shut-off ) position. Roller adjusting screws To adjust the rollers on 21...hex wrench with extension to turn with an icemaker, before plugging in position. Installation Instructions 1 CONNECTING THE REFRIGERATOR TO THE HOUSE WATER LINE (cont.) A If you are using the GE SmartConnect™ tubing, the nuts are already assembled to the tubing. While holding the tubing, tighten the...
... (icemaker and dispenser models) Turn the water on your kitchen cabinets. If you are using GE SmartConnect™ tubing, insert the molded end of the tubing into the refrigerator connection, at the shut-off ) position. Roller adjusting screws To adjust the rollers on 21...hex wrench with extension to turn with an icemaker, before plugging in position. Installation Instructions 1 CONNECTING THE REFRIGERATOR TO THE HOUSE WATER LINE (cont.) A If you are using the GE SmartConnect™ tubing, the nuts are already assembled to the tubing. While holding the tubing, tighten the...
Use and Care Manual
Page 22
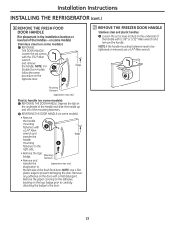
NOTE: Use a flat plastic edge to be tightened or removed, use a 1/4″ Allen wrench. Installation Instructions INSTALLING THE REFRIGERATOR (cont.) 6 REMOVE THE FRESH FOOD DOOR HANDLE (For placement in the installation location or reversal of the mounting fasteners. Remove any adhesive on the underside ...
NOTE: Use a flat plastic edge to be tightened or removed, use a 1/4″ Allen wrench. Installation Instructions INSTALLING THE REFRIGERATOR (cont.) 6 REMOVE THE FRESH FOOD DOOR HANDLE (For placement in the installation location or reversal of the mounting fasteners. Remove any adhesive on the underside ...


