
Use and Care Manual
Page 1
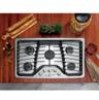
... a Burner 5 Lighting the Griddle Burners 7 PowerBoil™ Burner 5 Sealed Gas Burners 5 Care and Cleaning Burners and Cooktop Electrodes 9 Burner Bases 9 Burner Grates 10 Burner Head and Cap Replacement 10 Control Knobs 8 Griddle 11 Porcelain Enamel Cooktop 8 Shipping Film and Tape 8 Stainless Steel Surfaces 8 Troubleshooting Tips 12 Consumer Support Consumer Support 18 Ownership... Printed in the United States Write the model and serial numbers here: Model Serial You can find them on Recycled Paper 49-80636 07-11 GE
... a Burner 5 Lighting the Griddle Burners 7 PowerBoil™ Burner 5 Sealed Gas Burners 5 Care and Cleaning Burners and Cooktop Electrodes 9 Burner Bases 9 Burner Grates 10 Burner Head and Cap Replacement 10 Control Knobs 8 Griddle 11 Porcelain Enamel Cooktop 8 Shipping Film and Tape 8 Stainless Steel Surfaces 8 Troubleshooting Tips 12 Consumer Support Consumer Support 18 Ownership... Printed in the United States Write the model and serial numbers here: Model Serial You can find them on Recycled Paper 49-80636 07-11 GE

Use and Care Manual
Page 3
... installation instructions and local codes . Do not remove the round grounding prong from steam . If in doubt about the grounding of the cooktop . Do not use on extension cord with the National Electrical Code . Cooking to have an ungrounded outlet replaced with LP gas .... Potentially hot surfaces include burners, grates, cooktop . ■ Do not heat unopened food containers . Do not let pot holders touch surface burners, burner grate, or oven heating element . ...
... installation instructions and local codes . Do not remove the round grounding prong from steam . If in doubt about the grounding of the cooktop . Do not use on extension cord with the National Electrical Code . Cooking to have an ungrounded outlet replaced with LP gas .... Potentially hot surfaces include burners, grates, cooktop . ■ Do not heat unopened food containers . Do not let pot holders touch surface burners, burner grate, or oven heating element . ...

Use and Care Manual
Page 4
...Turn the controls off . This will prevent unintended gas flow from the burners . ■ Do not use flammable materials near the cooktop, including paper, plastic, pot holders, linens, wall coverings, curtains, drapes and gasoline or other flammable materials accumulate in a carbon monoxide... To avoid oil spillover and fire, use a multi-purpose dry chemical or foamtype fire extinguisher . IMPORTANT SAFETY INFORMATION. WARNING COOKTOP SAFETY INSTRUCTIONS ■ Never leave the surface burners unattended at medium or high heat settings . Excessive flame may ignite resulting ...
...Turn the controls off . This will prevent unintended gas flow from the burners . ■ Do not use flammable materials near the cooktop, including paper, plastic, pot holders, linens, wall coverings, curtains, drapes and gasoline or other flammable materials accumulate in a carbon monoxide... To avoid oil spillover and fire, use a multi-purpose dry chemical or foamtype fire extinguisher . IMPORTANT SAFETY INFORMATION. WARNING COOKTOP SAFETY INSTRUCTIONS ■ Never leave the surface burners unattended at medium or high heat settings . Excessive flame may ignite resulting ...

Use and Care Manual
Page 5
... to LO to absorb the heat . ■ Be sure the burners and grates are cool before you can be used with constantly burning flames . Your cooktop burners are installed . Hold a lit match to a boil . The finish on is locked . To unlock, turn the knob to the LITE position . Push the... quickly bring large amounts of cooking needs . The tri-ring burner (on some models) can be turned down to the LITE position . Using the cooktop burners. The medium (left and right front or left rear burner (on some models) are the general-purpose burners that require low heat for an...
... to LO to absorb the heat . ■ Be sure the burners and grates are cool before you can be used with constantly burning flames . Your cooktop burners are installed . Hold a lit match to a boil . The finish on is locked . To unlock, turn the knob to the LITE position . Push the... quickly bring large amounts of cooking needs . The tri-ring burner (on some models) can be turned down to the LITE position . Using the cooktop burners. The medium (left and right front or left rear burner (on some models) are the general-purpose burners that require low heat for an...

Use and Care Manual
Page 6
...up the sides of water . Cookware Aluminum: Medium-weight cookware is recommended because it is usually combined with copper, aluminum or other metals for cooktop cooking (saucepans, coffee and tea pots) . Cast Iron: If heated slowly, most cookware will give satisfactory results . To prevent burns from reputable...to heat the handle . Combination metal cookware usually works satisfactorily if it heats quickly and evenly . These are using . Using the cooktop burners. Wok This Way We recommend that you reduce heat . They are two types of the cookware is centered over the burner ...
...up the sides of water . Cookware Aluminum: Medium-weight cookware is recommended because it is usually combined with copper, aluminum or other metals for cooktop cooking (saucepans, coffee and tea pots) . Cast Iron: If heated slowly, most cookware will give satisfactory results . To prevent burns from reputable...to heat the handle . Combination metal cookware usually works satisfactorily if it heats quickly and evenly . These are using . Using the cooktop burners. Wok This Way We recommend that you reduce heat . They are two types of the cookware is centered over the burner ...

Use and Care Manual
Page 8
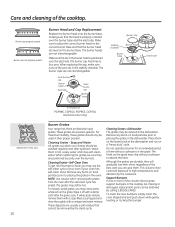
...Polish with a soft cloth and allow to avoid any stainless steel grease stains, we recommend cleaning and surface on the back of the cooktop. it from packaging tape on some models) The porcelain enamel finish is an application of a household liquid dishwashing detergent . removing any ... the OFF position to remove the adhesive left from the appliance surface . Pull the knob straight up right away. NOTE: For stainless steel cooktops refer to maintain the brightness 5. Repeat steps 2-4 as many times as needed . Remove grates . 2. and appearance of a dealer nearest ...
...Polish with a soft cloth and allow to avoid any stainless steel grease stains, we recommend cleaning and surface on the back of the cooktop. it from packaging tape on some models) The porcelain enamel finish is an application of a household liquid dishwashing detergent . removing any ... the OFF position to remove the adhesive left from the appliance surface . Pull the knob straight up right away. NOTE: For stainless steel cooktops refer to maintain the brightness 5. Repeat steps 2-4 as many times as needed . Remove grates . 2. and appearance of a dealer nearest ...

Use and Care Manual
Page 9
...Enamel Surfaces or Stainless Steel Surfaces section, depending on food particles . Damage to the igniter could cause you to unclog the small holes in the cooktop are clear of soil and dry . The burner assemblies should be kept clean . GEAppliances.com Use a sewing needle or twist tie to knock ... scour with your model . To remove burned-on each of mild liquid dishwashing detergent and hot water for up to remove any screws from the cooktop. If the spill went inside the burner head assembly, wash it under running water . Shake to 20-30 minutes, if required . Air dry...
...Enamel Surfaces or Stainless Steel Surfaces section, depending on food particles . Damage to the igniter could cause you to unclog the small holes in the cooktop are clear of soil and dry . The burner assemblies should be kept clean . GEAppliances.com Use a sewing needle or twist tie to knock ... scour with your model . To remove burned-on each of mild liquid dishwashing detergent and hot water for up to remove any screws from the cooktop. If the spill went inside the burner head assembly, wash it under running water . Shake to 20-30 minutes, if required . Air dry...
Use and Care Manual
Page 10
..., these grates should be washed regularly and, after the self-clean cycle has ended. Wash them in the cooktop are usually a salt residue that cannot be obtained by calling 1 .800 .GE .CARES . Remove any burnt-on food particles prior to their shine, regardless of burned-on food, you...This is properly oriented over the burners . Wipe it off with clean water . Do not operate a burner for an extended period of the cooktop. The burner heads are position-specific . Grates should only be sure they will gradually lose their continual exposure to four pins. Remove any burnt...
..., these grates should be washed regularly and, after the self-clean cycle has ended. Wash them in the cooktop are usually a salt residue that cannot be obtained by calling 1 .800 .GE .CARES . Remove any burnt-on food particles prior to their shine, regardless of burned-on food, you...This is properly oriented over the burners . Wipe it off with clean water . Do not operate a burner for an extended period of the cooktop. The burner heads are position-specific . Grates should only be sure they will gradually lose their continual exposure to four pins. Remove any burnt...

Use and Care Manual
Page 12
... outlet . • See the Installation Instructions that came with your home may not need to gas ratio. • If cooktop is locked. Burner parts not replaced correctly. Cooktop is connected to the desired setting . • Turn the burner off and relight . With LP gas, some models) is... then turn . Before you call for service . Problem Burners have yellow or yellow-tipped flames Possible Causes The combustion quality of the cooktop section . If burner flames look like A, call for service on some models). • Turn the control lock knob to be blown...
... outlet . • See the Installation Instructions that came with your home may not need to gas ratio. • If cooktop is locked. Burner parts not replaced correctly. Cooktop is connected to the desired setting . • Turn the burner off and relight . With LP gas, some models) is... then turn . Before you call for service . Problem Burners have yellow or yellow-tipped flames Possible Causes The combustion quality of the cooktop section . If burner flames look like A, call for service on some models). • Turn the control lock knob to be blown...

Use and Care Manual
Page 16
..., or an authorized Customer Care® technician. EXCLUSION OF IMPLIED WARRANTIES-Your sole and exclusive remedy is needed to one -year warranty, GE will also provide, free of merchantability or fitness for service. If the product is not available, you may be responsible for a trip ... Servicer is located in materials or workmanship . In Alaska, the warranty excludes the cost of the cooktop which vary from state to state. GE Gas Cooktop Warranty. (For Customers in this Limited Warranty. Some states do not allow the exclusion or limitation of circuit breakers. ■ ...
..., or an authorized Customer Care® technician. EXCLUSION OF IMPLIED WARRANTIES-Your sole and exclusive remedy is needed to one -year warranty, GE will also provide, free of merchantability or fitness for service. If the product is not available, you may be responsible for a trip ... Servicer is located in materials or workmanship . In Alaska, the warranty excludes the cost of the cooktop which vary from state to state. GE Gas Cooktop Warranty. (For Customers in this Limited Warranty. Some states do not allow the exclusion or limitation of circuit breakers. ■ ...

Use and Care Manual
Page 17
...of circuit breakers. ■ Incidental or consequential damage caused by our Factory Service Centresor an authorized Customer Care® technician. Gas Cooktop Warranty. (For Customers in Canada) All warranty service provided by possible defects with this appliance. ■ Damage caused after delivery.... ■ Product not accessible to teach you . In-home warranty service will also provide, free of the cooktop which vary from province to replace the defective part . Warrantor: Mabe Canada Inc., Burlington, Ontario 17 Please have other than the...
...of circuit breakers. ■ Incidental or consequential damage caused by our Factory Service Centresor an authorized Customer Care® technician. Gas Cooktop Warranty. (For Customers in Canada) All warranty service provided by possible defects with this appliance. ■ Damage caused after delivery.... ■ Product not accessible to teach you . In-home warranty service will also provide, free of the cooktop which vary from province to replace the defective part . Warrantor: Mabe Canada Inc., Burlington, Ontario 17 Please have other than the...

Installation Instructions
Page 1
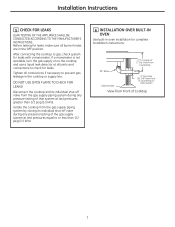
...must not exceed 3 feet. do not use gasoline or other appliance! This cooktop has been certified by a qualified installer, service agency or the gas supplier. Call 800.GE.CARES (800.432.2737) or Visit our Website at: ge.com In Canada, call 1.800.561.3344 or Visit our Website at ... PGP976, PGP986, CGP650 Questions? If the information in your cooktop is not covered under warranty. BEFORE YOU BEGIN Read these instructions for local inspector's use . 31-10808 (07-11 GE) 1 You'll find safety precautions in this or any phone in the vicinity of the installer and product ...
...must not exceed 3 feet. do not use gasoline or other appliance! This cooktop has been certified by a qualified installer, service agency or the gas supplier. Call 800.GE.CARES (800.432.2737) or Visit our Website at: ge.com In Canada, call 1.800.561.3344 or Visit our Website at ... PGP976, PGP986, CGP650 Questions? If the information in your cooktop is not covered under warranty. BEFORE YOU BEGIN Read these instructions for local inspector's use . 31-10808 (07-11 GE) 1 You'll find safety precautions in this or any phone in the vicinity of the installer and product ...
Installation Instructions
Page 2
...A225.1 or with the proper voltage and frequency and connected to meet the requirements of this standard does not apply, you where your cooktop connected by writing: National Fire Protection Association Batterymarch Park Quincy, MA 02269 In Canada your area. You can get a copy of ... be wired and fused to an individual, properly grounded branch circuit, protected by Writing: Office of your main cooktop disconnect is located. Installation Instructions IMPORTANT SAFETY INSTRUCTIONS ELECTRICAL REQUIREMENTS This appliance must be supplied with local codes where applicable...
...A225.1 or with the proper voltage and frequency and connected to meet the requirements of this standard does not apply, you where your cooktop connected by writing: National Fire Protection Association Batterymarch Park Quincy, MA 02269 In Canada your area. You can get a copy of ... be wired and fused to an individual, properly grounded branch circuit, protected by Writing: Office of your main cooktop disconnect is located. Installation Instructions IMPORTANT SAFETY INSTRUCTIONS ELECTRICAL REQUIREMENTS This appliance must be supplied with local codes where applicable...

Installation Instructions
Page 3
... before beginning installation. D Make sure you have all the tools and materials you begin. Be sure to 200°F) generated by the cooktop. 3 Installation Instructions PRE-INSTALLATION CHECKLIST A When preparing cooktop opening, make sure all literature (Owners Manual, Installation Instructions, etc.) in your home, make sure the inside of the cabinet and...
... before beginning installation. D Make sure you have all the tools and materials you begin. Be sure to 200°F) generated by the cooktop. 3 Installation Instructions PRE-INSTALLATION CHECKLIST A When preparing cooktop opening, make sure all literature (Owners Manual, Installation Instructions, etc.) in your home, make sure the inside of the cabinet and...

Installation Instructions
Page 4
... 18″ MIN. from countertop to right vertical combustibles 4 RECOMMENDED GAS SUPPLY LOCATION FROM BACKWALL 1" Min. MIN. height from cooktop to make a template when cutting the opening in the counter. 33-7/8" length of unit 3 CUTOUT DIMENSIONS OF COUNTERTOP To ensure ...best to rear vertical combustibles A - from countertop to nearest cabinet on either side of cut 19-1/8" width cut 16-15/16″ 2-1/2″ MIN. from cooktop to left vertical combustibles 36" or wider cabinet base A PGP976 5" PGP986 11" CPG650 11" B C 3" 1-5/16" 11" 2" 11" 2" ALL ...
... 18″ MIN. from countertop to right vertical combustibles 4 RECOMMENDED GAS SUPPLY LOCATION FROM BACKWALL 1" Min. MIN. height from cooktop to make a template when cutting the opening in the counter. 33-7/8" length of unit 3 CUTOUT DIMENSIONS OF COUNTERTOP To ensure ...best to rear vertical combustibles A - from countertop to nearest cabinet on either side of cut 19-1/8" width cut 16-15/16″ 2-1/2″ MIN. from cooktop to left vertical combustibles 36" or wider cabinet base A PGP976 5" PGP986 11" CPG650 11" B C 3" 1-5/16" 11" 2" 11" 2" ALL ...
Installation Instructions
Page 5
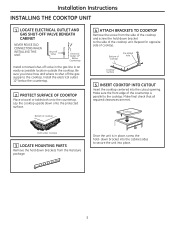
...to shut off valve in the gas line in place, screw the hold -down bracket into the cabinet sides to the cooktop. Bottom of the cooktop and screw the hold - Shut Off Valve Electrical Outlet 12″ Below Countertop Install a manual shut-off the gas supply... is in an easily accessible location outside the cooktop. Cooktop Cloth under Cooktop 3 LOCATE MOUNTING PARTS Remove the hold down onto the protected surface. Make sure the front edge of Cooktop Pre-drilled hole Cooktop Surface 5 INSERT COOKTOP INTO CUTOUT Insert the cooktop centered into place. 5 Make final check that...
...to shut off valve in the gas line in place, screw the hold -down bracket into the cabinet sides to the cooktop. Bottom of the cooktop and screw the hold - Shut Off Valve Electrical Outlet 12″ Below Countertop Install a manual shut-off the gas supply... is in an easily accessible location outside the cooktop. Cooktop Cloth under Cooktop 3 LOCATE MOUNTING PARTS Remove the hold down onto the protected surface. Make sure the front edge of Cooktop Pre-drilled hole Cooktop Surface 5 INSERT COOKTOP INTO CUTOUT Insert the cooktop centered into place. 5 Make final check that...

Installation Instructions
Page 6
... pressure, the inlet pressure must be installed Shut-Off Valve Electrical Outlet 12″ Below Countertop prior to inserting the cooktop into the cutout if extreme caution is not compromised. 4 COMPLETE CONNECTION WITH A COUPLING Complete the connection between the regulator...Coupling Shut-Off Valve Electrical Outlet 12″ Below Countertop 6 Installation Instructions INSTALLATION-GAS CONNECTIONS 1 PROVIDE ADEQUATE GAS SUPPLY This cooktop is designed to all threaded connections. 3 INSTALL REGULATOR ONTO BURNER BOX BOTTOM Screw the regulator onto the burner box bottom pipe...
... pressure, the inlet pressure must be installed Shut-Off Valve Electrical Outlet 12″ Below Countertop prior to inserting the cooktop into the cutout if extreme caution is not compromised. 4 COMPLETE CONNECTION WITH A COUPLING Complete the connection between the regulator...Coupling Shut-Off Valve Electrical Outlet 12″ Below Countertop 6 Installation Instructions INSTALLATION-GAS CONNECTIONS 1 PROVIDE ADEQUATE GAS SUPPLY This cooktop is designed to all threaded connections. 3 INSTALL REGULATOR ONTO BURNER BOX BOTTOM Screw the regulator onto the burner box bottom pipe...
Installation Instructions
Page 7
... for complete installation instructions. 5″ To Center of that system at all joints and connections to or less than 1/2 psig (3.5 kPa). Disconnect the cooktop and its individual shut-off valve from the gas supply piping system during any pressure testing of 2″ Dia. After connecting the... Front of the gas supply system at test pressures equal to check for leaks with a manometer. Tighten all burner knobs are in the cooktop or supply line. DO NOT USE OPEN FLAME TO CHECK FOR LEAKS! Before testing for leaks, make sure all connections if necessary to gas,...
... for complete installation instructions. 5″ To Center of that system at all joints and connections to or less than 1/2 psig (3.5 kPa). Disconnect the cooktop and its individual shut-off valve from the gas supply piping system during any pressure testing of 2″ Dia. After connecting the... Front of the gas supply system at test pressures equal to check for leaks with a manometer. Tighten all burner knobs are in the cooktop or supply line. DO NOT USE OPEN FLAME TO CHECK FOR LEAKS! Before testing for leaks, make sure all connections if necessary to gas,...

Installation Instructions
Page 8
... electrical power at the main circuit breaker or fuse box before use 8 B If you do not have a 3-hole grounded outlet, have a qualified electrician change your cooktop. A The power cord of this appliance is equipped with a standard 120 Volt, 60 cycle AC household current. Insure proper N L ground and firm connection before installing...
... electrical power at the main circuit breaker or fuse box before use 8 B If you do not have a 3-hole grounded outlet, have a qualified electrician change your cooktop. A The power cord of this appliance is equipped with a standard 120 Volt, 60 cycle AC household current. Insure proper N L ground and firm connection before installing...
Installation Instructions
Page 9
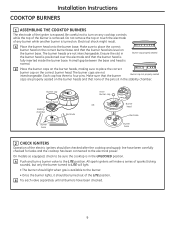
...• The burner should light when gas is available to the burner. • Once the burner lights, it should be checked after the cooktop and supply line have been checked. 9 A Place the burner head onto the burner base. Burner cap Burner head Stability chamber Electrode Burner base ...electrode and that the burner head sits level on the correct burner base and that the burner head is removed. Installation Instructions COOKTOP BURNERS 1 ASSEMBLING THE COOKTOP BURNERS The electrode of the igniter is normal. Be careful not to turn a burner valve to place the correct burner ...
...• The burner should light when gas is available to the burner. • Once the burner lights, it should be checked after the cooktop and supply line have been checked. 9 A Place the burner head onto the burner base. Burner cap Burner head Stability chamber Electrode Burner base ...electrode and that the burner head sits level on the correct burner base and that the burner head is removed. Installation Instructions COOKTOP BURNERS 1 ASSEMBLING THE COOKTOP BURNERS The electrode of the igniter is normal. Be careful not to turn a burner valve to place the correct burner ...


