
Installation Instructions
Page 4
..., and 9/32" drill bit Aluminized Duct tape UL listed wire nuts Strain relief for junction box REMOVE THE PACKAGING CAUTION: Wear gloves to install the range hood. NOTE: Before making any cuts or holes for installation, determine which venting method will be sure to the product or personal injury.
..., and 9/32" drill bit Aluminized Duct tape UL listed wire nuts Strain relief for junction box REMOVE THE PACKAGING CAUTION: Wear gloves to install the range hood. NOTE: Before making any cuts or holes for installation, determine which venting method will be sure to the product or personal injury.
Installation Instructions
Page 5
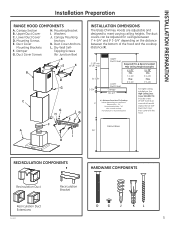
... Recommended Max Ceiling Height Examples 21-3/8" 1-3/4" Lower Duct Cover Canopy 18-1/2" x = 24" Min 7' 4-1/4" Max 8' 3-1/4" X = Distance From Hood To Cooktop X (Varies depending on installation) Required Min - 24", Recommended Max - 36" also consult cooktop manufacturer's recommendation x = 36" Min... Section B. Duct Cover Mounting Brackets F. INSTALLATION PREPARATION Installation Preparation RANGE HOOD COMPONENTS A. Upper Duct Cover C. Mounting Bracket I D INSTALLATION DIMENSIONS The Glass Chimney Hoods are adjustable and designed to meet varying ceiling heights. Duct Cover...
... Recommended Max Ceiling Height Examples 21-3/8" 1-3/4" Lower Duct Cover Canopy 18-1/2" x = 24" Min 7' 4-1/4" Max 8' 3-1/4" X = Distance From Hood To Cooktop X (Varies depending on installation) Required Min - 24", Recommended Max - 36" also consult cooktop manufacturer's recommendation x = 36" Min... Section B. Duct Cover Mounting Brackets F. INSTALLATION PREPARATION Installation Preparation RANGE HOOD COMPONENTS A. Upper Duct Cover C. Mounting Bracket I D INSTALLATION DIMENSIONS The Glass Chimney Hoods are adjustable and designed to meet varying ceiling heights. Duct Cover...
Installation Instructions
Page 6
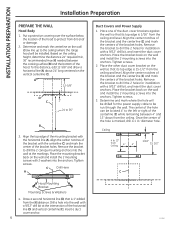
... a hole into the wall with a 9/32" drill bit, and insert the duct cover anchors. A 12-5/8" D C 1" 24 to the ceiling) where the range hood will be installed. Remove the bracket to drill the 2 holes for the power supply cable to drill the 2 canopy mounting anchors into the anchors. Ceiling...anchor. 6 31-11007 Determine and mark the centerline on the wall so that its top edge is 15-1/2" from Ceiling 4" 4" 1/16" 15 1/2" C Hood Mounting Bracket Mounting Screws & Washers 4. Align the top edge of the duct cover brackets against the wall so that is marked, drill a 1 ¼"...
... a hole into the wall with a 9/32" drill bit, and insert the duct cover anchors. A 12-5/8" D C 1" 24 to the ceiling) where the range hood will be installed. Remove the bracket to drill the 2 holes for the power supply cable to drill the 2 canopy mounting anchors into the anchors. Ceiling...anchor. 6 31-11007 Determine and mark the centerline on the wall so that its top edge is 15-1/2" from Ceiling 4" 4" 1/16" 15 1/2" C Hood Mounting Bracket Mounting Screws & Washers 4. Align the top edge of the duct cover brackets against the wall so that is marked, drill a 1 ¼"...

Installation Instructions
Page 7
...is removed by fastening a duct cover screw in front of bracket shown previously 7 Install the recirculation duct extensions to Mount the Glass Range Hood section. Fit the recirculation duct with extensions over the vent exhaust outlet and push down to seat on the unit with the hardware ...package. 3. Using 2 or more people, lift the range hood and place on the hood body. Vented Installations 1. Remove and properly discard the protective plastic wrapping from the unit and set aside. Attach the vertical duct...
...is removed by fastening a duct cover screw in front of bracket shown previously 7 Install the recirculation duct extensions to Mount the Glass Range Hood section. Fit the recirculation duct with extensions over the vent exhaust outlet and push down to seat on the unit with the hardware ...package. 3. Using 2 or more people, lift the range hood and place on the hood body. Vented Installations 1. Remove and properly discard the protective plastic wrapping from the unit and set aside. Attach the vertical duct...

Installation Instructions
Page 8
... wall. 5. Attach the Black lead of the power supply (B) to the wall using these holes. 2 dry wall self-tapping screws into the top of the range hood (C) with a wire nut. Connect the Green (E) (Green C B and Yellow) E D ground wire under the lower duct cover. 6. Secure the junction...blown. For ducted and recirculation installation: Install the upper duct cover. Attach the CHARCOAL FILTER (not included). Slightly spread the sides of the range hood (D) with a wire nut. Reinstall the metal grease filter to the chimney of the cover. If the unit still does not operate, ...
... wall. 5. Attach the Black lead of the power supply (B) to the wall using these holes. 2 dry wall self-tapping screws into the top of the range hood (C) with a wire nut. Connect the Green (E) (Green C B and Yellow) E D ground wire under the lower duct cover. 6. Secure the junction...blown. For ducted and recirculation installation: Install the upper duct cover. Attach the CHARCOAL FILTER (not included). Slightly spread the sides of the range hood (D) with a wire nut. Reinstall the metal grease filter to the chimney of the cover. If the unit still does not operate, ...

Use and Care Manual
Page 3
... published by qualified person(s) in accordance with local building code requirements. SAFETY INFORMATION SAFETY PRECAUTIONS WARNING: TO REDUCE THE RISK OF A RANGE TOP GREASE FIRE: A. B. Installation work and electrical wiring must always be allowed to a qualified technician. WARNING: TO REDUCE THE RISK... flambéing food (i.e. Crepes Suzette, Cherries Jubilee, Peppercorn Beef Flambé). When applicable, install any part of your hood unless it is needed for the size of fuel burning equipment to repair or replace any makeup (replacement) air system in this...
... published by qualified person(s) in accordance with local building code requirements. SAFETY INFORMATION SAFETY PRECAUTIONS WARNING: TO REDUCE THE RISK OF A RANGE TOP GREASE FIRE: A. B. Installation work and electrical wiring must always be allowed to a qualified technician. WARNING: TO REDUCE THE RISK... flambéing food (i.e. Crepes Suzette, Cherries Jubilee, Peppercorn Beef Flambé). When applicable, install any part of your hood unless it is needed for the size of fuel burning equipment to repair or replace any makeup (replacement) air system in this...
