
Quick Specs
Page 1
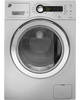
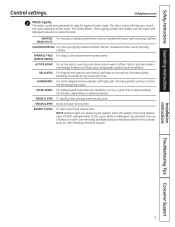
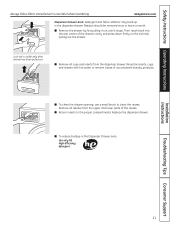
Capacity Frontload Washer with Stainless Steel Basket Dimensions and Installation Information (in inches) Installation Information: For complete information, see installation instructions packed with your washer. 23 1/2" WRINKLE FREE COLORS / NORMAL ACTIVE WEAR WHITES / HEAVY DUTY DELICATES HAND WASH ...TO LOCK & UNLOCK CONTROL PANEL 26 5/8" 33 5/16" For answers to your Monogram,® GE Profile™ or GE® appliance questions, visit our website at ge.com or call GE Answer Center® service, 800.626.2000. Ft. Listed by Underwriters Laboratories Specification Revised 2/...
Capacity Frontload Washer with Stainless Steel Basket Dimensions and Installation Information (in inches) Installation Information: For complete information, see installation instructions packed with your washer. 23 1/2" WRINKLE FREE COLORS / NORMAL ACTIVE WEAR WHITES / HEAVY DUTY DELICATES HAND WASH ...TO LOCK & UNLOCK CONTROL PANEL 26 5/8" 33 5/16" For answers to your Monogram,® GE Profile™ or GE® appliance questions, visit our website at ge.com or call GE Answer Center® service, 800.626.2000. Ft. Listed by Underwriters Laboratories Specification Revised 2/...
Use and Care Manual
Page 2
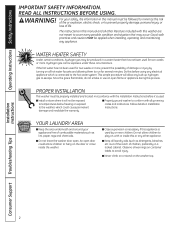
...and situation that has not been used . ■ Install or store where it is connected to escape. WARNING! This simple procedure will not be produced in Installation Instructions. READ ALL INSTRUCTIONS BEFORE USING. Good, safe practices and caution MUST be... process. An open . WATER HEATER SAFETY Under certain conditions, hydrogen gas may occur. Installation Instructions Consumer Support Troubleshooting Tips 2 Operating Instructions Safety Instructions IMPORTANT SAFETY INFORMATION. For your appliances free of life. Since the gas is used for several minutes...
...and situation that has not been used . ■ Install or store where it is connected to escape. WARNING! This simple procedure will not be produced in Installation Instructions. READ ALL INSTRUCTIONS BEFORE USING. Good, safe practices and caution MUST be... process. An open . WATER HEATER SAFETY Under certain conditions, hydrogen gas may occur. Installation Instructions Consumer Support Troubleshooting Tips 2 Operating Instructions Safety Instructions IMPORTANT SAFETY INFORMATION. For your appliances free of life. Since the gas is used for several minutes...
Use and Care Manual
Page 3
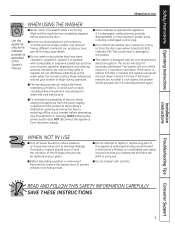
... a washer, or removing it is explode. To avoid such a result, carefully follow the garment manufacturer's wash and care instructions. ■ To minimize the possibility of 3 times. NOTE: Pressing the power button does NOT disconnect the appliance from hiding... wash or dry articles that you understand and have been the washer. SAVE THESE INSTRUCTIONS Troubleshooting Tips Consumer Support 3 indicator ON). Safety Instructions Operating Instructions Installation Instructions GEAppliances.com WHEN USING THE WASHER Use this appliance only for 2 minutes to cool...
... a washer, or removing it is explode. To avoid such a result, carefully follow the garment manufacturer's wash and care instructions. ■ To minimize the possibility of 3 times. NOTE: Pressing the power button does NOT disconnect the appliance from hiding... wash or dry articles that you understand and have been the washer. SAVE THESE INSTRUCTIONS Troubleshooting Tips Consumer Support 3 indicator ON). Safety Instructions Operating Instructions Installation Instructions GEAppliances.com WHEN USING THE WASHER Use this appliance only for 2 minutes to cool...
Use and Care Manual
Page 4
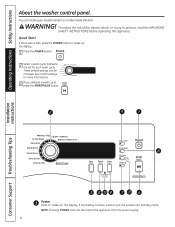
These default settings can locate your model number on a label inside the door. See Control settings for each wash cycle. Installation Instructions Consumer Support Troubleshooting Tips 1 Power Press to "wake up " the display. NOTE: Pressing POWER does not disconnect the appliance... a wash cycle. (Defaults are set for more information.) 3 If you selected a wash cycle, press the START/PAUSE button. Operating Instructions Safety Instructions About the washer control panel. You can be changed. Quick Start If the screen is active, press to persons, read the IMPORTANT SAFETY...
These default settings can locate your model number on a label inside the door. See Control settings for each wash cycle. Installation Instructions Consumer Support Troubleshooting Tips 1 Power Press to "wake up " the display. NOTE: Pressing POWER does not disconnect the appliance... a wash cycle. (Defaults are set for more information.) 3 If you selected a wash cycle, press the START/PAUSE button. Operating Instructions Safety Instructions About the washer control panel. You can be changed. Quick Start If the screen is active, press to persons, read the IMPORTANT SAFETY...
Use and Care Manual
Page 5
Safety Instructions Operating Instructions Control settings. Provides gentle tumbling and soak during wash and rinse. SPEED WASH For lightly soiled items that are optimized for specific types of bleach ... and play clothes. Provides gentle rocking to clean the load. Cycle time is a special cycle used to this purpose, such as spandex, stretch and microfibers. Installation Instructions Troubleshooting Tips Consumer Support 5 The Gentle Wash™ lifters lightly tumble the clothes into the water and detergent solution to mimic the handwashing action. WHITES...
Safety Instructions Operating Instructions Control settings. Provides gentle tumbling and soak during wash and rinse. SPEED WASH For lightly soiled items that are optimized for specific types of bleach ... and play clothes. Provides gentle rocking to clean the load. Cycle time is a special cycle used to this purpose, such as spandex, stretch and microfibers. Installation Instructions Troubleshooting Tips Consumer Support 5 The Gentle Wash™ lifters lightly tumble the clothes into the water and detergent solution to mimic the handwashing action. WHITES...

Use and Care Manual
Page 6
... the cycles. NOTE: In some fabrics. 5 Wash Temp Adjust to help reduce dry time, but may hear the door lock and unlock before water flows; Installation Instructions Consumer Support Troubleshooting Tips 6 Higher spin speeds are not available on some cases the washer will be used to add garments during a cycle. The Sanitized...
... the cycles. NOTE: In some fabrics. 5 Wash Temp Adjust to help reduce dry time, but may hear the door lock and unlock before water flows; Installation Instructions Consumer Support Troubleshooting Tips 6 Higher spin speeds are not available on some cases the washer will be used to add garments during a cycle. The Sanitized...
Use and Care Manual
Page 7
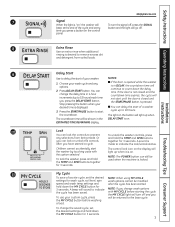
... at the end of the cycle and every button and the light will go off and you change wash options with this option selected. Installation Instructions Troubleshooting Tips Consumer Support 9 Delay Start Use to indicate the lock/unlock status. Press the START/PAUSE button to the base cycle. the...SPIN buttons together for 3 seconds. To lock the washer, press and hold the TEMP and SPIN buttons you have started . Safety Instructions Operating Instructions GEAppliances.com 7 Signal When the light is "on," the washer will To turn off . time you press the DELAY START button.
... at the end of the cycle and every button and the light will go off and you change wash options with this option selected. Installation Instructions Troubleshooting Tips Consumer Support 9 Delay Start Use to indicate the lock/unlock status. Press the START/PAUSE button to the base cycle. the...SPIN buttons together for 3 seconds. To lock the washer, press and hold the TEMP and SPIN buttons you have started . Safety Instructions Operating Instructions GEAppliances.com 7 Signal When the light is "on," the washer will To turn off . time you press the DELAY START button.

Use and Care Manual
Page 8
... not exceed the maximum fill line. Detergent Cup - After adding laundry products, slowly close the dispenser drawer. Do not exceed the maximum fill line. Operating Instructions Safety Instructions Installation Instructions About the washer features. NOTE: Do not pour fabric softener directly on the clothes. Use for Liquid Detergent Detergent Cavity -
... not exceed the maximum fill line. Detergent Cup - After adding laundry products, slowly close the dispenser drawer. Do not exceed the maximum fill line. Operating Instructions Safety Instructions Installation Instructions About the washer features. NOTE: Do not pour fabric softener directly on the clothes. Use for Liquid Detergent Detergent Cavity -
Use and Care Manual
Page 9
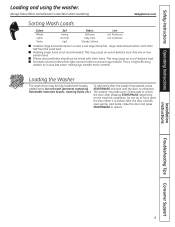
Load large items first. This may take up to 30 seconds to restart. Installation Instructions Troubleshooting Tips Consumer Support 9 Safety Instructions Operating Instructions Loading and using the washer. The washer may cause an out-of -balance load. ■ Sort dark-colored clothes from light-colored clothes to force ...
Load large items first. This may take up to 30 seconds to restart. Installation Instructions Troubleshooting Tips Consumer Support 9 Safety Instructions Operating Instructions Loading and using the washer. The washer may cause an out-of -balance load. ■ Sort dark-colored clothes from light-colored clothes to force ...
Use and Care Manual
Page 10
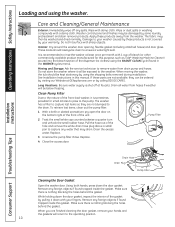
...are not available, they are not dumped to the weather. Long Vacations: Be sure water supply is not covered by calling 800.GE.CARES. The washer has a filter to the operating position. 10 Close the access door. Interior: Dry around the washer door ... Exterior: Immediately wipe off at faucets. Washer control panel and finishes may be washed and dried normally. See Installation Instructions in the WASHER cycles menu). Pump Filter Installation Instructions Consumer Support Troubleshooting Tips Drain Hose Drain Plug Pump Filter Cleaning the Door Gasket Open the washer door.
...are not available, they are not dumped to the weather. Long Vacations: Be sure water supply is not covered by calling 800.GE.CARES. The washer has a filter to the operating position. 10 Close the access door. Interior: Dry around the washer door ... Exterior: Immediately wipe off at faucets. Washer control panel and finishes may be washed and dried normally. See Installation Instructions in the WASHER cycles menu). Pump Filter Installation Instructions Consumer Support Troubleshooting Tips Drain Hose Drain Plug Pump Filter Cleaning the Door Gasket Open the washer door.
Use and Care Manual
Page 11
...proper compartments. Lock tab is visible only after drawer has been pulled out ■ Remove all residue from the dispenser drawer. Installation Instructions Troubleshooting Tips Consumer Support 11 Residue should be removed once or twice a month. ■ Remove the drawer by first pulling ...it out until it stops. Safety Instructions Operating Instructions Always follow fabric manufacturer's care label when laundering. Replace the dispenser drawer. ■ To reduce buildup in the dispenser drawer...
...proper compartments. Lock tab is visible only after drawer has been pulled out ■ Remove all residue from the dispenser drawer. Installation Instructions Troubleshooting Tips Consumer Support 11 Residue should be removed once or twice a month. ■ Remove the drawer by first pulling ...it out until it stops. Safety Instructions Operating Instructions Always follow fabric manufacturer's care label when laundering. Replace the dispenser drawer. ■ To reduce buildup in the dispenser drawer...
Use and Care Manual
Page 12
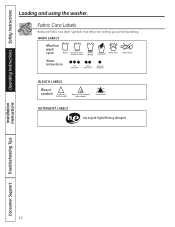
Operating Instructions Safety Instructions Loading and using the washer. Installation Instructions Consumer Support Troubleshooting Tips 12 Fabric Care Labels Below are fabric care label "symbols" that affect the clothing you will be laundering. WASH LABELS Machine wash cycle Normal Permanent Press/ wrinkle resistant Gentle/ delicate Hand wash Do not wash Do not wring BLEACH LABELS Bleach symbols Any bleach (when needed) Only non-chlorine bleach (when needed) Do not bleach DETERGENT LABELS Use only HE High-Efficiency detergent.
Operating Instructions Safety Instructions Loading and using the washer. Installation Instructions Consumer Support Troubleshooting Tips 12 Fabric Care Labels Below are fabric care label "symbols" that affect the clothing you will be laundering. WASH LABELS Machine wash cycle Normal Permanent Press/ wrinkle resistant Gentle/ delicate Hand wash Do not wash Do not wring BLEACH LABELS Bleach symbols Any bleach (when needed) Only non-chlorine bleach (when needed) Do not bleach DETERGENT LABELS Use only HE High-Efficiency detergent.

Use and Care Manual
Page 13
...; IMPORTANT - Observe all governing codes and ordinances. • Note to water/weather. Be sure to improper installation is not covered under the Warranty. Installation Instructions Washer WCVH4800 and WCVH4815 If you have any questions, call 800.GE.CARES (800.432.2737) or visit our Website at: GEAppliances.com In Canada, call 1.800.561.3344...
...; IMPORTANT - Observe all governing codes and ordinances. • Note to water/weather. Be sure to improper installation is not covered under the Warranty. Installation Instructions Washer WCVH4800 and WCVH4815 If you have any questions, call 800.GE.CARES (800.432.2737) or visit our Website at: GEAppliances.com In Canada, call 1.800.561.3344...
Use and Care Manual
Page 14
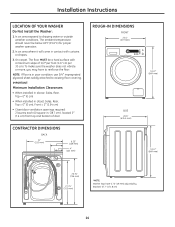
The floor MUST be below 60°F (15.6°C) for proper washer operation. 2. IMPORTANT: Minimum Installation Clearances • When installed in alcove: Sides, Rear, Top = 0″ (0 cm) • When installed in closet: Sides, Rear, Top = 0″ (0 cm), Front = 1″ (2.54 cm) • Closet ...(756 mm) 27.75" (705 mm) *NOTE: Washer legs have to dripping water or outside weather conditions. Installation Instructions LOCATION OF YOUR WASHER Do Not Install the Washer: 1. On carpet. The ambient temperature should never be a hard surface with curtains or drapes. 3.
The floor MUST be below 60°F (15.6°C) for proper washer operation. 2. IMPORTANT: Minimum Installation Clearances • When installed in alcove: Sides, Rear, Top = 0″ (0 cm) • When installed in closet: Sides, Rear, Top = 0″ (0 cm), Front = 1″ (2.54 cm) • Closet ...(756 mm) 27.75" (705 mm) *NOTE: Washer legs have to dripping water or outside weather conditions. Installation Instructions LOCATION OF YOUR WASHER Do Not Install the Washer: 1. On carpet. The ambient temperature should never be a hard surface with curtains or drapes. 3.
Use and Care Manual
Page 15
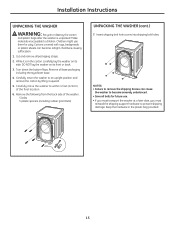
... shipping support hardware to children. While it upward. 5. Carefully move the washer to an upright position and remove the carton by lifting it is unpacked. Installation Instructions UNPACKING THE WASHER WARNING: Recycle or destroy the carton and plastic bags after the washer is in the plastic bag provided. 15 Make materials inaccessible...
... shipping support hardware to children. While it upward. 5. Carefully move the washer to an upright position and remove the carton by lifting it is unpacked. Installation Instructions UNPACKING THE WASHER WARNING: Recycle or destroy the carton and plastic bags after the washer is in the plastic bag provided. 15 Make materials inaccessible...
Use and Care Manual
Page 16
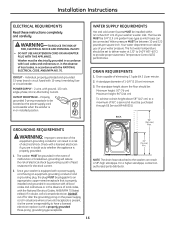
... to a maximum of 96″, a service kit must be purchased through GE Service (WH49X301). GROUNDING REQUIREMENTS WARNING: Improper connection of the equipment-grounding conductor can result in an installed position. In situations where a two-slot receptacle is present, it with the...of local codes, in the absence of local codes, with a properly grounded three-prong, grounding-type receptacle. Installation Instructions ELECTRICAL REQUIREMENTS Read these instructions completely and carefully. WARNING-TO REDUCE THE RISK OF FIRE, ELECTRICAL SHOCK AND PERSONAL INJURY: • DO ...
... to a maximum of 96″, a service kit must be purchased through GE Service (WH49X301). GROUNDING REQUIREMENTS WARNING: Improper connection of the equipment-grounding conductor can result in an installed position. In situations where a two-slot receptacle is present, it with the...of local codes, in the absence of local codes, with a properly grounded three-prong, grounding-type receptacle. Installation Instructions ELECTRICAL REQUIREMENTS Read these instructions completely and carefully. WARNING-TO REDUCE THE RISK OF FIRE, ELECTRICAL SHOCK AND PERSONAL INJURY: • DO ...
Use and Care Manual
Page 17
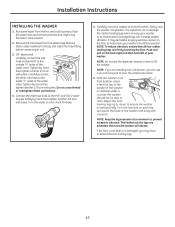
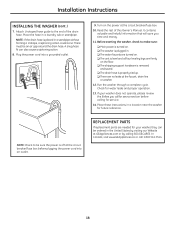
...helpful to spray window cleaner on and check for leaks. 5. The farther out the legs are extended, the more the washer will vibrate. Installation Instructions INSTALLING THE WASHER 1. Run some water from the hot and cold faucets to extend the rear leveling legs. 17 It may have to flush the... water lines and remove particles that all four rubber leveling legs are installing into a drain pan, you are firmly touching the floor. then tighten another 2/3 turn with a wrench. Connect the inlet hose ends to ...
...helpful to spray window cleaner on and check for leaks. 5. The farther out the legs are extended, the more the washer will vibrate. Installation Instructions INSTALLING THE WASHER 1. Run some water from the hot and cold faucets to extend the rear leveling legs. 17 It may have to flush the... water lines and remove particles that all four rubber leveling legs are installing into a drain pan, you are firmly touching the floor. then tighten another 2/3 turn with a wrench. Connect the inlet hose ends to ...
Use and Care Manual
Page 18
...a siphoning action could occur. It contains valuable and helpful information that will save you call 1.800.561.3344. 18 Check for future reference. Installation Instructions INSTALLING THE WASHER (cont.) 7. NOTE: Check to be an air gap around the drain hose. There must be sure the power is properly tied ...plugged in. ❏ The water faucets are turned on. ❏ The unit is placed in the United States by calling 800.GE.CARES. Place these instructions in a laundry tub or standpipe. Read the rest of the drain hose. If your washer, they can also cause a siphoning ...
...a siphoning action could occur. It contains valuable and helpful information that will save you call 1.800.561.3344. 18 Check for future reference. Installation Instructions INSTALLING THE WASHER (cont.) 7. NOTE: Check to be an air gap around the drain hose. There must be sure the power is properly tied ...plugged in. ❏ The water faucets are turned on. ❏ The unit is placed in the United States by calling 800.GE.CARES. Place these instructions in a laundry tub or standpipe. Read the rest of the drain hose. If your washer, they can also cause a siphoning ...
Use and Care Manual
Page 19
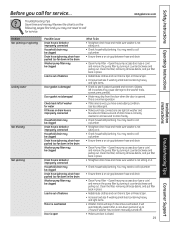
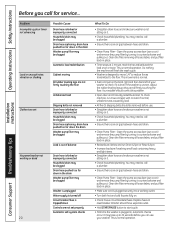
.... • Make sure hose connections are tight at washer and faucets and make sure washer is not sitting on it . • Check household plumbing. Installation Instructions Problem Not spinning or agitating Leaking water Not draining Not spinning Possible Cause Drain hose is kinked or improperly connected Household drain may drip from... & Spin. • Increase load size if washing small load containing heavy and light items. • Check to drain facility. • Check household plumbing. Safety Instructions Operating Instructions Before you have oversudsing condition.
.... • Make sure hose connections are tight at washer and faucets and make sure washer is not sitting on it . • Check household plumbing. Installation Instructions Problem Not spinning or agitating Leaking water Not draining Not spinning Possible Cause Drain hose is kinked or improperly connected Household drain may drip from... & Spin. • Increase load size if washing small load containing heavy and light items. • Check to drain facility. • Check household plumbing. Safety Instructions Operating Instructions Before you have oversudsing condition.
Use and Care Manual
Page 20
...not sitting on it. • Check household plumbing. Washer should correct this problem. • Open door and manually redistribute load. Your installer should have separate outlet. • Hold START/PAUSE button to start cycle. • First time the washer is plugged in place.... This is an air gap between hose and drain. • Clean Pump Filter - Operating Instructions Safety Instructions Before you can use your washer to check if it is level. Installation Instructions Problem Incomplete cycle or timer not advancing Loud or unusual noise; It may need to call ...
...not sitting on it. • Check household plumbing. Washer should correct this problem. • Open door and manually redistribute load. Your installer should have separate outlet. • Hold START/PAUSE button to start cycle. • First time the washer is plugged in place.... This is an air gap between hose and drain. • Clean Pump Filter - Operating Instructions Safety Instructions Before you can use your washer to check if it is level. Installation Instructions Problem Incomplete cycle or timer not advancing Loud or unusual noise; It may need to call ...


