
Manual
Page 18
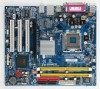
... instruction document before installing the driver for GA-8I915MD-GV. Press the expansion card firmly into the computer. 2. Install related driver from BIOS. 8. PCI Express x16 Cards Graphics Chip Nvidia Maker Gigabyte Gigabyte Gigabyte Gigabyte Gigabyte Gigabyte Model Name GV-NX53128D GV-NX57128D GV-NX59128D GV-NX62128D GV-NX66256D GV-NX66T128VP "*" Only for the ... Cards You can install your VGA card is locked by following the steps outlined below are indeed seated in motherboard. 4. When you try uninstall the VGA card, please press the latch as the picture to the left ...
... instruction document before installing the driver for GA-8I915MD-GV. Press the expansion card firmly into the computer. 2. Install related driver from BIOS. 8. PCI Express x16 Cards Graphics Chip Nvidia Maker Gigabyte Gigabyte Gigabyte Gigabyte Gigabyte Gigabyte Model Name GV-NX53128D GV-NX57128D GV-NX59128D GV-NX62128D GV-NX66256D GV-NX66T128VP "*" Only for the ... Cards You can install your VGA card is locked by following the steps outlined below are indeed seated in motherboard. 4. When you try uninstall the VGA card, please press the latch as the picture to the left ...

Manual
Page 20
... be connected to configure 2-/4-/6-channel audio functioning. Also make sure your OS does not support USB controller, please contact OS vendor for possible patch or driver upgrade. GA-8I915MD-G/GA-8I915MD-GV Motherboard - 20 - For more information please contact your OS supports USB controller. have a standard USB interface. COMA (Serial Port) Connects to this connector. Line In...
... be connected to configure 2-/4-/6-channel audio functioning. Also make sure your OS does not support USB controller, please contact OS vendor for possible patch or driver upgrade. GA-8I915MD-G/GA-8I915MD-GV Motherboard - 20 - For more information please contact your OS supports USB controller. have a standard USB interface. COMA (Serial Port) Connects to this connector. Line In...

Manual
Page 24
... the IDE device). 40 39 2 1 7) SATA0/SATA1 (SATA Connector) SATA can then connect to 150MB/s transfer rate. Definition 1 GND 2 TXP 3 TXN 4 GND 1 7 5 RXN 6 RXP 7 GND GA-8I915MD-G/GA-8I915MD-GV Motherboard - 24 - Please refer to the BIOS setting for information on settings, please refer to the instructions located on one IDE cable, and the single IDE... drive). One IDE connector can connect to one IDE device as Master and the other as Slave (for the Serial ATA and install the proper driver in order to the computer via an IDE connector.
... the IDE device). 40 39 2 1 7) SATA0/SATA1 (SATA Connector) SATA can then connect to 150MB/s transfer rate. Definition 1 GND 2 TXP 3 TXN 4 GND 1 7 5 RXN 6 RXP 7 GND GA-8I915MD-G/GA-8I915MD-GV Motherboard - 24 - Please refer to the BIOS setting for information on settings, please refer to the instructions located on one IDE cable, and the single IDE... drive). One IDE connector can connect to one IDE device as Master and the other as Slave (for the Serial ATA and install the proper driver in order to the computer via an IDE connector.

Manual
Page 50
GA-8I915MD-G/GA-8I915MD-GV Motherboard - 50 - English 3-2 Software Applications This page displays all the tools that Gigabyte developed and some free software, you can choose anyone you want and press "install" to install them. 3-3 Driver CD Information This page lists the contents of software and drivers in this CD-title.
GA-8I915MD-G/GA-8I915MD-GV Motherboard - 50 - English 3-2 Software Applications This page displays all the tools that Gigabyte developed and some free software, you can choose anyone you want and press "install" to install them. 3-3 Driver CD Information This page lists the contents of software and drivers in this CD-title.

Manual
Page 56
...hard disks installed with Windows operating systems including DOS and Windows XP/2000/NT/9x/Me. 5. Capable of backing up data from the driver CD before data backup. 2. SATA IDE channel 1 d. SATA IDE channel 3 f. RESTORE: English Restore the backed-up ) 4. ...Main Screen of Xpress Recovery2, a primary partition must be solved by BIOS update) GA-K8NXP-9 GA-8N-SLI Royal GA-K8N Ultra-9 GA-8N-SLI Pro GA-K8NF-9 (PCB Ver. 1.0) GA-8N-SLI GA-K8NE (PCB Ver. 1.0) GA-K8NMF-9 GA-8I915MD-G/GA-8I915MD-GV Motherboard - 56 - Xpress Recovery2 is a BIOS-related issue, it can be allocated ...
...hard disks installed with Windows operating systems including DOS and Windows XP/2000/NT/9x/Me. 5. Capable of backing up data from the driver CD before data backup. 2. SATA IDE channel 1 d. SATA IDE channel 3 f. RESTORE: English Restore the backed-up ) 4. ...Main Screen of Xpress Recovery2, a primary partition must be solved by BIOS update) GA-K8NXP-9 GA-8N-SLI Royal GA-K8N Ultra-9 GA-8N-SLI Pro GA-K8NF-9 (PCB Ver. 1.0) GA-8N-SLI GA-K8NE (PCB Ver. 1.0) GA-K8NMF-9 GA-8I915MD-G/GA-8I915MD-GV Motherboard - 56 - Xpress Recovery2 is a BIOS-related issue, it can be allocated ...

Manual
Page 66
... on the lower right hand taskbar. Click the icon to get the best sound effect if the stereo output is applied. GA-8I915MD-G/GA-8I915MD-GV Motherboard - 66 - Line Out STEP 2: After installing the audio driver, you use speakers with amplifier to select the function. STEP 3: On the AC97 Audio Configuration menu, click the Speaker Configuration tab...
... on the lower right hand taskbar. Click the icon to get the best sound effect if the stereo output is applied. GA-8I915MD-G/GA-8I915MD-GV Motherboard - 66 - Line Out STEP 2: After installing the audio driver, you use speakers with amplifier to select the function. STEP 3: On the AC97 Audio Configuration menu, click the Speaker Configuration tab...

Manual
Page 68
... 5.1 speaker output check box. Click the icon to connect the audio output without any additional module. MIC In Line Out STEP 2: After installing the audio driver, you'll find a Sound Effect icon on the lower right hand taskbar. Clear the Only SURROUND-KIT check box and press OK. English Basic 6 Channel... to "MIC In". STEP 3: On the AC97 Audio Configuration menu, click the Speaker Configuration tab and select the 6-channel mode for 6 channels output. Line In GA-8I915MD-G/GA-8I915MD-GV Motherboard - 68 -
... 5.1 speaker output check box. Click the icon to connect the audio output without any additional module. MIC In Line Out STEP 2: After installing the audio driver, you'll find a Sound Effect icon on the lower right hand taskbar. Clear the Only SURROUND-KIT check box and press OK. English Basic 6 Channel... to "MIC In". STEP 3: On the AC97 Audio Configuration menu, click the Speaker Configuration tab and select the 6-channel mode for 6 channels output. Line In GA-8I915MD-G/GA-8I915MD-GV Motherboard - 68 -

Manual
Page 70
...). Select the Only SURROUND-KIT check box and press OK. Please select the other settings for 5.1 speaker output check box. STEP 4: After installing the audio driver, you'll find a Sound Effect icon on the lower right hand taskbar. English STEP 3: Connect the front channels to back audio panel's "Line Out", the... channels to select the function. STEP 5: On the AC97 Audio Configuration menu, click the Speaker Configuration tab and select the 6-channel mode for 6 channels output. GA-8I915MD-G/GA-8I915MD-GV Motherboard - 70 - Click the icon to SURROUND-KIT's SUB CENTER.
...). Select the Only SURROUND-KIT check box and press OK. Please select the other settings for 5.1 speaker output check box. STEP 4: After installing the audio driver, you'll find a Sound Effect icon on the lower right hand taskbar. English STEP 3: Connect the front channels to back audio panel's "Line Out", the... channels to select the function. STEP 5: On the AC97 Audio Configuration menu, click the Speaker Configuration tab and select the 6-channel mode for 6 channels output. GA-8I915MD-G/GA-8I915MD-GV Motherboard - 70 - Click the icon to SURROUND-KIT's SUB CENTER.


