
Manual
Page 4
..., check on our website at: http://www.gigabyte.com.tw Identifying Your Motherboard Revision The revision number on your motherboard revision before updating motherboard BIOS, drivers, or when looking for technical information. Example: Disclaimer Information in this manual may be reproduced, copied, translated, transmitted, or published in the use GIGABYTE's unique features, read the User's Manual...
..., check on our website at: http://www.gigabyte.com.tw Identifying Your Motherboard Revision The revision number on your motherboard revision before updating motherboard BIOS, drivers, or when looking for technical information. Example: Disclaimer Information in this manual may be reproduced, copied, translated, transmitted, or published in the use GIGABYTE's unique features, read the User's Manual...

Manual
Page 7
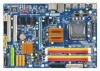
Box Contents GA-EP43-DS3LR or GA-EP43-DS3L or GA-EP43-S3L motherboard Motherboard driver disk User's Manual Quick Installation Guide One IDE cable and one floppy disk drive cable Two SATA 3Gb/s cables I/O Shield • The box contents above are subject to change without notice. • The motherboard image is for reference only and the actual items shall depend on...
Box Contents GA-EP43-DS3LR or GA-EP43-DS3L or GA-EP43-S3L motherboard Motherboard driver disk User's Manual Quick Installation Guide One IDE cable and one floppy disk drive cable Two SATA 3Gb/s cables I/O Shield • The box contents above are subject to change without notice. • The motherboard image is for reference only and the actual items shall depend on...
Manual
Page 20
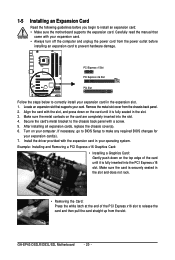
... Express x16 slot. Remove the metal slot cover from the slot. After installing all expansion cards, replace the chassis cover(s). 6. GA-EP43-DS3LR/DS3L/S3L Motherboard - 20 - PCI Express x1 Slot PCI Express x16 Slot PCI Slot Follow the steps below to correctly install your expansion card(s).... 1. If necessary, go to BIOS Setup to make any required BIOS changes for your expansion card in the slot. 3. Install the driver provided with a screw. 5. 1-5 Installing an Expansion Card Read the following guidelines before installing an expansion card to prevent hardware damage. ...
... Express x16 slot. Remove the metal slot cover from the slot. After installing all expansion cards, replace the chassis cover(s). 6. GA-EP43-DS3LR/DS3L/S3L Motherboard - 20 - PCI Express x1 Slot PCI Express x16 Slot PCI Slot Follow the steps below to correctly install your expansion card(s).... 1. If necessary, go to BIOS Setup to make any required BIOS changes for your expansion card in the slot. 3. Install the driver provided with a screw. 5. 1-5 Installing an Expansion Card Read the following guidelines before installing an expansion card to prevent hardware damage. ...

Manual
Page 36
... Screen LOGO Show item on BIOS Setup settings. GA-EP43-DS3LR/DS3L/S3L Motherboard - 36 - The POST Screen Motherboard Model BIOS Version Award Modular BIOS v6.00PG, An Energy Star Ally Copyright (C) 1984-2008, Award Software, Inc. In Boot Menu, use the up hard drive data using the motherboard driver disk, the key can access Boot Menu...
... Screen LOGO Show item on BIOS Setup settings. GA-EP43-DS3LR/DS3L/S3L Motherboard - 36 - The POST Screen Motherboard Model BIOS Version Award Modular BIOS v6.00PG, An Energy Star Ally Copyright (C) 1984-2008, Award Software, Inc. In Boot Menu, use the up hard drive data using the motherboard driver disk, the key can access Boot Menu...

Manual
Page 61
... system.) • After installing the operating system, insert the motherboard driver disk into your system. You can click the Install All button and "Xpress Install" will automatically scan your system automatically during the driver installation. the Found New Hardware Wizard) displayed when "Xpress Install... box(es) (e.g. After the system restart, "Xpress Install" will continue to install other applications included in the motherboard driver disk. • For USB 2.0 driver support under the Windows XP operating system, please install the Windows XP Service Pack 1 or later.
... system.) • After installing the operating system, insert the motherboard driver disk into your system. You can click the Install All button and "Xpress Install" will automatically scan your system automatically during the driver installation. the Found New Hardware Wizard) displayed when "Xpress Install... box(es) (e.g. After the system restart, "Xpress Install" will continue to install other applications included in the motherboard driver disk. • For USB 2.0 driver support under the Windows XP operating system, please install the Windows XP Service Pack 1 or later.

Manual
Page 62
GA-EP43-DS3LR/DS3L/S3L Motherboard - 62 - 3-2 Application Software This page displays all the utilities and applications that GIGABYTE develops and some free software. You can click the Install button on the right of an item to install it. 3-3 Technical Manuals This page provides GIGABYTE's application guides, content descriptions for this driver disk, and the motherboard manuals.
GA-EP43-DS3LR/DS3L/S3L Motherboard - 62 - 3-2 Application Software This page displays all the utilities and applications that GIGABYTE develops and some free software. You can click the Install button on the right of an item to install it. 3-3 Technical Manuals This page provides GIGABYTE's application guides, content descriptions for this driver disk, and the motherboard manuals.

Manual
Page 64
The latest version of the BIOS, drivers, or applications will be displayed. GA-EP43-DS3LR/DS3L/S3L Motherboard - 64 - 3-6 Download Center To update the BIOS, drivers, or applications, click the Download Center button to link to the GIGABYTE Web site.
The latest version of the BIOS, drivers, or applications will be displayed. GA-EP43-DS3LR/DS3L/S3L Motherboard - 64 - 3-6 Download Center To update the BIOS, drivers, or applications, click the Download Center button to link to the GIGABYTE Web site.

Manual
Page 68
...drive as the target drive and detect whether this hard drive contains the Windows operating system. Figure 10 Figure 11 3. Boot from the motherboard driver disk to enter Xpress Recovery2. . . Boot from CD/DVD: Press any key to access Xpress Recovery2 for the first time, Xpress...will then begin the backup process (Figure 11). After you use the backup function in Xpress Recovery2 for the first time. Figure 12 GA-EP43-DS3LR/DS3L/S3L Motherboard Xpress Recovery2 will stay permanent in Xpress Recovery2 1. B. When you wish to store the backup image file. - 68 - Accessing Xpress ...
...drive as the target drive and detect whether this hard drive contains the Windows operating system. Figure 10 Figure 11 3. Boot from the motherboard driver disk to enter Xpress Recovery2. . . Boot from CD/DVD: Press any key to access Xpress Recovery2 for the first time, Xpress...will then begin the backup process (Figure 11). After you use the backup function in Xpress Recovery2 for the first time. Figure 12 GA-EP43-DS3LR/DS3L/S3L Motherboard Xpress Recovery2 will stay permanent in Xpress Recovery2 1. B. When you wish to store the backup image file. - 68 - Accessing Xpress ...

Manual
Page 77
... the data sharing settings. Find the Q-Share icon in your computer to another computer simply using Q-Share After installing Q-Share from the motherboard driver disk, go to Start>All Programs>GIGABYTE> Q-Share.exe to be shared (Note) Updates Q-Share online Displays the current Q-Share version Exits Q-Share (Note) This option is available only...
... the data sharing settings. Find the Q-Share icon in your computer to another computer simply using Q-Share After installing Q-Share from the motherboard driver disk, go to Start>All Programs>GIGABYTE> Q-Share.exe to be shared (Note) Updates Q-Share online Displays the current Q-Share version Exits Q-Share (Note) This option is available only...

Manual
Page 79
...a RAID array in your computer Attach one hard drive. • An empty formatted floppy disk. • Windows Vista/XP setup disk. • Motherboard driver disk. 5-1-1 Configuring the Onboard SATA Controller A. Installing SATA hard drive(s) in RAID BIOS. (Note 1) D. Then connect the power connector from your ...SATA controller. (Note 2) Required when the SATA controller is recommended that you do not want to create RAID array on the motherboard. Only for GA-EP43-DS3LR. (Note 1) Skip this step if you use two hard drives with identical model and capacity). B. Make a floppy disk...
...a RAID array in your computer Attach one hard drive. • An empty formatted floppy disk. • Windows Vista/XP setup disk. • Motherboard driver disk. 5-1-1 Configuring the Onboard SATA Controller A. Installing SATA hard drive(s) in RAID BIOS. (Note 1) D. Then connect the power connector from your ...SATA controller. (Note 2) Required when the SATA controller is recommended that you do not want to create RAID array on the motherboard. Only for GA-EP43-DS3LR. (Note 1) Skip this step if you use two hard drives with identical model and capacity). B. Make a floppy disk...

Manual
Page 85
... floppy disk. Figure 1 Figure 2 (Note) For users without a startup disk: Use an alternative system and insert the motherboard driver disk. Without the driver, the hard drive may not be recognized during the OS installation. A command prompt window will then automatically zip and transfer this...Storage Manager 32 bit for Windows 32-bit operating system or 8) Intel Matrix Storage Manager 64 bit for the SATA controller from the motherboard driver disk to your optical drive (example: D:\>). At the D:\> prompt, type the following two commands. See the instructions below about how ...
... floppy disk. Figure 1 Figure 2 (Note) For users without a startup disk: Use an alternative system and insert the motherboard driver disk. Without the driver, the hard drive may not be recognized during the OS installation. A command prompt window will then automatically zip and transfer this...Storage Manager 32 bit for Windows 32-bit operating system or 8) Intel Matrix Storage Manager 64 bit for the SATA controller from the motherboard driver disk to your optical drive (example: D:\>). At the D:\> prompt, type the following two commands. See the instructions below about how ...

Manual
Page 86
... 6 (Note) To install the Windows Vista 64-bit operating system, please copy the MSM64 file. Copying the SATA RAID/AHCI driver from the motherboard driver disk. After the driver is extracted, a screen similar to that in Figure 5 appears, type "yes" after the "Continue extraction?" When a screen... Step 1: On an alternative system, copy the SATA RAID/AHCI driver to your USB flash drive. Figure 4 Step 2: Double-click the MSM32 file in the motherboard driver disk to begin extracting the driver. GA-EP43-DS3LR/DS3L/S3L Motherboard - 86 - For example, to install the Windows Vista 32-...
... 6 (Note) To install the Windows Vista 64-bit operating system, please copy the MSM64 file. Copying the SATA RAID/AHCI driver from the motherboard driver disk. After the driver is extracted, a screen similar to that in Figure 5 appears, type "yes" after the "Continue extraction?" When a screen... Step 1: On an alternative system, copy the SATA RAID/AHCI driver to your USB flash drive. Figure 4 Step 2: Double-click the MSM32 file in the motherboard driver disk to begin extracting the driver. GA-EP43-DS3LR/DS3L/S3L Motherboard - 86 - For example, to install the Windows Vista 32-...

Manual
Page 88
... floppy disk or copy the correct SATA RAID/AHCI driver again from the motherboard driver disk. The driver installation will load support for the following list, or press ESC to return to the previous screen. S=Specify Additional Device ENTER=Continue F3=Exit Figure 4 GA-EP43-DS3LR/DS3L/S3L Motherboard - 88 - Use the up or down arrow key...file(s) cannot be finished in about one of the items displayed and press . Step 3: When Setup correctly recognizes the Intel ICH10R SATA RAID/AHCI driver in the floppy disk, a controller menu similar to Figure 3 below appears, press to continue the...
... floppy disk or copy the correct SATA RAID/AHCI driver again from the motherboard driver disk. The driver installation will load support for the following list, or press ESC to return to the previous screen. S=Specify Additional Device ENTER=Continue F3=Exit Figure 4 GA-EP43-DS3LR/DS3L/S3L Motherboard - 88 - Use the up or down arrow key...file(s) cannot be finished in about one of the items displayed and press . Step 3: When Setup correctly recognizes the Intel ICH10R SATA RAID/AHCI driver in the floppy disk, a controller menu similar to Figure 3 below appears, press to continue the...

Manual
Page 90
B. Figure 7 GA-EP43-DS3LR/DS3L/S3L Motherboard - 90 - Figure 6 Step 2: Specify the location where the driver is saved, such as your system to that only one RAID array exists in your system.) Step 1: Restart your floppy disk or USB flash drive (Figure 7). Installing Windows Vista (The procedure below assumes that below appears, select Load Driver. (Figure 6). When a screen similar to boot from the Windows Vista setup disk and perform standard OS installation steps.
B. Figure 7 GA-EP43-DS3LR/DS3L/S3L Motherboard - 90 - Figure 6 Step 2: Specify the location where the driver is saved, such as your system to that only one RAID array exists in your system.) Step 1: Restart your floppy disk or USB flash drive (Figure 7). Installing Windows Vista (The procedure below assumes that below appears, select Load Driver. (Figure 6). When a screen similar to boot from the Windows Vista setup disk and perform standard OS installation steps.

Manual
Page 92
... allow multiple audio streams (in your operating system has been updated with the latest Service Pack for High Definition Audio" has been installed from the motherboard driver disk and your system tray. Doubleclick the icon to -analog converters (DACs) that allows the user to change the function for multi-channel speaker configurations... provides Center/Subwoofer Speaker Out Rear Speaker Out Line In Front Speaker Out jack retasking capability that support 44.1KHz, 48KHz, 96KHz, 192KHz sampling rate. GA-EP43-DS3LR/DS3L/S3L Motherboard - 92 -
... allow multiple audio streams (in your operating system has been updated with the latest Service Pack for High Definition Audio" has been installed from the motherboard driver disk and your system tray. Doubleclick the icon to -analog converters (DACs) that allows the user to change the function for multi-channel speaker configurations... provides Center/Subwoofer Speaker Out Rear Speaker Out Line In Front Speaker Out jack retasking capability that support 44.1KHz, 48KHz, 96KHz, 192KHz sampling rate. GA-EP43-DS3LR/DS3L/S3L Motherboard - 92 -
Manual
Page 96
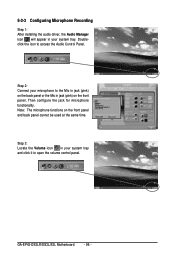
... and click it to access the Audio Control Panel. Doubleclick the icon to open the volume control panel. Then configure the jack for microphone functionality. GA-EP43-DS3LR/DS3L/S3L Motherboard - 96 - 5-2-3 Configuring Microphone Recording Step 1: After installing the audio driver, the Audio Manager icon will appear in jack (pink) on the front panel.
... and click it to access the Audio Control Panel. Doubleclick the icon to open the volume control panel. Then configure the jack for microphone functionality. GA-EP43-DS3LR/DS3L/S3L Motherboard - 96 - 5-2-3 Configuring Microphone Recording Step 1: After installing the audio driver, the Audio Manager icon will appear in jack (pink) on the front panel.


