Manual
Page 6
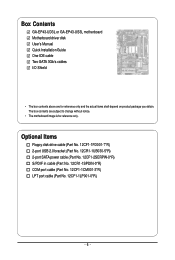
...-0*R) S/PDIF in cable (Part No. 12CR1-1SPDIN-0*R) COM port cable (Part No. 12CF1-1CM001-3*R) LPT port cable (Part No. 12CF1-1LP001-0*R) - 6 - Box Contents GA-EP43-UD3L or GA-EP43-US3L motherboard Motherboard driver disk User's Manual Quick Installation Guide One IDE cable Two SATA 3Gb/s cables I/O Shield • The box contents above are subject to change without...
...-0*R) S/PDIF in cable (Part No. 12CR1-1SPDIN-0*R) COM port cable (Part No. 12CF1-1CM001-3*R) LPT port cable (Part No. 12CF1-1LP001-0*R) - 6 - Box Contents GA-EP43-UD3L or GA-EP43-US3L motherboard Motherboard driver disk User's Manual Quick Installation Guide One IDE cable Two SATA 3Gb/s cables I/O Shield • The box contents above are subject to change without...

Manual
Page 18
...the expansion slot. 1. Remove the metal slot cover from the slot. After installing all expansion cards, replace the chassis cover(s). 6. GA-EP43-UD3L/US3L Motherboard - 18 - Make sure the metal contacts on the top edge of the PCI Express x16 slot to release the card ...following guidelines before installing an expansion card to prevent hardware damage. Carefully read the manual that supports your expansion card(s). 7. Install the driver provided with your operating system. Example: Installing and Removing a PCI Express x16 Graphics Card: • Installing a Graphics Card: Gently...
...the expansion slot. 1. Remove the metal slot cover from the slot. After installing all expansion cards, replace the chassis cover(s). 6. GA-EP43-UD3L/US3L Motherboard - 18 - Make sure the metal contacts on the top edge of the PCI Express x16 slot to release the card ...following guidelines before installing an expansion card to prevent hardware damage. Carefully read the manual that supports your expansion card(s). 7. Install the driver provided with your operating system. Example: Installing and Removing a PCI Express x16 Graphics Card: • Installing a Graphics Card: Gently...
Manual
Page 34
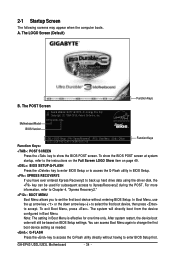
... screen. The system will still be used for one time only. In Boot Menu, use the up hard drive data using the driver disk, the key can access Boot Menu again to change the first boot device setting as needed. : Q-FLASH Press the key ... POST SCREEN Press the key to show the BIOS POST screen at system startup, refer to accept. The LOGO Screen (Default) Function Keys B. EP43-UD3L E3c . . . . GA-EP43-UD3L/US3L Motherboard - 34 - For more information, refer to Chapter 4, "Xpress Recovery2." : BOOT MENU Boot Menu allows you have ever entered Xpress Recovery2...
... screen. The system will still be used for one time only. In Boot Menu, use the up hard drive data using the driver disk, the key can access Boot Menu again to change the first boot device setting as needed. : Q-FLASH Press the key ... POST SCREEN Press the key to show the BIOS POST screen at system startup, refer to accept. The LOGO Screen (Default) Function Keys B. EP43-UD3L E3c . . . . GA-EP43-UD3L/US3L Motherboard - 34 - For more information, refer to Chapter 4, "Xpress Recovery2." : BOOT MENU Boot Menu allows you have ever entered Xpress Recovery2...

Manual
Page 50
... other device. If not, the corresponding LAN controller will dynamically detects if LAN cable(s) is an interface specification that cannot be disabled automatically. (Default: Disabled) GA-EP43-UD3L/US3L Motherboard - 50 - Disabled Disables AHCI for the SATA controllers and configures the SATA controllers to PATAmode. (Default) AHCI Configures the SATA controllers to operate in... integrated SATA controllers. Advanced Host Controller Interface (AHCI) is connected or not. In Legacy mode the SATA controllers use dedicated IRQs that allows the storage driver to Disabled.
... other device. If not, the corresponding LAN controller will dynamically detects if LAN cable(s) is an interface specification that cannot be disabled automatically. (Default: Disabled) GA-EP43-UD3L/US3L Motherboard - 50 - Disabled Disables AHCI for the SATA controllers and configures the SATA controllers to PATAmode. (Default) AHCI Configures the SATA controllers to operate in... integrated SATA controllers. Advanced Host Controller Interface (AHCI) is connected or not. In Legacy mode the SATA controllers use dedicated IRQs that allows the storage driver to Disabled.

Manual
Page 62
You can click the Install button on the right of an item to install it. 3-3 Technical Manuals This page provides GIGABYTE's application guides, content descriptions for this driver disk, and the motherboard manuals. GA-EP43-UD3L/US3L Motherboard - 62 - 3-2 Application Software This page displays all the utilities and applications that GIGABYTE develops and some free software.
You can click the Install button on the right of an item to install it. 3-3 Technical Manuals This page provides GIGABYTE's application guides, content descriptions for this driver disk, and the motherboard manuals. GA-EP43-UD3L/US3L Motherboard - 62 - 3-2 Application Software This page displays all the utilities and applications that GIGABYTE develops and some free software.

Manual
Page 64
The latest version of the BIOS, drivers, or applications will be displayed. 3-6 Download Center To update the BIOS, drivers, or applications, click the Download Center button to link to the GIGABYTE Web site. GA-EP43-UD3L/US3L Motherboard - 64 -
The latest version of the BIOS, drivers, or applications will be displayed. 3-6 Download Center To update the BIOS, drivers, or applications, click the Download Center button to link to the GIGABYTE Web site. GA-EP43-UD3L/US3L Motherboard - 64 -

Manual
Page 66
B. Boot from the motherboard driver disk to start backing up your hard drive data. After you use the backup function in Xpress Recovery2 for the first time. Step 1: Select BACKUP ... Xpress Recovery2 will save the backup file. Step 3: When partitioning your hard drive, make sure to enter Xpress Recovery2 later, simply press during the POST. C. GA-EP43-UD3L/US3L Motherboard - 66 - Step 4: After the operating system is no enough unallocated space, Xpress Recovery2 cannot save the backup file to check disk allocation. If you...
B. Boot from the motherboard driver disk to start backing up your hard drive data. After you use the backup function in Xpress Recovery2 for the first time. Step 1: Select BACKUP ... Xpress Recovery2 will save the backup file. Step 3: When partitioning your hard drive, make sure to enter Xpress Recovery2 later, simply press during the POST. C. GA-EP43-UD3L/US3L Motherboard - 66 - Step 4: After the operating system is no enough unallocated space, Xpress Recovery2 cannot save the backup file to check disk allocation. If you...

