Manual
Page 3
...that is protected by Macrovision. Use of this copyright protection technology must not be disposed of with user's other intellectual property rights. GV-NX88X768H-RH GeForce™ 8800 GTX Graphics Accelerator User's Manual Rev. 101 12MD-NX88X7R-101R * The WEEE marking on VGA card, this...the recycling of waste electrical and electronic equipment!! * The WEEE marking applies only in European Union's member states. Copyright © 2006 GIGABYTE TECHNOLOGY CO., LTD Copyright by GIGA-BYTE TECHNOLOGY CO., LTD. ("GBT"). Reverse engineering or disassembly is intended for home and other ...
...that is protected by Macrovision. Use of this copyright protection technology must not be disposed of with user's other intellectual property rights. GV-NX88X768H-RH GeForce™ 8800 GTX Graphics Accelerator User's Manual Rev. 101 12MD-NX88X7R-101R * The WEEE marking on VGA card, this...the recycling of waste electrical and electronic equipment!! * The WEEE marking applies only in European Union's member states. Copyright © 2006 GIGABYTE TECHNOLOGY CO., LTD Copyright by GIGA-BYTE TECHNOLOGY CO., LTD. ("GBT"). Reverse engineering or disassembly is intended for home and other ...
Manual
Page 4
... 32 5.2. Software Installation 10 3.1. Operating System Requirement 10 3.1.2. Display Properties Pages 15 3.1.6. Troubleshooting Tips 31 5. Resolutions and Color Depth Table (In Windows® XP 33 GV-NX88X768H-RH Graphics Accelerator - 2 -
... 32 5.2. Software Installation 10 3.1. Operating System Requirement 10 3.1.2. Display Properties Pages 15 3.1.6. Troubleshooting Tips 31 5. Resolutions and Color Depth Table (In Windows® XP 33 GV-NX88X768H-RH Graphics Accelerator - 2 -

Manual
Page 5
...chipset driver - GIGABYTE TECHNOLOGY). - 3 - Optical drive for best performance - An SLITM bridge connector (Note) SLI technology requires a PCI Express motherboard with Service Pack 2 (SP2) - Windows® XP with two x16 physical connectors. Two GV-NX88X768H-RH - Graphics cards... working in an SLI configuration must be with 450-watt is required: - Minimum System Requirements • Hardware - GV-NX88X768H-RH) and from the same vendor (i.e. Introduction Windows® 2000...
...chipset driver - GIGABYTE TECHNOLOGY). - 3 - Optical drive for best performance - An SLITM bridge connector (Note) SLI technology requires a PCI Express motherboard with Service Pack 2 (SP2) - Windows® XP with two x16 physical connectors. Two GV-NX88X768H-RH - Graphics cards... working in an SLI configuration must be with 450-watt is required: - Minimum System Requirements • Hardware - GV-NX88X768H-RH) and from the same vendor (i.e. Introduction Windows® 2000...

Manual
Page 7
... and handling damages on a grounded anti-static mat. Shipping and handling may cause damage to ensure your graphics card working correctly, please use official Gigabyte BIOS only. Be sure there are separated from static electricity, you do not have one, touch both of your computer. 1. Use none official... Gigabyte BIOS might cause problem on your hands to a safely grounded object or to a metal object, such as the anti-static mat. English Expansion cards...
... and handling damages on a grounded anti-static mat. Shipping and handling may cause damage to ensure your graphics card working correctly, please use official Gigabyte BIOS only. Be sure there are separated from static electricity, you do not have one, touch both of your computer. 1. Use none official... Gigabyte BIOS might cause problem on your hands to a safely grounded object or to a metal object, such as the anti-static mat. English Expansion cards...
Manual
Page 8
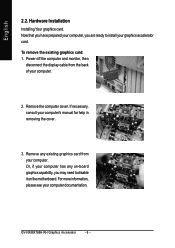
...: 1. Remove the computer cover. Remove any on-board graphics capability, you are ready to disable it on the motherboard. Hardware Installation Installing Your graphics card. GV-NX88X768H-RH Graphics Accelerator - 6 - For more information, please see your computer. 2. Power off the computer and monitor, then disconnect the display cable from your computer's manual for...
...: 1. Remove the computer cover. Remove any on-board graphics capability, you are ready to disable it on the motherboard. Hardware Installation Installing Your graphics card. GV-NX88X768H-RH Graphics Accelerator - 6 - For more information, please see your computer. 2. Power off the computer and monitor, then disconnect the display cable from your computer's manual for...
Manual
Page 9
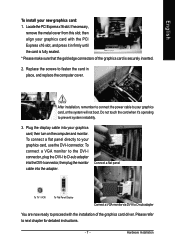
Please refer to prevent system instability. 3. Replace the screws to your new graphics card: 1. Hardware Installation English To install your graphics card, use the DVI-I connector. To connect a flat panel directly to fasten the card in firmly until the card is fully seated. * Please make sure that the gold edge connectors of the graphics card driver. LocatethePCIExpressx16slot.If necessary, remove the metal cover from this slot; then align your graphics card with the installation of the graphics card is securely inserted. 2. Plug the display cable into the ...
Please refer to prevent system instability. 3. Replace the screws to your new graphics card: 1. Hardware Installation English To install your graphics card, use the DVI-I connector. To connect a flat panel directly to fasten the card in firmly until the card is fully seated. * Please make sure that the gold edge connectors of the graphics card driver. LocatethePCIExpressx16slot.If necessary, remove the metal cover from this slot; then align your graphics card with the installation of the graphics card is securely inserted. 2. Plug the display cable into the ...

Manual
Page 10
... Output If your TV has a Composite video connection, you can connect the RCA cable from your TV to the TV-Out port on the adapter. GV-NX88X768H-RH Graphics Accelerator - 8 - English GIGABYTE Video Adapter for Nvidia Graphics Cards AV Out S-Video Out Connect to the AV Out port on the graphics card.
... Output If your TV has a Composite video connection, you can connect the RCA cable from your TV to the TV-Out port on the adapter. GV-NX88X768H-RH Graphics Accelerator - 8 - English GIGABYTE Video Adapter for Nvidia Graphics Cards AV Out S-Video Out Connect to the AV Out port on the graphics card.
Manual
Page 11
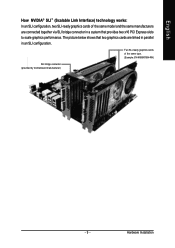
The picture below shows that two graphics cards are connected together via SLI bridge connector in an SLI configuration. Hardware Installation English How NVIDIA® SLI™ (Scalable Link Interface) technology works: In an SLI configuration, two SLI-ready graphics cards of the same type. (Example: GV-NX88X768H-RH) SLI bridge connector (provided by motherboard manufacturer) - 9 - Two SLI-ready graphics cards of the same model and the same manufacturers are linked in parallel in a system that provides two x16 PCI Express slots to scale graphics performance.
The picture below shows that two graphics cards are connected together via SLI bridge connector in an SLI configuration. Hardware Installation English How NVIDIA® SLI™ (Scalable Link Interface) technology works: In an SLI configuration, two SLI-ready graphics cards of the same type. (Example: GV-NX88X768H-RH) SLI bridge connector (provided by motherboard manufacturer) - 9 - Two SLI-ready graphics cards of the same model and the same manufacturers are linked in parallel in a system that provides two x16 PCI Express slots to scale graphics performance.
Manual
Page 12
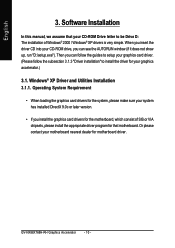
... version. • If you install the graphics card drivers for the motherboard, which consist of Windows® 2000 / Windows® XP drivers is very simple. GV-NX88X768H-RH Graphics Accelerator - 10 - Then you can follow the subsection 3.1.3 "Driver installation" to be Drive D: The installation of SIS or VIA chipsets, please install the appropriate...
... version. • If you install the graphics card drivers for the motherboard, which consist of Windows® 2000 / Windows® XP drivers is very simple. GV-NX88X768H-RH Graphics Accelerator - 10 - Then you can follow the subsection 3.1.3 "Driver installation" to be Drive D: The installation of SIS or VIA chipsets, please install the appropriate...

Manual
Page 13
When autorun window show up, click the Install DirectX 9 item. Step 4. Click Finish to install DirectX separately. Users who run Windows® XP with Service Pack 2 or above do not need to restart computer. Choose I accept the agreement and click the Next button. Software Installation English 3.1.2. Then the DirectX 9 installation is completed. - 11 - DirectX Installation Install Microsoft DirectX to enable 3D hardware acceleration support for Windows® 2000 or Windows® XP to achieve better 3D performance. 0 Note: For software MPEG support in Windows® ...
When autorun window show up, click the Install DirectX 9 item. Step 4. Click Finish to install DirectX separately. Users who run Windows® XP with Service Pack 2 or above do not need to restart computer. Choose I accept the agreement and click the Next button. Software Installation English 3.1.2. Then the DirectX 9 installation is completed. - 11 - DirectX Installation Install Microsoft DirectX to enable 3D hardware acceleration support for Windows® 2000 or Windows® XP to achieve better 3D performance. 0 Note: For software MPEG support in Windows® ...
Manual
Page 14
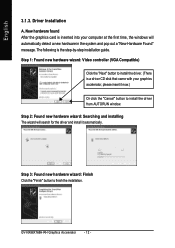
... first time, the windows will search for the driver and install it now.) Or click the "Cancel" button to install the driver from AUTORUN window. GV-NX88X768H-RH Graphics Accelerator - 12 - English 3.1.3. Step 2: Found new hardware wizard: Searching and installing The wizard will automatically detect a new hardware in the system and pop out...
... first time, the windows will search for the driver and install it now.) Or click the "Cancel" button to install the driver from AUTORUN window. GV-NX88X768H-RH Graphics Accelerator - 12 - English 3.1.3. Step 2: Found new hardware wizard: Searching and installing The wizard will automatically detect a new hardware in the system and pop out...
Manual
Page 15
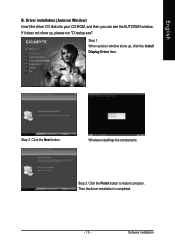
Click the Next button. Windows installings the components. Then the driver installation is completed. - 13 - English B. Step 1. Driver installation (Autorun Window) Insert the driver CD disk into your CD-ROM, and then you can see the AUTORUN window. Software Installation Click the Finish button to restart computer. If it does not show up , please run "D:\setup.exe". Step 2. Step 3. When autorun window show up , click the Install Display Driver item.
Click the Next button. Windows installings the components. Then the driver installation is completed. - 13 - English B. Step 1. Driver installation (Autorun Window) Insert the driver CD disk into your CD-ROM, and then you can see the AUTORUN window. Software Installation Click the Finish button to restart computer. If it does not show up , please run "D:\setup.exe". Step 2. Step 3. When autorun window show up , click the Install Display Driver item.

Manual
Page 16
GV-NX88X768H-RH Graphics Accelerator - 14 - English 3.1.4. Taskbar Icon After installation of the graphics accelerator from here. You can adjust the properties of the display drivers, you will find a NVIDIA icon area. Click this icon to open the control panel. on the taskbar's status Right click the icon.
GV-NX88X768H-RH Graphics Accelerator - 14 - English 3.1.4. Taskbar Icon After installation of the graphics accelerator from here. You can adjust the properties of the display drivers, you will find a NVIDIA icon area. Click this icon to open the control panel. on the taskbar's status Right click the icon.

Manual
Page 17
Software Installation Settings (Resolutions and Color depth for adapter and setting. Click the Start the NVIDIA Control Panel button to launch the NVIDIA Control Panel „ Launch Page All of display area, and the refresh rate. Click the GeForce 8800 GTX tab. (You can also click the NVIDIA icon on desktop and then select Properties. Display Properties Pages To access Display Properties pages, right-click on the taskbar and select NVIDIA Control Panel.) Access the GeForce 8800 GTX tab page to open the NVIDIA Control Panel. - 15 - NVIDIA Control Panel After pressing the...
Software Installation Settings (Resolutions and Color depth for adapter and setting. Click the Start the NVIDIA Control Panel button to launch the NVIDIA Control Panel „ Launch Page All of display area, and the refresh rate. Click the GeForce 8800 GTX tab. (You can also click the NVIDIA icon on desktop and then select Properties. Display Properties Pages To access Display Properties pages, right-click on the taskbar and select NVIDIA Control Panel.) Access the GeForce 8800 GTX tab page to open the NVIDIA Control Panel. - 15 - NVIDIA Control Panel After pressing the...
Manual
Page 18
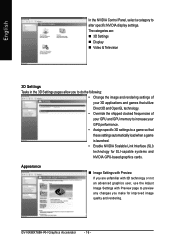
GV-NX88X768H-RH Graphics Accelerator - 16 - English In the NVIDIA Control Panel, select a category to a game so that these settings automatically load when a game is launched. • Enable ...
GV-NX88X768H-RH Graphics Accelerator - 16 - English In the NVIDIA Control Panel, select a category to a game so that these settings automatically load when a game is launched. • Enable ...

Manual
Page 19
English Performance „ Manage 3D Settings The Manage 3D Settings page enables you to establish default 3D settings to use for all your Direct3D or OpenGL applications and to establish a unique set of your GPU heats up over time. Software Installation When appropriate, the GPU will automatically slow down to see how your NVIDIA GPU and track its temperature history. You can monitor the current temperature of 3D settings for a particular game or application. „ Monitor Temperature Levels Use this page if you overclock your GPU and want to run at a lower temperature. - 17 ...
English Performance „ Manage 3D Settings The Manage 3D Settings page enables you to establish default 3D settings to use for all your Direct3D or OpenGL applications and to establish a unique set of your GPU heats up over time. Software Installation When appropriate, the GPU will automatically slow down to see how your NVIDIA GPU and track its temperature history. You can monitor the current temperature of 3D settings for a particular game or application. „ Monitor Temperature Levels Use this page if you overclock your GPU and want to run at a lower temperature. - 17 ...
Manual
Page 20
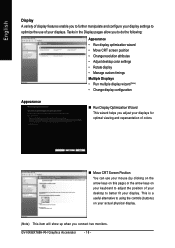
... Multiple Displays • Run multiple display wizard (Note) • Change display configuration Appearance „ Run Display Optimization Wizard This wizard helps you connect two monitors. GV-NX88X768H-RH Graphics Accelerator - 18 -
... Multiple Displays • Run multiple display wizard (Note) • Change display configuration Appearance „ Run Display Optimization Wizard This wizard helps you connect two monitors. GV-NX88X768H-RH Graphics Accelerator - 18 -

Manual
Page 21
Software Installation To change video color settings, go to Adjust Video Color Settings under the Video and TV section from the Start page. „ Rotate Display The NVIDIA Rotate features enable you to change the color setting, reduce screen flickering, or adjust the amount of information appearing on your display. „ Adjust Desktop Color Settings Use this page to set the contrast, sharpness, and color depth (Digital Vibrance) of your display. - 19 - This is useful if you have rotated your desktop. English „ Change ResolutionAttributes Using the Change Resolution controls...
Software Installation To change video color settings, go to Adjust Video Color Settings under the Video and TV section from the Start page. „ Rotate Display The NVIDIA Rotate features enable you to change the color setting, reduce screen flickering, or adjust the amount of information appearing on your display. „ Adjust Desktop Color Settings Use this page to set the contrast, sharpness, and color depth (Digital Vibrance) of your display. - 19 - This is useful if you have rotated your desktop. English „ Change ResolutionAttributes Using the Change Resolution controls...
Manual
Page 22
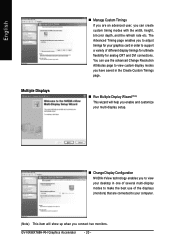
... displays (monitors) that are an advanced user, you can create custom timing modes with the width, height, bit-color depth, and the refresh rate etc. GV-NX88X768H-RH Graphics Accelerator - 20 -
... displays (monitors) that are an advanced user, you can create custom timing modes with the width, height, bit-color depth, and the refresh rate etc. GV-NX88X768H-RH Graphics Accelerator - 20 -
Manual
Page 23
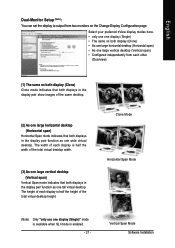
Vertical Span Mode Software Installation English Dual-Monitor Setup (Note) : You can set the display to output from each other (Dualview) (1) The same on the Change Display Configuration page. Clone Mode Horizontal Span Mode (Note) Only "only use one display (Single) • The same on both display (Clone) • As one large horizontal desktop (Horizontal span) • As one large vertical desktop (Vertical span) • Configured independently from two monitors on both display (Clone) Clone mode indicates that both displays in the display pair show images of the total ...
Vertical Span Mode Software Installation English Dual-Monitor Setup (Note) : You can set the display to output from each other (Dualview) (1) The same on the Change Display Configuration page. Clone Mode Horizontal Span Mode (Note) Only "only use one display (Single) • The same on both display (Clone) • As one large horizontal desktop (Horizontal span) • As one large vertical desktop (Vertical span) • Configured independently from two monitors on both display (Clone) Clone mode indicates that both displays in the display pair show images of the total ...