

Audio Setup Guide
Page 2
... Input and Output 1-1 Configuring 2/4/5.1/7.1-Channel Audio The motherboard provides six audio jacks on the back panel which support 2/4/5.1/7.1-channel (Note) audio. Configuring Speakers Step 1: After installing the audio driver, restart your computer. The picture to the type of device you connect. Then click OK. (Note) 2/4/5.1/7.1-Channel Audio Configurations: Refer to the...
... Input and Output 1-1 Configuring 2/4/5.1/7.1-Channel Audio The motherboard provides six audio jacks on the back panel which support 2/4/5.1/7.1-channel (Note) audio. Configuring Speakers Step 1: After installing the audio driver, restart your computer. The picture to the type of device you connect. Then click OK. (Note) 2/4/5.1/7.1-Channel Audio Configurations: Refer to the...

Audio Setup Guide
Page 5
... not mute the playback volume. Step 2: Connect your computer. Step 4: To raise the recording and playback volume for microphone functionality. 1-3 Configuring Microphone Recording Step 1: After installing the audio driver, restart your microphone to the Mic in jack on the back panel or the Mic in the notification area to access the...
... not mute the playback volume. Step 2: Connect your computer. Step 4: To raise the recording and playback volume for microphone functionality. 1-3 Configuring Microphone Recording Step 1: After installing the audio driver, restart your microphone to the Mic in jack on the back panel or the Mic in the notification area to access the...

RAID Setup Guide
Page 1
Configuring a RAID Set Configuring SATA Controllers 2 Installing the RAID/AHCI Driver and Operating System 16 Installing an Intel® Optane™ Memory 19 - 1 -
Configuring a RAID Set Configuring SATA Controllers 2 Installing the RAID/AHCI Driver and Operating System 16 Installing an Intel® Optane™ Memory 19 - 1 -

RAID Setup Guide
Page 2
..., it is recommended that you do not want to create RAID array on the motherboard. Then connect the power connectors from your computer. Install SATA hard drive(s) or SSDs in the Intel® Chipset controlled connectors on the SATA controller. (Note 2) An M.2 PCIe SSD cannot... be used to Chapter 1, "Internal Connectors," for the installation notices for the M.2 and SATA connectors. - 2 - Installing hard drives Install the hard drives/SSDs in your power supply to the hard drives. (Note 1) Skip this step if you use two ...
..., it is recommended that you do not want to create RAID array on the motherboard. Then connect the power connectors from your computer. Install SATA hard drive(s) or SSDs in the Intel® Chipset controlled connectors on the SATA controller. (Note 2) An M.2 PCIe SSD cannot... be used to Chapter 1, "Internal Connectors," for the installation notices for the M.2 and SATA connectors. - 2 - Installing hard drives Install the hard drives/SSDs in your power supply to the hard drives. (Note 1) Skip this step if you use two ...

RAID Setup Guide
Page 4
... Create tab. RAID levels supported include RAID 0, RAID 1, RAID 10, and RAID 5 (the selections available depend on the EZ RAID item. Figure 3 - 4 - Using EZ RAID GIGABYTE motherboards provide you with simplified steps. C-1. Click Proceed to Peripherals. Step 1: After restarting the computer, enter the BIOS Setup and go to begin (Figure 3). Then...
... Create tab. RAID levels supported include RAID 0, RAID 1, RAID 10, and RAID 5 (the selections available depend on the EZ RAID item. Figure 3 - 4 - Using EZ RAID GIGABYTE motherboards provide you with simplified steps. C-1. Click Proceed to Peripherals. Step 1: After restarting the computer, enter the BIOS Setup and go to begin (Figure 3). Then...

RAID Setup Guide
Page 7
Step 3: On the Intel(R) Rapid Storage Technology menu, press on the number of the hard drives being installed). Enter a volume name with "X"). Once you have selected the stripe block size, set from 4 KB to 128 KB. Next, use the down arrow key to ...
Step 3: On the Intel(R) Rapid Storage Technology menu, press on the number of the hard drives being installed). Enter a volume name with "X"). Once you have selected the stripe block size, set from 4 KB to 128 KB. Next, use the down arrow key to ...

RAID Setup Guide
Page 10
... Non-RAID [ MAIN MENU ] 4. Option ROM - 16.0.2.3402 Copyright (C) Intel Corporation. Reset Disks to Enabled. Recovery Volume Options 5. Skip this step and proceed with the installation of Windows operating system for a message which says "Press to configure a RAID array. RAID Volumes : None defined. Option ROM - 16.0.2.3402 Copyright (C) Intel Corporation. Step...
... Non-RAID [ MAIN MENU ] 4. Option ROM - 16.0.2.3402 Copyright (C) Intel Corporation. Reset Disks to Enabled. Recovery Volume Options 5. Skip this step and proceed with the installation of Windows operating system for a message which says "Press to configure a RAID array. RAID Volumes : None defined. Option ROM - 16.0.2.3402 Copyright (C) Intel Corporation. Step...

RAID Setup Guide
Page 11
... supported include RAID 0, RAID 1, RAID 10, and RAID 5 (the selections available depend on the number of the hard drives being installed). Option ROM - 16.0.2.3402 Copyright (C) Intel Corporation. Set the stripe block size (Figure 16) if necessary. The stripe block size...: Volume0 RAID Level : RAID0(Stripe) Disks : Select Disks Strip Size : 16KB Capacity : 1863.0 GB Sync : N/A Create Volume [ HELP ] The following are installed, they will be included in the RAID array. Step 3: After entering the CREATE VOLUME MENU screen, enter a volume name with 1~16 letters (letters cannot be...
... supported include RAID 0, RAID 1, RAID 10, and RAID 5 (the selections available depend on the number of the hard drives being installed). Option ROM - 16.0.2.3402 Copyright (C) Intel Corporation. Set the stripe block size (Figure 16) if necessary. The stripe block size...: Volume0 RAID Level : RAID0(Stripe) Disks : Select Disks Strip Size : 16KB Capacity : 1863.0 GB Sync : N/A Create Volume [ HELP ] The following are installed, they will be included in the RAID array. Step 3: After entering the CREATE VOLUME MENU screen, enter a volume name with 1~16 letters (letters cannot be...

RAID Setup Guide
Page 12
... Volume WARNING : ALL DATA ON SELECTED DISKS WILL BE LOST. [ HELP ] Are you sure you want to create this volume, press to confirm or to install the SATA RAID/AHCI driver and operating system. - 12 - Create RAID Volume 2. Exit RAID Volumes : ID Name 0 Volume0 [ DISK/VOLUME INFORMATION ] Level RAID0(Stripe) Strip...
... Volume WARNING : ALL DATA ON SELECTED DISKS WILL BE LOST. [ HELP ] Are you sure you want to create this volume, press to confirm or to install the SATA RAID/AHCI driver and operating system. - 12 - Create RAID Volume 2. Exit RAID Volumes : ID Name 0 Volume0 [ DISK/VOLUME INFORMATION ] Level RAID0(Stripe) Strip...

RAID Setup Guide
Page 14
... 22). Intel(R) Rapid Storage Technology - On Request allows users to update data from the master drive to the recovery drive when both hard drives are installed in the operating system.
... 22). Intel(R) Rapid Storage Technology - On Request allows users to update data from the master drive to the recovery drive when both hard drives are installed in the operating system.
RAID Setup Guide
Page 16
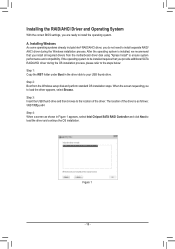
... and continue the OS installation. If the operating system to be installed requires that you install all required drivers from the Windows setup disk and perform standard OS installation steps. Step 2: Boot from the motherboard driver disk using "Xpress Install" to install the operating system. Figure... 1 - 16 - When the screen requesting you to your USB thumb drive. A. Installing the RAID/AHCI Driver and Operating...
... and continue the OS installation. If the operating system to be installed requires that you install all required drivers from the Windows setup disk and perform standard OS installation steps. Step 2: Boot from the motherboard driver disk using "Xpress Install" to install the operating system. Figure... 1 - 16 - When the screen requesting you to your USB thumb drive. A. Installing the RAID/AHCI Driver and Operating...

RAID Setup Guide
Page 17
... 1, RAID 5 or RAID 10 arrays. Rebuilding applies only to a hard drive from other drives in the operating system, make sure the chipset driver has been installed from the Start menu. The procedures below assume a new drive is the process of the screen displays the rebuild progress. Restart your computer and replace...
... 1, RAID 5 or RAID 10 arrays. Rebuilding applies only to a hard drive from other drives in the operating system, make sure the chipset driver has been installed from the Start menu. The procedures below assume a new drive is the process of the screen displays the rebuild progress. Restart your computer and replace...

RAID Setup Guide
Page 19
... and restart the system again. Step 2: After re-entering the operating system, the dialog box as shown above will auto-restart. Click Enable to install. Step 4: Launch the Intel(R) Optane Memory application from the Start menu and make sure the Intel® Optane™ Memory has been enabled.... will prevent Intel® Optane™ memory from functioning properly. (Note) If the system already has Intel® Rapid Storage Technology utility installed, you have to remove it must have equal or smaller capacity than the hard drive/SSD to continue. The Optane™ memory cannot be...
... and restart the system again. Step 2: After re-entering the operating system, the dialog box as shown above will auto-restart. Click Enable to install. Step 4: Launch the Intel(R) Optane Memory application from the Start menu and make sure the Intel® Optane™ Memory has been enabled.... will prevent Intel® Optane™ memory from functioning properly. (Note) If the system already has Intel® Rapid Storage Technology utility installed, you have to remove it must have equal or smaller capacity than the hard drive/SSD to continue. The Optane™ memory cannot be...

RAID Setup Guide
Page 20
...memory. Doing so will cause the operating system to stop functioning correctly. •• If you want to enable the Optane™ memory installed in Intel RST Premium With Intel Optane System Acceleration mode, please follow the steps below: Step 1: After system restarts, go to the ... first. •• After enabling the Optane™ memory, the related BIOS settings will remain even after a BIOS update. - 20 - B-2: Installation in Intel RST Premium With Intel Optane System Acceleration mode If the SATA controller has been configured in the M2M_32G connector, set PCIe Storage Dev...
...memory. Doing so will cause the operating system to stop functioning correctly. •• If you want to enable the Optane™ memory installed in Intel RST Premium With Intel Optane System Acceleration mode, please follow the steps below: Step 1: After system restarts, go to the ... first. •• After enabling the Optane™ memory, the related BIOS settings will remain even after a BIOS update. - 20 - B-2: Installation in Intel RST Premium With Intel Optane System Acceleration mode If the SATA controller has been configured in the M2M_32G connector, set PCIe Storage Dev...

Unique Features Introduction
Page 7
... system, check related updates online, and download the apps, drivers, and BIOS. Figure 2 (Note) Available applications in the notification area to install GIGABYTE App Center and the selected apps. APP Center GIGABYTE App Center gives you easy access to a wealth of each application may differ by clicking Launch App Center on the Start...
... system, check related updates online, and download the apps, drivers, and BIOS. Figure 2 (Note) Available applications in the notification area to install GIGABYTE App Center and the selected apps. APP Center GIGABYTE App Center gives you easy access to a wealth of each application may differ by clicking Launch App Center on the Start...

Unique Features Introduction
Page 8
... 3D OSD and specify the font size/location/color of the displayed information. (Note) Please ensure that DirectX End-User Runtime has been installed on your system prior to easily get hold of available options. 2-1 3D OSD 3D OSD (Note) automatically detects and displays your system information ...during games, allowing you to installing 3D OSD. - 8 - The 3D OSD Interface Using 3D OSD Main Menu: Allows you to enable or disable the 3D OSD feature and...
... 3D OSD and specify the font size/location/color of the displayed information. (Note) Please ensure that DirectX End-User Runtime has been installed on your system prior to easily get hold of available options. 2-1 3D OSD 3D OSD (Note) automatically detects and displays your system information ...during games, allowing you to installing 3D OSD. - 8 - The 3D OSD Interface Using 3D OSD Main Menu: Allows you to enable or disable the 3D OSD feature and...

Unique Features Introduction
Page 10
...HomeCloud HomeCloud allows you must have Android 4.0/iOS 6.0 or above version. •• The first time you use HomeCloud, GIGABYTE Remote, and Remote OC, you must install GIGABYTE Cloud Station on your smart phone/tablet device. (For Android systems, please download the app from App Store.) (Note 1)... •• To share HomeCloud files between computers, you need to install Cloud Station (Server) on the host computer ...
...HomeCloud HomeCloud allows you must have Android 4.0/iOS 6.0 or above version. •• The first time you use HomeCloud, GIGABYTE Remote, and Remote OC, you must install GIGABYTE Cloud Station on your smart phone/tablet device. (For Android systems, please download the app from App Store.) (Note 1)... •• To share HomeCloud files between computers, you need to install Cloud Station (Server) on the host computer ...

Unique Features Introduction
Page 11
... Tap on the folder and then tap on the menu icon to your computer. Cloud Station: Using HomeCloud Step 1: Launch HomeCloud on the host computer (installed with Cloud Station (Server)), sign in account(s). Tap on HomeCloud to perform the following functions: On the Host Computer: Option Function Account List Displays currently...
... Tap on the folder and then tap on the menu icon to your computer. Cloud Station: Using HomeCloud Step 1: Launch HomeCloud on the host computer (installed with Cloud Station (Server)), sign in account(s). Tap on HomeCloud to perform the following functions: On the Host Computer: Option Function Account List Displays currently...

Unique Features Introduction
Page 16
Disk Mode Switch Disk Mode Switch allows you to change the SATA controller disk mode from AHCI to RAID mode even after the hard drive has been installed with an operating system. After switching the operating mode, please restart your computer and make sure the Intel® Rapid Storage Technology utility can work properly. (Note) This feature is supported only in UEFI mode. - 16 - 2-5 Easy RAID The GIGABYTE Easy RAID(Note) utility includes the following 'EZ' setups applications that will offer greatly simplified install and configuration procedures: Disk Mode Switch and XHD.
Disk Mode Switch Disk Mode Switch allows you to change the SATA controller disk mode from AHCI to RAID mode even after the hard drive has been installed with an operating system. After switching the operating mode, please restart your computer and make sure the Intel® Rapid Storage Technology utility can work properly. (Note) This feature is supported only in UEFI mode. - 16 - 2-5 Easy RAID The GIGABYTE Easy RAID(Note) utility includes the following 'EZ' setups applications that will offer greatly simplified install and configuration procedures: Disk Mode Switch and XHD.

Unique Features Introduction
Page 17
... and click Create RAID 0 based on your data before using the XHD utility. - 17 - System Requirements 1. Intel® Rapid Storage Technology utility installed 4. B. Back up your need for the operating system drive, all data on other hard drive will be deleted. Intel® SATA controller driver...1) The XHD utility only supports the SATA connectors controlled by the Intel® Chipset. (Note 2) Except for complex and time-consuming configurations. XHD With GIGABYTE XHD (Note 1), users can quickly configure a RAID-ready system for RAID 0 when a new SATA drive is added.
... and click Create RAID 0 based on your data before using the XHD utility. - 17 - System Requirements 1. Intel® Rapid Storage Technology utility installed 4. B. Back up your need for the operating system drive, all data on other hard drive will be deleted. Intel® SATA controller driver...1) The XHD utility only supports the SATA connectors controlled by the Intel® Chipset. (Note 2) Except for complex and time-consuming configurations. XHD With GIGABYTE XHD (Note 1), users can quickly configure a RAID-ready system for RAID 0 when a new SATA drive is added.


