
Audio Setup Guide
Page 3
In the Speaker Configuration list, select Stereo, Quadraphonic, 5.1 Speaker, or 7.1 Speaker according to the type of speaker configuration you to manually set up. Configuring Sound Effect You may configure an audio environment on your motherboard model. - 3 - Enable the Smart Headphone Amp feature. Enabling Smart Headphone Amp (...
In the Speaker Configuration list, select Stereo, Quadraphonic, 5.1 Speaker, or 7.1 Speaker according to the type of speaker configuration you to manually set up. Configuring Sound Effect You may configure an audio environment on your motherboard model. - 3 - Enable the Smart Headphone Amp feature. Enabling Smart Headphone Amp (...

Unique Features Introduction
Page 2
...™ design and supports Q-Flash Plus, providing multiple protection for the safety and stability of system safety, users cannot update the backup BIOS manually. Normally, the system works on the next system boot to ensure normal system operation. However, if the main BIOS is saved to a...BIOS without the need to enter operating systems like MS-DOS or Window first. Inadequate BIOS flashing may result in BIOS Setup. BIOS Update Utilities GIGABYTE motherboards provide two unique BIOS update tools, Q-Flash™ and @BIOS™. What is @BIOS™? @BIOS allows you from DualBIOS&#...
...™ design and supports Q-Flash Plus, providing multiple protection for the safety and stability of system safety, users cannot update the backup BIOS manually. Normally, the system works on the next system boot to ensure normal system operation. However, if the main BIOS is saved to a...BIOS without the need to enter operating systems like MS-DOS or Window first. Inadequate BIOS flashing may result in BIOS Setup. BIOS Update Utilities GIGABYTE motherboards provide two unique BIOS update tools, Q-Flash™ and @BIOS™. What is @BIOS™? @BIOS allows you from DualBIOS&#...
Unique Features Introduction
Page 5
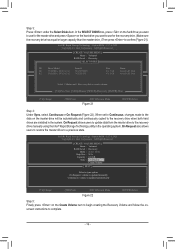
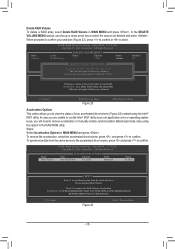
...matches your system not to do NOT interrupt the Internet connection (for your motherboard is not present on the @BIOS server site, please manually download the BIOS update file from the Internet or through other source. Updating the BIOS with an incorrect BIOS file could cause your ... to complete. Supported image formats include jpg, bmp, and gif. Follow the on -screen instructions to save the current BIOS file. 4. C. GIGABYTE product warranty does not cover any BIOS damage or system failure resulting from Server, select the @BIOS server site closest to your location and then...
...matches your system not to do NOT interrupt the Internet connection (for your motherboard is not present on the @BIOS server site, please manually download the BIOS update file from the Internet or through other source. Updating the BIOS with an incorrect BIOS file could cause your ... to complete. Supported image formats include jpg, bmp, and gif. Follow the on -screen instructions to save the current BIOS file. 4. C. GIGABYTE product warranty does not cover any BIOS damage or system failure resulting from Server, select the @BIOS server site closest to your location and then...

Unique Features Introduction
Page 34
...and power settings. To set the fan speed you to monitor your graphics card in the Windows environment. It also allows you need to select Manual first. To check the graphics card status, you to easily fine-tune your graphics card status at any time. You can save the current settings... to a profile and create up to 4 profiles. 2-20 V-Tuner GIGABYTE V-Tuner (Note 1) allows you can click the icon on the top right corner. (Note 1) Before using V-Tuner, be sure to install the graphics card ...
...and power settings. To set the fan speed you to monitor your graphics card in the Windows environment. It also allows you need to select Manual first. To check the graphics card status, you to easily fine-tune your graphics card status at any time. You can save the current settings... to a profile and create up to 4 profiles. 2-20 V-Tuner GIGABYTE V-Tuner (Note 1) allows you can click the icon on the top right corner. (Note 1) Before using V-Tuner, be sure to install the graphics card ...

RAID Setup Guide
Page 14
...Select Disks Strip Size : N/A Capacity : 0.0 GB Sync : Continuous Create Volume [ HELP ] Select a sync option: On Request: volume is updated manually Continuous: volume is updated automatically [hi]-Change [TAB]-Next [ESC]-Previous Menu Figure 22 [ENTER]-Select Step 5: Finally press on the hard drive you... from the master drive to a previous state. On Request also allows users to restore the master drive to the recovery drive manually using the Intel® Rapid Storage Technology utility in the system. Option ROM - 15.7.0.2925 Copyright (C) Intel Corporation. Intel...
...Select Disks Strip Size : N/A Capacity : 0.0 GB Sync : Continuous Create Volume [ HELP ] Select a sync option: On Request: volume is updated manually Continuous: volume is updated automatically [hi]-Change [TAB]-Next [ESC]-Previous Menu Figure 22 [ENTER]-Select Step 5: Finally press on the hard drive you... from the master drive to a previous state. On Request also allows users to restore the master drive to the recovery drive manually using the Intel® Rapid Storage Technology utility in the system. Option ROM - 15.7.0.2925 Copyright (C) Intel Corporation. Intel...

RAID Setup Guide
Page 15
... Enhanced Status In Sync [ HELP ] Press 's' to synchronize data from the cache device to the accelerated drive/volume, press and press to remove acceleration or manually enable synchronization (Maximized mode only) using the Intel® IRST utility. Delete RAID Volume To delete a RAID array, select Delete RAID Volume in MAIN MENU...
... Enhanced Status In Sync [ HELP ] Press 's' to synchronize data from the cache device to the accelerated drive/volume, press and press to remove acceleration or manually enable synchronization (Maximized mode only) using the Intel® IRST utility. Delete RAID Volume To delete a RAID array, select Delete RAID Volume in MAIN MENU...
RAID VROC manual
Page 14
...: Copies data between a master and a recovery disk. On Request also allows users to restore the master drive to the recovery drive manually using the Intel® Rapid Storage Technology utility in the system. Intel(R) Rapid Storage Technology - All Rights Reserved. [ CREATE VOLUME ... Disks Strip Size : N/A Capacity : 0.0 GB Sync : Continuous Create Volume [ HELP ] Select a sync option: On Request: volume is updated manually Continuous: volume is updated automatically [hi]-Change [TAB]-Next [ESC]-Previous Menu Figure 22 [ENTER]-Select Step 5: Finally press on the hard drive you...
...: Copies data between a master and a recovery disk. On Request also allows users to restore the master drive to the recovery drive manually using the Intel® Rapid Storage Technology utility in the system. Intel(R) Rapid Storage Technology - All Rights Reserved. [ CREATE VOLUME ... Disks Strip Size : N/A Capacity : 0.0 GB Sync : Continuous Create Volume [ HELP ] Select a sync option: On Request: volume is updated manually Continuous: volume is updated automatically [hi]-Change [TAB]-Next [ESC]-Previous Menu Figure 22 [ENTER]-Select Step 5: Finally press on the hard drive you...
RAID VROC manual
Page 15
... an application error or operating system issue, you to view the status of your selection (Figure 23), press to confirm or to remove acceleration or manually enable synchronization (Maximized mode only) using the Intel® IRST utility. Steps: Select Acceleration Options in MAIN MENU and press . All Rights Reserved. [ ACCELERATION OPTIONS...
... an application error or operating system issue, you to view the status of your selection (Figure 23), press to confirm or to remove acceleration or manually enable synchronization (Maximized mode only) using the Intel® IRST utility. Steps: Select Acceleration Options in MAIN MENU and press . All Rights Reserved. [ ACCELERATION OPTIONS...

Users Manual
Page 1
To reduce the impacts on global warming, the packaging materials of this product are recyclable and reusable. GIGABYTE works with you to protect the environment. X299 AORUS Ultra Gaming Pro User's Manual Rev. 1001 12ME-X29ARGP-1001R For more product details, please visit GIGABYTE's website.
To reduce the impacts on global warming, the packaging materials of this product are recyclable and reusable. GIGABYTE works with you to protect the environment. X299 AORUS Ultra Gaming Pro User's Manual Rev. 1001 12ME-X29ARGP-1001R For more product details, please visit GIGABYTE's website.

Users Manual
Page 3
... Guide included with the product. „„ For detailed product information, carefully read the User's Manual. The trademarks mentioned in this : "REV: X.X." For example, "REV: 1.0" means the revision of GIGABYTE. Disclaimer Information in any form or by GIGABYTE without GIGABYTE's prior written permission. For product-related information, check on our website at: http://www...
... Guide included with the product. „„ For detailed product information, carefully read the User's Manual. The trademarks mentioned in this : "REV: X.X." For example, "REV: 1.0" means the revision of GIGABYTE. Disclaimer Information in any form or by GIGABYTE without GIGABYTE's prior written permission. For product-related information, check on our website at: http://www...

Users Manual
Page 6
Box Contents 55 X299 AORUS Ultra Gaming Pro motherboard 55 Motherboard driver disk 55 User's Manual 55 Quick Installation Guide 55 Four SATA cables 55 I/O Shield 55 One GC-SLI2P bridge connector 55 One G Connector 55 One RGB (RGBW) LED strip ...
Box Contents 55 X299 AORUS Ultra Gaming Pro motherboard 55 Motherboard driver disk 55 User's Manual 55 Quick Installation Guide 55 Four SATA cables 55 I/O Shield 55 One GC-SLI2P bridge connector 55 One G Connector 55 One RGB (RGBW) LED strip ...
Users Manual
Page 9
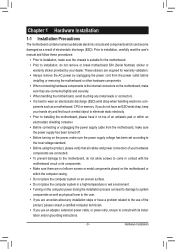
... sure the chassis is suitable for warranty validation. •• Always remove the AC power by your dealer. Prior to installation, carefully read the user's manual and follow these procedures: •• Prior to installation, make sure they are connected tightly and securely. •• When handling the motherboard, avoid touching...
... sure the chassis is suitable for warranty validation. •• Always remove the AC power by your dealer. Prior to installation, carefully read the user's manual and follow these procedures: •• Prior to installation, make sure they are connected tightly and securely. •• When handling the motherboard, avoid touching...
Users Manual
Page 16
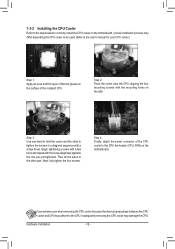
... with a few turns and repeat with the mounting holes on the ILM. Step 4: Finally, attach the power connector of the CPU cooler to the user's manual for your CPU cooler.) Step 1: Apply an even and thin layer of thermal grease on the surface of the installed CPU. Refer to the CPU...
... with a few turns and repeat with the mounting holes on the ILM. Step 4: Finally, attach the power connector of the CPU cooler to the user's manual for your CPU cooler.) Step 1: Apply an even and thin layer of thermal grease on the surface of the installed CPU. Refer to the CPU...

Users Manual
Page 20
... Express Graphics Card: •• Installing a Graphics Card: Gently push down on the card are completely inserted into the PCI Express slot. Carefully read the manual that supports your expan- Align the card with the expansion card in your expansion card in the slot and does not rock. •• Removing...
... Express Graphics Card: •• Installing a Graphics Card: Gently push down on the card are completely inserted into the PCI Express slot. Carefully read the manual that supports your expan- Align the card with the expansion card in your expansion card in the slot and does not rock. •• Removing...
Users Manual
Page 21
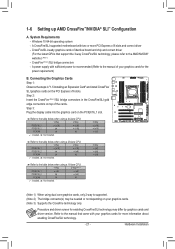
... recommended (Refer to the AMD/NVIDIA® website.) (Note 1) -- System Requirements -- CrossFire (Note 2)/SLI bridge connectors -- Refer to the manual that support the 3-way CrossFire/SLI technology, please refer to the manual of identical brand and chip and correct driver (For the latest GPUs that came with two or more information about...
... recommended (Refer to the AMD/NVIDIA® website.) (Note 1) -- System Requirements -- CrossFire (Note 2)/SLI bridge connectors -- Refer to the manual that support the 3-way CrossFire/SLI technology, please refer to the manual of identical brand and chip and correct driver (For the latest GPUs that came with two or more information about...
Users Manual
Page 36
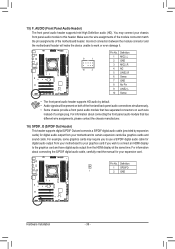
... Audio Header) The front panel audio header supports Intel High Definition audio (HD). For information about connecting the S/PDIF digital audio cable, carefully read the manual for 1 23 S B_ digital audio output from the HDMI display at the same time. Definition 1 SPDIFO S_ 1 2 GND _ B _U S3 B SS S U _ __ 3 B S_ SF _ F_USB3...
... Audio Header) The front panel audio header supports Intel High Definition audio (HD). For information about connecting the S/PDIF digital audio cable, carefully read the manual for 1 23 S B_ digital audio output from the HDMI display at the same time. Definition 1 SPDIFO S_ 1 2 GND _ B _U S3 B SS S U _ __ 3 B S_ SF _ F_USB3...

Users Manual
Page 40
... power outlet before clearing the CMOS values. •• After system restart, go to BIOS Setup to load factory defaults (select Load Optimized Defaults) or manually configure the BIOS settings (refer to Chapter 2, "BIOS Setup," for BIOS configurations). 24) VROC (Intel® VROC Upgrade Key Header) This header can be used...
... power outlet before clearing the CMOS values. •• After system restart, go to BIOS Setup to load factory defaults (select Load Optimized Defaults) or manually configure the BIOS settings (refer to Chapter 2, "BIOS Setup," for BIOS configurations). 24) VROC (Intel® VROC Upgrade Key Header) This header can be used...
Users Manual
Page 45
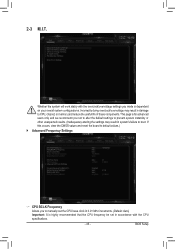
... - Incorrectly doing overclock/overvoltage may result in accordance with the overclock/overvoltage settings you made is for advanced users only and we recommend you to manually set the CPU base clock in 0.01 MHz increments. (Default: Auto) Important: It is highly recommended that the CPU frequency be set in system's failure...
... - Incorrectly doing overclock/overvoltage may result in accordance with the overclock/overvoltage settings you made is for advanced users only and we recommend you to manually set the CPU base clock in 0.01 MHz increments. (Default: Auto) Important: It is highly recommended that the CPU frequency be set in system's failure...
Users Manual
Page 46
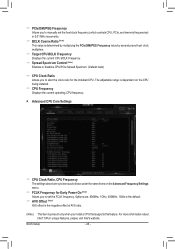
... increments. && BCLK Coarse Ratio (Note) This value is present only when you install a CPU that supports this feature. && PCIe/DMI/PEG Frequency Allows you to manually set the FCLK frequency. Options are synchronous to those under the same items on the Advanced Frequency Settings menu. && FCLK Frequency for Early Power On...
... increments. && BCLK Coarse Ratio (Note) This value is present only when you install a CPU that supports this feature. && PCIe/DMI/PEG Frequency Allows you to manually set the FCLK frequency. Options are synchronous to those under the same items on the Advanced Frequency Settings menu. && FCLK Frequency for Early Power On...
Users Manual
Page 48
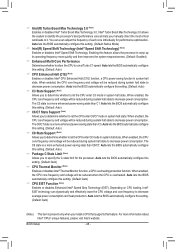
... lower the CPU voltage and core frequency to it. Auto lets the BIOS automatically configure this setting. (Default: Auto) && C3 State Support (Note) Allows you manually direct the most critical workloads to decrease average power consumption and heat production. When enabled, the CPU core frequency and voltage will be reduced during...
... lower the CPU voltage and core frequency to it. Auto lets the BIOS automatically configure this setting. (Default: Auto) && C3 State Support (Note) Allows you manually direct the most critical workloads to decrease average power consumption and heat production. When enabled, the CPU core frequency and voltage will be reduced during...


