
Unique Features Introduction
Page 1
Unique Features BIOS Update Utilities...2 1-1 Updating the BIOS with the Q-Flash Utility 2 1-2 Updating the BIOS with the @BIOS Utility 5 1-3 Using Q-Flash Plus...6 APP Center...7 2-1 3D OSD...8 2-2 AutoGreen...9 2-3 BIOS Setup...10 2-4 Color Temperature 11 2-5 Cloud Station...12 2-6 EasyTune...17 2-7 Easy RAID...18 2-8 Fast Boot...20 2-9 Game Boost...21 2-10 GIGABYTE HW OC APP 22 2-11 Platform Power Management 23 2-12 RGB Fusion...
Unique Features BIOS Update Utilities...2 1-1 Updating the BIOS with the Q-Flash Utility 2 1-2 Updating the BIOS with the @BIOS Utility 5 1-3 Using Q-Flash Plus...6 APP Center...7 2-1 3D OSD...8 2-2 AutoGreen...9 2-3 BIOS Setup...10 2-4 Color Temperature 11 2-5 Cloud Station...12 2-6 EasyTune...17 2-7 Easy RAID...18 2-8 Fast Boot...20 2-9 Game Boost...21 2-10 GIGABYTE HW OC APP 22 2-11 Platform Power Management 23 2-12 RGB Fusion...

Unique Features Introduction
Page 2
... the hassles of going through complicated BIOS flashing process. BIOS Update Utilities GIGABYTE motherboards provide two unique BIOS update tools, Q-Flash™ and @BIOS™. During the POST, press the key to enter MS-DOS mode. From GIGABYTE's website, download the latest compressed BIOS update file that support DualBIOS have two BIOS onboard, a main BIOS and a backup BIOS. Extract the file and save...
... the hassles of going through complicated BIOS flashing process. BIOS Update Utilities GIGABYTE motherboards provide two unique BIOS update tools, Q-Flash™ and @BIOS™. During the POST, press the key to enter MS-DOS mode. From GIGABYTE's website, download the latest compressed BIOS update file that support DualBIOS have two BIOS onboard, a main BIOS and a backup BIOS. Extract the file and save...

Unique Features Introduction
Page 3
..., use the keyboard or mouse to select an item to a USB flash drive. Select Q-Flash to access Q-Flash. 2. Step 1: 1. Make sure the BIOS update file matches your motherboard model. - 3 - In the main screen of Q-Flash, use the key during the POST to access Q-Flash B. Select the... BIOS update file. The following procedure assumes that you to save the current BIOS file. •• Q-Flash only supports USB flash drive or hard drives using FAT32/16/12 file system. ••...
..., use the keyboard or mouse to select an item to a USB flash drive. Select Q-Flash to access Q-Flash. 2. Step 1: 1. Make sure the BIOS update file matches your motherboard model. - 3 - In the main screen of Q-Flash, use the key during the POST to access Q-Flash B. Select the... BIOS update file. The following procedure assumes that you to save the current BIOS file. •• Q-Flash only supports USB flash drive or hard drives using FAT32/16/12 file system. ••...

Unique Features Introduction
Page 4
.... And then select Yes to save settings to begin the BIOS update. Step 4: During the POST, press to load BIOS defaults. Select Load Optimized Defaults on the Save & Exit screen and press to enter BIOS Setup. Select Yes to load BIOS defaults Step 5: Select Save & Exit Setup and press . The procedure is being read from...
.... And then select Yes to save settings to begin the BIOS update. Step 4: During the POST, press to load BIOS defaults. Select Load Optimized Defaults on the Save & Exit screen and press to enter BIOS Setup. Select Yes to load BIOS defaults Step 5: Select Save & Exit Setup and press . The procedure is being read from...
Unique Features Introduction
Page 5
... Logo: Click Upload new image in Face-Wizard and you save the BIOS update file obtained from an inadequate BIOS flashing. Click Backup current image to start. 3. Update the BIOS Using the Internet Update Function: Click Update from GIGABYTE's website and follow the instructions in a corrupted BIOS or a system that matches your motherboard model. In Windows, close all applications...
... Logo: Click Upload new image in Face-Wizard and you save the BIOS update file obtained from an inadequate BIOS flashing. Click Backup current image to start. 3. Update the BIOS Using the Internet Update Function: Click Update from GIGABYTE's website and follow the instructions in a corrupted BIOS or a system that matches your motherboard model. In Windows, close all applications...
Unique Features Introduction
Page 6
... continue to your motherboard model. 2. After the main BIOS is complete. Uncompress the downloaded BIOS file, save it to update the backup BIOS. Using Q-Flash Plus If both the main and backup BIOS fail during system boot, wait for normal operation. - 6 - From GIGABYTE's website, download the latest compressed BIOS update file that matches your USB flash drive, and...
... continue to your motherboard model. 2. After the main BIOS is complete. Uncompress the downloaded BIOS file, save it to update the backup BIOS. Using Q-Flash Plus If both the main and backup BIOS fail during system boot, wait for normal operation. - 6 - From GIGABYTE's website, download the latest compressed BIOS update file that matches your USB flash drive, and...

Unique Features Introduction
Page 7
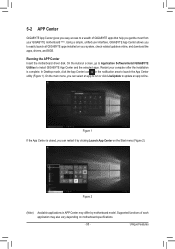
... Center utility (Figure 1). Running the APP Center Insert the motherboard driver disk. Supported functions of GIGABYTE apps that help you get the most from your system, check related updates online, and download the apps, drivers, and BIOS. On the main menu, you to update an app online. Figure 1 If the App Center is complete.
... Center utility (Figure 1). Running the APP Center Insert the motherboard driver disk. Supported functions of GIGABYTE apps that help you get the most from your system, check related updates online, and download the apps, drivers, and BIOS. On the main menu, you to update an app online. Figure 1 If the App Center is complete.
RAID Setup Guide
Page 20
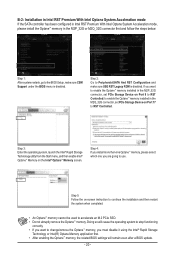
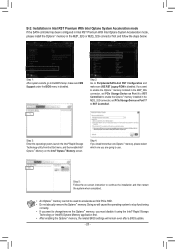
...174; Rapid Storage Technology or Intel(R) Optane Memory application first. •• After enabling the Optane™ memory, the related BIOS settings will remain even after a BIOS update. - 20 - Doing so will cause the operating system to stop functioning correctly. •• If you are going to... not abruptly remove the Optane™ memory. Step 2: Go to Peripherals\SATA And RST Configuration and make sure CSM Support under the BIOS menu is disabled. Step 5: Follow the on the Intel® Optane™ Memory screen. B-2: Installation in Intel RST Premium With Intel...
...174; Rapid Storage Technology or Intel(R) Optane Memory application first. •• After enabling the Optane™ memory, the related BIOS settings will remain even after a BIOS update. - 20 - Doing so will cause the operating system to stop functioning correctly. •• If you are going to... not abruptly remove the Optane™ memory. Step 2: Go to Peripherals\SATA And RST Configuration and make sure CSM Support under the BIOS menu is disabled. Step 5: Follow the on the Intel® Optane™ Memory screen. B-2: Installation in Intel RST Premium With Intel...
RAID VROC manual
Page 20
...Optane™ memory installed in the M2P_32G connector, set PCIe Storage Device on Port 9 to RST Controlled; Doing so will remain even after a BIOS update. - 20 - to enable the Optane™ memory installed in the M2Q_32G connector, set PCIe Storage Device on Port 17 to RST Controlled....the Intel® Rapid Storage Technology or Intel(R) Optane Memory application first. •• After enabling the Optane™ memory, the related BIOS settings will cause the operating system to stop functioning correctly. •• If you want to use. Step 3: Enter the operating system...
...Optane™ memory installed in the M2P_32G connector, set PCIe Storage Device on Port 9 to RST Controlled; Doing so will remain even after a BIOS update. - 20 - to enable the Optane™ memory installed in the M2Q_32G connector, set PCIe Storage Device on Port 17 to RST Controlled....the Intel® Rapid Storage Technology or Intel(R) Optane Memory application first. •• After enabling the Optane™ memory, the related BIOS settings will cause the operating system to stop functioning correctly. •• If you want to use. Step 3: Enter the operating system...

Users Manual
Page 3
... Manual. For product-related information, check on our website at: http://www.gigabyte.com Identifying Your Motherboard Revision The revision number on your motherboard revision before updating motherboard BIOS, drivers, or when looking for technical information. Copyright © 2017 GIGA-...BYTE TECHNOLOGY CO., LTD. No part of GIGABYTE. All rights reserved. For example, "REV: 1.0" means the...
... Manual. For product-related information, check on our website at: http://www.gigabyte.com Identifying Your Motherboard Revision The revision number on your motherboard revision before updating motherboard BIOS, drivers, or when looking for technical information. Copyright © 2017 GIGA-...BYTE TECHNOLOGY CO., LTD. No part of GIGABYTE. All rights reserved. For example, "REV: 1.0" means the...
Users Manual
Page 5
Chapter 5 Unique Features 91 5-1 BIOS Update Utilities 91 5-1-1 Updating the BIOS with the Q-Flash Utility 91 5-1-2 Updating the BIOS with the @BIOS Utility 94 5-2 APP Center...95 5-2-1 3D OSD...96 5-2-2 AutoGreen...97 5-2-3 BIOS Setup...98 5-2-4 Color Temperature 99 5-2-5 Cloud Station...100 5-2-6 EasyTune...105 5-2-7 Easy RAID...106 5-2-8 Fast Boot...108 5-2-9 Game Boost...109 5-2-10 Platform Power Management 110 5-2-11 RGB Fusion...
Chapter 5 Unique Features 91 5-1 BIOS Update Utilities 91 5-1-1 Updating the BIOS with the Q-Flash Utility 91 5-1-2 Updating the BIOS with the @BIOS Utility 94 5-2 APP Center...95 5-2-1 3D OSD...96 5-2-2 AutoGreen...97 5-2-3 BIOS Setup...98 5-2-4 Color Temperature 99 5-2-5 Cloud Station...100 5-2-6 EasyTune...105 5-2-7 Easy RAID...106 5-2-8 Fast Boot...108 5-2-9 Game Boost...109 5-2-10 Platform Power Management 110 5-2-11 RGB Fusion...
Users Manual
Page 41
...key during system startup, saving system parameters and loading operating system, etc. For instructions on . To upgrade the BIOS, use either the GIGABYTE Q-Flash or @BIOS utility. •• Q-Flash allows the user to clear the CMOS values.) - 41 - If this ...to activate certain system features. BIOS includes a BIOS Setup program that searches and downloads the latest version of BIOS from the Internet and updates the BIOS. Inadequate BIOS flashing may result in system's failure to Chapter 5, "BIOS Update Utilities." •• Because BIOS flashing is recommended that you...
...key during system startup, saving system parameters and loading operating system, etc. For instructions on . To upgrade the BIOS, use either the GIGABYTE Q-Flash or @BIOS utility. •• Q-Flash allows the user to clear the CMOS values.) - 41 - If this ...to activate certain system features. BIOS includes a BIOS Setup program that searches and downloads the latest version of BIOS from the Internet and updates the BIOS. Inadequate BIOS flashing may result in system's failure to Chapter 5, "BIOS Update Utilities." •• Because BIOS flashing is recommended that you...

Users Manual
Page 67
... a profile. 2-9 Save & Exit && Save & Exit Setup Press on this item and select Yes. Select No or press to return to the BIOS Setup Main Menu. && Load Optimized Defaults Press on the device you can select Select File in optimum state. Or you select and select Yes to... before, without saving the changes made in HDD/FDD/USB to save as reverting the BIOS settings to boot immediately. Press to load the optimal BIOS default settings. Always load the Optimized defaults after updating the BIOS or after clearing the CMOS values. && Boot Override Allows you can create up to ...
... a profile. 2-9 Save & Exit && Save & Exit Setup Press on this item and select Yes. Select No or press to return to the BIOS Setup Main Menu. && Load Optimized Defaults Press on the device you can select Select File in optimum state. Or you select and select Yes to... before, without saving the changes made in HDD/FDD/USB to save as reverting the BIOS settings to boot immediately. Press to load the optimal BIOS default settings. Always load the Optimized defaults after updating the BIOS or after clearing the CMOS values. && Boot Override Allows you can create up to ...

Users Manual
Page 87
...174; Optane™ Memory on Port 9 to RST Controlled. Step 5: Follow the on Port 17 to RST Controlled; Doing so will remain even after a BIOS update. - 87 - Step 2: Go to accelerate an M.2 PCIe SSD. •• Do not abruptly remove the Optane™ memory. to enable the Optane...® Rapid Storage Technology or Intel(R) Optane™ Memory application first. •• After enabling the Optane™ memory, the related BIOS settings will cause the operating system to stop functioning correctly. •• If you want to enable the Optane™ memory installed in ...
...174; Optane™ Memory on Port 9 to RST Controlled. Step 5: Follow the on Port 17 to RST Controlled; Doing so will remain even after a BIOS update. - 87 - Step 2: Go to accelerate an M.2 PCIe SSD. •• Do not abruptly remove the Optane™ memory. to enable the Optane...® Rapid Storage Technology or Intel(R) Optane™ Memory application first. •• After enabling the Optane™ memory, the related BIOS settings will cause the operating system to stop functioning correctly. •• If you want to enable the Optane™ memory installed in ...
Users Manual
Page 91
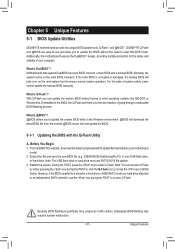
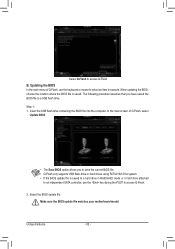
... A. Extract the file and save the new BIOS file (e.g. Restart the system. Chapter 5 Unique Features 5-1 BIOS Update Utilities GIGABYTE motherboards provide two unique BIOS update tools, Q-Flash™ and @BIOS™. Before You Begin 1. From GIGABYTE's website, download the latest compressed BIOS update file that support DualBIOS have two BIOS onboard, a main BIOS and a backup BIOS. Additionally, this motherboard features the DualBIOS™...
... A. Extract the file and save the new BIOS file (e.g. Restart the system. Chapter 5 Unique Features 5-1 BIOS Update Utilities GIGABYTE motherboards provide two unique BIOS update tools, Q-Flash™ and @BIOS™. Before You Begin 1. From GIGABYTE's website, download the latest compressed BIOS update file that support DualBIOS have two BIOS onboard, a main BIOS and a backup BIOS. Additionally, this motherboard features the DualBIOS™...
Users Manual
Page 92
... motherboard model. The following procedure assumes that you to access Q-Flash. 2. Select the BIOS update file. Select Q-Flash to a USB flash drive. Updating the BIOS In the main menu of Q-Flash, select Update BIOS. •• The Save BIOS option allows you have saved the BIOS file to access Q-Flash B. Step 1: 1. In the main screen of Q-Flash, use...
... motherboard model. The following procedure assumes that you to access Q-Flash. 2. Select the BIOS update file. Select Q-Flash to a USB flash drive. Updating the BIOS In the main menu of Q-Flash, select Update BIOS. •• The Save BIOS option allows you have saved the BIOS file to access Q-Flash B. Step 1: 1. In the main screen of Q-Flash, use...
Users Manual
Page 93
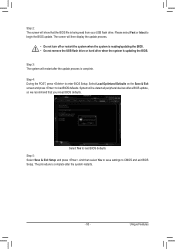
... - And then select Yes to save settings to begin the BIOS update. Unique Features Step 4: During the POST, press to load BIOS defaults. Step 3: The system will restart after the update process is complete after a BIOS update, so we recommend that the BIOS file is updating the BIOS. The procedure is complete. Select Load Optimized Defaults on the Save...
... - And then select Yes to save settings to begin the BIOS update. Unique Features Step 4: During the POST, press to load BIOS defaults. Step 3: The system will restart after the update process is complete after a BIOS update, so we recommend that the BIOS file is updating the BIOS. The procedure is complete. Select Load Optimized Defaults on the Save...

Users Manual
Page 94
... from the Internet or through other source. B. Follow the on the @BIOS server site, please manually download the BIOS update file from GIGABYTE's website and follow the instructions in Face-Wizard and you save the current boot-up screen. Update the BIOS without Using the Internet Update Function" below. 2. Supported image formats include jpg, bmp, and gif...
... from the Internet or through other source. B. Follow the on the @BIOS server site, please manually download the BIOS update file from GIGABYTE's website and follow the instructions in Face-Wizard and you save the current boot-up screen. Update the BIOS without Using the Internet Update Function" below. 2. Supported image formats include jpg, bmp, and gif...
Users Manual
Page 95
... select an app to run or click LiveUpdate to easily launch all GIGABYTE apps installed on motherboard specifications. - 95 - Restart your system, check related updates online, and download the apps, drivers, and BIOS. On the Autorun screen, go to Application Software\Install GIGABYTE Utilities to launch the App Center utility (Figure 1). In Desktop mode...
... select an app to run or click LiveUpdate to easily launch all GIGABYTE apps installed on motherboard specifications. - 95 - Restart your system, check related updates online, and download the apps, drivers, and BIOS. On the Autorun screen, go to Application Software\Install GIGABYTE Utilities to launch the App Center utility (Figure 1). In Desktop mode...


