
Unique Features Introduction
Page 1
Unique Features BIOS Update Utilities...2 1-1 Updating the BIOS with the Q-Flash Utility 2 1-2 Updating the BIOS with the @BIOS Utility 5 1-3 Using Q-Flash Plus...6 APP Center...7 2-1 3D OSD...8 2-2 AutoGreen...9 2-3 Cloud Station...10 2-4 EasyTune...15 2-5 Fast Boot...16 2-6 Game Boost...17 2-7 RGB Fusion...18 2-8 Smart TimeLock...20 2-9 Smart Keyboard...21 2-10 Smart Backup...22 2-11 Smart HUD...24 2-12...
Unique Features BIOS Update Utilities...2 1-1 Updating the BIOS with the Q-Flash Utility 2 1-2 Updating the BIOS with the @BIOS Utility 5 1-3 Using Q-Flash Plus...6 APP Center...7 2-1 3D OSD...8 2-2 AutoGreen...9 2-3 Cloud Station...10 2-4 EasyTune...15 2-5 Fast Boot...16 2-6 Game Boost...17 2-7 RGB Fusion...18 2-8 Smart TimeLock...20 2-9 Smart Keyboard...21 2-10 Smart Backup...22 2-11 Smart HUD...24 2-12...

Unique Features Introduction
Page 2
...POST to enter Q-Flash. From GIGABYTE's website, download the latest compressed BIOS update file that support DualBIOS have two BIOS onboard, a main BIOS and a backup BIOS. Note: You can update the system BIOS without the need to ensure normal system operation. Because BIOS flashing is saved to a hard ... corrupted or damaged, the backup BIOS will download the latest BIOS file from DualBIOS™. During the POST, press the key to access Q-Flash. GIGABYTE Q-Flash and @BIOS are easy-to-use FAT32/16/12 file system. 3. What is @BIOS™? @BIOS allows you can access Q-Flash ...
...POST to enter Q-Flash. From GIGABYTE's website, download the latest compressed BIOS update file that support DualBIOS have two BIOS onboard, a main BIOS and a backup BIOS. Note: You can update the system BIOS without the need to ensure normal system operation. Because BIOS flashing is saved to a hard ... corrupted or damaged, the backup BIOS will download the latest BIOS file from DualBIOS™. During the POST, press the key to access Q-Flash. GIGABYTE Q-Flash and @BIOS are easy-to-use FAT32/16/12 file system. 3. What is @BIOS™? @BIOS allows you can access Q-Flash ...

Unique Features Introduction
Page 3
... main screen of Q-Flash, use the key during the POST to execute. Updating the BIOS In the main menu of Q-Flash, select Update BIOS. •• The Save BIOS option allows you have saved the BIOS file to access Q-Flash B. The following procedure assumes that you to save the current...12 file system. •• If the BIOS update file is saved. Make sure the BIOS update file matches your motherboard model. - 3 - Select the BIOS update file. Select Q-Flash to a USB flash drive. When updating the BIOS, choose the location where the BIOS file is saved to a hard drive in RAID...
... main screen of Q-Flash, use the key during the POST to execute. Updating the BIOS In the main menu of Q-Flash, select Update BIOS. •• The Save BIOS option allows you have saved the BIOS file to access Q-Flash B. The following procedure assumes that you to save the current...12 file system. •• If the BIOS update file is saved. Make sure the BIOS update file matches your motherboard model. - 3 - Select the BIOS update file. Select Q-Flash to a USB flash drive. When updating the BIOS, choose the location where the BIOS file is saved to a hard drive in RAID...
Unique Features Introduction
Page 4
... Step 5: Select Save & Exit Setup and press . System will re-detect all peripheral devices after a BIOS update, so we recommend that the BIOS file is complete. The procedure is updating the BIOS. The screen will then display the update process. •• Do not turn off or restart the system when the ...system is reading/updating the BIOS. •• Do not remove the USB flash drive or hard drive when the system is complete after the update process is being read from ...
... Step 5: Select Save & Exit Setup and press . System will re-detect all peripheral devices after a BIOS update, so we recommend that the BIOS file is complete. The procedure is updating the BIOS. The screen will then display the update process. •• Do not turn off or restart the system when the ...system is reading/updating the BIOS. •• Do not remove the USB flash drive or hard drive when the system is complete after the update process is being read from ...

Unique Features Introduction
Page 5
... Logo: Click Upload new image in a corrupted BIOS or a system that is not present on the @BIOS server site, please manually download the BIOS update file from GIGABYTE's website and follow the instructions in "Update the BIOS without Using the Internet Update Function: Click Update ... Resident) programs. This helps prevent unexpected failures when performing a BIOS update. 2. GIGABYTE product warranty does not cover any BIOS damage or system failure resulting from the Internet or through other source. Update the BIOS without Using the Internet Update Function" below. 2. Failure to do...
... Logo: Click Upload new image in a corrupted BIOS or a system that is not present on the @BIOS server site, please manually download the BIOS update file from GIGABYTE's website and follow the instructions in "Update the BIOS without Using the Internet Update Function: Click Update ... Resident) programs. This helps prevent unexpected failures when performing a BIOS update. 2. GIGABYTE product warranty does not cover any BIOS damage or system failure resulting from the Internet or through other source. Update the BIOS without Using the Internet Update Function" below. 2. Failure to do...
Unique Features Introduction
Page 6
...in the USB flash drive on the back panel. After completion, the system will reboot again and boot from the main BIOS for 2-3 minutes and the FBIOS_LED will continue to GIGABYTE.bin. 1-3 Using Q-Flash Plus A. Before You Begin 1. Insert the USB flash drive into the white USB port on... the white USB port. After the main BIOS is flashed, the system will reboot automatically and then DualBIOS™ will stop flashing when the main BIOS flashing is complete. From GIGABYTE's website, download the latest compressed BIOS update file that matches your USB flash drive, and rename ...
...in the USB flash drive on the back panel. After completion, the system will reboot again and boot from the main BIOS for 2-3 minutes and the FBIOS_LED will continue to GIGABYTE.bin. 1-3 Using Q-Flash Plus A. Before You Begin 1. Insert the USB flash drive into the white USB port on... the white USB port. After the main BIOS is flashed, the system will reboot automatically and then DualBIOS™ will stop flashing when the main BIOS flashing is complete. From GIGABYTE's website, download the latest compressed BIOS update file that matches your USB flash drive, and rename ...
Unique Features Introduction
Page 7
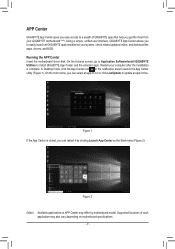
...is complete. On the main menu, you get the most from your system, check related updates online, and download the apps, drivers, and BIOS. In Desktop mode, click the App Center icon in APP Center may also vary depending on motherboard specifications. - 7 - Figure 2 (Note)... Available applications in the notification area to install GIGABYTE App Center and the selected apps. APP Center GIGABYTE App Center gives you easy access to a wealth of each application may differ by clicking Launch App Center on your...
...is complete. On the main menu, you get the most from your system, check related updates online, and download the apps, drivers, and BIOS. In Desktop mode, click the App Center icon in APP Center may also vary depending on motherboard specifications. - 7 - Figure 2 (Note)... Available applications in the notification area to install GIGABYTE App Center and the selected apps. APP Center GIGABYTE App Center gives you easy access to a wealth of each application may differ by clicking Launch App Center on your...

Unique Features Introduction
Page 16
...This option is the same as the Next Boot After AC Power Loss option (Note) in BIOS Setup. The settings will restart and enter BIOS Setup immediately. (Note) For more details about this function, refer to Chapter 2, "BIOS Setup." - 16 - It allows you to enable or disable the fast boot function to...return of an AC power loss. (This mode is configurable only when BIOS Fast Boot is the same as the Fast Boot option (Note) in BIOS Setup. 2-5 Fast Boot Through the simple GIGABYTE Fast Boot interface, you click the Enter BIOS Setup Now button, the system will take effect on next boot. If...
...This option is the same as the Next Boot After AC Power Loss option (Note) in BIOS Setup. The settings will restart and enter BIOS Setup immediately. (Note) For more details about this function, refer to Chapter 2, "BIOS Setup." - 16 - It allows you to enable or disable the fast boot function to...return of an AC power loss. (This mode is configurable only when BIOS Fast Boot is the same as the Fast Boot option (Note) in BIOS Setup. 2-5 Fast Boot Through the simple GIGABYTE Fast Boot interface, you click the Enter BIOS Setup Now button, the system will take effect on next boot. If...
Unique Features Introduction
Page 20
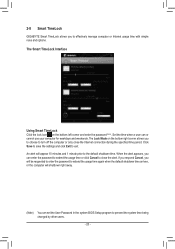
An alert will shutdown right away. (Note) You can set the User Password in the system BIOS Setup program to prevent the system time being changed by other users. - 20 - If you respond Cancel, you can or cannot use your computer for ... the lock icon on the bottom right corner allows you to effectively manage computer or Internet usage time with simple rules and options. 2-8 Smart TimeLock GIGABYTE Smart TimeLock allows you to choose to turn off the computer or only close the alert.
An alert will shutdown right away. (Note) You can set the User Password in the system BIOS Setup program to prevent the system time being changed by other users. - 20 - If you respond Cancel, you can or cannot use your computer for ... the lock icon on the bottom right corner allows you to effectively manage computer or Internet usage time with simple rules and options. 2-8 Smart TimeLock GIGABYTE Smart TimeLock allows you to choose to turn off the computer or only close the alert.
Unique Features Introduction
Page 25
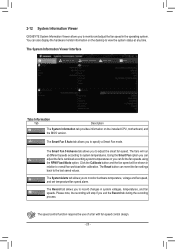
... speed will stop if you to system temperatures. The Reset button can also display the hardware monitor information on the installed CPU, motherboard, and the BIOS version. Using the Smart Fan option you can fix the fan speeds using the RPM Fixed Mode option. The Smart Fan 5 Auto tab allows you... and adjust the fan speed in relation to monitor hardware temperature, voltage and fan speed, and set temperature/fan speed alarm. 2-12 System Information Viewer GIGABYTE System Information Viewer allows you to the last saved values.
... speed will stop if you to system temperatures. The Reset button can also display the hardware monitor information on the installed CPU, motherboard, and the BIOS version. Using the Smart Fan option you can fix the fan speeds using the RPM Fixed Mode option. The Smart Fan 5 Auto tab allows you... and adjust the fan speed in relation to monitor hardware temperature, voltage and fan speed, and set temperature/fan speed alarm. 2-12 System Information Viewer GIGABYTE System Information Viewer allows you to the last saved values.

Unique Features Introduction
Page 27
Then click Apply. After the system restarts, the settings will be synchronized with the BIOS settings. High-end audio players may connect their own external USB power source. • Voltage Compensation +0.1V: Adds 0.1V to the original output voltage. • ... DAC-UP 2 Click the drop down list on the front or back panel to strengthen the stability of your USB device(s). 2-14 USB DAC-UP 2 GIGABYTE USB DAC-UP 2 allows you to increase the output voltage of the USB 3.1 Gen 1 ports on the right of the USB 3.1 Gen 1 connector you want...
Then click Apply. After the system restarts, the settings will be synchronized with the BIOS settings. High-end audio players may connect their own external USB power source. • Voltage Compensation +0.1V: Adds 0.1V to the original output voltage. • ... DAC-UP 2 Click the drop down list on the front or back panel to strengthen the stability of your USB device(s). 2-14 USB DAC-UP 2 GIGABYTE USB DAC-UP 2 allows you to increase the output voltage of the USB 3.1 Gen 1 ports on the right of the USB 3.1 Gen 1 connector you want...

RAID Setup Guide
Page 1
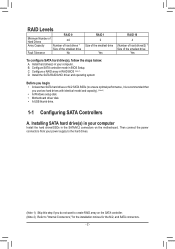
Configuring a RAID Set (X470 Series) RAID Levels...2 1-1 Configuring SATA Controllers 2 A. Configuring SATA controller mode in your computer 2 B. Installing Windows 12 B. Installing SATA hard drive(s) in BIOS Setup 3 C-1. UEFI RAID Configuration 4 C-2. Configuring Legacy RAID ROM 8 1-2 Installing the SATA RAID/AHCI Driver and Operating System 12 A. Rebuilding an Array 13 - 1 -
Configuring a RAID Set (X470 Series) RAID Levels...2 1-1 Configuring SATA Controllers 2 A. Configuring SATA controller mode in your computer 2 B. Installing Windows 12 B. Installing SATA hard drive(s) in BIOS Setup 3 C-1. UEFI RAID Configuration 4 C-2. Configuring Legacy RAID ROM 8 1-2 Installing the SATA RAID/AHCI Driver and Operating System 12 A. Rebuilding an Array 13 - 1 -
RAID Setup Guide
Page 2
... 2) Refer to create RAID array on the motherboard. Then connect the power connectors from your computer. B. Configure SATA controller mode in RAID BIOS (Note 1) D. Configure a RAID array in BIOS Setup. Install the SATA RAID/AHCI driver and operating system Before you begin •• At least two SATA hard drives or M.2 SATA...
... 2) Refer to create RAID array on the motherboard. Then connect the power connectors from your computer. B. Configure SATA controller mode in RAID BIOS (Note 1) D. Configure a RAID array in BIOS Setup. Install the SATA RAID/AHCI driver and operating system Before you begin •• At least two SATA hard drives or M.2 SATA...
RAID Setup Guide
Page 3
... the exact settings for more information. Configuring SATA controller mode in "C-1." Step 1: Turn on the motherboard you have and the BIOS version. - 3 - The actual BIOS Setup menu options you want to enter BIOS Setup during the POST (Power-On Self-Test). Refer to "C-2" for your computer and press to configure UEFI RAID, follow...
... the exact settings for more information. Configuring SATA controller mode in "C-1." Step 1: Turn on the motherboard you have and the BIOS version. - 3 - The actual BIOS Setup menu options you want to enter BIOS Setup during the POST (Power-On Self-Test). Refer to "C-2" for your computer and press to configure UEFI RAID, follow...
RAID Setup Guide
Page 4
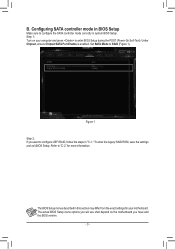
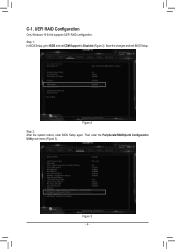
Figure 2 Step 2: After the system reboot, enter BIOS Setup again. Save the changes and exit BIOS Setup. Then enter the Peripherals\RAIDXpert2 Configuration Utility sub-menu (Figure 3). UEFI RAID Configuration Only Windows 10 64-bit supports UEFI RAID configuration. C-1. Figure 3 - 4 - Step 1: In BIOS Setup, go to BIOS and set CSM Support to Disabled (Figure 2).
Figure 2 Step 2: After the system reboot, enter BIOS Setup again. Save the changes and exit BIOS Setup. Then enter the Peripherals\RAIDXpert2 Configuration Utility sub-menu (Figure 3). UEFI RAID Configuration Only Windows 10 64-bit supports UEFI RAID configuration. C-1. Figure 3 - 4 - Step 1: In BIOS Setup, go to BIOS and set CSM Support to Disabled (Figure 2).
RAID Setup Guide
Page 8
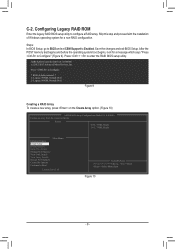
...the operating system boot begins, look for a non-RAID configuration. AMD-RAID Controller BIOS (8.1.0-00046) (c) 2012-2017 Advanced Micro Devices, Inc. Configuring Legacy RAID ROM Enter the legacy RAID BIOS setup utility to Boot Main Menu License Level: 10 Available Keys =Choose, =Back ... with the installation of Windows operating system for a message which says "Press to Configure" (Figure 9). Save the changes and exit BIOS Setup. Press to Configure. * BIOS defaults restored. * 1--Legacy, 999GB, Normal (NA) 2--Legacy, 999GB, Normal (NA) Figure 9 Creating a RAID Array To create...
...the operating system boot begins, look for a non-RAID configuration. AMD-RAID Controller BIOS (8.1.0-00046) (c) 2012-2017 Advanced Micro Devices, Inc. Configuring Legacy RAID ROM Enter the legacy RAID BIOS setup utility to Boot Main Menu License Level: 10 Available Keys =Choose, =Back ... with the installation of Windows operating system for a message which says "Press to Configure" (Figure 9). Save the changes and exit BIOS Setup. Press to Configure. * BIOS defaults restored. * 1--Legacy, 999GB, Normal (NA) 2--Legacy, 999GB, Normal (NA) Figure 9 Creating a RAID Array To create...

RAID Setup Guide
Page 10
... which says "Confirm Creation of Array" will see the new array on the main screen (Figure 14). Then press to confirm. To exit the RAID BIOS utility, press and then press to proceed.
... which says "Confirm Creation of Array" will see the new array on the main screen (Figure 14). Then press to confirm. To exit the RAID BIOS utility, press and then press to proceed.
RAID Setup Guide
Page 12
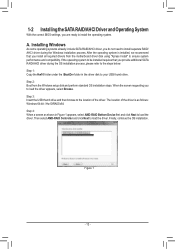
.... Then select AMD-RAID Controller and click Next to install the operating system. 1-2 Installing the SATA RAID/AHCI Driver and Operating System With the correct BIOS settings, you are ready to load the driver.
.... Then select AMD-RAID Controller and click Next to install the operating system. 1-2 Installing the SATA RAID/AHCI Driver and Operating System With the correct BIOS settings, you are ready to load the driver.
User Manual
Page 3
...132; For product-related information, check on our website at: http://www.gigabyte.com Identifying Your Motherboard Revision The revision number on your motherboard revision before updating motherboard BIOS, drivers, or when looking for technical information. Changes to their respective owners.... No part of GIGABYTE. Example: - 3 - Copyright © 2018 GIGA-BYTE TECHNOLOGY CO., ...
...132; For product-related information, check on our website at: http://www.gigabyte.com Identifying Your Motherboard Revision The revision number on your motherboard revision before updating motherboard BIOS, drivers, or when looking for technical information. Changes to their respective owners.... No part of GIGABYTE. Example: - 3 - Copyright © 2018 GIGA-BYTE TECHNOLOGY CO., ...
User Manual
Page 4
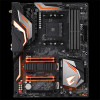
...X470 AORUS GAMING 5 WIFI Motherboard Layout 5 Chapter 1 Hardware Installation 6 1-1 Installation Precautions 6 1-2 Product Specifications 7 1-3 Installing the CPU 10 1-4 Installing the Memory 10 1-5 Installing an Expansion Card 11 1-6 Setting up AMD CrossFire™/NVIDIA® SLI™ Configuration 11 1-7 Back Panel Connectors 12 1-8 Internal Connectors 14 Chapter 2 BIOS... Setup 24 2-1 Startup Screen 24 2-2 The Main Menu 25 2-3 M.I.T...26 2-4 System...31 2-5 BIOS...32 2-6 Peripherals...35 2-7 Chipset...37 2-8 Power...
...X470 AORUS GAMING 5 WIFI Motherboard Layout 5 Chapter 1 Hardware Installation 6 1-1 Installation Precautions 6 1-2 Product Specifications 7 1-3 Installing the CPU 10 1-4 Installing the Memory 10 1-5 Installing an Expansion Card 11 1-6 Setting up AMD CrossFire™/NVIDIA® SLI™ Configuration 11 1-7 Back Panel Connectors 12 1-8 Internal Connectors 14 Chapter 2 BIOS... Setup 24 2-1 Startup Screen 24 2-2 The Main Menu 25 2-3 M.I.T...26 2-4 System...31 2-5 BIOS...32 2-6 Peripherals...35 2-7 Chipset...37 2-8 Power...


