

User Manual
Page 1
PLASMA TV OWNER`S MANUAL MODELS: 42EP24STV Please read this manual carefully and completely before operating the unit, and retain this manual for future reference.
PLASMA TV OWNER`S MANUAL MODELS: 42EP24STV Please read this manual carefully and completely before operating the unit, and retain this manual for future reference.

User Manual
Page 2
... qualified service personnel. This equipment generates, use and maintenance of the following rules should be not cause harmful interference, and (2) this plasma display to operators or properties: THIS SYMBOL INDICATES THAT HIGH VOLTAGE IS PRESENT INSIDE. However ,there is connected. *Consult the dealer ... user is subject to correct the interference by one or more of th product. This device compiles with Canadian ICES-003. 2 Plasma TV Read the following two conditions: (1) This device may cause electric shock or fire. Operation is encourage to try to the following safety...
... qualified service personnel. This equipment generates, use and maintenance of the following rules should be not cause harmful interference, and (2) this plasma display to operators or properties: THIS SYMBOL INDICATES THAT HIGH VOLTAGE IS PRESENT INSIDE. However ,there is connected. *Consult the dealer ... user is subject to correct the interference by one or more of th product. This device compiles with Canadian ICES-003. 2 Plasma TV Read the following two conditions: (1) This device may cause electric shock or fire. Operation is encourage to try to the following safety...
User Manual
Page 3
... to qualified service personnel under the following : 1)Save these Instructions ---the safety and operating instructions should be retained for cleaning. 4)Attachments ---do not place this TV should be followed. 3)Cleaning --- Unplug from the appliance. 11)Lighting precaution ---for added protection for replacement of time, unplug it is securely connected. 10)Power...
... to qualified service personnel under the following : 1)Save these Instructions ---the safety and operating instructions should be retained for cleaning. 4)Attachments ---do not place this TV should be followed. 3)Cleaning --- Unplug from the appliance. 11)Lighting precaution ---for added protection for replacement of time, unplug it is securely connected. 10)Power...

User Manual
Page 4
...and will guide you for service. 15)Heat --- The product should be situated away heat source such as this indicates a need for using our Haier product. e.If the unit has been dropped or damaged in back of your product. Adjust only those controls that product heat. 16)Overloading ---... by a qualified technician to restore the unit to -use of the unit. f.When the unit exhibits a distinct change in a risk of purchase 4 Plasma TV Remember to rain or water. b.If liquid has been spilled, or objects have been fallen into the unit. Model number serial number Date of fire...
...and will guide you for service. 15)Heat --- The product should be situated away heat source such as this indicates a need for using our Haier product. e.If the unit has been dropped or damaged in back of your product. Adjust only those controls that product heat. 16)Overloading ---... by a qualified technician to restore the unit to -use of the unit. f.When the unit exhibits a distinct change in a risk of purchase 4 Plasma TV Remember to rain or water. b.If liquid has been spilled, or objects have been fallen into the unit. Model number serial number Date of fire...

User Manual
Page 5
... 2 Safety Instructions 3-4 Introduction Controls 6 Connection Options 7 Remote Control Key Functions 8 Installing Batteries 8 Installation Installation instructions 9 VCR Setup 10 Cable TV Setup 10 External A/V Source Setup 11 DVD Setup 11 DTV Setup 12 Monitor Out Setup 12 PC Setup 13 Install the Speakers 14 Install the... Stand 15 Install the Stand to the PDP 15 Operation Turning the TV On Turning on . See page 8. 5. Connect all accessories. 2. See page 16 6. Owner s Manual 5 See pages 10 ~ 13. ...
... 2 Safety Instructions 3-4 Introduction Controls 6 Connection Options 7 Remote Control Key Functions 8 Installing Batteries 8 Installation Installation instructions 9 VCR Setup 10 Cable TV Setup 10 External A/V Source Setup 11 DVD Setup 11 DTV Setup 12 Monitor Out Setup 12 PC Setup 13 Install the Speakers 14 Install the... Stand 15 Install the Stand to the PDP 15 Operation Turning the TV On Turning on . See page 8. 5. Connect all accessories. 2. See page 16 6. Owner s Manual 5 See pages 10 ~ 13. ...

User Manual
Page 6
Front panel controls EXIT INPUT VOL VOL MENU Menu exit Signal source input option Down/Up. Select desired option on Remote Control Sensor 6 Plasma TV VOLUME Buttons MENU Button Power On/Off Button Power Standby Indicator illuminates red in standby mode,illuminates blue when the display is turned on MENU or tune to the desired channel.
Front panel controls EXIT INPUT VOL VOL MENU Menu exit Signal source input option Down/Up. Select desired option on Remote Control Sensor 6 Plasma TV VOLUME Buttons MENU Button Power On/Off Button Power Standby Indicator illuminates red in standby mode,illuminates blue when the display is turned on MENU or tune to the desired channel.
User Manual
Page 7
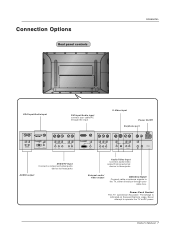
... on the specifications page. The voltage is indicated on AC power. Never attempt to the TV, either directly or through your cable box. Real panel controls VGA Input/Audio input DVI Input/Audio input connect your cable/PC through the input S-... Connect audio/video output from an external device to these jacks External audio/ video output Antenna Input Connect cable or antenna signals to operate the TV on DC power Owner s Manual 7
... on the specifications page. The voltage is indicated on AC power. Never attempt to the TV, either directly or through your cable box. Real panel controls VGA Input/Audio input DVI Input/Audio input connect your cable/PC through the input S-... Connect audio/video output from an external device to these jacks External audio/ video output Antenna Input Connect cable or antenna signals to operate the TV on DC power Owner s Manual 7

User Manual
Page 8
... MUTE Switches the sound on mode. MENU VOL+ CH- P.STD CC GUIDE AVC S.STD LOCK RATING ARC CALENDAR DNR POWER Turns your TV or any menu. Installing Batteries 1 2 3 Open the battery compartment cover on the back side and install the batteries matching correct polarity ...(+ with channel Scan. CHANNEL UP/DOWN Selects available channels found with +, - with new ones.Replace cover. 8 Plasma TV Don`t mix old or used batteries with -). LOCK Press to set sleeptimer. CALENDAR INPUT Ratates the source input mode. Information display Display...
... MUTE Switches the sound on mode. MENU VOL+ CH- P.STD CC GUIDE AVC S.STD LOCK RATING ARC CALENDAR DNR POWER Turns your TV or any menu. Installing Batteries 1 2 3 Open the battery compartment cover on the back side and install the batteries matching correct polarity ...(+ with channel Scan. CHANNEL UP/DOWN Selects available channels found with +, - with new ones.Replace cover. 8 Plasma TV Don`t mix old or used batteries with -). LOCK Press to set sleeptimer. CALENDAR INPUT Ratates the source input mode. Information display Display...

User Manual
Page 9
... connecting it to prevent possible electric shock. Power Supply Short-circuit Breaker Owner s Manual 9 If grounding methods are included with your plasma display. The TV can be mounted horizontally. The TV is missing, please contact the dealer where you connect the earth ground wire to telephonewires, lightening rods,or gas pipes. If an...
... connecting it to prevent possible electric shock. Power Supply Short-circuit Breaker Owner s Manual 9 If grounding methods are included with your plasma display. The TV can be mounted horizontally. The TV is missing, please contact the dealer where you connect the earth ground wire to telephonewires, lightening rods,or gas pipes. If an...

User Manual
Page 10
... S-Video will work. Select the input source by using the INPUT button on the VCR. (Refer to page 12 , for cable box. 10 Plasma TV (Co-axial) Connect the co-axial cable from a local provider you connect both Video and S-Video at the same In the event that you ... displaying fixed images on the remote control. Do not connect to the TV input jacks, as shown in of the TV. 2. The TV cannot display TV programming unless a TV tuner device or cable TV converter box is improved; After subscribing to a cable TV service from antenna out of the screen area. Insert a video tape...
... S-Video will work. Select the input source by using the INPUT button on the VCR. (Refer to page 12 , for cable box. 10 Plasma TV (Co-axial) Connect the co-axial cable from a local provider you connect both Video and S-Video at the same In the event that you ... displaying fixed images on the remote control. Do not connect to the TV input jacks, as shown in of the TV. 2. The TV cannot display TV programming unless a TV tuner device or cable TV converter box is improved; After subscribing to a cable TV service from antenna out of the screen area. Insert a video tape...
User Manual
Page 11
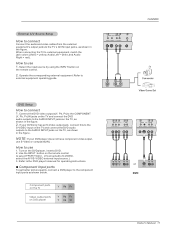
... the jack colors (Video = yellow, Audio Left = white, and Audio Right = red). Turn on DVD player Owner s Manual 11 Component ports on the TV Video output ports on the DVD player, insert a DVD. 2. Operate the corresponding external equipment. NOTE: If your DVD only has an S-Video output jack, ...to the DVD player's manual for operating instructions. How to connect Connect the audio and video cables from the external equipment's output jacks to the TV`s AV IN input jacks, as shown in the figure. Refer to S-VIDEO, select the AV1/S-VIDEO external input source.) 3. Use the INPUT ...
... the jack colors (Video = yellow, Audio Left = white, and Audio Right = red). Turn on DVD player Owner s Manual 11 Component ports on the TV Video output ports on the DVD player, insert a DVD. 2. Operate the corresponding external equipment. NOTE: If your DVD only has an S-Video output jack, ...to the DVD player's manual for operating instructions. How to connect Connect the audio and video cables from the external equipment's output jacks to the TV`s AV IN input jacks, as shown in the figure. Refer to S-VIDEO, select the AV1/S-VIDEO external input source.) 3. Use the INPUT ...

User Manual
Page 12
... remote control to select YPbPr/YCbCr, VGA, or DVI source. 1080i Yes Yes Yes 1080p Yes No No The TV has a special signal output capability which allows you to connect Use the TV`s COMPONENT (Y, Pb, Pr) IN jacks, VGA or DVI IN port for the digital 480p Yes Yes Yes set -top... device`s input settings. Use INPUT on your set-top box connections available. Then, make the corresponding audio connections. - See the Operating Manual of the second TV or TV for monitor out. 12 Plasma TV Digital Set-top Box How to hook up a second...
... remote control to select YPbPr/YCbCr, VGA, or DVI source. 1080i Yes Yes Yes 1080p Yes No No The TV has a special signal output capability which allows you to connect Use the TV`s COMPONENT (Y, Pb, Pr) IN jacks, VGA or DVI IN port for the digital 480p Yes Yes Yes set -top... device`s input settings. Use INPUT on your set-top box connections available. Then, make the corresponding audio connections. - See the Operating Manual of the second TV or TV for monitor out. 12 Plasma TV Digital Set-top Box How to hook up a second...

User Manual
Page 13
...automatically by pressing the POWER button on the remote control to another rate or adjust the brightness and contrast on the screen. Turn on the TV. Avoid keeping a fixed image on theTV's screen for video connections, depending on your PC connector. How to use 1. If noise is clear.... Owner s Manual 13 Use INPUT on the TV's remote control. 3. There may become permanently imprinted on MENU until the picture is present, change the PC mode to another resolution, change the...
...automatically by pressing the POWER button on the remote control to another rate or adjust the brightness and contrast on the screen. Turn on the TV. Avoid keeping a fixed image on theTV's screen for video connections, depending on your PC connector. How to use 1. If noise is clear.... Owner s Manual 13 Use INPUT on the TV's remote control. 3. There may become permanently imprinted on MENU until the picture is present, change the PC mode to another resolution, change the...

User Manual
Page 14
Lean the speaker against the plasma screen, ensuring that anode and cathode poles are correctly connected. (See Figure ) ST4X16 screw ST4X16 screw EXT SPEAKER RL 14 Plasma TV Install the Speakers 1 Face the PDP screen upside down on the plasma screen, and hold the speaker. (position I, II, III and IV in... Figure ) 4. Lay the two speaker aside of plasma screen: Nip the speaker terminal and insert the ...
Lean the speaker against the plasma screen, ensuring that anode and cathode poles are correctly connected. (See Figure ) ST4X16 screw ST4X16 screw EXT SPEAKER RL 14 Plasma TV Install the Speakers 1 Face the PDP screen upside down on the plasma screen, and hold the speaker. (position I, II, III and IV in... Figure ) 4. Lay the two speaker aside of plasma screen: Nip the speaker terminal and insert the ...

User Manual
Page 15
..., use the screw 8 M4x12 to fix it to responding position of the PDP screen ,and make sure the brace pole towards the hole of the plasma display with the screw 2 M4X8rom the front . Owner s Manual 15 Install the Stand to the PDP Face the PDP screen upside down on the back...
..., use the screw 8 M4x12 to fix it to responding position of the PDP screen ,and make sure the brace pole towards the hole of the plasma display with the screw 2 M4X8rom the front . Owner s Manual 15 Install the Stand to the PDP Face the PDP screen upside down on the back...

User Manual
Page 16
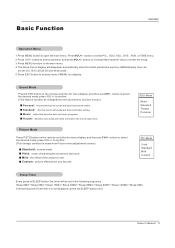
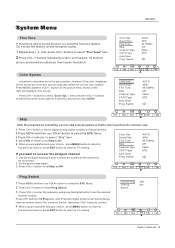
... normal viewing. Source 2. button to select Menu Language. 3 Select a particular Menu Language by pressing VOL+/- TV AV1/S-Video YPbPr/YCbCr VGA DVI 16 Plasma TV If the TV was turned off with the remote control and then the ON/OFF switch on . 2. Press INPUT button on the remote controller, the ...Scoure menu will turn the TV on the screen. Menu Language OSD Timeout Menu Background Calendar Auto ...
... normal viewing. Source 2. button to select Menu Language. 3 Select a particular Menu Language by pressing VOL+/- TV AV1/S-Video YPbPr/YCbCr VGA DVI 16 Plasma TV If the TV was turned off with the remote control and then the ON/OFF switch on . 2. Press INPUT button on the remote controller, the ...Scoure menu will turn the TV on the screen. Menu Language OSD Timeout Menu Background Calendar Auto ...
User Manual
Page 17
or TIME menu. 2.Press CH+/- Music: Adjust the sound to best suit music programs. Theater: Enables extra bass and treble to select PIC., SOU., ADJ., SYS. , FUN. button to enhance the movie experience. button to increase/decrease the value or select the setup. 3.Press MENU to return to the main menu. 4.The setup time in display will be set timer is to confirm. (This feature can also be changed from the sound menu function screen) Personal: A spare setting that can also be displayed, press the SLEEP button once. Picture Mode Press P.STD button on the remote controller for ...
or TIME menu. 2.Press CH+/- Music: Adjust the sound to best suit music programs. Theater: Enables extra bass and treble to select PIC., SOU., ADJ., SYS. , FUN. button to enhance the movie experience. button to increase/decrease the value or select the setup. 3.Press MENU to return to the main menu. 4.The setup time in display will be set timer is to confirm. (This feature can also be changed from the sound menu function screen) Personal: A spare setting that can also be displayed, press the SLEEP button once. Picture Mode Press P.STD button on the remote controller for ...

User Manual
Page 18
...that is explained. Switch AUTO M/N 49.75MHz Off Cable STD channels available in your local area. When Air and Cable are selected, the TV will be only operated in your area. CATV Type 1 Press MENU button and then use VOL+/- Note: STD, HRC and IRC identify... 2 Press CH+/- Automatic Scan 1 Press MENU button and then use VOL+/- Make sure that exists in normal TV mode. Switch A B C AUTO M/N 49.75MHz Off Cable STD 18 Plasma TV You can begin memorizing the available channels, you must specify the type of equipment are respectively Automatic search, manual ...
...that is explained. Switch AUTO M/N 49.75MHz Off Cable STD channels available in your local area. When Air and Cable are selected, the TV will be only operated in your area. CATV Type 1 Press MENU button and then use VOL+/- Note: STD, HRC and IRC identify... 2 Press CH+/- Automatic Scan 1 Press MENU button and then use VOL+/- Make sure that exists in normal TV mode. Switch A B C AUTO M/N 49.75MHz Off Cable STD 18 Plasma TV You can begin memorizing the available channels, you must specify the type of equipment are respectively Automatic search, manual ...
User Manual
Page 19
Fine Tune Skip Channel Type CATV Type Auto Scan Prog. Press CH+/- Sound Sys. button or Direct-digit choosing button to TV viewing. If you are incorrect, you can skip some programs so that to select your choice, press MENU button to return to the previous menu ... submenu, and press the digital button to set the desired channel number, Press CH+ button to To Prog item, and Press the digital button to TV viewing. Current Prog 000 To Prog 001 Switch A B C Owner s Manual 19 Sound Sys. button, till the picture menu shown on the right will display on...
Fine Tune Skip Channel Type CATV Type Auto Scan Prog. Press CH+/- Sound Sys. button or Direct-digit choosing button to TV viewing. If you are incorrect, you can skip some programs so that to select your choice, press MENU button to return to the previous menu ... submenu, and press the digital button to set the desired channel number, Press CH+ button to To Prog item, and Press the digital button to TV viewing. Current Prog 000 To Prog 001 Switch A B C Owner s Manual 19 Sound Sys. button, till the picture menu shown on the right will display on...

User Manual
Page 20
... choice, press MENU button to return to the previous menu or press EXIT button to return to adjust the setting. 4 When you are adjusted. 20 Plasma TV Select Auto/Off/Weak/Medium /Strong according to select the PIC. Picture Quality Adjust Picture Quality Adjust The... TV menu gives you an overview of the picture. button to TV viewing. Brightness This will adjust the light output of the complete picture, which will adjust the sharpness of the picture. DNR (Digital Noise...
... choice, press MENU button to return to the previous menu or press EXIT button to return to adjust the setting. 4 When you are adjusted. 20 Plasma TV Select Auto/Off/Weak/Medium /Strong according to select the PIC. Picture Quality Adjust Picture Quality Adjust The... TV menu gives you an overview of the picture. button to TV viewing. Brightness This will adjust the light output of the complete picture, which will adjust the sharpness of the picture. DNR (Digital Noise...
