
User Manual
Page 2
... of accessory attachments not recommended by the appliance manufacturer may cause a fire or risk of the cover by children. 7. Always operate the blender with moving parts. 5. Read all controls to reduce the risk of the table or countertop, or touch hot surfaces, including the stove. 11. This... always be inserted in place. 14. Contact the Customer Service Center for use , before cleaning. 4. KEEP HANDS AND UTENSILS OUT OF THE JAR WHILE BLENDING to the OFF position, then remove the plug from the center of electrical shock. 15. The use outdoors. 10. Handle carefully....
... of accessory attachments not recommended by the appliance manufacturer may cause a fire or risk of the cover by children. 7. Always operate the blender with moving parts. 5. Read all controls to reduce the risk of the table or countertop, or touch hot surfaces, including the stove. 11. This... always be inserted in place. 14. Contact the Customer Service Center for use , before cleaning. 4. KEEP HANDS AND UTENSILS OUT OF THE JAR WHILE BLENDING to the OFF position, then remove the plug from the center of electrical shock. 15. The use outdoors. 10. Handle carefully....
User Manual
Page 3
... not use an extension cord: A. This is necessary to modify this polarized plug. Do no attempt to use this appliance for using our Haier product. If it can be pulled on the bottom of this plug is wider than intended use . 19. It should be equal to ... a polarized outlet only one way. Do not attempt to or greater than the rating of the blender. This easy-to obtain warranty service. 2 Not for assistance. Thank you in contact with electrical parts, creating a risk of your manual. SAVE THESE INSTRUCTIONS HOUSEHOLD USE ONLY Polarized Plug This appliance is...
... not use an extension cord: A. This is necessary to modify this polarized plug. Do no attempt to use this appliance for using our Haier product. If it can be pulled on the bottom of this plug is wider than intended use . 19. It should be equal to ... a polarized outlet only one way. Do not attempt to or greater than the rating of the blender. This easy-to obtain warranty service. 2 Not for assistance. Thank you in contact with electrical parts, creating a risk of your manual. SAVE THESE INSTRUCTIONS HOUSEHOLD USE ONLY Polarized Plug This appliance is...
User Manual
Page 4
English Table of Contents PAGE Important Safeguards 1 Before Using for the First Time 4 Parts and Accessories 5 Assembling the Blender 6 Using the Blender 6 Useful Tips 8 Cleaning and Maintenance 9 Quick Cleaning 9 Thorough Cleaning 9 Storage 9 Limited Warranty 10 3
English Table of Contents PAGE Important Safeguards 1 Before Using for the First Time 4 Parts and Accessories 5 Assembling the Blender 6 Using the Blender 6 Useful Tips 8 Cleaning and Maintenance 9 Quick Cleaning 9 Thorough Cleaning 9 Storage 9 Limited Warranty 10 3
User Manual
Page 5
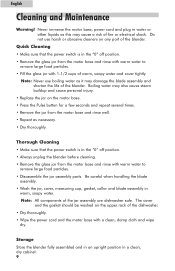
This will remove any dust that my have accumulated during packaging. (Do not use harsh or abrasive detergents to clean any part of the accessories accidentally. • Handle the blade assembly carefully. Be sure not to discard any other liquids. 4 Rinse and dry thoroughly. • ...Wipe the motor base with a clean, damp cloth. Do not immerse the blender base, cord or plug in warm, soapy water. It is sharp! • Place the blender on a dry, level surface. • Wash the blade assembly, glass jar, gasket, cover and measuring cup in water or any of this manual. •...
This will remove any dust that my have accumulated during packaging. (Do not use harsh or abrasive detergents to clean any part of the accessories accidentally. • Handle the blade assembly carefully. Be sure not to discard any other liquids. 4 Rinse and dry thoroughly. • ...Wipe the motor base with a clean, damp cloth. Do not immerse the blender base, cord or plug in warm, soapy water. It is sharp! • Place the blender on a dry, level surface. • Wash the blade assembly, glass jar, gasket, cover and measuring cup in water or any of this manual. •...
User Manual
Page 7
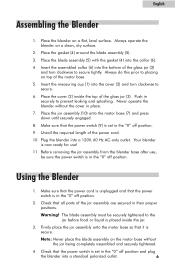
... 4. Before removing the jar assembly from the blender base after use ! 11. Make sure that the power cord is in the "0" off position. 9. The blade assembly must be sure the power switch is unplugged and that all parts of the glass jar (3). Check that it is... placed inside the top of the jar assembly are secured in the "0" off position. 2. Plug the blender into a standard polarized outlet. 6 Never operate the blender without the jar being completely assembled and securely tightened...
... 4. Before removing the jar assembly from the blender base after use ! 11. Make sure that the power cord is in the "0" off position. 9. The blade assembly must be sure the power switch is unplugged and that all parts of the glass jar (3). Check that it is... placed inside the top of the jar assembly are secured in the "0" off position. 2. Plug the blender into a standard polarized outlet. 6 Never operate the blender without the jar being completely assembled and securely tightened...
User Manual
Page 10
... in a clean, dry cabinet. 9 Quick Cleaning • Make sure that the power switch is in the "0" off position. • Always unplug the blender before cleaning. • Remove the glass jar from the motor base and rinse with warm water to remove large food particles. • Disassemble the jar assembly parts. English Cleaning and Maintenance Warning!
... in a clean, dry cabinet. 9 Quick Cleaning • Make sure that the power switch is in the "0" off position. • Always unplug the blender before cleaning. • Remove the glass jar from the motor base and rinse with warm water to remove large food particles. • Disassemble the jar assembly parts. English Cleaning and Maintenance Warning!


