User Manual
Page 1
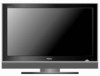
HL15B/HL15E/HL19E/HL19W/HL22E LCD TV USER MANUAL Please read this manual carefully before using this TV set and keep it for future reference.
HL15B/HL15E/HL19E/HL19W/HL22E LCD TV USER MANUAL Please read this manual carefully before using this TV set and keep it for future reference.

User Manual
Page 2
...SERVICING TO QUALIFIED SERVICE PERSONNEL. CAUTION: TO REDUCE THE RISK OF ELECTRIC SHOCK AND FIRE, DO NOT PUT THE TV SET NEAR SOURCES OF HUMIDITY. AVOID CONTACT WITH OBJECTS THAT MAY SCRATCH THE LCD SCREEN. ! NOTE: SERVICING THE UNIT YOURSELF IS UNAUTHORIZED AND COULD LEAD TO INJURY OR PRODUCT DAMAGE. RISK ...TO REDUCE THE RISK OF ELECTRIC SHOCK, DO NOT REMOVE COVER (OR BACK). DO NOT USE ANY ABRASIVE CLEANSERS WHICH MAY SCRATCH OR DAMAGE THE LCD SCREEN. IT IS DANGEROUS TO MAKE ANY KIND OF CONTACT WITH ANY INSIDE PART OF THIS PRODUCT. THERE IS AN EXCLAMATION MARK IN THE TRIANGLE...
...SERVICING TO QUALIFIED SERVICE PERSONNEL. CAUTION: TO REDUCE THE RISK OF ELECTRIC SHOCK AND FIRE, DO NOT PUT THE TV SET NEAR SOURCES OF HUMIDITY. AVOID CONTACT WITH OBJECTS THAT MAY SCRATCH THE LCD SCREEN. ! NOTE: SERVICING THE UNIT YOURSELF IS UNAUTHORIZED AND COULD LEAD TO INJURY OR PRODUCT DAMAGE. RISK ...TO REDUCE THE RISK OF ELECTRIC SHOCK, DO NOT REMOVE COVER (OR BACK). DO NOT USE ANY ABRASIVE CLEANSERS WHICH MAY SCRATCH OR DAMAGE THE LCD SCREEN. IT IS DANGEROUS TO MAKE ANY KIND OF CONTACT WITH ANY INSIDE PART OF THIS PRODUCT. THERE IS AN EXCLAMATION MARK IN THE TRIANGLE...

User Manual
Page 5
... 5 Installing Batteries 5 Connection Instructions 6 Grounding 6 External equipment Connections 6 Antenna Connection 6 PC Setup 7 VCR Setup 8 Cable TV Setup 9 External AV Source Setup 9 Basic Operating Instructions 10 Turn on the LCD-TV 10 Audio Control 10 Mute...10 Select the TV Channel You Want 11 Picture Mode 11 Sound Mode 11 Sleep...1. 1 INFO...11 GUIDE 11...
... 5 Installing Batteries 5 Connection Instructions 6 Grounding 6 External equipment Connections 6 Antenna Connection 6 PC Setup 7 VCR Setup 8 Cable TV Setup 9 External AV Source Setup 9 Basic Operating Instructions 10 Turn on the LCD-TV 10 Audio Control 10 Mute...10 Select the TV Channel You Want 11 Picture Mode 11 Sound Mode 11 Sleep...1. 1 INFO...11 GUIDE 11...

User Manual
Page 6
... read the following items carefully before using and cleaning this manual for proper ventilation; l Never put the unit in contact with the LCD-TV, disconnect the power cord from the LCD-TV . If water comes in direct sunlight or near heat sources; l Please comply strictly with the instructions provided; If service is correct; l ...an Authorized service technician. l Please do as required when you are not recommended by manufacturer: l Before operation, please make sure that the operating voltage of LCD-TV, please read and understand all the instructions before operation;
... read the following items carefully before using and cleaning this manual for proper ventilation; l Never put the unit in contact with the LCD-TV, disconnect the power cord from the LCD-TV . If water comes in direct sunlight or near heat sources; l Please comply strictly with the instructions provided; If service is correct; l ...an Authorized service technician. l Please do as required when you are not recommended by manufacturer: l Before operation, please make sure that the operating voltage of LCD-TV, please read and understand all the instructions before operation;

User Manual
Page 12
Then connect the other end to the VGA video interface connector on the back of the LCD-TV.Tighten the screws on the VGA connectors once they are off; 3.Connect a D type 15-pin VGAinterface ...and ensure that it has a VGA connector; 2.Make sure that the power of the LCD -TV and the PC are firmly connected; 4.Turn on the power of the LCD-TV first , and then turn on the power of the PC; 5.Press the INPUT button... to set the video input mode of the LCD-TV to PC; 6.Check the image on the menu until the picture is present, change the PC mode to ...
Then connect the other end to the VGA video interface connector on the back of the LCD-TV.Tighten the screws on the VGA connectors once they are off; 3.Connect a D type 15-pin VGAinterface ...and ensure that it has a VGA connector; 2.Make sure that the power of the LCD -TV and the PC are firmly connected; 4.Turn on the power of the LCD-TV first , and then turn on the power of the PC; 5.Press the INPUT button... to set the video input mode of the LCD-TV to PC; 6.Check the image on the menu until the picture is present, change the PC mode to ...

User Manual
Page 13
... VCR owner s manual.) 3.Turn on the power of the AV device; 4.Press the INPUT button to set the video 1 input mode of the LCD-TV and the AV device are off; Connect the audio and video cables from V. CR to the same channel number. Connection Option 1 Set VCR output ... conne- compared to the Video input. 2. Connection Instructions VCR Setup - To avoid picture noise (interference), leave an adequate distance between the VCR and TV Connection and use steps: 1.Read the user guide supplied with your AV devices and ensure that it has Composite or S-Video connectors; 2.Make sure that...
... VCR owner s manual.) 3.Turn on the power of the AV device; 4.Press the INPUT button to set the video 1 input mode of the LCD-TV and the AV device are off; Connect the audio and video cables from V. CR to the same channel number. Connection Option 1 Set VCR output ... conne- compared to the Video input. 2. Connection Instructions VCR Setup - To avoid picture noise (interference), leave an adequate distance between the VCR and TV Connection and use steps: 1.Read the user guide supplied with your AV devices and ensure that it has Composite or S-Video connectors; 2.Make sure that...

User Manual
Page 15
... to increase the volume. CC SLEEP S.MODE GUIDE ARC CH.LIST FAV.LIST When the POWER button is pressed and the LCD-TV is turned off using the power button, the LCD-TV will appear on the screen in order. Audio Control 1.Press the VOL+ button to mute the sound temporarily. A number will... go into standby mode and the indicator light turns red(or turns dark). When the LCD-TV is turned on, the indicator light on the LCD-TV MUTE Q.VIEW INPUT INFO EXIT SAP OK P.MODE CH+ VOL - Each time you press the INPUT button...
... to increase the volume. CC SLEEP S.MODE GUIDE ARC CH.LIST FAV.LIST When the POWER button is pressed and the LCD-TV is turned off using the power button, the LCD-TV will appear on the screen in order. Audio Control 1.Press the VOL+ button to mute the sound temporarily. A number will... go into standby mode and the indicator light turns red(or turns dark). When the LCD-TV is turned on, the indicator light on the LCD-TV MUTE Q.VIEW INPUT INFO EXIT SAP OK P.MODE CH+ VOL - Each time you press the INPUT button...
User Manual
Page 25
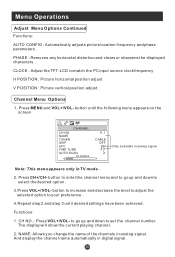
...The display will show the current playing channel. 2. Press MENU and VOL+/VOL- NAME: Allows you change the name of the channels in TV mode . 2. PHASE : Removes any horizontal distortion and clears or sharpens the displayed characters . button to increase and decrease the level to adjust...horizontal position adjust V POSITION : Picture vertical position adjust . to go up and down to set the channel number. CLOCK : Adjust the TFT-LCD to your preference . 4.Repeat step 2 and step 3 until the following menu appears on the screen CHANNEL CH NO. And display the channel name...
...The display will show the current playing channel. 2. Press MENU and VOL+/VOL- NAME: Allows you change the name of the channels in TV mode . 2. PHASE : Removes any horizontal distortion and clears or sharpens the displayed characters . button to increase and decrease the level to adjust...horizontal position adjust V POSITION : Picture vertical position adjust . to go up and down to set the channel number. CLOCK : Adjust the TFT-LCD to your preference . 4.Repeat step 2 and step 3 until the following menu appears on the screen CHANNEL CH NO. And display the channel name...


