

User Manual
Page 6
TV/AV 6 7 Side AV VIDEO Left AUDIO Right AUDEO VIDEO L AUDIO R Switch Power jack POWER 1.Remote control signal receive window. 2.Power indicator: in red when standby mode, in blue when display. 7.Remote control signal receive window. 1 2 MENU 3 VOL+ 4 VOL- POWER: Is used to activate ...the display or return to standby mode. POWER: Is used to activate the display or return to standby mode. 6.Power indicator: in red when standby mode, in blue when display. 3.MENU: menu display. 4.TV...
TV/AV 6 7 Side AV VIDEO Left AUDIO Right AUDEO VIDEO L AUDIO R Switch Power jack POWER 1.Remote control signal receive window. 2.Power indicator: in red when standby mode, in blue when display. 7.Remote control signal receive window. 1 2 MENU 3 VOL+ 4 VOL- POWER: Is used to activate ...the display or return to standby mode. POWER: Is used to activate the display or return to standby mode. 6.Power indicator: in red when standby mode, in blue when display. 3.MENU: menu display. 4.TV...

User Manual
Page 7
...HDMI/DVI Input Connect the monitor output connector from a PC to the jack DVD/DTV Input (Component ) Connect a component video/audiodevice to operate the TV on DC power. Audio input for linking DVI/PC audio output terminals. PC VIDEO Input Connect the monitor output connector from a DVD player to the... Scart input. audio output terminals. Never attempt to these jacks. Antenna Input Connect cable or antenna signals to the scart YPbPr/YCbCr input. Buttons and interface location Rear Control panel Power Cord Socket This...
...HDMI/DVI Input Connect the monitor output connector from a PC to the jack DVD/DTV Input (Component ) Connect a component video/audiodevice to operate the TV on DC power. Audio input for linking DVI/PC audio output terminals. PC VIDEO Input Connect the monitor output connector from a DVD player to the... Scart input. audio output terminals. Never attempt to these jacks. Antenna Input Connect cable or antenna signals to the scart YPbPr/YCbCr input. Buttons and interface location Rear Control panel Power Cord Socket This...

User Manual
Page 8
... obstacle between the remote controller and television set. 7 The batteries are loaded. The batteries must be located properly. Precautions As strong light may interfere the signals, change your position to ensure effective performance of the remote controller. Keep the remote controller away from heat source or humid area to operate the...
... obstacle between the remote controller and television set. 7 The batteries are loaded. The batteries must be located properly. Precautions As strong light may interfere the signals, change your position to ensure effective performance of the remote controller. Keep the remote controller away from heat source or humid area to operate the...

User Manual
Page 10
... control: 1. To ensure a normal operation, the remote controller should also be kept dry and away from your TV, is 8 meters to the left 45 45 right front 8m above or below Ensure the remote control is necessary... when the remote control acts inconsistently or stops operating the LCD display. left or right side and 20O above 20 20 below the control window. No obstacles should ... different from all heat sources. 2. The effective receiving scope for the signal is only the graphic solution, please take material object as.
... control: 1. To ensure a normal operation, the remote controller should also be kept dry and away from your TV, is 8 meters to the left 45 45 right front 8m above or below Ensure the remote control is necessary... when the remote control acts inconsistently or stops operating the LCD display. left or right side and 20O above 20 20 below the control window. No obstacles should ... different from all heat sources. 2. The effective receiving scope for the signal is only the graphic solution, please take material object as.

User Manual
Page 11
... ANT IN 300 twin-lead cable Antenna adapter 75 coaxial cable Plug (additional purchase) Note * It is not installed properly, contact your dealer for two Tv`s, install a 2-WaySignal Splitter in a poor signal area, purchase and install...
... ANT IN 300 twin-lead cable Antenna adapter 75 coaxial cable Plug (additional purchase) Note * It is not installed properly, contact your dealer for two Tv`s, install a 2-WaySignal Splitter in a poor signal area, purchase and install...

User Manual
Page 12
... into the VCR and press PLAY on the remote control. To avoid picture noise (interference), leave an adequate distance between the VCR And TV. 1. The following are not included with the TV. SCART2 SCART1 ANT IN HD-AUDIO PC/DVI AUDIO IN HD-AUDIO S-VIDEO Select the input source by the... TV/AV button on the VCR. (Refer to the VCR owner`s manual.) 3. Choose the connection which is best for you want to connect and the quality of the signal you . External Equipment Connection NOTE: All cables shown are examples of...
... into the VCR and press PLAY on the remote control. To avoid picture noise (interference), leave an adequate distance between the VCR And TV. 1. The following are not included with the TV. SCART2 SCART1 ANT IN HD-AUDIO PC/DVI AUDIO IN HD-AUDIO S-VIDEO Select the input source by the... TV/AV button on the VCR. (Refer to the VCR owner`s manual.) 3. Choose the connection which is best for you want to connect and the quality of the signal you . External Equipment Connection NOTE: All cables shown are examples of...

User Manual
Page 18
...+/- button to the previous menu. button to select the TUNING menu. 2 Press VOL+/- button and then use CH+/- Tuning menu Manual search If excessive channel signals of unwanted programs are received in local area, manual search function is obtained. button to select Tuning Program. 3 Press VOL+/- button and then use CH...
...+/- button to the previous menu. button to select the TUNING menu. 2 Press VOL+/- button and then use CH+/- Tuning menu Manual search If excessive channel signals of unwanted programs are received in local area, manual search function is obtained. button to select Tuning Program. 3 Press VOL+/- button and then use CH...

User Manual
Page 23
...be adjusted to the previous menu. Noise Reduction Automatically filters out and reduces the image noise and improves picture quality when receiving weak video signals. button to the image noise. How to customize your choice, press the EXIT button to return to normal viewing or press MENU ... : when the personal mode is not selected, the personal mode will mainly affect the darker areas of the picture. Picture Adjustment The TV menu gives you an overview of the menus you can be selectable. picture modes The picture mode provides the pre-defined images settings. Backlight...
...be adjusted to the previous menu. Noise Reduction Automatically filters out and reduces the image noise and improves picture quality when receiving weak video signals. button to the image noise. How to customize your choice, press the EXIT button to return to normal viewing or press MENU ... : when the personal mode is not selected, the personal mode will mainly affect the darker areas of the picture. Picture Adjustment The TV menu gives you an overview of the menus you can be selectable. picture modes The picture mode provides the pre-defined images settings. Backlight...

User Manual
Page 24
... speaker`s reproduction capability of the right and left speaker becomes stronger and weaker, respectively. Auto Volume Each broadcasting station has its own signal conditions, making it sometimes difficult to select the AUDIO menu. 2 Press VOL+/- Volume This will adjust the output of the right ...and stronger. button to select the option.(Music/Standard/Personal/Hall) This select the modes for sound reproduction dependent on the broadcast signals or signals from external inputs received. Press the S.STD button to select the Music Standard Personal or Hall. button to select the item ...
... speaker`s reproduction capability of the right and left speaker becomes stronger and weaker, respectively. Auto Volume Each broadcasting station has its own signal conditions, making it sometimes difficult to select the AUDIO menu. 2 Press VOL+/- Volume This will adjust the output of the right ...and stronger. button to select the option.(Music/Standard/Personal/Hall) This select the modes for sound reproduction dependent on the broadcast signals or signals from external inputs received. Press the S.STD button to select the Music Standard Personal or Hall. button to select the item ...
User Manual
Page 27
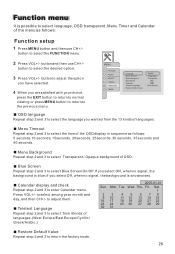
...return to the previous menu. button and then use CH+/- button to adjust the option you have selected. 4 When you select ON, when no signal, the background is snownoises. Calendar display and check Repeat step 2 and 3 to return the factory mode. Teletext Language Repeat step 2 and 3 to... Default Value English 15 seconds Transparent OFF West Europe OSD language Repeat step 2 and 3 to select the language you select Off, when no signal, the background is blue; Function menu It is possible to select language, OSD transparent, Menu Timer and Calendar of the menu as follows: ...
...return to the previous menu. button and then use CH+/- button to adjust the option you have selected. 4 When you select ON, when no signal, the background is snownoises. Calendar display and check Repeat step 2 and 3 to return the factory mode. Teletext Language Repeat step 2 and 3 to... Default Value English 15 seconds Transparent OFF West Europe OSD language Repeat step 2 and 3 to select the language you select Off, when no signal, the background is blue; Function menu It is possible to select language, OSD transparent, Menu Timer and Calendar of the menu as follows: ...

User Manual
Page 28
... reset the defecult setting parameters Display Mode Adjust RGB Default Auto Sync Color Temperature Black Stretch 4:3 9300K OFF It does not work on the input signal, one or more menu items may not be selectable. button to give the white colors a neutral tint, 6500K to select the desired option. 3 Press... select. Display Mode This will increase or decrease 6500K (red) and 11000K (blue) colors to select the ADJUST menu. 2 Press VOL+/- Adjust menu The TV menu gives you an overview of the menus you are satisfied with your choice, press the EXIT button to return to normal viewing or press...
... reset the defecult setting parameters Display Mode Adjust RGB Default Auto Sync Color Temperature Black Stretch 4:3 9300K OFF It does not work on the input signal, one or more menu items may not be selectable. button to give the white colors a neutral tint, 6500K to select the desired option. 3 Press... select. Display Mode This will increase or decrease 6500K (red) and 11000K (blue) colors to select the ADJUST menu. 2 Press VOL+/- Adjust menu The TV menu gives you an overview of the menus you are satisfied with your choice, press the EXIT button to return to normal viewing or press...
User Manual
Page 29
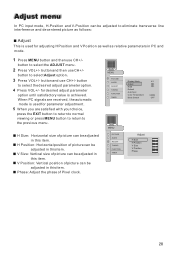
... FUNCTION TIMER Adjust H Size H Position V Size V Position Phase button to eliminate transverse line interference and decentered picture as follows: Adjust This is achieved. When PC signals are received, the automatic mode is used for desired adjust parameter option until satisfactory value is used for adjusting H Position and V Position as well as...
... FUNCTION TIMER Adjust H Size H Position V Size V Position Phase button to eliminate transverse line interference and decentered picture as follows: Adjust This is achieved. When PC signals are received, the automatic mode is used for desired adjust parameter option until satisfactory value is used for adjusting H Position and V Position as well as...

User Manual
Page 31
... screen. button to unlock all set On or Off mode. Press VOL+/- Press VOL+/button to select channel number.(The item is not available except TV signal.) Source Lock Source Lock is opted for adjustment between 0 100. button to select Prog Num. Press CH+/- button to select Unlock mode. Press VOL+/- button...
... screen. button to unlock all set On or Off mode. Press VOL+/- Press VOL+/button to select channel number.(The item is not available except TV signal.) Source Lock Source Lock is opted for adjustment between 0 100. button to select Prog Num. Press CH+/- button to select Unlock mode. Press VOL+/- button...

User Manual
Page 37
... of control Verify if the antenna is correctly connected. NOTE: Design and specifications are input. Blank screen Verify if correct signals are subject to change signal input to other channels. Switch to TV input. Check out of picture and sound systems. Refer to the power supply. Make fine adjustment of the screen requires...
... of control Verify if the antenna is correctly connected. NOTE: Design and specifications are input. Blank screen Verify if correct signals are subject to change signal input to other channels. Switch to TV input. Check out of picture and sound systems. Refer to the power supply. Make fine adjustment of the screen requires...

