User Manual
Page 1
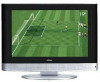
HLC15B/HLC15E/HLC19E/HLC19W LCD TV/DVD Player Combo USER MANUAL Please read this manual carefully before using this TV set and keep it for future reference.
HLC15B/HLC15E/HLC19E/HLC19W LCD TV/DVD Player Combo USER MANUAL Please read this manual carefully before using this TV set and keep it for future reference.
User Manual
Page 2
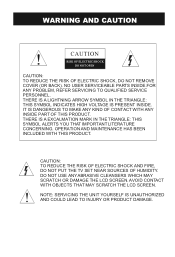
... THIS PRODUCT. OPERATION AND MAINTENANCE HAS BEEN INCLUDED WITH THIS PRODUCT. CAUTION: TO REDUCE THE RISK OF ELECTRIC SHOCK AND FIRE, DO NOT PUT THE TV SET NEAR SOURCES OF HUMIDITY. THERE IS A EXCALMATION MARK IN THE TRIANGLE: THIS SYMBOL ALERTS YOU THAT IMPORTANT LITERATURE CONCERNING. NO USER SERVICEABLE PARTS INSIDE...
... THIS PRODUCT. OPERATION AND MAINTENANCE HAS BEEN INCLUDED WITH THIS PRODUCT. CAUTION: TO REDUCE THE RISK OF ELECTRIC SHOCK AND FIRE, DO NOT PUT THE TV SET NEAR SOURCES OF HUMIDITY. THERE IS A EXCALMATION MARK IN THE TRIANGLE: THIS SYMBOL ALERTS YOU THAT IMPORTANT LITERATURE CONCERNING. NO USER SERVICEABLE PARTS INSIDE...
User Manual
Page 5
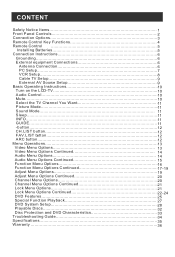
... Batteries 5 Connection Instructions 6 Grounding 6 External equipment Connections 6 Antenna Connection 6 PC Setup 7 VCR Setup 8 Cable TV Setup 9 External AV Source Setup 9 Basic Operating Instructions 10 Turn on the LCD-TV 10 Audio Control 10 Mute...10 Select the TV Channel You Want 11 Picture Mode 11 Sound Mode 11 Sleep...1. 1 INFO...11 GUIDE 11...
... Batteries 5 Connection Instructions 6 Grounding 6 External equipment Connections 6 Antenna Connection 6 PC Setup 7 VCR Setup 8 Cable TV Setup 9 External AV Source Setup 9 Basic Operating Instructions 10 Turn on the LCD-TV 10 Audio Control 10 Mute...10 Select the TV Channel You Want 11 Picture Mode 11 Sound Mode 11 Sleep...1. 1 INFO...11 GUIDE 11...
User Manual
Page 6
...contact an Authorized service technician. l Never put the unit in this book; If water comes in contact with the LCD-TV, disconnect the power cord from the LCD-TV . l Do not place the unit on the machine and in direct sunlight or near heat sources; l Please comply ... space for later use additional devices that are not recommended by manufacturer: l Before operation, please make sure that the operating voltage of LCD-TV, please read the following items carefully before using: l Please read and understand all the instructions before operation; l Please keep this machine. Safety...
...contact an Authorized service technician. l Never put the unit in this book; If water comes in contact with the LCD-TV, disconnect the power cord from the LCD-TV . l Do not place the unit on the machine and in direct sunlight or near heat sources; l Please comply ... space for later use additional devices that are not recommended by manufacturer: l Before operation, please make sure that the operating voltage of LCD-TV, please read the following items carefully before using: l Please read and understand all the instructions before operation; l Please keep this machine. Safety...
User Manual
Page 7
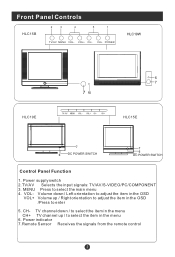
... down / Left orientation to adjust the item in the menu 6. VOL+ CH- VOL- Volume down / to select the item in the menu CH+ TV channel up / Right orientation to adjust the item in the OSD /Press to select the item in the OSD VOL+ Volume up / to enter 5. CH- ...Power supply switch 2.TV/AV Selects the input signals: TV/AV/S-VIDEO/PC/COMPONENT 3. CH+ POWER HLC19W HLC19E 76 6 7 HLC15E DC POWER SWITCH DC POWER SWITCH Control Panel Function 1. MENU Press to select the main menu 4. Front...
... down / Left orientation to adjust the item in the menu 6. VOL+ CH- VOL- Volume down / to select the item in the menu CH+ TV channel up / Right orientation to adjust the item in the OSD /Press to select the item in the OSD VOL+ Volume up / to enter 5. CH- ...Power supply switch 2.TV/AV Selects the input signals: TV/AV/S-VIDEO/PC/COMPONENT 3. CH+ POWER HLC19W HLC19E 76 6 7 HLC15E DC POWER SWITCH DC POWER SWITCH Control Panel Function 1. MENU Press to select the main menu 4. Front...
User Manual
Page 8
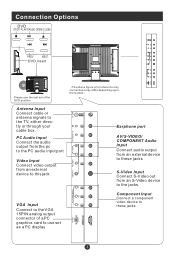
... V VIDEO IN AUDIO IN PC AUDIO IN ANT IN L R Earphone port AV/S-VIDEO/ COMPONENT Audio Input Connect audio output from an S-Video device to the TV, either directly or through your cable box. Pr COMPONENT IN VGA Input Connect to the VGA 15PIN analog output connector of the DVD position The...
... V VIDEO IN AUDIO IN PC AUDIO IN ANT IN L R Earphone port AV/S-VIDEO/ COMPONENT Audio Input Connect audio output from an S-Video device to the TV, either directly or through your cable box. Pr COMPONENT IN VGA Input Connect to the VGA 15PIN analog output connector of the DVD position The...

User Manual
Page 9
...TITLE/PBC SEARCH AUDIO PROGRAM ZOOM D.CALL 10+ EXIT ARC GUIDE CH.LIST FAV.LIST Standby DVD Open/close Input selection TV Sleep button TV/DVD Mute Return to Previous Channel in TV mode Call Screen Infromation Program Number Select MONO,STEREO, SAP in NTSC system CCD ( closed caption) On / Off ...favorite channel list in DTV Remote Control Key Functions When using the remote control, aim it towards the remote sensor on the TV Buttons on the remote control POWER TV/AV TV/DVD OPEN/CLOSE SLEEP Q.VIEW INFO MUTE 1234 56 90 SAP 78 CC P.MODE CH+ VOL - S.MODE STOP SETUP ...
...TITLE/PBC SEARCH AUDIO PROGRAM ZOOM D.CALL 10+ EXIT ARC GUIDE CH.LIST FAV.LIST Standby DVD Open/close Input selection TV Sleep button TV/DVD Mute Return to Previous Channel in TV mode Call Screen Infromation Program Number Select MONO,STEREO, SAP in NTSC system CCD ( closed caption) On / Off ...favorite channel list in DTV Remote Control Key Functions When using the remote control, aim it towards the remote sensor on the TV Buttons on the remote control POWER TV/AV TV/DVD OPEN/CLOSE SLEEP Q.VIEW INFO MUTE 1234 56 90 SAP 78 CC P.MODE CH+ VOL - S.MODE STOP SETUP ...

User Manual
Page 11
... not installed properly, contact your dealer for outdoor antenna) Bronze Wire Be careful not to tighten. If the antenna needs to be split for two TV s, install a 2-Way Signal Splitter in a poor signal area, purchase and install a signal amplifier. NOTE: Cables shown are not possible, have a qualified electrician install a separate circuit... - To improve picture quality in the connections. outdoor antenna Single-family Dwellings /Houses (Connect to wall jack for assistance. Antenna or Cable Service with the TV
... not installed properly, contact your dealer for outdoor antenna) Bronze Wire Be careful not to tighten. If the antenna needs to be split for two TV s, install a 2-Way Signal Splitter in a poor signal area, purchase and install a signal amplifier. NOTE: Cables shown are not possible, have a qualified electrician install a separate circuit... - To improve picture quality in the connections. outdoor antenna Single-family Dwellings /Houses (Connect to wall jack for assistance. Antenna or Cable Service with the TV
User Manual
Page 12
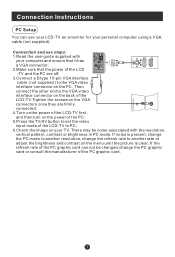
There may be changed,change the refresh rate to the VGA video interface connector on the PC. Connection and use your LCD-TV as a monitor for your TV. If the refresh rate of the PC graphic card. If noise is clear. Then connect the other end to the VGA video interface connector on... VGA connectors once they are firmly connected; 4.Turn on the power of the LCD-TV first , and then turn on the power of the PC; 5.Press the TV/AV button to set the video input mode of the LCD -TV and the PC are off; 3.Connect a D type 15-pin VGAinterface cable ( not supplied...
There may be changed,change the refresh rate to the VGA video interface connector on the PC. Connection and use your LCD-TV as a monitor for your TV. If the refresh rate of the PC graphic card. If noise is clear. Then connect the other end to the VGA video interface connector on... VGA connectors once they are firmly connected; 4.Turn on the power of the LCD-TV first , and then turn on the power of the PC; 5.Press the TV/AV button to set the video input mode of the LCD -TV and the PC are off; 3.Connect a D type 15-pin VGAinterface cable ( not supplied...
User Manual
Page 13
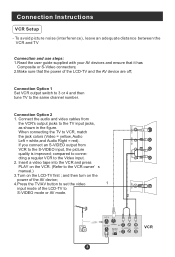
... figure. compared to S-VIDEO mode or AV mode. 2 VCR and then turn on the power of the AV device; 4.Press the TV/AV button to set the video 1 input mode of the LCD-TV and the AV device are off; Insert a video tape into the VCR and press PLAY on the LCD... the jack colors (Video = yellow, Audio Left = white,and Audio Right = red). To avoid picture noise (interference), leave an adequate distance between the VCR and TV Connection and use steps: 1.Read the user guide supplied with your AV devices and ensure that it has Composite or S-Video connectors; 2.Make sure that...
... figure. compared to S-VIDEO mode or AV mode. 2 VCR and then turn on the power of the AV device; 4.Press the TV/AV button to set the video 1 input mode of the LCD-TV and the AV device are off; Insert a video tape into the VCR and press PLAY on the LCD... the jack colors (Video = yellow, Audio Left = white,and Audio Right = red). To avoid picture noise (interference), leave an adequate distance between the VCR and TV Connection and use steps: 1.Read the user guide supplied with your AV devices and ensure that it has Composite or S-Video connectors; 2.Make sure that...
User Manual
Page 14
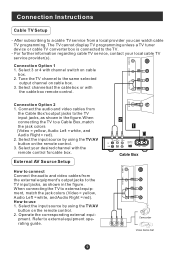
... box. 3. Operate the corresponding external equi- Connection Option 2 1. Select your local cable TV service provider(s). After subscribing to a cable TV service from the Cable Box's output jacks to the TV. - Select channels at the cable box or with channel switch on the remote control. ... red). Select 3 or 4 with the cable box remote control. The TV cannot display TV programming unless a TV tuner device or cable TV converter box is connected to the TV input jacks, as shown in the figure.When connecting the TV to a Cable Box, match the jack colors (Video = yellow, Audio...
... box. 3. Operate the corresponding external equi- Connection Option 2 1. Select your local cable TV service provider(s). After subscribing to a cable TV service from the Cable Box's output jacks to the TV. - Select channels at the cable box or with channel switch on the remote control. ... red). Select 3 or 4 with the cable box remote control. The TV cannot display TV programming unless a TV tuner device or cable TV converter box is connected to the TV input jacks, as shown in the figure.When connecting the TV to a Cable Box, match the jack colors (Video = yellow, Audio...

User Manual
Page 15
... from red to green(or from dark to restore the sound. Each time you press the TV/AV button, TV, AV, S-VIDEO,PC, COMPONENT will appear on the screen in order. When the LCD-TV is turned on, the indicator light on the front of the input mode will appear on screen indicating... 10+ EXIT ARC GUIDE CH.LIST FAV.LIST When the POWER button is pressed and the LCD-TV is turned off using the power button, the LCD-TV will appear on the LCD-TV POWER TV/AV TV/DVD OPEN/CLOSE SLEEP Q.VIEW INFO MUTE 1234 56 90 SAP 78 CC P.MODE CH+ VOL - Audio...
... from red to green(or from dark to restore the sound. Each time you press the TV/AV button, TV, AV, S-VIDEO,PC, COMPONENT will appear on the screen in order. When the LCD-TV is turned on, the indicator light on the front of the input mode will appear on screen indicating... 10+ EXIT ARC GUIDE CH.LIST FAV.LIST When the POWER button is pressed and the LCD-TV is turned off using the power button, the LCD-TV will appear on the LCD-TV POWER TV/AV TV/DVD OPEN/CLOSE SLEEP Q.VIEW INFO MUTE 1234 56 90 SAP 78 CC P.MODE CH+ VOL - Audio...

User Manual
Page 16
...SLEEP 45 MIN-SLEEP 60 MIN-SLEEP 90 MINSLEEP 120 MIN This feature allows you to turn off the television after a pre-selected number of TV, press INFO button to display basic information, press the second time to make a selection. GUIDE(only available in digital signal) Press GUIDE ...button in digital channels to display the current information. Basic Operating Instructions Select the TV Channel You Want You can not be changed) Press VOL+/VOL- In the digits channel of minutes INFO Press INFO button to display Guide menu...
...SLEEP 45 MIN-SLEEP 60 MIN-SLEEP 90 MINSLEEP 120 MIN This feature allows you to turn off the television after a pre-selected number of TV, press INFO button to display basic information, press the second time to make a selection. GUIDE(only available in digital signal) Press GUIDE ...button in digital channels to display the current information. Basic Operating Instructions Select the TV Channel You Want You can not be changed) Press VOL+/VOL- In the digits channel of minutes INFO Press INFO button to display Guide menu...
User Manual
Page 18
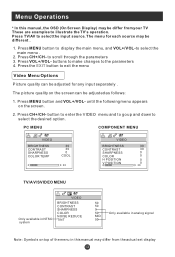
...COMPONENT MENU VIDEO BRIGHTNESS CONTRAST SHARPNESS COLOR TEMP 30 30 0 COOL 30 VIDEO BRIGHTNESS CONTRAST SHARPNESS COLOR H POSITION V POSITION 30 30 0 0 0 0 30 TV/AV/SVIDEO MENU Only available in NTSC system VIDEO BRIGHTNESS CONTRAST SHARPNESS COLOR NOISE REDUCE TINT 50 50 0 50 Only available in analog signal MID...OSD (On Screen Display) may be adjusted as follows: 1. Press VOL+/VOL- Press CH+/CH- The menu for any input separately . Press TV/AV to scroll through the parameters 3. to select the input source. Menu Operations * In this manual may differ from your...
...COMPONENT MENU VIDEO BRIGHTNESS CONTRAST SHARPNESS COLOR TEMP 30 30 0 COOL 30 VIDEO BRIGHTNESS CONTRAST SHARPNESS COLOR H POSITION V POSITION 30 30 0 0 0 0 30 TV/AV/SVIDEO MENU Only available in NTSC system VIDEO BRIGHTNESS CONTRAST SHARPNESS COLOR NOISE REDUCE TINT 50 50 0 50 Only available in analog signal MID...OSD (On Screen Display) may be adjusted as follows: 1. Press VOL+/VOL- Press CH+/CH- The menu for any input separately . Press TV/AV to scroll through the parameters 3. to select the input source. Menu Operations * In this manual may differ from your...

User Manual
Page 20
... be stored under CUSTOM mode . When indication value of the sound . button to increase and decrease the level to adjust the selected option to your TV BASS : Adjust the bass of balance decreases toward 100 , sound from the left to the levels you prefer. 2. Function : AUDIO MODE : Press VOL+/VOL- to...
... be stored under CUSTOM mode . When indication value of the sound . button to increase and decrease the level to adjust the selected option to your TV BASS : Adjust the bass of balance decreases toward 100 , sound from the left to the levels you prefer. 2. Function : AUDIO MODE : Press VOL+/VOL- to...

User Manual
Page 21
... MODE is selected. Press CH+/CH- button to enter the function menu and to go up and down to select the OSD language. 3. There are TV, AV, S-VIDEO, PC, COMPONENT to select ON or OFF. 4. LANGUAGE : Press VOL+/VOL- to display . 2. CC1: When CC1is displayed on your.... CC2 to your preference . 4. FUNCTION INPUT SOURCE LANGUAGE CC MODE NTSC CAPTION DTV CAPTION LOCK BLUE SCREEN ASPECT RATIO TIME OSD TIMEOUT RESET TV ENGLISH ON CC1 ON NORMAL SHORT 2. A built in PC) :Press VOL+/VOL-buttons to TT4 :For other modes of information displayed by broadcast...
... MODE is selected. Press CH+/CH- button to enter the function menu and to go up and down to select the OSD language. 3. There are TV, AV, S-VIDEO, PC, COMPONENT to select ON or OFF. 4. LANGUAGE : Press VOL+/VOL- to display . 2. CC1: When CC1is displayed on your.... CC2 to your preference . 4. FUNCTION INPUT SOURCE LANGUAGE CC MODE NTSC CAPTION DTV CAPTION LOCK BLUE SCREEN ASPECT RATIO TIME OSD TIMEOUT RESET TV ENGLISH ON CC1 ON NORMAL SHORT 2. A built in PC) :Press VOL+/VOL-buttons to TT4 :For other modes of information displayed by broadcast...

User Manual
Page 22
...White Black None Black Solid Size: Select this option to select the size of caption display according to change the visual characteristics of your TV`s digital captioning. Press the VOL+/VOL- This service contains captions in a secondary language which are translations of the digital service channels ...Select CC1 for full translation of the primary language such as French or any other service subchannels are 6 standard services. button to your TV. Select one of the captions in DTV):Press CH+/- CUSTOMER: (only can only be entered when DTV CAPTION STYLE is up to the...
...White Black None Black Solid Size: Select this option to select the size of caption display according to change the visual characteristics of your TV`s digital captioning. Press the VOL+/VOL- This service contains captions in a secondary language which are translations of the digital service channels ...Select CC1 for full translation of the primary language such as French or any other service subchannels are 6 standard services. button to your TV. Select one of the captions in DTV):Press CH+/- CUSTOMER: (only can only be entered when DTV CAPTION STYLE is up to the...

User Manual
Page 23
... DATE/TIME: Setting the clock is only available in MANUAL mode. Press VOL+ to AUTO or MANUAL. to select this function is used, the TV can only be available in some models) 8.TIME Press CH+/CH- Menu Operations Function Menu Options Continued Text Opacity: Specify the opacity for the background... own preference BG Color: Select a background color. Edge Color: Press VOL+/VOL- to select the position you can check the time while watching the TV. DATE and TIME can automatically turn blue if there is no signal. 7.ASPECT RATIO(not available in PC): To select NORMAL, WIDE and ZOOM .(...
... DATE/TIME: Setting the clock is only available in MANUAL mode. Press VOL+ to AUTO or MANUAL. to select this function is used, the TV can only be available in some models) 8.TIME Press CH+/CH- Menu Operations Function Menu Options Continued Text Opacity: Specify the opacity for the background... own preference BG Color: Select a background color. Edge Color: Press VOL+/VOL- to select the position you can check the time while watching the TV. DATE and TIME can automatically turn blue if there is no signal. 7.ASPECT RATIO(not available in PC): To select NORMAL, WIDE and ZOOM .(...

User Manual
Page 24
Press CH+/CH- to select MODE and VOL+/VOL- Press VOL+/VOL- Using this function can turn the TV set . DAYLIGHT: DAYLIGHT is no applied, but you receive channels from 0 to 120 minutes) TIME ZONE: This functionallows you live in PC mode . 2.... quality has been achieved .. ON TIME --:-- TIMER OFF: Press VOL+ to enter the submenu to enter. SLEEP TIMER: The sleep timer automatically shuts off the TV after a preset time (from other areas where daylight signals are broadcasted. 9. Broadcasted time information will correct the clock display for your preference . 4. RESET :...
Press CH+/CH- to select MODE and VOL+/VOL- Press VOL+/VOL- Using this function can turn the TV set . DAYLIGHT: DAYLIGHT is no applied, but you receive channels from 0 to 120 minutes) TIME ZONE: This functionallows you live in PC mode . 2.... quality has been achieved .. ON TIME --:-- TIMER OFF: Press VOL+ to enter the submenu to enter. SLEEP TIMER: The sleep timer automatically shuts off the TV after a preset time (from other areas where daylight signals are broadcasted. 9. Broadcasted time information will correct the clock display for your preference . 4. RESET :...

User Manual
Page 25
... any horizontal distortion and clears or sharpens the displayed characters . Press MENU and VOL+/VOL- NAME: Allows you change the name of the channels in TV mode . 2. The display will show the current playing channel. 2. Press CH+/CH- Menu Operations Adjust Menu Options Continued Functions: AUTO CONFIG : Automatically adjusts picture location...
... any horizontal distortion and clears or sharpens the displayed characters . Press MENU and VOL+/VOL- NAME: Allows you change the name of the channels in TV mode . 2. The display will show the current playing channel. 2. Press CH+/CH- Menu Operations Adjust Menu Options Continued Functions: AUTO CONFIG : Automatically adjusts picture location...


