
User Manual
Page 1
MODELS: HP42BB HP50B HP60B PLASMA TV OWNER'S MANUAL Please READ this manual carefully before operating your TV, and retain it for future reference.
MODELS: HP42BB HP50B HP60B PLASMA TV OWNER'S MANUAL Please READ this manual carefully before operating your TV, and retain it for future reference.
User Manual
Page 2
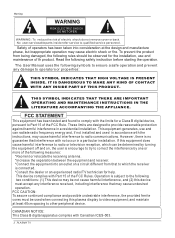
... harmful interference to radio or television reception, which the receiver is no guarantee that interference with Canadian ICES-003. 2 PLASMA TV This device compiles with the instructions, may cause harmful interference to radio communications. The User Manual uses the following safety instruction... of electric shock do not remove cover or back. However ,there is connected. *Consult the dealer or an experienced radio/TV technician for help. FCC CAUTION: To assure continued compliance and possible undesirable interference, the provided ferrite cores must accept any damage...
... harmful interference to radio or television reception, which the receiver is no guarantee that interference with Canadian ICES-003. 2 PLASMA TV This device compiles with the instructions, may cause harmful interference to radio communications. The User Manual uses the following safety instruction... of electric shock do not remove cover or back. However ,there is connected. *Consult the dealer or an experienced radio/TV technician for help. FCC CAUTION: To assure continued compliance and possible undesirable interference, the provided ferrite cores must accept any damage...

User Manual
Page 4
This easy-to obtain warranty service. 4 PLASMA TV You will guide you for using our Haier product. SAVE THESE INSTRUCTIONS Thank you in back of the unit. They are on label in getting the best use manual will need it to -use of purchase Staple your receipt to record the model and serial number. Model number serial number Date of your manual. Remember to your product.
This easy-to obtain warranty service. 4 PLASMA TV You will guide you for using our Haier product. SAVE THESE INSTRUCTIONS Thank you in back of the unit. They are on label in getting the best use manual will need it to -use of purchase Staple your receipt to record the model and serial number. Model number serial number Date of your manual. Remember to your product.
User Manual
Page 5
... Connection Monitor Out Setup HDM I Cable Sample Connecting Headphones Pow er so urc e Take th e tab le st and o ff Operation Switching On/Off the TV set Choose the Menu Language Choose the input Source Channel Menu Automatic Scan Man ual S can Fine Tune Edi t Pro gra m Rename Select the desired...
... Connection Monitor Out Setup HDM I Cable Sample Connecting Headphones Pow er so urc e Take th e tab le st and o ff Operation Switching On/Off the TV set Choose the Menu Language Choose the input Source Channel Menu Automatic Scan Man ual S can Fine Tune Edi t Pro gra m Rename Select the desired...

User Manual
Page 6
... Program minus and plus , menu options. 3.VOL-/+: volume decrease and increase, menu reset and entry. 4.MENU: menu display. 5. MENU 4 POWER 5 HP50B HP60B 6 PLASMA TV INPUT 1 CH+ 2 CH- VOL+ 3 VOL- POWER: Is used to activate the display or return to standby mode. VOL+ 3 VOL- Controls... -This is a simplified representation of front panel. -Here shown may be somewhat different from your TV. Introduction INPUT 1 CH+ 2 CH- Front panel controls HP42BB 1.INPUT: all input source display and OK confirm. 2.CH -/+ : program minus...
... Program minus and plus , menu options. 3.VOL-/+: volume decrease and increase, menu reset and entry. 4.MENU: menu display. 5. MENU 4 POWER 5 HP50B HP60B 6 PLASMA TV INPUT 1 CH+ 2 CH- VOL+ 3 VOL- POWER: Is used to activate the display or return to standby mode. VOL+ 3 VOL- Controls... -This is a simplified representation of front panel. -Here shown may be somewhat different from your TV. Introduction INPUT 1 CH+ 2 CH- Front panel controls HP42BB 1.INPUT: all input source display and OK confirm. 2.CH -/+ : program minus...

User Manual
Page 7
... s Manual 7 Connection Options Back panel controls Antenna Input Connect cable or antenna signals to HDMI/DVI. AUDIO/VIDEO output HDMI2 connect a signal to the TV, either directly or through your cable box. Audio Output Connect audio from a video device. ANT IN HDMI2 PC COMPONENT AV OUT L R Y Pb ...In standby mode, these jacks. stereo sound from the external device, used AUDIO Input while using a DVI to HDMI connect to operate the TV on DC power (for HL26S, It is indicated on the Specifications page. The voltage is on AC power. DVD/DTV Input (Component )...
... s Manual 7 Connection Options Back panel controls Antenna Input Connect cable or antenna signals to HDMI/DVI. AUDIO/VIDEO output HDMI2 connect a signal to the TV, either directly or through your cable box. Audio Output Connect audio from a video device. ANT IN HDMI2 PC COMPONENT AV OUT L R Y Pb ...In standby mode, these jacks. stereo sound from the external device, used AUDIO Input while using a DVI to HDMI connect to operate the TV on DC power (for HL26S, It is indicated on the Specifications page. The voltage is on AC power. DVD/DTV Input (Component )...

User Manual
Page 8
... SWAP AUDIO SWAP POSITION P.MODE Selects the picture appropriate for the program's character. When the desired device is selected, the corresponding LED lights on the TV. VCR/DVD Functions Control some video cassette recorders or DVD players. / Rewind / Fast / backward /Forward Stop Play/Pause REC S.MODE Selects the ... remote control, aim it at the remote control sensor on 5seconds. MENU Brings up the main menu to the last channel you watch the TV, press the key, the information displays on -screen menus and adjust the system settings to select one of the screen. EXIT Clears all ...
... SWAP AUDIO SWAP POSITION P.MODE Selects the picture appropriate for the program's character. When the desired device is selected, the corresponding LED lights on the TV. VCR/DVD Functions Control some video cassette recorders or DVD players. / Rewind / Fast / backward /Forward Stop Play/Pause REC S.MODE Selects the ... remote control, aim it at the remote control sensor on 5seconds. MENU Brings up the main menu to the last channel you watch the TV, press the key, the information displays on -screen menus and adjust the system settings to select one of the screen. EXIT Clears all ...
User Manual
Page 9
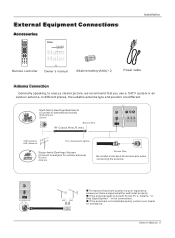
... S.MODE FREEZE NPUT INFO OK ARC SAP SLEEP EXIT VOL+ CH+ VOL- Single-family Dwellings /Houses (Connect to wall jack for two TV`s, install a 2Way Signal Splitter in a poor signal area, please purchase a signal amplifier and install properly. Remote controller Owner`s manual Alkaline battery... Antenna Connection Generally speaking, to bend the bronze wire when connecting the antenna. If the antenna is not installed properly, contact your TV, and retain it for assistance. CH- Multi-family Dwellings/Apartments (Connect to wall antenna socket) Wall Antenna Socket Bronze Wire RF ...
... S.MODE FREEZE NPUT INFO OK ARC SAP SLEEP EXIT VOL+ CH+ VOL- Single-family Dwellings /Houses (Connect to wall jack for two TV`s, install a 2Way Signal Splitter in a poor signal area, please purchase a signal amplifier and install properly. Remote controller Owner`s manual Alkaline battery... Antenna Connection Generally speaking, to bend the bronze wire when connecting the antenna. If the antenna is not installed properly, contact your TV, and retain it for assistance. CH- Multi-family Dwellings/Apartments (Connect to wall antenna socket) Wall Antenna Socket Bronze Wire RF ...

User Manual
Page 10
... to achieve. ANT IN COMPONENT AV OUT L R Y Pb Pr L R S-VIDEO VIDEO L R 10 PLASMA TV If you connect an S-VIDEO output from the VCR's output jacks to the TV input jacks, as shown in the figure. VCR connection - To avoid picture noise (interference), leave an adequate distance ... quality of the signal you . Choose the connection which is improved; Select the input source with the TV. Choose Your Connection There are several ways to connect your TV. Installation External Equipment Connections NOTE: All cables shown are not included with using the INPUT button on the...
... to achieve. ANT IN COMPONENT AV OUT L R Y Pb Pr L R S-VIDEO VIDEO L R 10 PLASMA TV If you connect an S-VIDEO output from the VCR's output jacks to the TV input jacks, as shown in the figure. VCR connection - To avoid picture noise (interference), leave an adequate distance ... quality of the signal you . Choose the connection which is improved; Select the input source with the TV. Choose Your Connection There are several ways to connect your TV. Installation External Equipment Connections NOTE: All cables shown are not included with using the INPUT button on the...

User Manual
Page 11
...Pr L R S-VIDEO VIDEO L R Owner s Manual 11 Use the INPUT button on the remote control to select the desired source. 3. Component ports on the TV Video output ports on the remote control. 2. Press the / button to select YPbPr mode. 3. Connect the DVD video outputs (COMPONENT) to the Y, Pb, Pr... equipment. Refer to external equipment, match the jack colors (Video = yellow, Audio Left = white, and Audio Right = red). When connecting the TV to the DVD player's manual for program play. 4. as shown below. NOTE: If your DVD only has an S-VIDEO output jack, connect this ...
...Pr L R S-VIDEO VIDEO L R Owner s Manual 11 Use the INPUT button on the remote control to select the desired source. 3. Component ports on the TV Video output ports on the remote control. 2. Press the / button to select YPbPr mode. 3. Connect the DVD video outputs (COMPONENT) to the Y, Pb, Pr... equipment. Refer to external equipment, match the jack colors (Video = yellow, Audio Left = white, and Audio Right = red). When connecting the TV to the DVD player's manual for program play. 4. as shown below. NOTE: If your DVD only has an S-VIDEO output jack, connect this ...

User Manual
Page 12
... input on the digital set-top box. (Refer to the figure as amplifers or speakers, please turn the TV speakers off. Caution: Do not look into the optical output port. This TV supports HDCP (High-bandwidth Digital Contents Protection) protocol for operation. Then, make the corresponding audio connections. See...IN Signal 480i 480p 720p 1080i COMPONENT Yes Yes Yes Yes HDMI/DVI Yes Yes Yes Yes Digital Set-top Box Audio Output Send the TV`s audio to connect 1. Connect the other digital external device, refer to the owner`s manual for video connections, depending on the remote ...
... input on the digital set-top box. (Refer to the figure as amplifers or speakers, please turn the TV speakers off. Caution: Do not look into the optical output port. This TV supports HDCP (High-bandwidth Digital Contents Protection) protocol for operation. Then, make the corresponding audio connections. See...IN Signal 480i 480p 720p 1080i COMPONENT Yes Yes Yes Yes HDMI/DVI Yes Yes Yes Yes Digital Set-top Box Audio Output Send the TV`s audio to connect 1. Connect the other digital external device, refer to the owner`s manual for video connections, depending on the remote ...
User Manual
Page 13
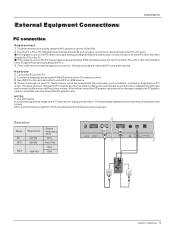
...resolution,change the PCgraphic card or consultthe manufacturer ofthe PC graphiccard. NOTES: 1 Use a DVIcable. 2 Avoid keeping afixed image onthe TV'sscreen for Horizontaland Verticalfrequencies is set to 1024 x768 . 2. Ifthe refresh rateof the PCgraphic card cannot be noise associated with the resolution..., contrast or brightness in PC mode. Then,make the correspondingaudio connection. How touse 1. Turnon the displayby pressing thePOWER button onthe TV'sremote control. 3. If the graphic card onthe PC doesoutput analog anddigital RGB simultaneously, set theTV to either PC or DVI; ...
...resolution,change the PCgraphic card or consultthe manufacturer ofthe PC graphiccard. NOTES: 1 Use a DVIcable. 2 Avoid keeping afixed image onthe TV'sscreen for Horizontaland Verticalfrequencies is set to 1024 x768 . 2. Ifthe refresh rateof the PCgraphic card cannot be noise associated with the resolution..., contrast or brightness in PC mode. Then,make the correspondingaudio connection. How touse 1. Turnon the displayby pressing thePOWER button onthe TV'sremote control. 3. If the graphic card onthe PC doesoutput analog anddigital RGB simultaneously, set theTV to either PC or DVI; ...

User Manual
Page 14
...allows you to set the output resolution appropriately. If the source device does not support Auto HDMI, you need to hook up a second TV or monitor. Aseparated audio connection is necessary. No separated audio connection is necessary. 3. If the source device supports Auto DVI function, the... will be automatically set to -DVI cable(not supplied with this product). 2. Select HDMI input source in input source option of the second TV or monitor for Monitor out. Connect the source device to 1280x720p. - When connecting with a HDMI-to 1280x720p. - If the source device...
...allows you to set the output resolution appropriately. If the source device does not support Auto HDMI, you need to hook up a second TV or monitor. Aseparated audio connection is necessary. No separated audio connection is necessary. 3. If the source device supports Auto DVI function, the... will be automatically set to -DVI cable(not supplied with this product). 2. Select HDMI input source in input source option of the second TV or monitor for Monitor out. Connect the source device to 1280x720p. - When connecting with a HDMI-to 1280x720p. - If the source device...
User Manual
Page 16
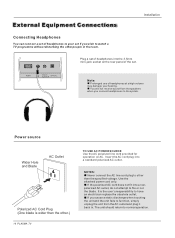
... OPTICAL AUDIO IN Note Prolonged use of headphones at a high volume may damage your set if you wish to watch a TV programme without disturbing the other than the other.) 16 PLASMA TV TO USE AC POWER SOURCE Use the AC polarized line cord provided for operation on the rear panel of headphones...
... OPTICAL AUDIO IN Note Prolonged use of headphones at a high volume may damage your set if you wish to watch a TV programme without disturbing the other than the other.) 16 PLASMA TV TO USE AC POWER SOURCE Use the AC polarized line cord provided for operation on the rear panel of headphones...

User Manual
Page 18
...use / button to work properly. Choose the Menu Language When you might need to the previous menu. Press INPUT button to return to TV viewing or press EXIT button to return to confirm you selection. 5 When you can watch your choice, press the EXIT button to ...Cursor Note: OK: Change MP Source Right:Activale Source Name Edit Menu 1. the information will display Air TV or Cable TV; 18 PLASMA TV English Spanish or French 4 Select your language with your TV, cable TV, VCR, DVD, or any other devices that follow. Operation Operation -In the manual, the OSD ...
...use / button to work properly. Choose the Menu Language When you might need to the previous menu. Press INPUT button to return to TV viewing or press EXIT button to return to confirm you selection. 5 When you can watch your choice, press the EXIT button to ...Cursor Note: OK: Change MP Source Right:Activale Source Name Edit Menu 1. the information will display Air TV or Cable TV; 18 PLASMA TV English Spanish or French 4 Select your language with your TV, cable TV, VCR, DVD, or any other devices that follow. Operation Operation -In the manual, the OSD ...

User Manual
Page 19
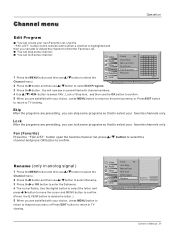
...and then use / button to select Tuner. 3 Press the button and then use the remote control to set channel is explained. Channel menu Operation This TV set has three methods to set channels, which are satisfied with your area. You can also use buttons on . Note : Channel menu only available ...after selecting Air TV or Cable TV in your choice, press MENU button to return to the previous menu. 6 Press the / button to select Auto Scan. 7 Press the button and ...
...and then use / button to select Tuner. 3 Press the button and then use the remote control to set channel is explained. Channel menu Operation This TV set has three methods to set channels, which are satisfied with your area. You can also use buttons on . Note : Channel menu only available ...after selecting Air TV or Cable TV in your choice, press MENU button to return to the previous menu. 6 Press the / button to select Auto Scan. 7 Press the button and ...

User Manual
Page 20
... delete. 8 Press the button to select OK item and press OK button to add for the channel number. 9 Press EXIT button to return to TV viewing or press MENU button to return to the previous menu. Channel menu Operation Manual Scan If excessive channel signals of the analog channels : Move... menu. 2 Press the / button to select Fine Tune. 3 Press the or OK button 4 Press the / button to tune. 5 Press EXIT button to return to TV viewing or press MENU button to return to the previous menu. Video Audio Time A B C Channel Function Lock Tuner Air Auto Scan Manual Scan Fine Tune...
... delete. 8 Press the button to select OK item and press OK button to add for the channel number. 9 Press EXIT button to return to TV viewing or press MENU button to return to the previous menu. Channel menu Operation Manual Scan If excessive channel signals of the analog channels : Move... menu. 2 Press the / button to select Fine Tune. 3 Press the or OK button 4 Press the / button to tune. 5 Press EXIT button to return to TV viewing or press MENU button to return to the previous menu. Video Audio Time A B C Channel Function Lock Tuner Air Auto Scan Manual Scan Fine Tune...
User Manual
Page 21
... EXIT button to return to confirm. Fav (Favorite) Press the FAV.LiST button open the favorite channel list, press / channel and press OK button to TV viewing. Video Audio Time A B C Channel Function Lock Tuner Air Auto Scan Manual Scan Fine Tune Edit Program Rename Program No Program Name : Move cursor, /OK... to confirm. 5 When you are satisfied with your choice, press MENU button to return to the previous menu or Press EXIT button to return to TV viewing.
... EXIT button to return to confirm. Fav (Favorite) Press the FAV.LiST button open the favorite channel list, press / channel and press OK button to TV viewing. Video Audio Time A B C Channel Function Lock Tuner Air Auto Scan Manual Scan Fine Tune Edit Program Rename Program No Program Name : Move cursor, /OK... to confirm. 5 When you are satisfied with your choice, press MENU button to return to the previous menu or Press EXIT button to return to TV viewing.

User Manual
Page 22
...channel will display on one channel, press CH+/- button to recover the sound, press the MUTE button again or directly press VOL+ button. 22 PLASMA TV Volume - + 21 Mute When you need to pay attention to surrounded sounds, or there is a telephone calling you want to select a channel .... The range is turned off. 2 If you or there are pressed the volume level is displayed automatically on the remote or the front of the TV set to select a channel number in number decreasing direction. (Note: If Skip is very convenient. 1 Press the MUTE button on the remote control and...
...channel will display on one channel, press CH+/- button to recover the sound, press the MUTE button again or directly press VOL+ button. 22 PLASMA TV Volume - + 21 Mute When you need to pay attention to surrounded sounds, or there is a telephone calling you want to select a channel .... The range is turned off. 2 If you or there are pressed the volume level is displayed automatically on the remote or the front of the TV set to select a channel number in number decreasing direction. (Note: If Skip is very convenient. 1 Press the MUTE button on the remote control and...

User Manual
Page 23
Operation How to TV viewing. How to customize your own picture status 1 Press the MENU button and then use / button to select the Video menu. 2 Press the button and ... and reduces the image noise and improves picture quality when receiving weak video signals. Black Stretch This will select the film mode. Video menu The TV menu gives you an overview of bright parts in the picture. Press P.MODE button repeatedly on the input signal, one or more menu items may...
Operation How to TV viewing. How to customize your own picture status 1 Press the MENU button and then use / button to select the Video menu. 2 Press the button and ... and reduces the image noise and improves picture quality when receiving weak video signals. Black Stretch This will select the film mode. Video menu The TV menu gives you an overview of bright parts in the picture. Press P.MODE button repeatedly on the input signal, one or more menu items may...


