
User Manual
Page 1
PLASMA TV OWNER`S MANUAL MODELS: P42SV6-C1 P42S6A-C2 Please READ this manual carefully before operating the unit, and keep it for future reference. -Y-
PLASMA TV OWNER`S MANUAL MODELS: P42SV6-C1 P42S6A-C2 Please READ this manual carefully before operating the unit, and keep it for future reference. -Y-
User Manual
Page 2
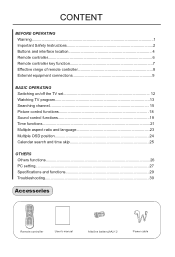
... and interface location 4 Remote controller 6 Remote controller key function 7 Effective range of remote controller 8 External equipment connections 9 BASIC OPERATING Switching on/off the TV set 12 Watching TV program 13 Searching channel 15 Picture control functions 18 Sound control functions 19 Time functions...21 Multiple aspect ratio and language 23 Multiple OSD...
... and interface location 4 Remote controller 6 Remote controller key function 7 Effective range of remote controller 8 External equipment connections 9 BASIC OPERATING Switching on/off the TV set 12 Watching TV program 13 Searching channel 15 Picture control functions 18 Sound control functions 19 Time functions...21 Multiple aspect ratio and language 23 Multiple OSD...
User Manual
Page 6
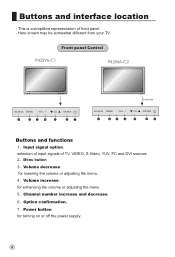
Front panel Control P42SV6-C1 P42S6A-C2 SOURCE MENU - VOL + 1 2 3 4 CH ENTER 5 6 7 Underside SOURCE MENU - This is a simplified representation of TV, VIDEO, S-Video, YUV, PC and DVI sources. 2 Menu button 3 Volume decrease: for lowering the volume or adjusting the menu. 4 ...decrease. 6 Option confirmation. 7 Power button for turning on or off the power supply. 4 Here shown may be somewhat different from your TV. VOL + 1 2 3 4 CH ENTER 5 6 7 Buttons and functions 1 Input signal option: selection of input signals of front panel. - Buttons and interface ...
Front panel Control P42SV6-C1 P42S6A-C2 SOURCE MENU - VOL + 1 2 3 4 CH ENTER 5 6 7 Underside SOURCE MENU - This is a simplified representation of TV, VIDEO, S-Video, YUV, PC and DVI sources. 2 Menu button 3 Volume decrease: for lowering the volume or adjusting the menu. 4 ...decrease. 6 Option confirmation. 7 Power button for turning on or off the power supply. 4 Here shown may be somewhat different from your TV. VOL + 1 2 3 4 CH ENTER 5 6 7 Buttons and functions 1 Input signal option: selection of input signals of front panel. - Buttons and interface ...

User Manual
Page 7
...the S-VIDEO input. 5 External Speaker (8 ohm Output) Connect to the jack Power Cord Socket Antenna Input and switch Connect cable or This TV operates on DC power cable box. EXT Subwoofer: Subwoofer audio output terminal. Audio input for linking DVI, PC or other appliance audio input... video/audio or other appliance audio output terminals. RS-232 INPUT (CONTROL/SERVICE) PORT Connect to the RS232 port on the the TV, either directly Specifications page. S-Video Input Connect S-Video out from an external device to these jacks. Buttons and interface location Rear ...
...the S-VIDEO input. 5 External Speaker (8 ohm Output) Connect to the jack Power Cord Socket Antenna Input and switch Connect cable or This TV operates on DC power cable box. EXT Subwoofer: Subwoofer audio output terminal. Audio input for linking DVI, PC or other appliance audio input... video/audio or other appliance audio output terminals. RS-232 INPUT (CONTROL/SERVICE) PORT Connect to the RS232 port on the the TV, either directly Specifications page. S-Video Input Connect S-Video out from an external device to these jacks. Buttons and interface location Rear ...

User Manual
Page 9
...USB DOWN Right/Next REV EXIT Pause Enter ZOOM HELP PC/DVI mode select PC/DVI mode. S-Video mode select S-Video. TV/VIDEO Selects: TV, Video NUMBER buttons CHANNEL select are not available Calendar Display of current channel signals, program and systems CHANNEL UP/DOWN Selects available...buttons are not available OK button VOLUME UP/DOWN Increases/decreases the sound level. Information display Display of year/month/date POWER Turns your TV on or off . Remote controller key function Picture still MUTE Switches the sound on or off . Sound system option Theater, Personal, ...
...USB DOWN Right/Next REV EXIT Pause Enter ZOOM HELP PC/DVI mode select PC/DVI mode. S-Video mode select S-Video. TV/VIDEO Selects: TV, Video NUMBER buttons CHANNEL select are not available Calendar Display of current channel signals, program and systems CHANNEL UP/DOWN Selects available...buttons are not available OK button VOLUME UP/DOWN Increases/decreases the sound level. Information display Display of year/month/date POWER Turns your TV on or off . Remote controller key function Picture still MUTE Switches the sound on or off . Sound system option Theater, Personal, ...
User Manual
Page 11
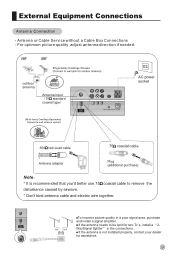
... AC-IN 300 twin-lead cable 75 coaxial cable Antenna adapter Plug (additional purchase) Note * It is not installed properly, contact your dealer for two Tv`s, install a 2WaySignal Splitter in a poor signal area, purchase and install a signal amplifier.
... AC-IN 300 twin-lead cable 75 coaxial cable Antenna adapter Plug (additional purchase) Note * It is not installed properly, contact your dealer for two Tv`s, install a 2WaySignal Splitter in a poor signal area, purchase and install a signal amplifier.

User Manual
Page 12
... digital set -top box. External Equipment Connections DVD setup How to the DVD player's manual for operating instructions. Refer to connect 1. Use YUV on the TV, as shown in the figure. DTV setup -To watch digitally broadcast programs, purchase and connect a digital set -top box. (Refer to select S-VIDEO mode... to use 1. If your DVD only has an S-Video output jack, connect this to the S-VIDEO input on the TV and Connect the DVD audio outputs to connect Use the TV`s COMPONENT (Y, Pb/Cb, Pr/Cr) INPUT jacks, RGB or DVI port for video connections, depending on the DVD ...
... digital set -top box. External Equipment Connections DVD setup How to the DVD player's manual for operating instructions. Refer to connect 1. Use YUV on the TV, as shown in the figure. DTV setup -To watch digitally broadcast programs, purchase and connect a digital set -top box. (Refer to select S-VIDEO mode... to use 1. If your DVD only has an S-Video output jack, connect this to the S-VIDEO input on the TV and Connect the DVD audio outputs to connect Use the TV`s COMPONENT (Y, Pb/Cb, Pr/Cr) INPUT jacks, RGB or DVI port for video connections, depending on the DVD ...
User Manual
Page 13
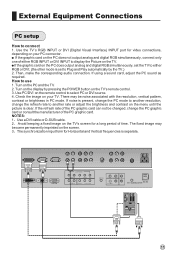
...the screen. 3 The synchronization input form for Horizontal and Vertical frequencies is clear. There may become permanently imprinted on the display by the TV.) 2. Use the TV`s RGB INPUT or DVI (Digital Visual Interface) INPUT port for a long period of the PC graphic card. If the refresh rate of... pattern, contrast or brightness in PC mode. If using a sound card, adjust the PC sound as required. If noise is set the TV to either RGB INPUT or DVI INPUT to another resolution, change the PC graphic card or consult the manufacturer of time. External Equipment Connections PC...
...the screen. 3 The synchronization input form for Horizontal and Vertical frequencies is clear. There may become permanently imprinted on the display by the TV.) 2. Use the TV`s RGB INPUT or DVI (Digital Visual Interface) INPUT port for a long period of the PC graphic card. If the refresh rate of... pattern, contrast or brightness in PC mode. If using a sound card, adjust the PC sound as required. If noise is set the TV to either RGB INPUT or DVI INPUT to another resolution, change the PC graphic card or consult the manufacturer of time. External Equipment Connections PC...
User Manual
Page 14
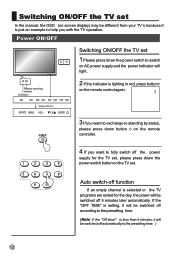
...power supply for the day, the power will be switched off 5 minutes later automatically. Switching ON/OFF the TV set In the manual, the OSD (on screen display) may be different from your TV`s because it is less than 5 minutes, it will be switched off function If an empty channel is ...setting, it will light . Power ON/OFF Switching ON/OFF the TV set . Remote receiving window Indicator 2 If the indicator is selected or the TV programs are ended for the TV set, please press down the power switch button on the TV set 1 Please press down the power switch to help you want ...
...power supply for the day, the power will be switched off 5 minutes later automatically. Switching ON/OFF the TV set In the manual, the OSD (on screen display) may be different from your TV`s because it is less than 5 minutes, it will be switched off function If an empty channel is ...setting, it will light . Power ON/OFF Switching ON/OFF the TV set . Remote receiving window Indicator 2 If the indicator is selected or the TV programs are ended for the TV set, please press down the power switch button on the TV set 1 Please press down the power switch to help you want ...

User Manual
Page 15
... program 1 Using "Program number" buttons. Directly enter the channel number with the numeric keypad on the remote or the front of the TV set to select the desired sound Press the VOL-/+ buttons on the remote control. Press the VOL- picture sound tuner function signal timer ...How to adjust the volume level. How to Adjust 13 Volume MENU to select tv mode. Watching TV Program You can watch TV program in number increasing direction. Press TV/AV button to Exit Vol+/Vol- To select channel numbers from 10 ~ 99 ,press continuously the numeric...
... program 1 Using "Program number" buttons. Directly enter the channel number with the numeric keypad on the remote or the front of the TV set to select the desired sound Press the VOL-/+ buttons on the remote control. Press the VOL- picture sound tuner function signal timer ...How to adjust the volume level. How to Adjust 13 Volume MENU to select tv mode. Watching TV Program You can watch TV program in number increasing direction. Press TV/AV button to Exit Vol+/Vol- To select channel numbers from 10 ~ 99 ,press continuously the numeric...
User Manual
Page 16
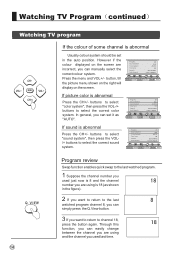
Watching TV Program continued Watching TV program If the colour of some channel is abnormal Usually colour system should be set it as shown in the auto position. Prog.No. Prog....
Watching TV Program continued Watching TV program If the colour of some channel is abnormal Usually colour system should be set it as shown in the auto position. Prog.No. Prog....
User Manual
Page 17
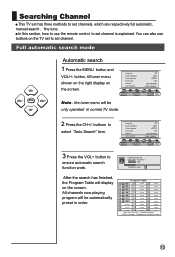
...the remote control to Cancel 073.25 Programs Found 01 After the search has finished, the Program Table will be automatically preset in normal TV mode. 2 Press the CH+/- Prog.No. Ch+/Ch- buttons to Select Program 1=Del 2=Change 3=Rename 4=Favorite 5=Skip 15 ... ----05 @2112 15 ----- 25 ----06 @2322 16 ----- 26 ----07 ----- 17 ----- 27 ----08 ----- 18 ----- 28 ----09 ----- 19 ----- 29 ----- Searching Channel This TV set has three methods to ensure automatic search function work. Full automatic search mode Automatic search 1 Press the MENU button and VOL+/-
...the remote control to Cancel 073.25 Programs Found 01 After the search has finished, the Program Table will be automatically preset in normal TV mode. 2 Press the CH+/- Prog.No. Ch+/Ch- buttons to Select Program 1=Del 2=Change 3=Rename 4=Favorite 5=Skip 15 ... ----05 @2112 15 ----- 25 ----06 @2322 16 ----- 26 ----07 ----- 17 ----- 27 ----08 ----- 18 ----- 28 ----09 ----- 19 ----- 29 ----- Searching Channel This TV set has three methods to ensure automatic search function work. Full automatic search mode Automatic search 1 Press the MENU button and VOL+/-

User Manual
Page 22
... button again or directly press the VOL-/+ buttons. 20 buttons to select frequency to adjust the value data. At this time, the sound of the TV set Mute is very convenient. 1 Press the MUTE button on the remote control and "MUTE" type face will display on the lower part of the...
... button again or directly press the VOL-/+ buttons. 20 buttons to select frequency to adjust the value data. At this time, the sound of the TV set Mute is very convenient. 1 Press the MUTE button on the remote control and "MUTE" type face will display on the lower part of the...

User Manual
Page 23
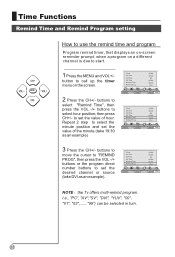
button, and the timer Off Time 00:00 menu display on the rear panel, the clock loses power and will only work if the TV set is turned on or in a preset time. 1 Press the MENU and VOL+/- then press the CH+/- buttons to call up the timer menu on .... 00:00 00:00 AV 00:00 00:00 DVI picture sound tuner function signal timer On/off timer Using on/off timer function, the TV set can automatically turn on to select hour position; buttons to select "On time", press the VOL-/+buttons to a preset program or shut down in...
button, and the timer Off Time 00:00 menu display on the rear panel, the clock loses power and will only work if the TV set is turned on or in a preset time. 1 Press the MENU and VOL+/- then press the CH+/- buttons to call up the timer menu on .... 00:00 00:00 AV 00:00 00:00 DVI picture sound tuner function signal timer On/off timer Using on/off timer function, the TV set can automatically turn on to select hour position; buttons to select "On time", press the VOL-/+buttons to a preset program or shut down in...
User Manual
Page 24
... CH+/- Off Time Remind Time Remind Prog. 00:00 00:00 AV 00:00 00:00 DVI picture sound tuner function signal timer NOTE the Tv offers multi-remind program. button to call up the timer menu on a different channel is due to start. 1 Press the MENU and VOL+/- I.e., "PC", "AV...
... CH+/- Off Time Remind Time Remind Prog. 00:00 00:00 AV 00:00 00:00 DVI picture sound tuner function signal timer NOTE the Tv offers multi-remind program. button to call up the timer menu on a different channel is due to start. 1 Press the MENU and VOL+/- I.e., "PC", "AV...

User Manual
Page 27
... search the desired year or month. 4. Press VOL+ button to previous mode. To choose time skip function Repeat step 1. Calendar search and time skip This TV set the desired time. Calendar search and time skip To choose calendar search 1 Press the MENU button and VOL+/-
... search the desired year or month. 4. Press VOL+ button to previous mode. To choose time skip function Repeat step 1. Calendar search and time skip This TV set the desired time. Calendar search and time skip To choose calendar search 1 Press the MENU button and VOL+/-

User Manual
Page 30
.... As adjusting H position or V position parameter, It is natural that the picture will have faintness once in a while if the range is only available in TV mode , AV and S-VIDEO mode. 3. Auto Adjust is more, then to adjust contrarily to normal position. 2. button , till the signal menu shown on the right...
.... As adjusting H position or V position parameter, It is natural that the picture will have faintness once in a while if the range is only available in TV mode , AV and S-VIDEO mode. 3. Auto Adjust is more, then to adjust contrarily to normal position. 2. button , till the signal menu shown on the right...
User Manual
Page 32
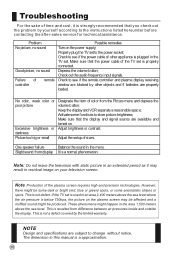
... cable of other objects and if batteries are properly loaded. Activate some anomalistic stripes or spots. Make sure that the power cable of the TV set to change without notice. One speaker failure Balance the sound in the area 1,500 meters above the sea level where the air pressure ...is properly connected. Slight sound fromdisplay It is not defect. This is a normal phenomenon. If the TV set . These phenomena might happen in themenu. The dimension in residual image on the power supply; Troubleshooting For the sake of time and cost, ...
... cable of other objects and if batteries are properly loaded. Activate some anomalistic stripes or spots. Make sure that the power cable of the TV set to change without notice. One speaker failure Balance the sound in the area 1,500 meters above the sea level where the air pressure ...is properly connected. Slight sound fromdisplay It is not defect. This is a normal phenomenon. If the TV set . These phenomena might happen in themenu. The dimension in residual image on the power supply; Troubleshooting For the sake of time and cost, ...


