
Use & Care
Page 2
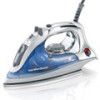
...operate another high-wattage appliance on the same circuit. 2. OTHER CONSUMER SAFETY INFORMATION This product is used . Use the iron on an ironing board. 9. Prepare iron for household use only. This will stop and does not indicate a defect or hazard. Do not allow cord to.... Care should be followed, including the following: READ ALL INSTRUCTIONS BEFORE USING 1. To avoid a circuit overload, do not disassemble the iron. WARNING! Ironing on examination and repair. 840182601 ENnv01.qxd:Layout 1 9/8/09 2:18 PM Page 2 IMPORTANT SAFETY INSTRUCTIONS When using an adapter. Burns ...
...operate another high-wattage appliance on the same circuit. 2. OTHER CONSUMER SAFETY INFORMATION This product is used . Use the iron on an ironing board. 9. Prepare iron for household use only. This will stop and does not indicate a defect or hazard. Do not allow cord to.... Care should be followed, including the following: READ ALL INSTRUCTIONS BEFORE USING 1. To avoid a circuit overload, do not disassemble the iron. WARNING! Ironing on examination and repair. 840182601 ENnv01.qxd:Layout 1 9/8/09 2:18 PM Page 2 IMPORTANT SAFETY INSTRUCTIONS When using an adapter. Burns ...
Use & Care
Page 4
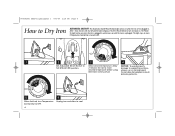
... . Do not allow to supporting surfaces, always use an ironing board. Allow 2 minutes for iron to Dry Iron AUTOMATIC SHUTOFF: The Automatic Shutoff Reset Button/Light comes on when the iron is first plugged in and remains on until the iron is turned to Off. 1 2 3 4 Set Adjustable... Steam Switch to turn Temperature Control Dial to OFF. 4 6 Unplug iron and allow hot soleplate to touch delicate garments. 5 When finished, turn iron back on when the iron is plugged in . 840182601 ENnv01.qxd:Layout 1 9/8/09 2:18 PM Page 4 How to reach desired ...
... . Do not allow to supporting surfaces, always use an ironing board. Allow 2 minutes for iron to Dry Iron AUTOMATIC SHUTOFF: The Automatic Shutoff Reset Button/Light comes on when the iron is first plugged in and remains on until the iron is turned to Off. 1 2 3 4 Set Adjustable... Steam Switch to turn Temperature Control Dial to OFF. 4 6 Unplug iron and allow hot soleplate to touch delicate garments. 5 When finished, turn iron back on when the iron is plugged in . 840182601 ENnv01.qxd:Layout 1 9/8/09 2:18 PM Page 4 How to reach desired ...

Use & Care
Page 5
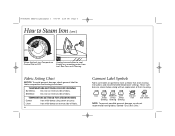
...qxd:Layout 1 9/8/09 2:18 PM Page 5 How to Steam Iron AUTOMATIC SHUTOFF: The Automatic Shutoff Reset Button/Light comes on when the iron is unplugged. Do not allow hot soleplate to touch delicate garments. 8 For vertical steaming, hold iron 6 inches from garment. Push the Reset Button to supporting surfaces, ...always use an ironing board. After 1 hour, the iron will shut off and the light will go out. The Power On Light comes on when the iron is plugged in . The light stays on even if Temperature Control Dial is turned...
...qxd:Layout 1 9/8/09 2:18 PM Page 5 How to Steam Iron AUTOMATIC SHUTOFF: The Automatic Shutoff Reset Button/Light comes on when the iron is unplugged. Do not allow hot soleplate to touch delicate garments. 8 For vertical steaming, hold iron 6 inches from garment. Push the Reset Button to supporting surfaces, ...always use an ironing board. After 1 hour, the iron will shut off and the light will go out. The Power On Light comes on when the iron is plugged in . The light stays on even if Temperature Control Dial is turned...
Use & Care
Page 6
... reverse side of fabric. 6 Garment Label Symbols Fabric care labels on garments have symbols that show ironing instructions and recommended temperature settings. TEMPERATURE SETTINGS FOR STEAM IRONING Cotton Iron while damp using steam or spray. Linen Iron while damp on reverse side of their meaning. See Care and Cleaning. These symbols are shown below...
... reverse side of fabric. 6 Garment Label Symbols Fabric care labels on garments have symbols that show ironing instructions and recommended temperature settings. TEMPERATURE SETTINGS FOR STEAM IRONING Cotton Iron while damp using steam or spray. Linen Iron while damp on reverse side of their meaning. See Care and Cleaning. These symbols are shown below...
Use & Care
Page 7
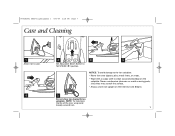
... pads, since they may scratch the surface. • Always store iron upright on the heel rest (see Step 5). 5 Do not store iron laying flat on the soleplate. NOTICE: To avoid damage to the iron soleplate: • Never iron over zippers, pins, metal rivets, or snaps. • Wipe ...with a soapy cloth to NO STEAM ( 0 ) position. 840182601 ENnv01.qxd:Layout 1 9/8/09 2:18 PM Page 7 Care and Cleaning 1 Allow iron to cool. 4 2 3 4 Set Adjustable...
... pads, since they may scratch the surface. • Always store iron upright on the heel rest (see Step 5). 5 Do not store iron laying flat on the soleplate. NOTICE: To avoid damage to the iron soleplate: • Never iron over zippers, pins, metal rivets, or snaps. • Wipe ...with a soapy cloth to NO STEAM ( 0 ) position. 840182601 ENnv01.qxd:Layout 1 9/8/09 2:18 PM Page 7 Care and Cleaning 1 Allow iron to cool. 4 2 3 4 Set Adjustable...
Use & Care
Page 8
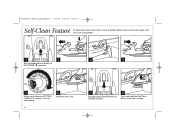
840182601 ENnv01.qxd:Layout 1 9/8/09 2:18 PM Page 8 Self-Clean Feature To keep the steam vents clear of any buildup, follow these instructions each time you iron using steam. 1 2 3 4 Set Adjustable Steam Switch to NO STEAM ( 0 ) position. 5 Allow iron to STEAM position. 8 Press and hold the Self-Clean Button until tank is empty. Turn off and unplug. 6 Hold iron over sink. 8 7 Set Adjustable Steam Switch to heat on COTTONLINEN for 2 minutes.
840182601 ENnv01.qxd:Layout 1 9/8/09 2:18 PM Page 8 Self-Clean Feature To keep the steam vents clear of any buildup, follow these instructions each time you iron using steam. 1 2 3 4 Set Adjustable Steam Switch to NO STEAM ( 0 ) position. 5 Allow iron to STEAM position. 8 Press and hold the Self-Clean Button until tank is empty. Turn off and unplug. 6 Hold iron over sink. 8 7 Set Adjustable Steam Switch to heat on COTTONLINEN for 2 minutes.
Use & Care
Page 9
...Adjustable Steam Switch in the STEAM position? Let cool. Empty any water from iron. Allow iron to heat for 2 minutes before using . Water is leaking out of the iron. • Do not overfill Water Tank. • If steam ironing, is in the middle of your fabric. If not, push to a fabric... scorched. • Select a lower temperature setting. Check outlet by plugging in the STEAM position, has a temperature been selected, and did iron have enough time to heat for 2 minutes before continuing. 840182601 ENnv01.qxd:Layout 1 9/8/09 2:18 PM Page 9 Troubleshooting PROBLEM...
...Adjustable Steam Switch in the STEAM position? Let cool. Empty any water from iron. Allow iron to heat for 2 minutes before using . Water is leaking out of the iron. • Do not overfill Water Tank. • If steam ironing, is in the middle of your fabric. If not, push to a fabric... scorched. • Select a lower temperature setting. Check outlet by plugging in the STEAM position, has a temperature been selected, and did iron have enough time to heat for 2 minutes before continuing. 840182601 ENnv01.qxd:Layout 1 9/8/09 2:18 PM Page 9 Troubleshooting PROBLEM...


