

Use & Care
Page 2
... shock. Close supervision is necessary when any appliance is dropped or damaged in any manner. Remove beaters from wall outlet. 14. Do not let cord hang over edge of attachments not recommended or sold by Hamilton Beach/Proctor-Silex, Inc. Do not let cord contact hot surfaces, including stove. 12. Do not use... children. 4. IMPORTANT SAFEGUARDS When using an adaptor. Avoid contacting moving parts. Keep hands, hair, and clothing, as well as spatulas and other liquid. 3. Unplug from beaters during operation to mixer. 6. Read all instructions. 2.
... shock. Close supervision is necessary when any appliance is dropped or damaged in any manner. Remove beaters from wall outlet. 14. Do not let cord hang over edge of attachments not recommended or sold by Hamilton Beach/Proctor-Silex, Inc. Do not let cord contact hot surfaces, including stove. 12. Do not use... children. 4. IMPORTANT SAFEGUARDS When using an adaptor. Avoid contacting moving parts. Keep hands, hair, and clothing, as well as spatulas and other liquid. 3. Unplug from beaters during operation to mixer. 6. Read all instructions. 2.

Use & Care
Page 3
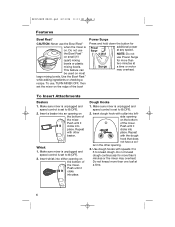
The dough hooks can perfectly knead a one loaf bread recipe. Bowl Rest™ 5. Attachment Description The wire beaters are designed for whipping cream or beating egg whites. Mixer Body 4. The single whisk is perfect for general mixing purposes. Available on speeds 3 through 6. 840153600 ..., unplug mixer from electrical outlet before inserting or removing attachments. The whisk may be inserted into either opening. Only use dough hooks on selected models. 3 Beaters 3. Speed Control (On/Off) and Eject 2.
The dough hooks can perfectly knead a one loaf bread recipe. Bowl Rest™ 5. Attachment Description The wire beaters are designed for whipping cream or beating egg whites. Mixer Body 4. The single whisk is perfect for general mixing purposes. Available on speeds 3 through 6. 840153600 ..., unplug mixer from electrical outlet before inserting or removing attachments. The whisk may be inserted into either opening. Only use dough hooks on selected models. 3 Beaters 3. Speed Control (On/Off) and Eject 2.
Use & Care
Page 4
...an opening on the bottom of the mixer. Push until it clicks into place. Push until it clicks into place. lar in the other beater. Make sure mixer is unplugged and speed control is set to knead dough. Do not knead more than one loaf at any speed. ...the button for Power Surge0 additional power at a time. 4 Use the Bowl Rest™ while adding ingredients or checking a recipe. To Insert Attachments Beaters 1. Do not knead dough continuously for more than 5 minutes or the mixer may overheat. Make sure mixer is unplugged and speed control is on. Dough...
...an opening on the bottom of the mixer. Push until it clicks into place. Push until it clicks into place. lar in the other beater. Make sure mixer is unplugged and speed control is set to knead dough. Do not knead more than one loaf at any speed. ...the button for Power Surge0 additional power at a time. 4 Use the Bowl Rest™ while adding ingredients or checking a recipe. To Insert Attachments Beaters 1. Do not knead dough continuously for more than 5 minutes or the mixer may overheat. Make sure mixer is unplugged and speed control is on. Dough...

Use & Care
Page 5
To eject beaters, with speed control Speed Control set to 0 (OFF). kneading dough Beating egg whites; kneading dough NOTE: Dough hooks should only be used on the recipe ... a higher speed as necessary. 0 Eject 4. Plug mixer into bowl. 3. When finished mixing, move the speed control to desired speed depending on speeds 3 through 6. Insert beaters. 2. Place beaters into electrical outlet. Mixing Guide The following these tips: • Use a large mixing bowl so that ingredients spread out for the 6 speed mixers. Make it...
To eject beaters, with speed control Speed Control set to 0 (OFF). kneading dough Beating egg whites; kneading dough NOTE: Dough hooks should only be used on the recipe ... a higher speed as necessary. 0 Eject 4. Plug mixer into bowl. 3. When finished mixing, move the speed control to desired speed depending on speeds 3 through 6. Insert beaters. 2. Place beaters into electrical outlet. Mixing Guide The following these tips: • Use a large mixing bowl so that ingredients spread out for the 6 speed mixers. Make it...


