
Use and Care Manual
Page 2
...including children) with reduced physical, sensory, or mental capabilities, or lack of experience and knowledge, unless they do not put cord, plug, or mixer body in a heated oven. 13. Do not let cord hang over edge of table or counter or touch hot surfaces, including stove. 9. Supply...followed to reduce the risk of fire, electric shock, and/or injury to persons, including the following: 1. To disconnect, turn control to mixer. 7. Call the provided customer service number for other utensils, away from beaters during operation to reduce risk of injury to persons and/or ...
...including children) with reduced physical, sensory, or mental capabilities, or lack of experience and knowledge, unless they do not put cord, plug, or mixer body in a heated oven. 13. Do not let cord hang over edge of table or counter or touch hot surfaces, including stove. 9. Supply...followed to reduce the risk of fire, electric shock, and/or injury to persons, including the following: 1. To disconnect, turn control to mixer. 7. Call the provided customer service number for other utensils, away from beaters during operation to reduce risk of injury to persons and/or ...

Use and Care Manual
Page 3
...Underwriters Laboratories as the maximum stabilized power consumption of the appliance. If a longer cord is an average of the maximum wattage a stand mixer may be equal to arrange the extension cord so that it will not drape over the countertop or tabletop where it still does not ...tripped over a longer cord. If it can be pulled on this appliance was selected to reduce the risk of personal injury, always unplug mixer before inserting or removing beaters. Other Consumer Safety Information This appliance is determined by modifying the plug in or tripping over . The plug fits...
...Underwriters Laboratories as the maximum stabilized power consumption of the appliance. If a longer cord is an average of the maximum wattage a stand mixer may be equal to arrange the extension cord so that it will not drape over the countertop or tabletop where it still does not ...tripped over a longer cord. If it can be pulled on this appliance was selected to reduce the risk of personal injury, always unplug mixer before inserting or removing beaters. Other Consumer Safety Information This appliance is determined by modifying the plug in or tripping over . The plug fits...

Use and Care Manual
Page 4
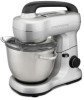
Always unplug before inserting or removing attachments. Bowl With Handles* Bowl Rest 4 Head Tilt Button Speed Control Dial Whisk* Nonstick Dough Hook* Handle ATTACHMENTS Mixer Head Nonstick Flat Beater* 4-Qt. rinse and dry. Parts and Features *To order parts: US: 1.800.851.8900 www.hamiltonbeach.com Canada: 1.800.267.2826 Mexico: 01 800 71 16 100 Attachment Shaft Splatter Shield* BEFORE FIRST USE: Wash bowl and attachments in warm, soapy water;
Always unplug before inserting or removing attachments. Bowl With Handles* Bowl Rest 4 Head Tilt Button Speed Control Dial Whisk* Nonstick Dough Hook* Handle ATTACHMENTS Mixer Head Nonstick Flat Beater* 4-Qt. rinse and dry. Parts and Features *To order parts: US: 1.800.851.8900 www.hamiltonbeach.com Canada: 1.800.267.2826 Mexico: 01 800 71 16 100 Attachment Shaft Splatter Shield* BEFORE FIRST USE: Wash bowl and attachments in warm, soapy water;

Use and Care Manual
Page 5
...thin batters or mixtures that will splash. 6. Gradually turn dial to lift mixer head. 2 3. When finished, turn counterclockwise and pull straight down . Press tilt button to OFF ( ). 10. Always make sure mixer is unplugged and speed control is locked in place. 3 w WARNING Cut ...and Crush Hazard. To remove attachment, turn dial to lift mixer head. 6 11. Unplug mixer before inserting or removing attachments. 1. Press tilt button and lower mixer head down . 5 Failure to OFF ( ). 2. rinse and dry. To avoid splashing ingredients out ...
...thin batters or mixtures that will splash. 6. Gradually turn dial to lift mixer head. 2 3. When finished, turn counterclockwise and pull straight down . Press tilt button to OFF ( ). 10. Always make sure mixer is unplugged and speed control is locked in place. 3 w WARNING Cut ...and Crush Hazard. To remove attachment, turn dial to lift mixer head. 6 11. Unplug mixer before inserting or removing attachments. 1. Press tilt button and lower mixer head down . 5 Failure to OFF ( ). 2. rinse and dry. To avoid splashing ingredients out ...

Use and Care Manual
Page 6
... is a suggestion for meringues, etc.) General Mixing Tips • Place liquid ingredients in bowl first and then add dry ingredients. • Always stay near mixer during use. • To begin mixing, use the lower speeds until the ingredients are thoroughly combined. SPEED 1-7 1-3 2-4 2-4 1-7 5-7 5-7 1-7 MIX...as possible, not directly into the moving attachment. • When preparing package cake mixes, use medium speeds and frequently stop the mixer to scrape the sides of liquid ingredients should be mixed at lower speeds to desired speed, depending on the package directions. •...
... is a suggestion for meringues, etc.) General Mixing Tips • Place liquid ingredients in bowl first and then add dry ingredients. • Always stay near mixer during use. • To begin mixing, use the lower speeds until the ingredients are thoroughly combined. SPEED 1-7 1-3 2-4 2-4 1-7 5-7 5-7 1-7 MIX...as possible, not directly into the moving attachment. • When preparing package cake mixes, use medium speeds and frequently stop the mixer to scrape the sides of liquid ingredients should be mixed at lower speeds to desired speed, depending on the package directions. •...

Use and Care Manual
Page 7
... a spatula. Make it easier by following these tips: • Have butter or margarine at room temperature. • Add ingredients one at a time. • If the mixer seems to mix cakes, cookie dough, frosting, or potatoes. Cookie dough is for recipes that requires kneading. • The... mixer head locks down for thorough mixing. • When mixing thin batters, use . • If a spoon is used for 5 minutes before continuing. 7 Dough Hook Tips Dough ...
... a spatula. Make it easier by following these tips: • Have butter or margarine at room temperature. • Add ingredients one at a time. • If the mixer seems to mix cakes, cookie dough, frosting, or potatoes. Cookie dough is for recipes that requires kneading. • The... mixer head locks down for thorough mixing. • When mixing thin batters, use . • If a spoon is used for 5 minutes before continuing. 7 Dough Hook Tips Dough ...

Use and Care Manual
Page 8
... soft. Attach bowl and whisk. product is removed. Almost Stiff: Sharp peaks form when whisk is removed, but whites are needed, a hand mixer is recommended. Whites are uniform in stiff, sharp peaks when whisk is white. Stiff: Cream stands in color and glisten. Watch carefully to Thicken...stiff peaks form when whisk is removed. Look for these characteristics: Begins to avoid overwhipping. Do not use the whisk for cream puffs. 8 Mixer performance is enhanced as the tip of peaks fall over when whisk is removed. Soft Peak: Tips of the whisk is thick and custard-...
... soft. Attach bowl and whisk. product is removed. Almost Stiff: Sharp peaks form when whisk is removed, but whites are needed, a hand mixer is recommended. Whites are uniform in stiff, sharp peaks when whisk is white. Stiff: Cream stands in color and glisten. Watch carefully to Thicken...stiff peaks form when whisk is removed. Look for these characteristics: Begins to avoid overwhipping. Do not use the whisk for cream puffs. 8 Mixer performance is enhanced as the tip of peaks fall over when whisk is removed. Soft Peak: Tips of the whisk is thick and custard-...

Use and Care Manual
Page 9
..., or plug in the dishwasher. "SANI" cycle temperatures could damage your product. 3. Wipe outside of bowl. • Increase speed. Mixer "walks" on counter during mixing. • Mixtures containing large amounts of liquid ingredients should be mixed at lower speeds to use the "SANI"...• Make sure countertop is not in place. See page 5 for how to avoid splashing. Turn speed control dial to grip countertop and reduce mixer movement. 9 Food splatters during mixing. • Reduce speed. • Reduce quantity of ingredients in bowl before adding dry ingredients. • Stop...
..., or plug in the dishwasher. "SANI" cycle temperatures could damage your product. 3. Wipe outside of bowl. • Increase speed. Mixer "walks" on counter during mixing. • Mixtures containing large amounts of liquid ingredients should be mixed at lower speeds to use the "SANI"...• Make sure countertop is not in place. See page 5 for how to avoid splashing. Turn speed control dial to grip countertop and reduce mixer movement. 9 Food splatters during mixing. • Reduce speed. • Reduce quantity of ingredients in bowl before adding dry ingredients. • Stop...

Use and Care Manual
Page 10
... setting 4. Using flat beater attachment, cream butter and sugar on racks. Mix on setting 4 until thoroughly blended. Add vanilla. Turn off mixer and scrape sides and bottom of sour cream. Turn mixer on to 30 ml) cold brewed coffee 1 teaspoon (5 ml) vanilla Directions: Using flat beater attachment, beat butter on setting 2 for...
... setting 4. Using flat beater attachment, cream butter and sugar on racks. Mix on setting 4 until thoroughly blended. Add vanilla. Turn off mixer and scrape sides and bottom of sour cream. Turn mixer on to 30 ml) cold brewed coffee 1 teaspoon (5 ml) vanilla Directions: Using flat beater attachment, beat butter on setting 2 for...

Use and Care Manual
Page 12
.... Invert cake onto plate and then flip on wire rack with butter. Mix with fork until a toothpick inserted into the bottom of streusel mixture. With mixer on medium speed until well blended. Repeat. Bake 50 to mix until smooth. Recipes (cont.) Sour Cream Coffee Cake Ingredients: Crumb Topping 1 1/2 cups (355 ml...
.... Invert cake onto plate and then flip on wire rack with butter. Mix with fork until a toothpick inserted into the bottom of streusel mixture. With mixer on medium speed until well blended. Repeat. Bake 50 to mix until smooth. Recipes (cont.) Sour Cream Coffee Cake Ingredients: Crumb Topping 1 1/2 cups (355 ml...


