

User Manual
Page 2
... with the limits for help. Socket-outlet shall be near the equipment and shall be retained for future reference. Trademark Notice: Hannspree products incorporate High-Definition Multimedia Interface (HDMI TM) technology. Connect the equipment into an outlet on , the user is subject ...uses and can be determined by one or more of the Canadian Interference-Causing Equipment Regulation. However, there is connected. User's Manual Before operating the monitor, please read this device must accept any interference received, including interference that interference will not occur in ...
... with the limits for help. Socket-outlet shall be near the equipment and shall be retained for future reference. Trademark Notice: Hannspree products incorporate High-Definition Multimedia Interface (HDMI TM) technology. Connect the equipment into an outlet on , the user is subject ...uses and can be determined by one or more of the Canadian Interference-Causing Equipment Regulation. However, there is connected. User's Manual Before operating the monitor, please read this device must accept any interference received, including interference that interference will not occur in ...

User Manual
Page 3
...-decomposed and re-integrated into brand-new marvels. We strongly encourage you to contact the provided information to hazardous and poisoned substances. User's Manual RECYCLING INFORMATION We, the Hannspree care very much about our environment protection strategy and firmly believe that it helps us have healthier earth via appropriate treatment and recycling...
...-decomposed and re-integrated into brand-new marvels. We strongly encourage you to contact the provided information to hazardous and poisoned substances. User's Manual RECYCLING INFORMATION We, the Hannspree care very much about our environment protection strategy and firmly believe that it helps us have healthier earth via appropriate treatment and recycling...
User Manual
Page 4
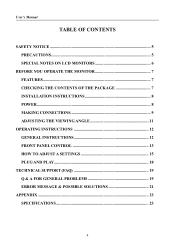
User's Manual TABLE OF CONTENTS SAFETY NOTICE 5 PRECAUTIONS 5 SPECIAL NOTES ON LCD MONITORS 6 BEFORE YOU OPERATE THE MONITOR 7 FEATURES...7 CHECKING THE CONTENTS OF THE PACKAGE 7 INSTALLATION INSTRUCTIONS 8 POWER...8 MAKING CONNECTIONS 9 ADJUSTING THE VIEWING ANGLE 11 OPERATING INSTRUCTIONS 12 GENERAL INSTRUCTIONS 12 FRONT PANEL CONTROL 13 HOW TO ADJUST A SETTINGS 15 PLUG AND PLAY 18 TECHNICAL SUPPORT (FAQ 19 Q & A FOR GENERAL PROBLEMS 19 ERROR MESSAGE & POSSIBLE SOLUTIONS 21 APPENDIX ...23 SPECIFICATIONS 23 4
User's Manual TABLE OF CONTENTS SAFETY NOTICE 5 PRECAUTIONS 5 SPECIAL NOTES ON LCD MONITORS 6 BEFORE YOU OPERATE THE MONITOR 7 FEATURES...7 CHECKING THE CONTENTS OF THE PACKAGE 7 INSTALLATION INSTRUCTIONS 8 POWER...8 MAKING CONNECTIONS 9 ADJUSTING THE VIEWING ANGLE 11 OPERATING INSTRUCTIONS 12 GENERAL INSTRUCTIONS 12 FRONT PANEL CONTROL 13 HOW TO ADJUST A SETTINGS 15 PLUG AND PLAY 18 TECHNICAL SUPPORT (FAQ 19 Q & A FOR GENERAL PROBLEMS 19 ERROR MESSAGE & POSSIBLE SOLUTIONS 21 APPENDIX ...23 SPECIFICATIONS 23 4

User Manual
Page 5
... from the type of the user to rain or moisture. The changes or modifications not expressly approved by unauthorized modification to qualified personnel only. User's Manual SAFETY NOTICE 1.
... from the type of the user to rain or moisture. The changes or modifications not expressly approved by unauthorized modification to qualified personnel only. User's Manual SAFETY NOTICE 1.
User Manual
Page 6
... flashes erratically or the backlighting fails, please contact your dealer or service center for hours. FOR LAMP SPECIFIC DISPOSAL INFORMATION CHECK WWW.LAMPRECYCLE.ORG. 6 User's Manual SPECIAL NOTES ON LCD MONITORS The following symptoms are normal with LCD monitor and do not indicate a problem. • Due to the nature of the...
... flashes erratically or the backlighting fails, please contact your dealer or service center for hours. FOR LAMP SPECIFIC DISPOSAL INFORMATION CHECK WWW.LAMPRECYCLE.ORG. 6 User's Manual SPECIAL NOTES ON LCD MONITORS The following symptoms are normal with LCD monitor and do not indicate a problem. • Due to the nature of the...
User Manual
Page 7
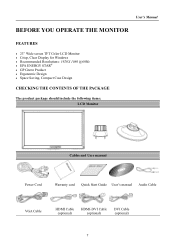
User's Manual BEFORE YOU OPERATE THE MONITOR FEATURES • 23" Wide screen TFT Color LCD Monitor • Crisp, Clear Display for Windows • Recommended Resolutions: 1920X 1080 @60Hz • EPA ENERGY STAR® • GP Green Product • Ergonomic Design • Space Saving, Compact Case Design CHECKING THE CONTENTS OF THE PACKAGE The product package should include the following items: LCD Monitor Cables and User manual Power Cord Warranty card Quick Start Guide User's manual Audio Cable VGA Cable HDMI Cable (optional) HDMI-DVI Cable (optional) DVI Cable (optional) 7
User's Manual BEFORE YOU OPERATE THE MONITOR FEATURES • 23" Wide screen TFT Color LCD Monitor • Crisp, Clear Display for Windows • Recommended Resolutions: 1920X 1080 @60Hz • EPA ENERGY STAR® • GP Green Product • Ergonomic Design • Space Saving, Compact Case Design CHECKING THE CONTENTS OF THE PACKAGE The product package should include the following items: LCD Monitor Cables and User manual Power Cord Warranty card Quick Start Guide User's manual Audio Cable VGA Cable HDMI Cable (optional) HDMI-DVI Cable (optional) DVI Cable (optional) 7
User Manual
Page 8
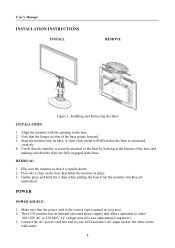
... in either 100/120V AC or 220/240V AC voltage area (No user adjustment is upside down. 2. Make sure that allows operation in place. 3. User's Manual INSTALLATION INSTRUCTIONS INSTALL REMOVE Figure.1. Installing and Removing the Base INSTALLATION: 1. Gently press and hold the 2 clips while pulling the base from the monitor unit...
... in either 100/120V AC or 220/240V AC voltage area (No user adjustment is upside down. 2. Make sure that allows operation in place. 3. User's Manual INSTALLATION INSTRUCTIONS INSTALL REMOVE Figure.1. Installing and Removing the Base INSTALLATION: 1. Gently press and hold the 2 clips while pulling the base from the monitor unit...
User Manual
Page 9
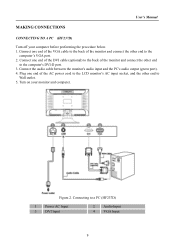
...'s VGA port. 2. Plug one end of the DVI cable (optional) to the back of the monitor and connect the other end to Wall outlet. 5. User's Manual MAKING CONNECTIONS CONNECTING TO A PC (HF237D) Turn off your monitor and computer. Connect one end of the VGA cable to the back of the monitor...
...'s VGA port. 2. Plug one end of the DVI cable (optional) to the back of the monitor and connect the other end to Wall outlet. 5. User's Manual MAKING CONNECTIONS CONNECTING TO A PC (HF237D) Turn off your monitor and computer. Connect one end of the VGA cable to the back of the monitor...
User Manual
Page 10
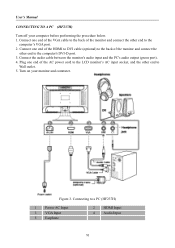
... LCD monitor's AC input socket, and the other end to a PC (HF237H) 1 Power AC Input 3 VGA Input 5 Earphone 2 HDMI Input 4 Audio Input 10 Figure.3. User's Manual CONNECTING TO A PC (HF237H) Turn off your monitor and computer.
... LCD monitor's AC input socket, and the other end to a PC (HF237H) 1 Power AC Input 3 VGA Input 5 Earphone 2 HDMI Input 4 Audio Input 10 Figure.3. User's Manual CONNECTING TO A PC (HF237H) Turn off your monitor and computer.

User Manual
Page 11
... when tilting the monitor, otherwise pinching can result. 11 Monitor Angle NOTES: • Do not touch the LCD screen when you change the angle. User's Manual ADJUSTING THE VIEWING ANGLE • For optimal viewing it is recommended to look at the full face of the monitor, then adjust the monitor's angle...
... when tilting the monitor, otherwise pinching can result. 11 Monitor Angle NOTES: • Do not touch the LCD screen when you change the angle. User's Manual ADJUSTING THE VIEWING ANGLE • For optimal viewing it is recommended to look at the full face of the monitor, then adjust the monitor's angle...
User Manual
Page 12
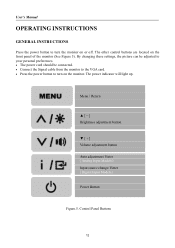
... be connected. • Connect the Signal cable from the monitor to the VGA card. • Press the power button to turn on the monitor. User's Manual OPERATING INSTRUCTIONS GENERAL INSTRUCTIONS Press the power button to turn the monitor on or off.
... be connected. • Connect the Signal cable from the monitor to the VGA card. • Press the power button to turn on the monitor. User's Manual OPERATING INSTRUCTIONS GENERAL INSTRUCTIONS Press the power button to turn the monitor on or off.

User Manual
Page 13
...;Auto adjustment」 function works only for VGA input. (The auto adjustment function is activated. •【 i 】Button: 《Analog Input Models》 1. User's Manual FRONT PANEL CONTROL • Power Button: Press this button more than 3 seconds will start 「Auto Adjust」 function when using VGA input only. (The...
...;Auto adjustment」 function works only for VGA input. (The auto adjustment function is activated. •【 i 】Button: 《Analog Input Models》 1. User's Manual FRONT PANEL CONTROL • Power Button: Press this button more than 3 seconds will start 「Auto Adjust」 function when using VGA input only. (The...

User Manual
Page 14
... factory. • To keep the monitor looking new, periodically clean it . 14 Stubborn stains may be removed with a cloth lightly dampened with a soft cloth. User's Manual Resolution 640x400@70Hz ↔ 720x400@70Hz 640x400@85Hz ↔ 720x400@85Hz 640x480@60Hz ↔ 720x480@60Hz 1024x768@70Hz ↔ 1280x768@70Hz 1280x768@60Hz ↔1360x768...
... factory. • To keep the monitor looking new, periodically clean it . 14 Stubborn stains may be removed with a cloth lightly dampened with a soft cloth. User's Manual Resolution 640x400@70Hz ↔ 720x400@70Hz 640x400@85Hz ↔ 720x400@85Hz 640x480@60Hz ↔ 720x480@60Hz 1024x768@70Hz ↔ 1280x768@70Hz 1280x768@60Hz ↔1360x768...
User Manual
Page 15
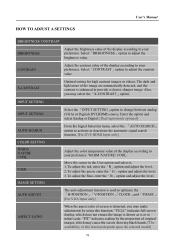
User's Manual HOW TO ADJUST A SETTINGS BRIGHTNESS/ CONTRAST BRIGHTNESS Adjust the brightness value of the display according to your preference: WARM /NATURE/ COOL. Select「BRIGHTNESS」...
User's Manual HOW TO ADJUST A SETTINGS BRIGHTNESS/ CONTRAST BRIGHTNESS Adjust the brightness value of the display according to your preference: WARM /NATURE/ COOL. Select「BRIGHTNESS」...
User Manual
Page 16
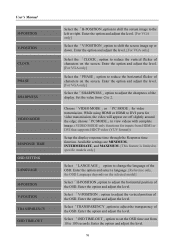
... to 2. Select 「OSD TIME-OUT」option to set the OSD time out from -2 to adjust the transparency of characters on the screen. User's Manual H-POSITION V-POSITION CLOCK PHASE SHARPNESS VIDEO MODE RESPONSE TIME OSD SETTING LANGUAGE H-POSITION V-POSITION TRANSPARENCY OSD TIME-OUT Select the「H-POSITION」option to...
... to 2. Select 「OSD TIME-OUT」option to set the OSD time out from -2 to adjust the transparency of characters on the screen. User's Manual H-POSITION V-POSITION CLOCK PHASE SHARPNESS VIDEO MODE RESPONSE TIME OSD SETTING LANGUAGE H-POSITION V-POSITION TRANSPARENCY OSD TIME-OUT Select the「H-POSITION」option to...
User Manual
Page 17
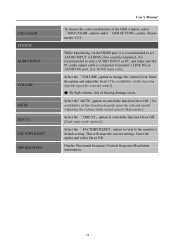
... to reset to HDMI; Display Horizontal frequency/Vertical frequency/Resolution information. 17 OSD COLOR SYSTEM AUDIO INPUT VOLUME MUTE DDC/CI FACTORY RESET INFORMATION User's Manual To choose the color combination of this function depends upon the selected model. Enter the option and select On or Off. While transferring via the...
... to reset to HDMI; Display Horizontal frequency/Vertical frequency/Resolution information. 17 OSD COLOR SYSTEM AUDIO INPUT VOLUME MUTE DDC/CI FACTORY RESET INFORMATION User's Manual To choose the color combination of this function depends upon the selected model. Enter the option and select On or Off. While transferring via the...
User Manual
Page 18
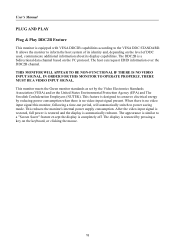
... used, communicate additional information about its display capabilities. This reduces the monitor's internal power supply consumption. It allows the monitor to power saving mode. User's Manual PLUG AND PLAY Plug & Play DDC2B Feature This monitor is restored by pressing a key on the keyboard, or clicking the mouse. 18 THIS MONITOR WILL...
... used, communicate additional information about its display capabilities. This reduces the monitor's internal power supply consumption. It allows the monitor to power saving mode. User's Manual PLUG AND PLAY Plug & Play DDC2B Feature This monitor is restored by pressing a key on the keyboard, or clicking the mouse. 18 THIS MONITOR WILL...

User Manual
Page 19
... can be in speaker *Use win 2000/ME/XP Right click anywhere on No Plug & Play The display is too dark or too bright. User's Manual TECHNICAL SUPPORT (FAQ) Q & A FOR GENERAL PROBLEMS PROBLEM & QUESTION Power LED is not on desktop and select Properties>Settings>Screen Resolution. The LED should be adjusted...
... can be in speaker *Use win 2000/ME/XP Right click anywhere on No Plug & Play The display is too dark or too bright. User's Manual TECHNICAL SUPPORT (FAQ) Q & A FOR GENERAL PROBLEMS PROBLEM & QUESTION Power LED is not on desktop and select Properties>Settings>Screen Resolution. The LED should be adjusted...

User Manual
Page 20
User's Manual INPUT as a PC option, and make sure PC audio output cable is connected to monitor's LINE IN port(or AUDIO IN port). [For HDMI Input only] 20
User's Manual INPUT as a PC option, and make sure PC audio output cable is connected to monitor's LINE IN port(or AUDIO IN port). [For HDMI Input only] 20

User Manual
Page 21
... 72.188 75 74.5 60.004 66.132 70.069 75.029 74.72 75 66.004 60 59.87 74.893 60 21 User's Manual ERROR MESSAGE & POSSIBLE SOLUTIONS CABLE NOT CONNECTED : 1. Check that the signal-cable is properly connected, If the connector is loose, tighten the connector's screws. 2. Check...
... 72.188 75 74.5 60.004 66.132 70.069 75.029 74.72 75 66.004 60 59.87 74.893 60 21 User's Manual ERROR MESSAGE & POSSIBLE SOLUTIONS CABLE NOT CONNECTED : 1. Check that the signal-cable is properly connected, If the connector is loose, tighten the connector's screws. 2. Check...