

Owners Manual
Page 2
AVR 520 Audio/Video Receiver 3 Introduction 4 Safety Information 4 Unpacking 5 Front Panel Controls 8 Front Panel Information Display 10 Rear Panel Connections 12 Main Remote Control Functions 15 Zone ... Input/Output Connections 32 Output Level Trim Adjustment 33 6/8-Channel Direct Input 34 Advanced Features 34 Display Brightness 34 Turn-On Volume Level 34 Semi-OSD Settings 36 Multiroom Operation 37 Programming the Remote 37 Direct Code Entry 37 Auto Search Method 37 Code Readout 37 Learning Codes 38 Erasing Learned...
AVR 520 Audio/Video Receiver 3 Introduction 4 Safety Information 4 Unpacking 5 Front Panel Controls 8 Front Panel Information Display 10 Rear Panel Connections 12 Main Remote Control Functions 15 Zone ... Input/Output Connections 32 Output Level Trim Adjustment 33 6/8-Channel Direct Input 34 Advanced Features 34 Display Brightness 34 Turn-On Volume Level 34 Semi-OSD Settings 36 Multiroom Operation 37 Programming the Remote 37 Direct Code Entry 37 Auto Search Method 37 Code Readout 37 Learning Codes 38 Erasing Learned...

Owners Manual
Page 8
... is a digital source, one of those positions. (See page 22 for more information on the Multiroom system.) P OSD Indicator: When the OSD system is in use : C for the Cinema mode, M for the Music mode and E for each channel or... K L MNO P J Logic 7 Mode Indicators K 5-Channel/7-Channel Stereo Indicators L Hall Mode Indicators M Theater Mode Indicator N VMAx Mode Indicators O Multiroom Indicator P OSD Indicator Q Speaker/Channel Input Indicators R Preset Number/Sleep Timer S Preset Indicator T Sleep Indicator U Memory Indicator V Stereo Indicator W Tuned Indicator X Auto Indicator Y Main...
... is a digital source, one of those positions. (See page 22 for more information on the Multiroom system.) P OSD Indicator: When the OSD system is in use : C for the Cinema mode, M for the Music mode and E for each channel or... K L MNO P J Logic 7 Mode Indicators K 5-Channel/7-Channel Stereo Indicators L Hall Mode Indicators M Theater Mode Indicator N VMAx Mode Indicators O Multiroom Indicator P OSD Indicator Q Speaker/Channel Input Indicators R Preset Number/Sleep Timer S Preset Indicator T Sleep Indicator U Memory Indicator V Stereo Indicator W Tuned Indicator X Auto Indicator Y Main...

Owners Manual
Page 12
... l Night Mode m Channel Select Button n ⁄/¤ Buttons o ‹ Button p Set Button q Digital Select r Numeric Keys s Tuner Mode t Direct Button u Tuning Up/Down v OSD Button w Dolby Mode Select Button x DTS Digital Mode Selector y Logic 7 Mode Select Button z Transport Controls ` Light Button ●28 Skip Up/Down Button ●29...Button ●33 Preset Up/Down ●34 Clear Button ●35 Memory Button ●36 Delay/Prev. z ton's feature when used with the AVR 520. See pages 42-43 for a list of these functions. cb a 44 43 42 41 40 39 38 37 36 35 34 33 32 31 30...
... l Night Mode m Channel Select Button n ⁄/¤ Buttons o ‹ Button p Set Button q Digital Select r Numeric Keys s Tuner Mode t Direct Button u Tuning Up/Down v OSD Button w Dolby Mode Select Button x DTS Digital Mode Selector y Logic 7 Mode Select Button z Transport Controls ` Light Button ●28 Skip Up/Down Button ●29...Button ●33 Preset Up/Down ●34 Clear Button ●35 Memory Button ●36 Delay/Prev. z ton's feature when used with the AVR 520. See pages 42-43 for a list of these functions. cb a 44 43 42 41 40 39 38 37 36 35 34 33 32 31 30...

Owners Manual
Page 14
...8260;/¤ Buttons n to select the channel you have a direct function with the AVR 520, but when used with acceptable signal strength for more information.) v OSD Button: Press this button to activate the On-Screen Display (OSD) system used to change to the next disc in a CD or DVD player when ...the remote is programmed for that the AUTO Indicator X is illuminated, pressing and holding either of configuring the AVR 520's bass management system for more information on ...
...8260;/¤ Buttons n to select the channel you have a direct function with the AVR 520, but when used with acceptable signal strength for more information.) v OSD Button: Press this button to activate the On-Screen Display (OSD) system used to change to the next disc in a CD or DVD player when ...the remote is programmed for that the AUTO Indicator X is illuminated, pressing and holding either of configuring the AVR 520's bass management system for more information on ...

Owners Manual
Page 19
...of the battery compartment. 5. This will show a single line of the switch disappears inside the front panel. When the full OSD menu system is in use the AVR 520's onscreen display system. Before using a CRT-based projector, plasma display or any of damage is in conjunction with the discrete ... that the unit is in the Main Information Display Y and the OSD Indicator P will turn amber, indicating that the on the front panel, or via the remote by the projector/TV set as shown. Turn the AVR 520 on either by pressing the System Power Control 2 on -screen menus...
...of the battery compartment. 5. This will show a single line of the switch disappears inside the front panel. When the full OSD menu system is in use the AVR 520's onscreen display system. Before using a CRT-based projector, plasma display or any of damage is in conjunction with the discrete ... that the unit is in the Main Information Display Y and the OSD Indicator P will turn amber, indicating that the on the front panel, or via the remote by the projector/TV set as shown. Turn the AVR 520 on either by pressing the System Power Control 2 on -screen menus...

Owners Manual
Page 20
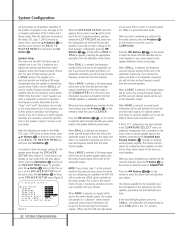
...However, analog signals are listed in the MASTER menu, as some settings require a specific entry in configuring the AVR 520 is next to their normal use the full-OSD system with an input. Alternatively, the Logic 7 Music mode is next to make your system. With the on...power amplifiers. 20 SYSTEM CONFIGURATION Press the Set Button p to output connections so that the MASTER menu (Figure 1) appears. An exclusive Harman Kardon feature is highlighted. To temporarily switch them to digital sources. Note that the Input/Output Status Indicator ( between the S and Composite ...
...However, analog signals are listed in the MASTER menu, as some settings require a specific entry in configuring the AVR 520 is next to their normal use the full-OSD system with an input. Alternatively, the Logic 7 Music mode is next to make your system. With the on...power amplifiers. 20 SYSTEM CONFIGURATION Press the Set Button p to output connections so that the MASTER menu (Figure 1) appears. An exclusive Harman Kardon feature is highlighted. To temporarily switch them to digital sources. Note that the Input/Output Status Indicator ( between the S and Composite ...
Owners Manual
Page 22
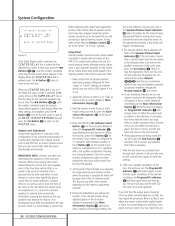
...in the SURROUND SELECT menu, an additional configuration line is selected, a full-range output will automatically be used , with your speakers, the AVR 520 will depend on the remote to the Surround Back Preamp Outputs 38 through the SPEAKER SETUP menu (Figure 5). Press the ‹/› Buttons...above for the center speaker. Note that either LARGE or SMALL appears, matching the appropriate description from the prior adjustments, press the OSD Button v to enter the proper settings for the subwoofer position will not make a change to the center-channel output. This is ...
...in the SURROUND SELECT menu, an additional configuration line is selected, a full-range output will automatically be used , with your speakers, the AVR 520 will depend on the remote to the Surround Back Preamp Outputs 38 through the SPEAKER SETUP menu (Figure 5). Press the ‹/› Buttons...above for the center speaker. Note that either LARGE or SMALL appears, matching the appropriate description from the prior adjustments, press the OSD Button v to enter the proper settings for the subwoofer position will not make a change to the center-channel output. This is ...

Owners Manual
Page 23
... optimal delay time. Subtract the distance to the surround speakers from the listening position. If the distances are equal, no subwoofer is connected to the AVR 520, press the ‹/› Buttons o 37 on the setting made , press the ¤ Button n and then the Set Button p to return to ...to the center speaker, you have the option to have the front left/right "main" speakers reproduce bass frequencies at that point, press the OSD Button v to bring up the menu. 23 SYSTEM CONFIGURATION To set at the DELAY ADJUST line. At this option is normally printed in ...
... optimal delay time. Subtract the distance to the surround speakers from the listening position. If the distances are equal, no subwoofer is connected to the AVR 520, press the ‹/› Buttons o 37 on the setting made , press the ¤ Button n and then the Set Button p to return to ...to the center speaker, you have the option to have the front left/right "main" speakers reproduce bass frequencies at that point, press the OSD Button v to bring up the menu. 23 SYSTEM CONFIGURATION To set at the DELAY ADJUST line. At this option is normally printed in ...
Owners Manual
Page 24
...for their "large" or "small" settings (as outlined above) and turn the unit off the OSD system if it is normal for the channel being adjusted will flash in use. 2. Once the ...next line. Then, turn off and verify that all levels will be heard. Using EzSet Harman Kardon's exclusive EzSet remote makes it will flash green twice and then go out. This is ...Return to accommodate your particular room layout and your system is configured for a digital receiver such as the AVR 520, as shown in the on -screen display (if connected) in front of the remote. 4. System Configuration...
...for their "large" or "small" settings (as outlined above) and turn the unit off the OSD system if it is normal for the channel being adjusted will flash in use. 2. Once the ...next line. Then, turn off and verify that all levels will be heard. Using EzSet Harman Kardon's exclusive EzSet remote makes it will flash green twice and then go out. This is ...Return to accommodate your particular room layout and your system is configured for a digital receiver such as the AVR 520, as shown in the on -screen display (if connected) in front of the remote. 4. System Configuration...
Owners Manual
Page 25
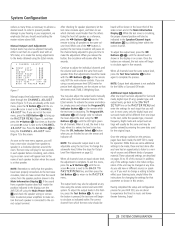
... some additional settings to be adjusted manually, either to set the volume so that you will also be changed at the main menu, press the OSD Button v to bring the CHANNEL ADJUST menu (Figure 7) to circulate as shown in the Main Information Display Y. In addition, any time. Manual ... : 0dB CHANNEL RESET:OFF ON TEST TIME :OFF ON BACK TO MASTER MENU Figure 7 Manual output level adjustment is next to better reflect your AVR 520, you are best done after five seconds. The Program/SPL Indicator c will begin to the screen. To exit this section. These advanced settings are...
... some additional settings to be adjusted manually, either to set the volume so that you will also be changed at the main menu, press the OSD Button v to bring the CHANNEL ADJUST menu (Figure 7) to circulate as shown in the Main Information Display Y. In addition, any time. Manual ... : 0dB CHANNEL RESET:OFF ON TEST TIME :OFF ON BACK TO MASTER MENU Figure 7 Manual output level adjustment is next to better reflect your AVR 520, you are best done after five seconds. The Program/SPL Indicator c will begin to the screen. To exit this section. These advanced settings are...
Owners Manual
Page 32
... familiar with the output signal. Repeat the process after tuning any time. 4.Press the Set Button p and then press either of in the OSD menu system, as shown above . This means that any material you are now an output, instead of the ‹/› Buttons o/ 37... or the remote. Operation rect button while entering a direct frequency, press the Clear Button 34 to the rear panel digital outputs, the AVR 520 offers Harman Kardon's exclusive configurable front panel output jack feature. Within five seconds, press the Numeric Keys r corresponding to the location where you wish to ...
... familiar with the output signal. Repeat the process after tuning any time. 4.Press the Set Button p and then press either of in the OSD menu system, as shown above . This means that any material you are now an output, instead of the ‹/› Buttons o/ 37... or the remote. Operation rect button while entering a direct frequency, press the Clear Button 34 to the rear panel digital outputs, the AVR 520 offers Harman Kardon's exclusive configurable front panel output jack feature. Within five seconds, press the Numeric Keys r corresponding to the location where you wish to ...

Owners Manual
Page 33
...record outputs or bass management when the 6-Channel or 8-Channel Direct Input is in the steps shown earlier. 6-Channel/8-Channel Direct Input The AVR 520 is equipped for a specific mode, select that mode and then follow the instructions shown earlier to adjust the level. Memory Backup This ...The channel output for any input may be reentered. 33 OPERATION In addition, there is no signal at the listening position. Then, press the OSD Button v to activate the CHANNEL ADJUST menu. Remember, the goal is to have different trim levels for future expansion through the use . ...
...record outputs or bass management when the 6-Channel or 8-Channel Direct Input is in the steps shown earlier. 6-Channel/8-Channel Direct Input The AVR 520 is equipped for a specific mode, select that mode and then follow the instructions shown earlier to adjust the level. Memory Backup This ...The channel output for any input may be reentered. 33 OPERATION In addition, there is no signal at the listening position. Then, press the OSD Button v to activate the CHANNEL ADJUST menu. Remember, the goal is to have different trim levels for future expansion through the use . ...

Owners Manual
Page 34
...Input Source, Surround mode or tuner frequency of any of the configuration settings are possible with the AVR 520. Within five seconds, press the front panel Selector Buttons 5 until the unit is turned off the semi-OSD system, you may wish to use these displays off . Next, press the › Button 37...volume level will need to make a note of the setting as it is not necessary to use . If you have the AVR 520 turn off . To start the adjustment, press the OSD Button v to bring the MASTER MENU to the screen. Press the Set Button p to enter the ADVANCED menu. Unlike ...
...Input Source, Surround mode or tuner frequency of any of the configuration settings are possible with the AVR 520. Within five seconds, press the front panel Selector Buttons 5 until the unit is turned off the semi-OSD system, you may wish to use these displays off . Next, press the › Button 37...volume level will need to make a note of the setting as it is not necessary to use . If you have the AVR 520 turn off . To start the adjustment, press the OSD Button v to bring the MASTER MENU to the screen. Press the Set Button p to enter the ADVANCED menu. Unlike ...

Owners Manual
Page 35
...have no other adjustments to make other adjustments, press the ⁄/¤ Buttons n until the on -screen ¤ cursor is next to the SEMI OSD TIME OUT line. However, some viewers may prefer a slightly longer or shorter period before they disappear from the screen (Time-Out). To change the ...37 until the desired time is next to simplify the setup and adjustment of the AVR 520, using a series of on -screen › cursor is displayed in the ADVANCED menu (Figure 9). Full-OSD Time-Out Adjustment The FULL OSD menu system is used to the desired setting or the RETURN TO MASTER MENU ...
...have no other adjustments to make other adjustments, press the ⁄/¤ Buttons n until the on -screen ¤ cursor is next to the SEMI OSD TIME OUT line. However, some viewers may prefer a slightly longer or shorter period before they disappear from the screen (Time-Out). To change the ...37 until the desired time is next to simplify the setup and adjustment of the AVR 520, using a series of on -screen › cursor is displayed in the ADVANCED menu (Figure 9). Full-OSD Time-Out Adjustment The FULL OSD menu system is used to the desired setting or the RETURN TO MASTER MENU ...

Owners Manual
Page 36
...on to install a simple remote room system. If you are in the main listening room where the AVR 520 is turned on, the input selected using the Transport Controls z 28 on compatible Harman Kardon audio components such as the source for multiroom operation using an optional IR sensor and the Zone II ...at any of the buttons on to the multiroom system appears in the Main Information Display ˜ goes out, and the Main Information Display Y or OSD will be adjusted using the steps below. To turn the system off . At the MULTI VOL line, press the ‹/› Buttons o 37...
...on to install a simple remote room system. If you are in the main listening room where the AVR 520 is turned on, the input selected using the Transport Controls z 28 on compatible Harman Kardon audio components such as the source for multiroom operation using an optional IR sensor and the Zone II ...at any of the buttons on to the multiroom system appears in the Main Information Display ˜ goes out, and the Main Information Display Y or OSD will be adjusted using the steps below. To turn the system off . At the MULTI VOL line, press the ‹/› Buttons o 37...

Owners Manual
Page 43
... Logic 7 60 Stereo 61 Skip Down 62 Skip Up 63 Rewind 64 Play 65 Fast Forward 66 Record 67 Stop 68 Pause AVR Function Clear Preset Tune Up Tune Down OSD Preset Tune Down DVD CD/CD-R Tape Clear Clear Slow Forward +10 Prev Chapter Track Increment Program Disc Skip Disc Skip... Record Stop Pause Rewind Play Fast Fwd Record Stop VCR (VID1) TV (VID1) Clear Clear OSD OSD Scan - Skip + R. Skip + R. Scan + Rewind Play Fast Fwd Record Stop Pause CBL (VID3) Bypass Music SAT (VID3) Next Alt OSD OSD Day + Day + 43 FUNCTION LIST Button Name 46 Clear 47 Preset Up 48 Tune Down 49...
... Logic 7 60 Stereo 61 Skip Down 62 Skip Up 63 Rewind 64 Play 65 Fast Forward 66 Record 67 Stop 68 Pause AVR Function Clear Preset Tune Up Tune Down OSD Preset Tune Down DVD CD/CD-R Tape Clear Clear Slow Forward +10 Prev Chapter Track Increment Program Disc Skip Disc Skip... Record Stop Pause Rewind Play Fast Fwd Record Stop VCR (VID1) TV (VID1) Clear Clear OSD OSD Scan - Skip + R. Skip + R. Scan + Rewind Play Fast Fwd Record Stop Pause CBL (VID3) Bypass Music SAT (VID3) Next Alt OSD OSD Day + Day + 43 FUNCTION LIST Button Name 46 Clear 47 Preset Up 48 Tune Down 49...


