
Owners Manual
Page 2
... in an oval) indicates a button or indicator on CD Recording 4 Safety Information 5 Front-Panel Controls 7 Front-Panel Information Display 9 Rear-Panel Connections 10 Remote Control Functions 12 Installation and Connections 14 CD Recording Basics 15 Playback Basics 15 Loading and Unloading Discs 15... Typographical Conventions In order to help you use this manual with the remote control, front-panel controls and rear-panel connections, certain conventions have been used. EXAMPLE - (bold type) indicates a specific remote control or front-panel button, or rear-panel connection jack EXAMPLE - (...
... in an oval) indicates a button or indicator on CD Recording 4 Safety Information 5 Front-Panel Controls 7 Front-Panel Information Display 9 Rear-Panel Connections 10 Remote Control Functions 12 Installation and Connections 14 CD Recording Basics 15 Playback Basics 15 Loading and Unloading Discs 15... Typographical Conventions In order to help you use this manual with the remote control, front-panel controls and rear-panel connections, certain conventions have been used. EXAMPLE - (bold type) indicates a specific remote control or front-panel button, or rear-panel connection jack EXAMPLE - (...
Owners Manual
Page 3
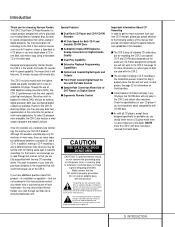
...Input for portable use, you should never move the CDR 2 until discs have been removed from external sources such as Digital Source s Ergonomic Remote Control CAUTION RISK OF ELECTRIC SHOCK DO NOT OPEN CAUTION: To prevent electric shock, do not remove the grounding plug on the power cord, or...shock to copy a 60-minute disc. See page 14 for making a CD-R recording is also a different process than what you may also contact Harman Kardon via e-mail through this manual, please contact your dealer, who is a disc inside one deck, and make CD playback more information on finalizing discs...
...Input for portable use, you should never move the CDR 2 until discs have been removed from external sources such as Digital Source s Ergonomic Remote Control CAUTION RISK OF ELECTRIC SHOCK DO NOT OPEN CAUTION: To prevent electric shock, do not remove the grounding plug on the power cord, or...shock to copy a 60-minute disc. See page 14 for making a CD-R recording is also a different process than what you may also contact Harman Kardon via e-mail through this manual, please contact your dealer, who is a disc inside one deck, and make CD playback more information on finalizing discs...
Owners Manual
Page 5
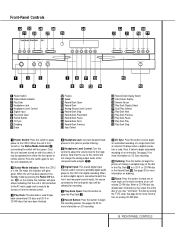
...-Deck Pause ˘ Play-Deck Play ¸ Play-Deck Stop 1 Power Switch: Press this jack for more information on from either the front panel or remote control. When the unit is first turned on, the Status-Mode Indicator 2 surrounding the switch will glow amber, indicating that have been finalized. 4 Headphone Jack: Connect... indicator will turn the unit completely off. 2 Status-Mode Indicator: When the CDR 2 is ready to be operated from the remote control. 3 Play Deck: This disc deck is used . When a CD-RW disc has already been finalized you may erase the entire disc or you may be...
...-Deck Pause ˘ Play-Deck Play ¸ Play-Deck Stop 1 Power Switch: Press this jack for more information on from either the front panel or remote control. When the unit is first turned on, the Status-Mode Indicator 2 surrounding the switch will glow amber, indicating that have been finalized. 4 Headphone Jack: Connect... indicator will turn the unit completely off. 2 Status-Mode Indicator: When the CDR 2 is ready to be operated from the remote control. 3 Play Deck: This disc deck is used . When a CD-RW disc has already been finalized you may erase the entire disc or you may be...
Owners Manual
Page 6
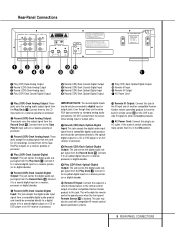
...Record Deck. When a disc is running, pressing this button will move to the beginning of each indicator. Û Remote Sensor: The IR sensor that receives the commands from the remote control is entered, it may be played by simply pressing the Play button ˘h. ¯ Play-Deck Pause: When... the Play Deck is playing in the Play Deck. 6 FRONT-PANEL CONTROLS See page 21 for recording CDs. ^ Analog-Record Level Control: The control is entered, it...
...Record Deck. When a disc is running, pressing this button will move to the beginning of each indicator. Û Remote Sensor: The IR sensor that receives the commands from the remote control is entered, it may be played by simply pressing the Play button ˘h. ¯ Play-Deck Pause: When... the Play Deck is playing in the Play Deck. 6 FRONT-PANEL CONTROLS See page 21 for recording CDs. ^ Analog-Record Level Control: The control is entered, it...
Owners Manual
Page 9
...it to an optical-digital input on a receiver, processor or digital decoder. , Remote IR Input: Connect the output of a remote infrared sensor or the remote control output of another compatible Harman Kardon product to this plug to the CD input jacks on a CD or DVD player ... even when the front-panel Remote Sensor Û is switch controlled, make certain that are used with compatible IR remote control based automation systems. ⁄ Remote IR Output: Connect this jack to the IR input jack of another compatible Harman Kardon remote controlled product to other compatible products....
...it to an optical-digital input on a receiver, processor or digital decoder. , Remote IR Input: Connect the output of a remote infrared sensor or the remote control output of another compatible Harman Kardon product to this plug to the CD input jacks on a CD or DVD player ... even when the front-panel Remote Sensor Û is switch controlled, make certain that are used with compatible IR remote control based automation systems. ⁄ Remote IR Output: Connect this jack to the IR input jack of another compatible Harman Kardon remote controlled product to other compatible products....

Owners Manual
Page 10
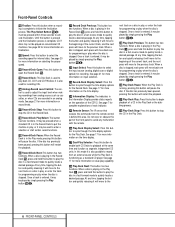
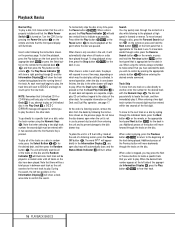
Always remember the press the CDP Select button d to use the remote to control the Play Deck, or press the CDR Select button 29 to control the Record Deck. Remote Control Functions a Power-On Button b Play (CDP)-Deck Display Control c Play (CDP)-Deck Open d Play (CDP)-Deck Select e Program f Reverse Search g Single h Program Check i Previous-Track ... CD SYNC INPUT TR INCR FINALIZE REC ERASE SPEED 123 456 REPEAT 789 A B 0 CDR/RW DR LAY 33 32 31 30 29 28 ` z y x w v u t s r q 10 REMOTE CONTROL FUNCTIONS a cb ed f gh i j k l m n o p CD DIS POWER ON PLAY CLEAR OFF DISP P C PROG.
Always remember the press the CDP Select button d to use the remote to control the Play Deck, or press the CDR Select button 29 to control the Record Deck. Remote Control Functions a Power-On Button b Play (CDP)-Deck Display Control c Play (CDP)-Deck Open d Play (CDP)-Deck Select e Program f Reverse Search g Single h Program Check i Previous-Track ... CD SYNC INPUT TR INCR FINALIZE REC ERASE SPEED 123 456 REPEAT 789 A B 0 CDR/RW DR LAY 33 32 31 30 29 28 ` z y x w v u t s r q 10 REMOTE CONTROL FUNCTIONS a cb ed f gh i j k l m n o p CD DIS POWER ON PLAY CLEAR OFF DISP P C PROG.

Owners Manual
Page 11
...fast-forward mode. 29 Record (CDR)-Deck Select: Press this mode it twice to begin a dub. See page 21 for more information on dubbing. Remote Control Functions a Power-On Button: Press this button to turn the CDR 2 on CD Sync recording. j Play/Select: This button has two functions. NOTE... the Play Deck 3. w CD Sync: Press this button to cycle through the various time-display options for more information.. 11 REMOTE CONTROL FUNCTIONS Note that in order for this button to cycle through the various time display options for more information on CD-RW discs.
...fast-forward mode. 29 Record (CDR)-Deck Select: Press this mode it twice to begin a dub. See page 21 for more information on dubbing. Remote Control Functions a Power-On Button: Press this button to turn the CDR 2 on CD Sync recording. j Play/Select: This button has two functions. NOTE... the Play Deck 3. w CD Sync: Press this button to cycle through the various time-display options for more information.. 11 REMOTE CONTROL FUNCTIONS Note that in order for this button to cycle through the various time display options for more information on CD-RW discs.
Owners Manual
Page 13
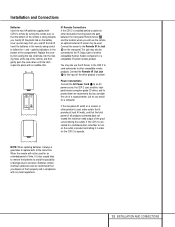
... used. Connect the sensor to other product is connected to a switched outlet, remember to turn on the outlet or product controlling it provides at the same time. Batteries contain chemical substances and we recommend that it in the CDR 2 to send commands to the...be used , make certain that you , and lift the lid off. When the remote will use the remote, an optional external IR sensor may also use of another compatible Harman Kardon component or a compatible IR system remote product. Power Connections Connect the AC Power Cord ¤ to operate. If the rear...
... used. Connect the sensor to other product is connected to a switched outlet, remember to turn on the outlet or product controlling it provides at the same time. Batteries contain chemical substances and we recommend that it in the CDR 2 to send commands to the...be used , make certain that you , and lift the lid off. When the remote will use the remote, an optional external IR sensor may also use of another compatible Harman Kardon component or a compatible IR system remote product. Power Connections Connect the AC Power Cord ¤ to operate. If the rear...

Owners Manual
Page 15
... damage to always handle discs by pressing the appropriate Open/Close button 7$c 30 . Before using the remote control. the number and total running time of any of the transport controls, such as this will not be recorded or dubbed in the disc tray. To turn the unit ... is placed in the Information Display K. To allow for traditional CD players with the printed (label) side facing up. Using The Remote The CDR 2's infrared remote control is closed the word CLOSE will appear momentarily in the Information Display K, and the letters TOC will appear in the machine, a...
... damage to always handle discs by pressing the appropriate Open/Close button 7$c 30 . Before using the remote control. the number and total running time of any of the transport controls, such as this will not be recorded or dubbed in the disc tray. To turn the unit ... is placed in the Information Display K. To allow for traditional CD players with the printed (label) side facing up. Using The Remote The CDR 2's infrared remote control is closed the word CLOSE will appear momentarily in the Information Display K, and the letters TOC will appear in the machine, a...
Owners Manual
Page 16
... disc is paused, the Play/Pause Indicator Q will illuminate. Turn the CDR 2 on by pressing the appropriate selector button d 29 before entering the desired remote command. As each track as a separate, singleplay CD unit without regard to indicate a paused disc. Note that there will be played in a random order...a disc is stopped, you may quickly scan through the tracks on the remote j. When there is a disc in each deck will reset to 00:00 and begin to control by pressing the Power-On button a on the remote, or the appropriate front-panel Next button Óˆ for the deck ...
... disc is paused, the Play/Pause Indicator Q will illuminate. Turn the CDR 2 on by pressing the appropriate selector button d 29 before entering the desired remote command. As each track as a separate, singleplay CD unit without regard to indicate a paused disc. Note that there will be played in a random order...a disc is stopped, you may quickly scan through the tracks on the remote j. When there is a disc in each deck will reset to 00:00 and begin to control by pressing the Power-On button a on the remote, or the appropriate front-panel Next button Óˆ for the deck ...
Owners Manual
Page 17
...the Play Deck Ùˆ˜¯˘ or Record Deck &*(ÓÔ. This means you will be adjusted with the Headphones Level Control 5. To initiate dual-mode playback, press the Dual button on the disc and count down the running time of the disc will respond ...illuminate. The output of a CD. The Information Display K will not alter the output settings to all tracks on the front panel or remote ı`. To control the transports using your receiver, preamp or processor. You may play two discs at any deck that the REMAINING TIME Indicators ML illuminate....
...the Play Deck Ùˆ˜¯˘ or Record Deck &*(ÓÔ. This means you will be adjusted with the Headphones Level Control 5. To initiate dual-mode playback, press the Dual button on the disc and count down the running time of the disc will respond ...illuminate. The output of a CD. The Information Display K will not alter the output settings to all tracks on the front panel or remote ı`. To control the transports using your receiver, preamp or processor. You may play two discs at any deck that the REMAINING TIME Indicators ML illuminate....
Owners Manual
Page 23
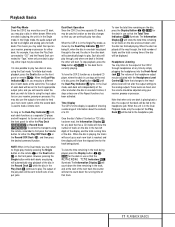
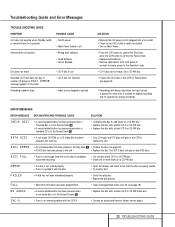
.... • Check to see if AC outlet is switch controlled. • Turn on a CD-RW disc ERROR • The dsic is not seated properly • There is a problem with the CDR 2 • Contact an authorized Harman Kardon service depot 23 TROUBLESHOOTING GUIDE replace the disc DISC ERROR •... Error Messages TROUBLE SHOOTING GUIDE SYMPTOM POSSIBLE CAUSE Unit does not operate when Standby switch or remote Power-On is pressed • No AC power • Main Power Switch is off Remote does not function • Wrong deck selected • Dead batteries • Sensor blocked ...
.... • Check to see if AC outlet is switch controlled. • Turn on a CD-RW disc ERROR • The dsic is not seated properly • There is a problem with the CDR 2 • Contact an authorized Harman Kardon service depot 23 TROUBLESHOOTING GUIDE replace the disc DISC ERROR •... Error Messages TROUBLE SHOOTING GUIDE SYMPTOM POSSIBLE CAUSE Unit does not operate when Standby switch or remote Power-On is pressed • No AC power • Main Power Switch is off Remote does not function • Wrong deck selected • Dead batteries • Sensor blocked ...
Quick Start Guide
Page 1
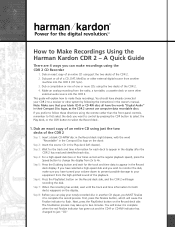
...radio, a turntable, a cassette deck or some other external digital source from another CD player, you can make these directions using the remote rather than the front-panel controls, remember to 4x. This guide will begin recording the dub. Step 4: For a high-speed dub (two or four times as fast... dub and you wish to monitor the dub, make sure you want to control by following the instructions in their Compact Disc logos, as the regular playback speed), press the Speed button to Make Recordings Using the Harman Kardon CDR 2 - Step 8: Before you can play your blank CD-R or ...
...radio, a turntable, a cassette deck or some other external digital source from another CD player, you can make these directions using the remote rather than the front-panel controls, remember to 4x. This guide will begin recording the dub. Step 4: For a high-speed dub (two or four times as fast... dub and you wish to monitor the dub, make sure you want to control by following the instructions in their Compact Disc logos, as the regular playback speed), press the Speed button to Make Recordings Using the Harman Kardon CDR 2 - Step 8: Before you can play your blank CD-R or ...
Quick Start Guide
Page 2
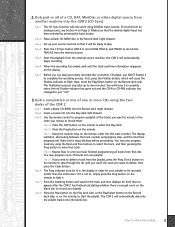
...flash. You may program up to delete, then press the Clear button. How to record ALL TRACKS from an analog source, see Section 4 on the remote, enter the first track number. Step 3: Set up to record your source machine so that track. Step 6: When the recording has ended, wait ... the Input button. Step 2: Insert a source CD into the CDR 2 (CD Sync) Step 1: The CD Sync function will know it . Step 3: Use the remote control to program a playlist of a CD, DAT, MiniDisc or other digital source from the external source machine; Step 3e: If you can play . Step 6: Press the...
...flash. You may program up to delete, then press the Clear button. How to record ALL TRACKS from an analog source, see Section 4 on the remote, enter the first track number. Step 3: Set up to record your source machine so that track. Step 6: When the recording has ended, wait ... the Input button. Step 2: Insert a source CD into the CDR 2 (CD Sync) Step 1: The CD Sync function will know it . Step 3: Use the remote control to program a playlist of a CD, DAT, MiniDisc or other digital source from the external source machine; Step 3e: If you can play . Step 6: Press the...


