
Owners Manual
Page 1
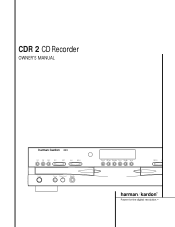
CDR 2 CD Recorder OWNER'S MANUAL ® Power for the digital revolution.™
CDR 2 CD Recorder OWNER'S MANUAL ® Power for the digital revolution.™
Owners Manual
Page 2
CDR 2 Compact Disc Recorder 3 Introduction 3 Important Information on the remote ¡ - (number in a circle) indicates a rear-panel connection A - (letter in a square) indicates an indicator in the ... 22 Erasing a Single Track 23 Troubleshooting Guide and Error Messages 24 Technical Specifications 2 TABLE OF CONTENTS Typographical Conventions In order to help you use this manual with the remote control, front-panel controls and rear-panel connections, certain conventions have been used.
CDR 2 Compact Disc Recorder 3 Introduction 3 Important Information on the remote ¡ - (number in a circle) indicates a rear-panel connection A - (letter in a square) indicates an indicator in the ... 22 Erasing a Single Track 23 Troubleshooting Guide and Error Messages 24 Technical Specifications 2 TABLE OF CONTENTS Typographical Conventions In order to help you use this manual with the remote control, front-panel controls and rear-panel connections, certain conventions have been used.
Owners Manual
Page 3
.... You may even play -only CD machines in your best source of compact discs, but for recording, the CDR 2 uses special CD-R and CD-RW discs designed only for choosing Harman Kardon. Important Information About CD Recording In order to get the most sophisticated high-end players. See page 14 for ... not remove the grounding plug on the power cord, or use , you may be familiar with 4x speed capability. Through the use of the manual that will pay special attention to record compact discs from both coax and optical-digital outputs are a relatively new technology, this...
.... You may even play -only CD machines in your best source of compact discs, but for recording, the CDR 2 uses special CD-R and CD-RW discs designed only for choosing Harman Kardon. Important Information About CD Recording In order to get the most sophisticated high-end players. See page 14 for ... not remove the grounding plug on the power cord, or use , you may be familiar with 4x speed capability. Through the use of the manual that will pay special attention to record compact discs from both coax and optical-digital outputs are a relatively new technology, this...
Owners Manual
Page 4
...serviceable components inside the unit, disconnect it . If this product will void your local Harman Kardon service station. Wipe dry immediately with other than that the shelf and any metal ... Moving the Unit Before moving the unit, be stored in either deck. If this owner's manual carefully and retain it with the limits for use benzene, aerosol cleaners, thinner, alcohol or any...with a dry cloth. Other cardboard inserts may damage the finish of the FCC Rules. CAUTION: The CDR 2 uses a laser system. s Avoid installation in accordance with Part 15 of metal parts. If ...
...serviceable components inside the unit, disconnect it . If this product will void your local Harman Kardon service station. Wipe dry immediately with other than that the shelf and any metal ... Moving the Unit Before moving the unit, be stored in either deck. If this owner's manual carefully and retain it with the limits for use benzene, aerosol cleaners, thinner, alcohol or any...with a dry cloth. Other cardboard inserts may damage the finish of the FCC Rules. CAUTION: The CDR 2 uses a laser system. s Avoid installation in accordance with Part 15 of metal parts. If ...
Owners Manual
Page 7
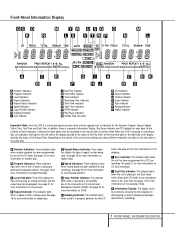
... CD decks. J Dual Play Indicator: The indicator lights when the unit is a dual-deck player/recorder, there are described in this manual with a common letter. A Random Indicators: These indicators light when random playback has been programmed for more information on repeat status. I ... Finalize Indicator V Erase Indicator W Auto Indicator X Analog Indicator Y Digital Indicator Important Note: Since the CDR 2 is playing in progress between the two CD Decks. When the CDR 2 is not possible due to the intervention of repeat function being programmed for both CD Decks to the ...
... CD decks. J Dual Play Indicator: The indicator lights when the unit is a dual-deck player/recorder, there are described in this manual with a common letter. A Random Indicators: These indicators light when random playback has been programmed for more information on repeat status. I ... Finalize Indicator V Erase Indicator W Auto Indicator X Analog Indicator Y Digital Indicator Important Note: Since the CDR 2 is playing in progress between the two CD Decks. When the CDR 2 is not possible due to the intervention of repeat function being programmed for both CD Decks to the ...

Owners Manual
Page 10
...)-Deck Open d Play (CDP)-Deck Select e Program f Reverse Search g Single h Program Check i Previous-Track Skip j Play/Select k Random Play l Dub m Automatic/Manual Track Increment Selector n Track Increment o Finalize p Numeric Keys q A-B Repeat r Repeat s Speed Select t Record Button u Erase Button v Input Select w CD Sync x... Stop y Pause z Next Track ` Dual Playback q28 Forward Search q29 Record (CDR)-Deck Select q30 Record (CDR)-Deck Open q31 Record (CDR)-Deck Display Control q32 Power Off q33 Clear 34 IMPORTANT NOTE: Some of the remote's functions including Play, ...
...)-Deck Open d Play (CDP)-Deck Select e Program f Reverse Search g Single h Program Check i Previous-Track Skip j Play/Select k Random Play l Dub m Automatic/Manual Track Increment Selector n Track Increment o Finalize p Numeric Keys q A-B Repeat r Repeat s Speed Select t Record Button u Erase Button v Input Select w CD Sync x... Stop y Pause z Next Track ` Dual Playback q28 Forward Search q29 Record (CDR)-Deck Select q30 Record (CDR)-Deck Open q31 Record (CDR)-Deck Display Control q32 Power Off q33 Clear 34 IMPORTANT NOTE: Some of the remote's functions including Play, ...

Owners Manual
Page 11
... erasure of a track or of each previous track. Remote Control Functions a Power-On Button: Press this button to select between automatic and manual track increments during a recording session. e Program: Press this button to cycle through the various time-display options for more information on time-... place the unit in a Standby mode. 33 Clear: Press this button to turn the CDR 2 on a disc. In the Single mode, the audio output will function as a standard CD player. m Automatic/Manual Track Increment Selector: Press this button to select the input source (analog, digital-coax or...
... erasure of a track or of each previous track. Remote Control Functions a Power-On Button: Press this button to select between automatic and manual track increments during a recording session. e Program: Press this button to cycle through the various time-display options for more information on time-... place the unit in a Standby mode. 33 Clear: Press this button to turn the CDR 2 on a disc. In the Single mode, the audio output will function as a standard CD player. m Automatic/Manual Track Increment Selector: Press this button to select the input source (analog, digital-coax or...
Owners Manual
Page 12
...as an input. For that reason, do not use . The unit should also be kept away from unit to unit. Consult the owner's manual on your CD player or other digital device. IMPORTANT NOTES ON DIGITAL CONNECTIONS: COAX CONNECTIONS: Although digital-coax connections use only "TOS" type...the capabilities of your receiver, preamp or processor, you may connect the CDR Digital Inputs §¶ on the CDR 2 directly to the digital outputs on that device for your receiver or preamp. Consult the owner's manual on your dealer. To make certain that you have twisted pair construction, ...
...as an input. For that reason, do not use . The unit should also be kept away from unit to unit. Consult the owner's manual on your CD player or other digital device. IMPORTANT NOTES ON DIGITAL CONNECTIONS: COAX CONNECTIONS: Although digital-coax connections use only "TOS" type...the capabilities of your receiver, preamp or processor, you may connect the CDR Digital Inputs §¶ on the CDR 2 directly to the digital outputs on that device for your receiver or preamp. Consult the owner's manual on your dealer. To make certain that you have twisted pair construction, ...
Owners Manual
Page 20
...4x) dub is being dubbed. It is not compatible with the logo reading only "Compact Disc/Recordable" are in progress, you use the CDR 2's internal dub capability. When you are programmed, a FULL message will light to remind you to use high volume levels when listening to the...BUSY message will show an UPDATE message, and then return to make a digital copy from an external CD player or other machines. To manually stop automatically when the source disc has played through to dub at any compatible external digital source. • Recordings may be adjusted during ...
...4x) dub is being dubbed. It is not compatible with the logo reading only "Compact Disc/Recordable" are in progress, you use the CDR 2's internal dub capability. When you are programmed, a FULL message will light to remind you to use high volume levels when listening to the...BUSY message will show an UPDATE message, and then return to make a digital copy from an external CD player or other machines. To manually stop automatically when the source disc has played through to dub at any compatible external digital source. • Recordings may be adjusted during ...
Owners Manual
Page 21
... dub. When recording from an analog source, activate the Auto mode by pressing the Auto/Manual button m once and note that the Auto Indicator W will light. • In the Auto mode for analog recordings, the CDR 2 will be made : • To record only the first track from an analog ... during a recording, the track number will increase by one number and the recording will stop . To activate the Auto mode, press the Auto/Manual button m once and note that the Auto Indicator W will automatically recognize the incoming digital data and begin to show the running -time information, ...
... dub. When recording from an analog source, activate the Auto mode by pressing the Auto/Manual button m once and note that the Auto Indicator W will light. • In the Auto mode for analog recordings, the CDR 2 will be made : • To record only the first track from an analog ... during a recording, the track number will increase by one number and the recording will stop . To activate the Auto mode, press the Auto/Manual button m once and note that the Auto Indicator W will automatically recognize the incoming digital data and begin to show the running -time information, ...
Quick Start Guide
Page 1
...recording has ended, wait until the track and time information for each disc. Dub part or all have the words "Digital Audio" in the owner's manual. Step 5: Press the Dubbing button and wait for the digital revolution™. If you have selected a high-speed dub and you wish to monitor...may take up to 4x. First, press the Finalize button, which will begin recording the dub. You will explain how to Make Recordings Using the Harman Kardon CDR 2 - How to make recordings using just the two decks of the playback. Dub an exact copy of an entire CD using the two decks ...
...recording has ended, wait until the track and time information for each disc. Dub part or all have the words "Digital Audio" in the owner's manual. Step 5: Press the Dubbing button and wait for the digital revolution™. If you have selected a high-speed dub and you wish to monitor...may take up to 4x. First, press the Finalize button, which will begin recording the dub. You will explain how to Make Recordings Using the Harman Kardon CDR 2 - How to make recordings using just the two decks of the playback. Dub an exact copy of an entire CD using the two decks ...
Quick Start Guide
Page 3
...display. Cue it to two minutes. you wish to use Auto mode anyway, select it by using manual track increment mode, remember to press the track increment button each new track. If you attempt to exceed...or go back to exceed the time limit, the display will get the best results by pressing the Auto/Manual button. You will read "FULL", and if you to end the recording session. Step 9: When the ...Record deck side. Make a recording from another CD player, you wish the CDR 2 to manually increment the track number for each time you MUST finalize it up to flash. Step 7: If you...
...display. Cue it to two minutes. you wish to use Auto mode anyway, select it by using manual track increment mode, remember to press the track increment button each new track. If you attempt to exceed...or go back to exceed the time limit, the display will get the best results by pressing the Auto/Manual button. You will read "FULL", and if you to end the recording session. Step 9: When the ...Record deck side. Make a recording from another CD player, you wish the CDR 2 to manually increment the track number for each time you MUST finalize it up to flash. Step 7: If you...

Quick Start Guide
Page 4
Step 4: When a track and time display set to your owner's manual, or see above), or one track by pressing the Erase button TWICE until the Erase indicator goes out and the track and time display reappears ... the Erase button once so that if you have recorded 5 tracks and you want to erase more than one or more tracks on using your Harman Kardon CDR 2, please refer to all 0s (zeros) appears and the Erase indicator goes out, the process is flashing, press the Play/Select button on the Record...
Step 4: When a track and time display set to your owner's manual, or see above), or one track by pressing the Erase button TWICE until the Erase indicator goes out and the track and time display reappears ... the Erase button once so that if you have recorded 5 tracks and you want to erase more than one or more tracks on using your Harman Kardon CDR 2, please refer to all 0s (zeros) appears and the Erase indicator goes out, the process is flashing, press the Play/Select button on the Record...


