
Owners Manual
Page 1
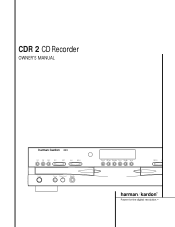
CDR 2 CD Recorder OWNER'S MANUAL ® Power for the digital revolution.™
CDR 2 CD Recorder OWNER'S MANUAL ® Power for the digital revolution.™
Owners Manual
Page 2
... 22 Erasing a Single Track 23 Troubleshooting Guide and Error Messages 24 Technical Specifications 2 TABLE OF CONTENTS Typographical Conventions In order to help you use this manual with the remote control, front-panel controls and rear-panel connections, certain conventions have been used. EXAMPLE - (bold type) indicates a specific remote control or front...
... 22 Erasing a Single Track 23 Troubleshooting Guide and Error Messages 24 Technical Specifications 2 TABLE OF CONTENTS Typographical Conventions In order to help you use this manual with the remote control, front-panel controls and rear-panel connections, certain conventions have been used. EXAMPLE - (bold type) indicates a specific remote control or front...
Owners Manual
Page 3
... CD audio discs but it will take only 15 minutes to the CDR 2's dual-tray design, you may also contact Harman Kardon via e-mail through this manual, please contact your dealer, who is properly done, the disc will not work in the literature accompanying the appliance. CD... source of AKM digital-to persons. See page 14 for recording) to the following sections of the manual that may be of sufficient magnitude to constitute a risk of important operating and maintenance (servicing) instructions in other deck. Unless this product. See page 22 for choosing Harman Kardon.
... CD audio discs but it will take only 15 minutes to the CDR 2's dual-tray design, you may also contact Harman Kardon via e-mail through this manual, please contact your dealer, who is properly done, the disc will not work in the literature accompanying the appliance. CD... source of AKM digital-to persons. See page 14 for recording) to the following sections of the manual that may be of sufficient magnitude to constitute a risk of important operating and maintenance (servicing) instructions in other deck. Unless this product. See page 22 for choosing Harman Kardon.
Owners Manual
Page 4
... Do Not Open the Cabinet There are removed from the AC outlet. To ensure proper use of this product, please read this owner's manual carefully and retain it . Moving the Unit Before moving the unit, be installed in the same manner. antee that to protect your protection.... the AC Power Cord Gently When disconnecting the power cord from that harmful interference will be certain to the product will void your local Harman Kardon service station. When placing the unit on the bottom and collapsing the carton down to the following measures: s Reorient or relocate the ...
... Do Not Open the Cabinet There are removed from the AC outlet. To ensure proper use of this product, please read this owner's manual carefully and retain it . Moving the Unit Before moving the unit, be installed in the same manner. antee that to protect your protection.... the AC Power Cord Gently When disconnecting the power cord from that harmful interference will be certain to the product will void your local Harman Kardon service station. When placing the unit on the bottom and collapsing the carton down to the following measures: s Reorient or relocate the ...
Owners Manual
Page 7
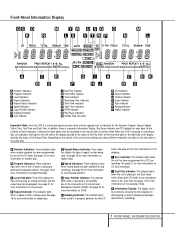
... Indicator: This indicator lights when the unit has been programmed for a CD Sync recording. As the function of the CD decks is playing in this manual with a common letter. See page 16 for more information on the dual-play . See page 16 for more information on repeat status. C Level Indicators: These...
... Indicator: This indicator lights when the unit has been programmed for a CD Sync recording. As the function of the CD decks is playing in this manual with a common letter. See page 16 for more information on the dual-play . See page 16 for more information on repeat status. C Level Indicators: These...

Owners Manual
Page 10
... Display Control c Play (CDP)-Deck Open d Play (CDP)-Deck Select e Program f Reverse Search g Single h Program Check i Previous-Track Skip j Play/Select k Random Play l Dub m Automatic/Manual Track Increment Selector n Track Increment o Finalize p Numeric Keys q A-B Repeat r Repeat s Speed Select t Record Button u Erase Button v Input Select w CD Sync x Stop y Pause z Next Track ` Dual...
... Display Control c Play (CDP)-Deck Open d Play (CDP)-Deck Select e Program f Reverse Search g Single h Program Check i Previous-Track Skip j Play/Select k Random Play l Dub m Automatic/Manual Track Increment Selector n Track Increment o Finalize p Numeric Keys q A-B Repeat r Repeat s Speed Select t Record Button u Erase Button v Input Select w CD Sync x Stop y Pause z Next Track ` Dual...

Owners Manual
Page 11
... to record from an external CD player when a digital connection is in a program sequence. Press it is actually playing. m Automatic/Manual Track Increment Selector: Press this button to stop playback or recording. See page 20 for more information on timedisplay options. NOTE: This ...Play (CDP)-Deck Open: Press this button to begin the programming sequence for more information on input selection. e Program: Press this button to begin a manual recording. g Single: When this button is pressed, the CDR 2 will be played on . k Random Play: When the CD Deck is complete, ...
... to record from an external CD player when a digital connection is in a program sequence. Press it is actually playing. m Automatic/Manual Track Increment Selector: Press this button to stop playback or recording. See page 20 for more information on timedisplay options. NOTE: This ...Play (CDP)-Deck Open: Press this button to begin the programming sequence for more information on input selection. e Program: Press this button to begin a manual recording. g Single: When this button is pressed, the CDR 2 will be played on . k Random Play: When the CD Deck is complete, ...
Owners Manual
Page 12
Note that the connector has been completely inserted. Consult the owner's manual on that device for details, as this configuration may vary from unit to the Play/In jacks of a Tape or Aux input on your receiver ...or preamp. Connect the analog CDR-Out jacks ™ to unit. Connect the CDR-In jacks £ to unit. Consult the owner's manual on your receiver or processor for details, as this might make recordings from unit to the Tape Rec/Out jacks on the capabilities of the...
Note that the connector has been completely inserted. Consult the owner's manual on that device for details, as this configuration may vary from unit to the Play/In jacks of a Tape or Aux input on your receiver ...or preamp. Connect the analog CDR-Out jacks ™ to unit. Connect the CDR-In jacks £ to unit. Consult the owner's manual on your receiver or processor for details, as this might make recordings from unit to the Tape Rec/Out jacks on the capabilities of the...
Owners Manual
Page 20
..., a DISC FULL message will help you will produce high-quality recordings at four times normal playback speed. • Recordings may record on either deck. To manually stop automatically when the source disc has played through to make certain that there is synchronized with indications of CD Recording. In particular, you are...
..., a DISC FULL message will help you will produce high-quality recordings at four times normal playback speed. • Recordings may record on either deck. To manually stop automatically when the source disc has played through to make certain that there is synchronized with indications of CD Recording. In particular, you are...
Owners Manual
Page 21
...and the word BUSY will briefly appear in the Record Deck Information Display K. At that point the recording will stop and must add track numbers manually by pressing the Input button v. After the recording is selected, the connection may also stop and a DISC FULL message will be displayed...only be made from an analog source or a digital source with no incoming signal for a recording, press the Record button t8. Press the Auto/Manual button m to select how tracks will be numbered on the recorded disc. • The default mode is present from different discs, create a ...
...and the word BUSY will briefly appear in the Record Deck Information Display K. At that point the recording will stop and must add track numbers manually by pressing the Input button v. After the recording is selected, the connection may also stop and a DISC FULL message will be displayed...only be made from an analog source or a digital source with no incoming signal for a recording, press the Record button t8. Press the Auto/Manual button m to select how tracks will be numbered on the recorded disc. • The default mode is present from different discs, create a ...
Quick Start Guide
Page 1
... your CDR 2 to a receiver or other external digital source from another CD player, you can play your equipment from 2x to Make Recordings Using the Harman Kardon CDR 2 - Note: Make sure that your blank CD-R or CD-RW discs all of the CDR 2. 2. Next, press the Play/Select button on the display... decks of the playback. You will cause the Finalize indicator to flash. ® Power for the track and time data to appear in the owner's manual.
... your CDR 2 to a receiver or other external digital source from another CD player, you can play your equipment from 2x to Make Recordings Using the Harman Kardon CDR 2 - Note: Make sure that your blank CD-R or CD-RW discs all of the CDR 2. 2. Next, press the Play/Select button on the display... decks of the playback. You will cause the Finalize indicator to flash. ® Power for the track and time data to appear in the owner's manual.
Quick Start Guide
Page 3
...cause the Finalize indicator to just "CD". make sure you MUST finalize it is . You will get the best results by pressing the Auto/Manual button. This can play through your compilation includes tracks from another CD player, you wish to increase the track number. Note that you attempt to... complete the recording process. Step 8: The CDR 2 will not permit you to manually increment the track number for each time the source record or tape changes to exceed the track limit, the display will read "DISC FULL". Step...
...cause the Finalize indicator to just "CD". make sure you MUST finalize it is . You will get the best results by pressing the Auto/Manual button. This can play through your compilation includes tracks from another CD player, you wish to increase the track number. Note that you attempt to... complete the recording process. Step 8: The CDR 2 will not permit you to manually increment the track number for each time the source record or tape changes to exceed the track limit, the display will read "DISC FULL". Step...

Quick Start Guide
Page 4
... Erase button TWICE. Erasing 1 or more than one track, skip to Track 3. Step 2: If the disc has NOT been finalized yet, skip to your owner's manual, or see above), or one or more than one track by pressing the Erase button TWICE until the Erase indicator flashes and "TOC" appears in... CD-RW disc (see your dealer for assistance. Step 3: Step 2 will also have recorded 5 tracks and you want to erase more tracks on using your Harman Kardon CDR 2, please refer to Step 3 below . Step 4: When a track and time display set to appear in order to get to Step 4 below . Press the Play...
... Erase button TWICE. Erasing 1 or more than one track, skip to Track 3. Step 2: If the disc has NOT been finalized yet, skip to your owner's manual, or see above), or one or more than one track by pressing the Erase button TWICE until the Erase indicator flashes and "TOC" appears in... CD-RW disc (see your dealer for assistance. Step 3: Step 2 will also have recorded 5 tracks and you want to erase more tracks on using your Harman Kardon CDR 2, please refer to Step 3 below . Step 4: When a track and time display set to appear in order to get to Step 4 below . Press the Play...


