

Owners Manual
Page 2
...into the beam. WARNING: TO REDUCE THE RISK OF FIRE OR ELECTRIC SHOCK, DO NOT EXPOSE THIS APPLIANCE TO RAIN OR MOISTURE. Harman Kardon FL8300 Date of purchase Purchased from Address of business purchased from Installed by Date of trouble-free service. To avoid early damage, never place ...the unit near radiators, in front of electric shock to read this manual thoroughly. Harman Kardon FL8300 LrY RISK OF ELECTRIC SHOCK A CADOUNOTT OIPOEN N CAUTION: TO REDUCE THE RISK OF ELECTRIC SHOCK, DO NOT REMOVE COVER (OR BACK). ...
...into the beam. WARNING: TO REDUCE THE RISK OF FIRE OR ELECTRIC SHOCK, DO NOT EXPOSE THIS APPLIANCE TO RAIN OR MOISTURE. Harman Kardon FL8300 Date of purchase Purchased from Address of business purchased from Installed by Date of trouble-free service. To avoid early damage, never place ...the unit near radiators, in front of electric shock to read this manual thoroughly. Harman Kardon FL8300 LrY RISK OF ELECTRIC SHOCK A CADOUNOTT OIPOEN N CAUTION: TO REDUCE THE RISK OF ELECTRIC SHOCK, DO NOT REMOVE COVER (OR BACK). ...
Owners Manual
Page 5
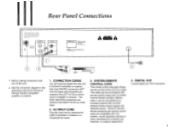
... be connected to amplifier or receiver. SYSTEM REMOTE CONTROL CORD The remote control input jack allows remote control of Harman Kardon compatible amplifier or receiver. 1. The other manufacturer's products are compatible with one another, not all accessory devices ... receiver. However, it can be connected to the RIGHT of another Harman Kardon product. MODEL NO FL8300 HARMAN KARDON NORTHRIDGE CALIFORNIA, U.S.A. This cable can be connected to experiment. 4. While all Harman Kardon products with remote control jacks are . Rear Panel Connections 0ponation eubjactlo ...
... be connected to amplifier or receiver. SYSTEM REMOTE CONTROL CORD The remote control input jack allows remote control of Harman Kardon compatible amplifier or receiver. 1. The other manufacturer's products are compatible with one another, not all accessory devices ... receiver. However, it can be connected to the RIGHT of another Harman Kardon product. MODEL NO FL8300 HARMAN KARDON NORTHRIDGE CALIFORNIA, U.S.A. This cable can be connected to experiment. 4. While all Harman Kardon products with remote control jacks are . Rear Panel Connections 0ponation eubjactlo ...

Owners Manual
Page 14
... programmed or deleted without the PLAY/PAUSE button. • To select a two-digit track number, the second digit must be remotely controlled by Harman Kardon RECEIVERS. 1 • For available control functions, refer to display ON mode. • DISC INTRO, PROGRAM/ REVIEW, TAPE SIZE, EDIT, ...This unit can be pressed within 2 seconds. 2. B BUTTON • During play, press this button at the beginning of the HARMAN KARDON RECEIVER. 3 REMOTE CONTROL FOR THE FL8300 1. B is pressed, the unit switches to the receiver's manual. • To play , select the desired track on the...
... programmed or deleted without the PLAY/PAUSE button. • To select a two-digit track number, the second digit must be remotely controlled by Harman Kardon RECEIVERS. 1 • For available control functions, refer to display ON mode. • DISC INTRO, PROGRAM/ REVIEW, TAPE SIZE, EDIT, ...This unit can be pressed within 2 seconds. 2. B BUTTON • During play, press this button at the beginning of the HARMAN KARDON RECEIVER. 3 REMOTE CONTROL FOR THE FL8300 1. B is pressed, the unit switches to the receiver's manual. • To play , select the desired track on the...
Owners Manual
Page 15
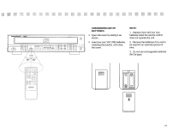
Replace them with two new batteries when the remote control does not operate the unit. 2. Do not use rechargeable batteries (Ni-Cd type). 0 14 NOTE: 1. harman/kardon FL8300 0 m =5= 0 0 0 0 0 8 a, ati:Bil 7m 30° 30° ® 8 O 0 CONCERNING USE OF BATTERIES • Open the cover by sliding it is not to be used for an extended period of time. 3. Remove the batteries if it as shown. • Insert two size "AA" (R6) batteries, matching the polarity, and close the cover.
Replace them with two new batteries when the remote control does not operate the unit. 2. Do not use rechargeable batteries (Ni-Cd type). 0 14 NOTE: 1. harman/kardon FL8300 0 m =5= 0 0 0 0 0 8 a, ati:Bil 7m 30° 30° ® 8 O 0 CONCERNING USE OF BATTERIES • Open the cover by sliding it is not to be used for an extended period of time. 3. Remove the batteries if it as shown. • Insert two size "AA" (R6) batteries, matching the polarity, and close the cover.

Owners Manual
Page 18
harman/kardon H Service and Parts Office: 80 Crossways Park West, Woodbury, New York 11797 (800) 422-8027 8500 Balboa Blvd., Northridge CA 91329 A Harman International Company 1111-FL8300 Printed in Korea 120 Volt Version 9007018340
harman/kardon H Service and Parts Office: 80 Crossways Park West, Woodbury, New York 11797 (800) 422-8027 8500 Balboa Blvd., Northridge CA 91329 A Harman International Company 1111-FL8300 Printed in Korea 120 Volt Version 9007018340


