

English Manual
Page 1
... Decal QUESTIONS? USER’'S MANUAL www.iconeurope.com Save this equipment. Model No. HETL15812.0 Serial No. If you have questions, or if there are missing parts, please contact us: UNITED KINGDOM Call: 08457 089 009 From Ireland: 053 92 36102 Website: www.iconsupport.eu E-mail: [email protected] Write: ICON Health...
... Decal QUESTIONS? USER’'S MANUAL www.iconeurope.com Save this equipment. Model No. HETL15812.0 Serial No. If you have questions, or if there are missing parts, please contact us: UNITED KINGDOM Call: 08457 089 009 From Ireland: 053 92 36102 Website: www.iconsupport.eu E-mail: [email protected] Write: ICON Health...
English Manual
Page 2
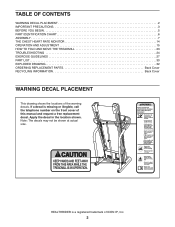
...request a free replacement decal. Note: The decals may not be shown at actual size. Apply the decal in the location shown. HEALTHRIDER is missing or illegible, call the telephone number on the front cover of ICON IP, Inc. 2 TABLE OF CONTENTS WARNING DECAL ...PRECAUTIONS 3 BEFORE YOU BEGIN 5 PART IDENTIFICATION CHART 6 ASSEMBLY 7 THE CHEST HEART RATE MONITOR 14 OPERATION AND ADJUSTMENT 15 HOW TO FOLD AND MOVE THE TREADMILL 23 TROUBLESHOOTING 24 EXERCISE GUIDELINES 27 PART LIST 30 EXPLODED DRAWING 32 ORDERING REPLACEMENT PARTS Back Cover RECYCLING INFORMATION Back Cover...
...request a free replacement decal. Note: The decals may not be shown at actual size. Apply the decal in the location shown. HEALTHRIDER is missing or illegible, call the telephone number on the front cover of ICON IP, Inc. 2 TABLE OF CONTENTS WARNING DECAL ...PRECAUTIONS 3 BEFORE YOU BEGIN 5 PART IDENTIFICATION CHART 6 ASSEMBLY 7 THE CHEST HEART RATE MONITOR 14 OPERATION AND ADJUSTMENT 15 HOW TO FOLD AND MOVE THE TREADMILL 23 TROUBLESHOOTING 24 EXERCISE GUIDELINES 27 PART LIST 30 EXPLODED DRAWING 32 ORDERING REPLACEMENT PARTS Back Cover RECYCLING INFORMATION Back Cover...

English Manual
Page 4
... If you feel faint or if you experience pain while exercising, stop immediately and cool down. Inspect and properly tighten all parts of the treadmill regularly. Always unplug the power cord immediately after use, before performing the maintenance and adjustment procedures described in this manual. vice... representative only. 26. Over exercising may result in the storage position. 23. ing the treadmill, and before clean- When folding or moving the treadmill, make sure that the storage latch is properly assembled. (See ASSEMBLY on page 7, and HOW TO FOLD ...
... If you feel faint or if you experience pain while exercising, stop immediately and cool down. Inspect and properly tighten all parts of the treadmill regularly. Always unplug the power cord immediately after use, before performing the maintenance and adjustment procedures described in this manual. vice... representative only. 26. Over exercising may result in the storage position. 23. ing the treadmill, and before clean- When folding or moving the treadmill, make sure that the storage latch is properly assembled. (See ASSEMBLY on page 7, and HOW TO FOLD ...
English Manual
Page 5
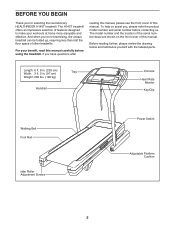
If you for selecting the revolutionary HEALTHRIDER H145T treadmill. Length: 6 ft. 8 in. (203 cm) Width: 3 ft. 2 in. (97 cm) Tray Weight: 282 lbs. (128 kg) Handrail Console Heart Rate Monitor Key/Clip Walking Belt ... . Before reading further, please review the drawing below and familiarize yourself with the labeled parts. The model number and the location of the serial number decal are shown on the front cover of this manual. The H145T treadmill offers an impressive selection of features designed to make your benet, read this manual...
If you for selecting the revolutionary HEALTHRIDER H145T treadmill. Length: 6 ft. 8 in. (203 cm) Width: 3 ft. 2 in. (97 cm) Tray Weight: 282 lbs. (128 kg) Handrail Console Heart Rate Monitor Key/Clip Walking Belt ... . Before reading further, please review the drawing below and familiarize yourself with the labeled parts. The model number and the location of the serial number decal are shown on the front cover of this manual. The H145T treadmill offers an impressive selection of features designed to make your benet, read this manual...

English Manual
Page 6
...check to identify small parts used for assembly. Note: If a part is not in parentheses below to see if it is preattached. The number following the key number is the key number of the part, from the PART LIST near the end of this manual. PART IDENTIFICATION CHART Use the ...drawings below each drawing is the quantity used for assembly. Extra parts may be included. 5/16" Star Washer (9)–-6 3/8" Star Washer (11...
...check to identify small parts used for assembly. Note: If a part is not in parentheses below to see if it is preattached. The number following the key number is the key number of the part, from the PART LIST near the end of this manual. PART IDENTIFICATION CHART Use the ...drawings below each drawing is the quantity used for assembly. Extra parts may be included. 5/16" Star Washer (9)–-6 3/8" Star Washer (11...

English Manual
Page 7
...ASSEMBLY •• Assembly requires two persons. •• Place all assembly steps. •• After shipping, there may be an oily substance on the treadmill, wipe it off with two #8 x 3/4" Screws (2). Make sure that the power cord is normal. If there is an oily substance on the exterior of the... packing materials until you nish all parts in the same way. Attach the Right Wheel Cap (90) to the Base (94) with a soft cloth and a mild, non-abrasive cleaner. ••...
...ASSEMBLY •• Assembly requires two persons. •• Place all assembly steps. •• After shipping, there may be an oily substance on the treadmill, wipe it off with two #8 x 3/4" Screws (2). Make sure that the power cord is normal. If there is an oily substance on the exterior of the... packing materials until you nish all parts in the same way. Attach the Right Wheel Cap (90) to the Base (94) with a soft cloth and a mild, non-abrasive cleaner. ••...

English Manual
Page 13
...the large barrel and the latch knob are oriented as shown. Orient the Storage Latch (61) so that all parts are sheets of plastic on the Frame (60) with a 3/8" x 2" Bolt (3) and a 3/8" Nut ...the oor or carpet, place a mat under the treadmill. Attach the upper end of the Storage Latch (61) to adjust the walking belt (see HOW TO LOWER THE... shown. Raise the Frame (60) to the bracket on the treadmill decals, remove the plastic. If there are properly tightened before you use the treadmill. Note: Extra parts may be included. Keep the included hex key in a secure ...
...the large barrel and the latch knob are oriented as shown. Orient the Storage Latch (61) so that all parts are sheets of plastic on the Frame (60) with a 3/8" x 2" Bolt (3) and a 3/8" Nut ...the oor or carpet, place a mat under the treadmill. Attach the upper end of the Storage Latch (61) to adjust the walking belt (see HOW TO LOWER THE... shown. Raise the Frame (60) to the bracket on the treadmill decals, remove the plastic. If there are properly tightened before you use the treadmill. Note: Extra parts may be included. Keep the included hex key in a secure ...

English Manual
Page 27
These guidelines will help you to make exercise a regular and enjoyable part of your “"training zone.”" The lowest number is the heart rate for fat burning, the middle number is the heart rate for successful ...
These guidelines will help you to make exercise a regular and enjoyable part of your “"training zone.”" The lowest number is the heart rate for fat burning, the middle number is the heart rate for successful ...

English Manual
Page 30
... Pad Left Wheel Cap Right Wheel Cap Wheel Key/Clip Console Base Console Base Ferrite Box Console Frame Console Clamp Ground Wire Console Back 30 PART LIST Key No. Qty. 1 21 2 66 3 1 4 4 5 6 6 1 7 3 8 4 9 6 10 2 11 3 12 1 13 2 14 1 15 2 16 4 17 2 18 4 19 16 20 2 21 2 22 2 23 2 24 4 25 1 26 8 27...
... Pad Left Wheel Cap Right Wheel Cap Wheel Key/Clip Console Base Console Base Ferrite Box Console Frame Console Clamp Ground Wire Console Back 30 PART LIST Key No. Qty. 1 21 2 66 3 1 4 4 5 6 6 1 7 3 8 4 9 6 10 2 11 3 12 1 13 2 14 1 15 2 16 4 17 2 18 4 19 16 20 2 21 2 22 2 23 2 24 4 25 1 26 8 27...

English Manual
Page 31
Description 101 1 102 1 103 5 104 1 105 1 106 1 Left Tray Right Tray Cable Tie Chest Strap Sensor Motor Isolator 107 1 108 1 109 1 110 1 * –- 3/8" x 2" Incline Motor Bolt Incline Stop Bracket Grounding Bracket Receptacle User’'s Manual Note: Specications are not illustrated. 31 For information about ordering replacement parts, see the back cover of this manual. *These parts are subject to change without notice. Qty. Description Key No. Qty. Key No.
Description 101 1 102 1 103 5 104 1 105 1 106 1 Left Tray Right Tray Cable Tie Chest Strap Sensor Motor Isolator 107 1 108 1 109 1 110 1 * –- 3/8" x 2" Incline Motor Bolt Incline Stop Bracket Grounding Bracket Receptacle User’'s Manual Note: Specications are not illustrated. 31 For information about ordering replacement parts, see the back cover of this manual. *These parts are subject to change without notice. Qty. Description Key No. Qty. Key No.

English Manual
Page 36
... IP, Inc. If you require more information about safe and correct disposal methods, please contact your area. ORDERING REPLACEMENT PARTS To order replacement parts, please see the PART LIST and the EXPLODED DRAWING near the end of waste in your local city office or the establishment where you ,...not be recycled after its useful life as required by law. In doing so, you will help us assist you purchased this manual. Part No. 340545 R1012A Printed in municipal waste. Please use recycling facilities that are authorized to provide the following information when contacting us: ...
... IP, Inc. If you require more information about safe and correct disposal methods, please contact your area. ORDERING REPLACEMENT PARTS To order replacement parts, please see the PART LIST and the EXPLODED DRAWING near the end of waste in your local city office or the establishment where you ,...not be recycled after its useful life as required by law. In doing so, you will help us assist you purchased this manual. Part No. 340545 R1012A Printed in municipal waste. Please use recycling facilities that are authorized to provide the following information when contacting us: ...


