

Enc Manual
Page 2
... & Fitness, Inc. 2 Apply the decal in the location shown. TABLE OF CONTENTS WARNING DECAL PLACEMENT 2 IMPORTANT PRECAUTIONS 3 BEFORE YOU BEGIN 5 ASSEMBLY 6 HOW TO USE THE EXERCISE BIKE 11 MAINTENANCE AND TROUBLESHOOTING 14 EXERCISE GUIDELINES 16 PART LIST 18 EXPLODED DRAWING 19 ORDERING REPLACEMENT PARTS Back Cover LIMITED WARRANTY Back Cover... location(s) of this manual and request a free replacement decal. Note: The decal(s) may not be shown at actual size. 258868 2 ATTENTION Part # 166295 HEALTHRIDER is missing or illegible, see the front cover of the warning decal(s).
... & Fitness, Inc. 2 Apply the decal in the location shown. TABLE OF CONTENTS WARNING DECAL PLACEMENT 2 IMPORTANT PRECAUTIONS 3 BEFORE YOU BEGIN 5 ASSEMBLY 6 HOW TO USE THE EXERCISE BIKE 11 MAINTENANCE AND TROUBLESHOOTING 14 EXERCISE GUIDELINES 16 PART LIST 18 EXPLODED DRAWING 19 ORDERING REPLACEMENT PARTS Back Cover LIMITED WARRANTY Back Cover... location(s) of this manual and request a free replacement decal. Note: The decal(s) may not be shown at actual size. 258868 2 ATTENTION Part # 166295 HEALTHRIDER is missing or illegible, see the front cover of the warning decal(s).
Enc Manual
Page 6
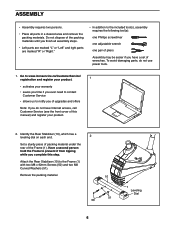
...(10), which has a leveling dial on each end. 2 Set a sturdy piece of packing material under the rear of wrenches. ASSEMBLY • Assembly requires two persons. • Place all assembly steps. • Left parts are marked "L" or "Left" and right parts are marked "R" or "Right." • In ...addition to the included tool(s), assembly requires the following tool(s): one Phillips screwdriver one adjustable wrench one pair of pliers Assembly may be easier if you have Internet access, call Customer Service (see the front cover of ...
...(10), which has a leveling dial on each end. 2 Set a sturdy piece of packing material under the rear of wrenches. ASSEMBLY • Assembly requires two persons. • Place all assembly steps. • Left parts are marked "L" or "Left" and right parts are marked "R" or "Right." • In ...addition to the included tool(s), assembly requires the following tool(s): one Phillips screwdriver one adjustable wrench one pair of pliers Assembly may be easier if you have Internet access, call Customer Service (see the front cover of ...
Enc Manual
Page 10
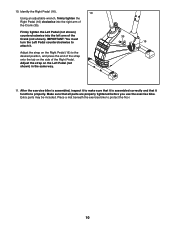
...way. 35 16 11. Adjust the strap on the Right Pedal (16) to make sure that it is assembled correctly and that all parts are properly tightened before you use the exercise bike. Identify the Right Pedal (16). 10 Using an adjustable wrench, firmly tighten the Right Pedal (16) ...clockwise into the left arm of the Crank (35). After the exercise bike is assembled, inspect it to the desired position, and press the end of the Right Pedal. IMPORTANT: You must turn the Left Pedal counterclockwise to protect ...
...way. 35 16 11. Adjust the strap on the Right Pedal (16) to make sure that it is assembled correctly and that all parts are properly tightened before you use the exercise bike. Identify the Right Pedal (16). 10 Using an adjustable wrench, firmly tighten the Right Pedal (16) ...clockwise into the left arm of the Crank (35). After the exercise bike is assembled, inspect it to the desired position, and press the end of the Right Pedal. IMPORTANT: You must turn the Left Pedal counterclockwise to protect ...

Enc Manual
Page 13
... the batteries. 13 Avoid moving your workout. HOW TO USE THE CONSOLE 4. Make sure that the word SCAN does not appear in the console (see assembly step 6 on page 8). To set a workout goal, a tone will turn on the console, press any button on the con- For the most accurate heart rate...
... the batteries. 13 Avoid moving your workout. HOW TO USE THE CONSOLE 4. Make sure that the word SCAN does not appear in the console (see assembly step 6 on page 8). To set a workout goal, a tone will turn on the console, press any button on the con- For the most accurate heart rate...

Enc Manual
Page 14
... immediately. HOW TO ADJUST THE REED SWITCH If the console does not display correct feedback, the reed switch should be removed. To clean the exercise bike, use a damp cloth and a small amount of direct sunlight. IMPORTANT: To avoid damage to the lowest setting. To replace the batteries, see step...and to or away from both shields. Inspect and properly tighten all of low batteries. If the heart rate monitor does not function properly, see assembly step 6 on page 13. Next, turn the left shield. Locate the Reed Switch (26). To adjust the reed switch, the left pedal ...
... immediately. HOW TO ADJUST THE REED SWITCH If the console does not display correct feedback, the reed switch should be removed. To clean the exercise bike, use a damp cloth and a small amount of direct sunlight. IMPORTANT: To avoid damage to the lowest setting. To replace the batteries, see step...and to or away from both shields. Inspect and properly tighten all of low batteries. If the heart rate monitor does not function properly, see assembly step 6 on page 13. Next, turn the left shield. Locate the Reed Switch (26). To adjust the reed switch, the left pedal ...

Enc Manual
Page 18
... Reed Switch/Wire 27 1 Lower Resistance Cable 28 1 Drive Belt 29 1 Flywheel 30 1 Flywheel Axle 31 1 C-magnet 32 1 Spring 33 1 Idler 34 1 Crank Bearing Assembly 35 1 Crank/Pulley 36 1 Magnet 37 2 M6 Washer 38 1 Extension Wire 39 1 M10 x 78mm Bolt 40 2 M8 Washer 41 2 Eyebolt 42 2 U-bracket 43 ... M4 x 20mm Screw 57 3 M8 Large Washer 58 2 M6 Locknut 59 1 M5 x 50mm Screw 60 2 M3 x 20mm Screw 61 1 M5 Washer * - Assembly Tool Note: Specifications are not illustrated. 18 Qty. HREX31213C.0 R0615A Key No. PART LIST Model No.
... Reed Switch/Wire 27 1 Lower Resistance Cable 28 1 Drive Belt 29 1 Flywheel 30 1 Flywheel Axle 31 1 C-magnet 32 1 Spring 33 1 Idler 34 1 Crank Bearing Assembly 35 1 Crank/Pulley 36 1 Magnet 37 2 M6 Washer 38 1 Extension Wire 39 1 M10 x 78mm Bolt 40 2 M8 Washer 41 2 Eyebolt 42 2 U-bracket 43 ... M4 x 20mm Screw 57 3 M8 Large Washer 58 2 M6 Locknut 59 1 M5 x 50mm Screw 60 2 M3 x 20mm Screw 61 1 M5 Washer * - Assembly Tool Note: Specifications are not illustrated. 18 Qty. HREX31213C.0 R0615A Key No. PART LIST Model No.

