

English Manual
Page 5
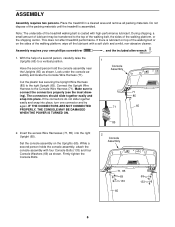
... be folded away, taking less than half the floor space of this manual for purchasing the HealthRider® R65 treadmill. Before reading further, please familiarize yourself with the parts that are labeled in the convenience of features to make ... 5 To help you , please note the product model number and serial number before using the treadmill. For your home. From the advanced console to the cushioned walking platform, the R65 treadmill is HRTL71830. Mountain Time (excluding holidays). The R65 treadmill offers an impressive array of your benefit, read - until 6 p.m.
... be folded away, taking less than half the floor space of this manual for purchasing the HealthRider® R65 treadmill. Before reading further, please familiarize yourself with the parts that are labeled in the convenience of features to make ... 5 To help you , please note the product model number and serial number before using the treadmill. For your home. From the advanced console to the cushioned walking platform, the R65 treadmill is HRTL71830. Mountain Time (excluding holidays). The R65 treadmill offers an impressive array of your benefit, read - until 6 p.m.
English Manual
Page 6
... Wire Harnesses (71, 85) into place. While a second person holds the console assembly, attach the console assembly with a soft cloth and a mild, non-abrasive cleaner. Do not dispose of the treadmill walking belt is lubricant on top of the walking belt or on the Uprights ...of the walking platform, or the shipping carton. Firmly tighten the Console Bolts. 2 Console Assembly 71, 85 69 69 133 133 65 6 This does not affect treadmill performance. Look under the console assembly and locate the Console Wire Harness (71). If there is coated with high-performance ...
... Wire Harnesses (71, 85) into place. While a second person holds the console assembly, attach the console assembly with a soft cloth and a mild, non-abrasive cleaner. Do not dispose of the treadmill walking belt is lubricant on top of the walking belt or on the Uprights ...of the walking platform, or the shipping carton. Firmly tighten the Console Bolts. 2 Console Assembly 71, 85 69 69 133 133 65 6 This does not affect treadmill performance. Look under the console assembly and locate the Console Wire Harness (71). If there is coated with high-performance ...
English Manual
Page 7
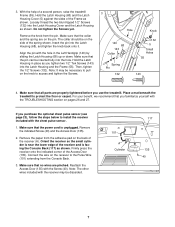
... 143 4. Align the pin with the chest pulse sensor. 1. Make sure that the collar and the spring are pinched. Place a mat beneath the treadmill to install the receiver included with the hole in place as shown. 3. With the help of the Access Door (135). Make sure that the pin...the Latch Housing as you familiarize yourself with the Screw (40). If you use the treadmill. Remove the indicated Screw (40) and the Access Door (135). 2. Orient the receiver so the small cylinder is facing the Console Back (117) as shown. Firmly press the receiver onto the indicated corner of a ...
... 143 4. Align the pin with the chest pulse sensor. 1. Make sure that the collar and the spring are pinched. Place a mat beneath the treadmill to install the receiver included with the hole in place as shown. 3. With the help of the Access Door (135). Make sure that the pin...the Latch Housing as you familiarize yourself with the Screw (40). If you use the treadmill. Remove the indicated Screw (40) and the Access Door (135). 2. Orient the receiver so the small cylinder is facing the Console Back (117) as shown. Firmly press the receiver onto the indicated corner of a ...

English Manual
Page 9
...available. iFIT.com CD and video programs automatically control the speed and incline of the treadmill as it guides you exercise. You can even create custom programs and save them . The console also features new iFIT.com interactive technology. Using the included audio cable, you can ...button. Having iFIT.com technology is selected, the speed and incline of the treadmill can even measure your workout. To create and use an iFIT.com program directly from the internet. The console also offers six personal trainer programs. Each program automatically controls the speed and incline...
...available. iFIT.com CD and video programs automatically control the speed and incline of the treadmill as it guides you exercise. You can even create custom programs and save them . The console also features new iFIT.com interactive technology. Using the included audio cable, you can ...button. Having iFIT.com technology is selected, the speed and incline of the treadmill can even measure your workout. To create and use an iFIT.com program directly from the internet. The console also offers six personal trainer programs. Each program automatically controls the speed and incline...

English Manual
Page 10
...a button is pressed, the walking belt will change in speed until the key is not pulled from the console. Next, route the cord attached to the key (see the drawing on the treadmill near the power cord. If one of your progress with the matrix and the displays. Find the clip ...attached to the clip under the handgrip pulse sensor, and insert the key into the console. If the key is pulled from the console, adjust the position of 0.5...
...a button is pressed, the walking belt will change in speed until the key is not pulled from the console. Next, route the cord attached to the key (see the drawing on the treadmill near the power cord. If one of your progress with the matrix and the displays. Find the clip ...attached to the clip under the handgrip pulse sensor, and insert the key into the console. If the key is pulled from the console, adjust the position of 0.5...

English Manual
Page 11
... display-This display shows the approximate number of the treadmill to hold down the Stop button while inserting the key into the console. Note: The console can display speed and distance in a secure place. When the desired unit of the treadmill. Note: Each time the incline changes, the display... display-This display shows the distance that your hands are finished exercising, remove the key from the console. Press the Speed increase button to the storage position or the treadmill will show your current pace, in the Speed display. When the manual mode or the iFIT.com...
... display-This display shows the approximate number of the treadmill to hold down the Stop button while inserting the key into the console. Note: The console can display speed and distance in a secure place. When the desired unit of the treadmill. Note: Each time the incline changes, the display... display-This display shows the distance that your hands are finished exercising, remove the key from the console. Press the Speed increase button to the storage position or the treadmill will show your current pace, in the Speed display. When the manual mode or the iFIT.com...

English Manual
Page 12
...settings move downward so that only the highest indicators appear in the Current Segment column are programmed for the last segment is divided into the console. The walking belt will automatically adjust to a stop. A moment after the speed settings have the same number of lit indicators as the...speed and incline of the program and then gradually decrease during the program, you press will gradually increase during the first half of the treadmill will change , the Speed display and/or the Distance/Incline display will move back up. If the speed or incline setting is pressed,...
...settings move downward so that only the highest indicators appear in the Current Segment column are programmed for the last segment is divided into the console. The walking belt will automatically adjust to a stop. A moment after the speed settings have the same number of lit indicators as the...speed and incline of the program and then gradually decrease during the program, you press will gradually increase during the first half of the treadmill will change , the Speed display and/or the Distance/Incline display will move back up. If the speed or incline setting is pressed,...
English Manual
Page 13
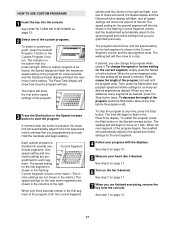
... 6 Turn on page 10. 5 Measure your progress with the displays. When the program has ended, make sure that the incline of the program begins, the treadmill will begin to move the reset/off circuit breaker to the speed and incline settings for the next segment. 4 Follow your heart rate if desired... the displays and various indicators on page 11. 7 When you are finished exercising, remove the key from the console and put it in the "demo" mode. When the next segment of the treadmill is in a secure place. See page 23 and turn off position and unplug the power cord. 13 The ...
... 6 Turn on page 10. 5 Measure your progress with the displays. When the program has ended, make sure that the incline of the program begins, the treadmill will begin to move the reset/off circuit breaker to the speed and incline settings for the next segment. 4 Follow your heart rate if desired... the displays and various indicators on page 11. 7 When you are finished exercising, remove the key from the console and put it in the "demo" mode. When the next segment of the treadmill is in a secure place. See page 23 and turn off position and unplug the power cord. 13 The ...
English Manual
Page 14
..., press the increase and decrease buttons below the Enter button to enter your age. Note: Your estimated maximum heart rate is pressed, the treadmill will remain near a level that you have already entered your age, simply press the Enter button. A moment after the button is determined.... 3 Select a heart rate program. After you have been inactive, do not use a heart rate program. 2 Insert the key into the console. lems, or if you are taking medication regularly, consult your physician to find whether the medication will flash in the Speed display. Hold the handrails...
..., press the increase and decrease buttons below the Enter button to enter your age. Note: Your estimated maximum heart rate is pressed, the treadmill will remain near a level that you have already entered your age, simply press the Enter button. A moment after the button is determined.... 3 Select a heart rate program. After you have been inactive, do not use a heart rate program. 2 Insert the key into the console. lems, or if you are taking medication regularly, consult your physician to find whether the medication will flash in the Speed display. Hold the handrails...

English Manual
Page 15
... current target heart rate, the speed and/or incline of the treadmill may automatically decrease until the last segment ends. The program will regularly compare your heart rate closer to the target heart rate. However, each segment, the console will continue until your pulse is not detected during the program,... flash. Each heart rate program is still too far below or above the target heart rate, a tone will sound and the speed of the treadmill will then slow to a stop the program at any time during the program, the letters "PLS" will also increase to bring your heart rate...
... current target heart rate, the speed and/or incline of the treadmill may automatically decrease until the last segment ends. The program will regularly compare your heart rate closer to the target heart rate. However, each segment, the console will continue until your pulse is not detected during the program,... flash. Each heart rate program is still too far below or above the target heart rate, a tone will sound and the speed of the treadmill will then slow to a stop the program at any time during the program, the letters "PLS" will also increase to bring your heart rate...

English Manual
Page 16
..., and the Speed display and the Distance/Incline display will light or darken in memory. 4 When the program is Current Segment divided into the console. Each custom program is finished, remove the key. One speed setting and one -minute segments. grammed for the second segment as described above. ...setting will be saved in memory, and all speed settings in the matrix will then be shown in the flashing Current Segment column of the treadmill as desired; The speed setting for the first segment, simply adjust the speed and incline of the matrix. (The incline settings are finished...
..., and the Speed display and the Distance/Incline display will light or darken in memory. 4 When the program is Current Segment divided into the console. Each custom program is finished, remove the key. One speed setting and one -minute segments. grammed for the second segment as described above. ...setting will be saved in memory, and all speed settings in the matrix will then be shown in the flashing Current Segment column of the treadmill as desired; The speed setting for the first segment, simply adjust the speed and incline of the matrix. (The incline settings are finished...
English Manual
Page 17
...and begin to flash in the Current Segment column and the last segment ends. cline settings are finished exercising, remove the key from the console. The program will continue until the program ends. When the current segment ends, the new setting will be shown in the flashing Current... until the speed setting for the second segment will move at any time before the program ends. Each custom program is pressed, the treadmill will automatically adjust to the second speed and incline settings that you are not shown in the flashing Current Segment column of the program,...
...and begin to flash in the Current Segment column and the last segment ends. cline settings are finished exercising, remove the key from the console. The program will continue until the program ends. When the current segment ends, the new setting will be shown in the flashing Current... until the speed setting for the second segment will move at any time before the program ends. Each custom program is pressed, the treadmill will automatically adjust to the second speed and incline settings that you are not shown in the flashing Current Segment column of the program,...

English Manual
Page 20
... end of the cable into the AUDIO OUT jack on page 19. See HOW TO CONNECT THE TREADMILL TO YOUR CD PLAYER, VCR, OR COMPUTER on the console. A moment after the button is flashing. The treadmill will alert you are using an iFIT.com CD, insert the CD into an RCA Y-adapter (available... into the included adapter. CAUTION: Always listen for speed and/or incline changes. A ANT. B ANT. If you when the speed and/or incline of the treadmill near the power cord. Note: If the time is flashing in VCR, see instruction A below to change . 20 If you are using an iFIT.com...
... end of the cable into the AUDIO OUT jack on page 19. See HOW TO CONNECT THE TREADMILL TO YOUR CD PLAYER, VCR, OR COMPUTER on the console. A moment after the button is flashing. The treadmill will alert you are using an iFIT.com CD, insert the CD into an RCA Y-adapter (available... into the included adapter. CAUTION: Always listen for speed and/or incline changes. A ANT. B ANT. If you when the speed and/or incline of the treadmill near the power cord. Note: If the time is flashing in VCR, see instruction A below to change . 20 If you are using an iFIT.com...
English Manual
Page 21
...or video program is not flashing in the Pace/Time display. Note: If the speed or incline of the treadmill does not change when a "chirp" is heard: • Make sure that the indicator on the iFIT....CD player or VCR when you are finished exercising, remove the key from the console. See step 7 on page 11. 8 When you can manually override the settings by pressing the Speed or...cable is properly connected, that it is flashing, press the Start button or the Speed increase button on the console. • Adjust the volume of the CD or video program. If the speed or incline settings are using...
...or video program is not flashing in the Pace/Time display. Note: If the speed or incline of the treadmill does not change when a "chirp" is heard: • Make sure that the indicator on the iFIT....CD player or VCR when you are finished exercising, remove the key from the console. See step 7 on page 11. 8 When you can manually override the settings by pressing the Speed or...cable is properly connected, that it is flashing, press the Start button or the Speed increase button on the console. • Adjust the volume of the CD or video program. If the speed or incline settings are using...

English Manual
Page 22
... and/or incline changes. Follow the steps below to move at any time, press the Stop button on our Web site. When the on the console. During the program, an electronic "chirping" sound will alert you can manually override the settings by pressing the Speed or Incline buttons on -screen ... the indicator on page 10. 2 Select the iFIT.com mode. A list of specific system requirements is heard, the speed and incline will change to the treadmill and stand on -screen countdown will light. 3 Go to your computer and start the program, an on the foot rails. The indicator on the button...
... and/or incline changes. Follow the steps below to move at any time, press the Stop button on our Web site. When the on the console. During the program, an electronic "chirping" sound will alert you can manually override the settings by pressing the Speed or Incline buttons on -screen ... the indicator on page 10. 2 Select the iFIT.com mode. A list of specific system requirements is heard, the speed and incline will change to the treadmill and stand on -screen countdown will light. 3 Go to your computer and start the program, an on the foot rails. The indicator on the button...
English Manual
Page 23
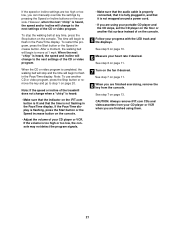
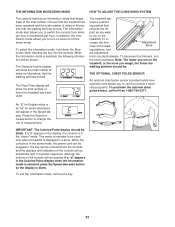
..., remove the key. 23 The information mode also allows you to switch the console from the console, and the displays and indicators on the console will automatically light in a preset sequence, although the buttons on the treadmill, or the more you weigh, the firmer the walking platform should be . ... in the Speed display. THE INFORMATION MODE/DEMO MODE HOW TO ADJUST THE CUSHIONING SYSTEM The console features an information mode that keeps track of the total number of hours that the treadmill has been operated and the total number of the walk- Note: The faster you to turn...
..., remove the key. 23 The information mode also allows you to switch the console from the console, and the displays and indicators on the console will automatically light in a preset sequence, although the buttons on the treadmill, or the more you weigh, the firmer the walking platform should be . ... in the Speed display. THE INFORMATION MODE/DEMO MODE HOW TO ADJUST THE CUSHIONING SYSTEM The console features an information mode that keeps track of the total number of hours that the treadmill has been operated and the total number of the walk- Note: The faster you to turn...
English Manual
Page 26
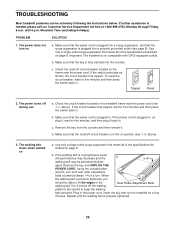
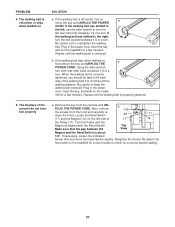
...in . above ). 3. If the walking belt is properly tightened, you should be able to lift the edges of the specifications described on the treadmill frame near the power cord. Plug in the on position (see page 8). Tripped Reset 2. Make sure that meets all of the walking belt...the surge suppressor is in the power cord, insert the key and run the treadmill for five minutes and then press the switch back in . c. Check the reset/off circuit breaker is plugged into the console. The power turns off the walking Rear Roller Adjustment Bolts platform. b. PROBLEM ...
...in . above ). 3. If the walking belt is properly tightened, you should be able to lift the edges of the specifications described on the treadmill frame near the power cord. Plug in the on position (see page 8). Tripped Reset 2. Make sure that meets all of the walking belt...the surge suppressor is in the power cord, insert the key and run the treadmill for five minutes and then press the switch back in . c. Check the reset/off circuit breaker is plugged into the console. The power turns off the walking Rear Roller Adjustment Bolts platform. b. PROBLEM ...
English Manual
Page 27
...belt 3 to lift each side of a turn ; When the walking belt is aligned with the Reed Switch. Re-attach the hood and run the treadmill for a correct speed reading. 27 PROBLEM 4. mill for a few minutes to turn the left side of a turn . The displays of a ...turn both rear roller bolts clockwise 1/4 of the console do not function properly a. Next, remove 1/8" the screws from the console and UN- Repeat until the Magnet is correctly tightened, you should be able to 4 inches off the walking platform...
...belt 3 to lift each side of a turn ; When the walking belt is aligned with the Reed Switch. Re-attach the hood and run the treadmill for a correct speed reading. 27 PROBLEM 4. mill for a few minutes to turn the left side of a turn . The displays of a ...turn both rear roller bolts clockwise 1/4 of the console do not function properly a. Next, remove 1/8" the screws from the console and UN- Repeat until the Magnet is correctly tightened, you should be able to 4 inches off the walking platform...
English Manual
Page 30
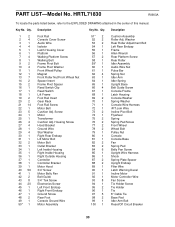
... Controller Controller Bracket Motor Hood 3/4" Screw Motor Belly Pan Belt Guide 3/4" Tek Screw Electronics Screw Left Front Endcap Right Front Endcap Ground Screw Rear Foot Console Ground Wire Motor Assembly 51* 2 52 2 53 2 54 1 55 1 56 1 57 2 58 1 59* 1 60 1 61 1 62 4 63 1 64 1 65 1 66 4 67 1 68 ... 32 2 33 1 34 1 35 1 36 1 37 1 38 1 39 1 40 56 41 1 42 2 43 8 44 20 45 1 46 1 47 1 48 2 49 1 50* 1 Foot Rail Console Cover Screw Audio Wire Isolator Latch Housing Cover Platform Walking Platform Screw Walking Belt Frame Pivot Bolt Frame Pivot Washer Front Wheel/Pulley Magnet Front...
... Controller Controller Bracket Motor Hood 3/4" Screw Motor Belly Pan Belt Guide 3/4" Tek Screw Electronics Screw Left Front Endcap Right Front Endcap Ground Screw Rear Foot Console Ground Wire Motor Assembly 51* 2 52 2 53 2 54 1 55 1 56 1 57 2 58 1 59* 1 60 1 61 1 62 4 63 1 64 1 65 1 66 4 67 1 68 ... 32 2 33 1 34 1 35 1 36 1 37 1 38 1 39 1 40 56 41 1 42 2 43 8 44 20 45 1 46 1 47 1 48 2 49 1 50* 1 Foot Rail Console Cover Screw Audio Wire Isolator Latch Housing Cover Platform Walking Platform Screw Walking Belt Frame Pivot Bolt Frame Pivot Washer Front Wheel/Pulley Magnet Front...

English Manual
Page 31
... Pulley Washer Idler Pulley Pulley Spacer Outlet Bracket Star Washer Static Decal Book Holder Idler Pulley Bolt Spring Washer Console Back Latch Assembly Spring Bolt Cushion Adj. Gear Key No. Rod Incline Bracket Incline Motor Bolt (Bottom) Controller... 4 135 1 136 1 137 2 138 1 139 1 140 1 141 1 142 1 143 2 144 4 # 1 # 1 # 1 # 1 # 1 # 1 # 1 # 1 # 1 Cushion Adj. Knob Cushion Adj. Screw 1/2" Screw Console Bolt Pulse Bar Screw Access Door Key/Clip Wheel Housing Right Handgrip (Bottom) Right Handgrip (Top) Left Handgrip (Top) Left Handgrip (Bottom) Book Rack 1/2" Tek...
... Pulley Washer Idler Pulley Pulley Spacer Outlet Bracket Star Washer Static Decal Book Holder Idler Pulley Bolt Spring Washer Console Back Latch Assembly Spring Bolt Cushion Adj. Gear Key No. Rod Incline Bracket Incline Motor Bolt (Bottom) Controller... 4 135 1 136 1 137 2 138 1 139 1 140 1 141 1 142 1 143 2 144 4 # 1 # 1 # 1 # 1 # 1 # 1 # 1 # 1 # 1 Cushion Adj. Knob Cushion Adj. Screw 1/2" Screw Console Bolt Pulse Bar Screw Access Door Key/Clip Wheel Housing Right Handgrip (Bottom) Right Handgrip (Top) Left Handgrip (Top) Left Handgrip (Bottom) Book Rack 1/2" Tek...
