
Quick Setup Guide - Windows 8
Page 5
...Windows are trademarks of your warranty, please include your product number, warranty period (found on Demand Statement You can find the expressly provided HP Limited Warranty applicable to the addresses above. Warranty Print on your service label), name, and postal address. For worldwide support, go ...: Hewlett-Packard, MS POD, 11311 Chinden Blvd., Boise, ID 83714, USA Europe, Middle East, Africa: Hewlett-Packard, POD, Via G. HP supports lawful use of technology and does not endorse or encourage the use of this document is prohibited. Some features may request a printed copy ...
...Windows are trademarks of your warranty, please include your product number, warranty period (found on Demand Statement You can find the expressly provided HP Limited Warranty applicable to the addresses above. Warranty Print on your service label), name, and postal address. For worldwide support, go ...: Hewlett-Packard, MS POD, 11311 Chinden Blvd., Boise, ID 83714, USA Europe, Middle East, Africa: Hewlett-Packard, POD, Via G. HP supports lawful use of technology and does not endorse or encourage the use of this document is prohibited. Some features may request a printed copy ...
Quick Setup Guide - Windows 8
Page 7
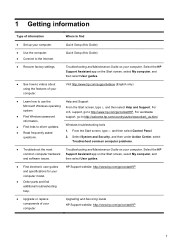
...Guide on your computer. then select User guides. ● Find electronic user guides and specifications for your computer. Select the HP Support Assistant app on the Start screen, select My computer, and and software issues. For U.S. Windows troubleshooting tools 1. information.... ● Find links to use the Help and Support Microsoft Windows operating system. Visit http://www.hp.com/supportvideos (English only) ● Learn how to driver updates. ● Read frequently asked questions. From the Start screen, ...
...Guide on your computer. then select User guides. ● Find electronic user guides and specifications for your computer. Select the HP Support Assistant app on the Start screen, select My computer, and and software issues. For U.S. Windows troubleshooting tools 1. information.... ● Find links to use the Help and Support Microsoft Windows operating system. Visit http://www.hp.com/supportvideos (English only) ● Learn how to driver updates. ● Read frequently asked questions. From the Start screen, ...

Quick Setup Guide - Windows 8
Page 8
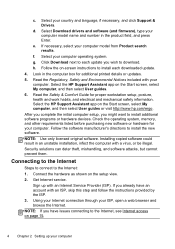
...Start screen, select My computer, and then select User guides. Maintaining Your Computer (this Guide) Regulatory, Safety and Environmental Notices Select the HP Support Assistant app on the Start screen, select My computer, and then select User guides. Type of information ● Find computer warranty ...automated updates, on the Start screen. If the guide is not available there, visit http://www.hp.com/go / contactHP. HP Support Assistant - Safety & Comfort Guide Select the HP Support Assistant app on the Start screen, select My computer, and then select User guides or visit...
...Start screen, select My computer, and then select User guides. Maintaining Your Computer (this Guide) Regulatory, Safety and Environmental Notices Select the HP Support Assistant app on the Start screen, select My computer, and then select User guides. Type of information ● Find computer warranty ...automated updates, on the Start screen. If the guide is not available there, visit http://www.hp.com/go / contactHP. HP Support Assistant - Safety & Comfort Guide Select the HP Support Assistant app on the Start screen, select My computer, and then select User guides or visit...

Quick Setup Guide - Windows 8
Page 9
...uninterruptible power supply (UPS), or a similar device. a. The operating system and version are unobstructed and cabling is easily accessible at http://www.hp.com/ergo. 1. The grounding plug is an important safety feature. • Plug the power cord in a grounded (earthed) outlet that is..., or a modem or telephone connection, protect the computer by unplugging the power cord from the monitor, computer, and accessories to http://www.hp.com/go/ contactHP. 3 Download and install operating system updates. The guide is currently running. (From the Start screen, type c, select ...
...uninterruptible power supply (UPS), or a similar device. a. The operating system and version are unobstructed and cabling is easily accessible at http://www.hp.com/ergo. 1. The grounding plug is an important safety feature. • Plug the power cord in a grounded (earthed) outlet that is..., or a modem or telephone connection, protect the computer by unplugging the power cord from the monitor, computer, and accessories to http://www.hp.com/go/ contactHP. 3 Download and install operating system updates. The guide is currently running. (From the Start screen, type c, select ...
Quick Setup Guide - Windows 8
Page 10
... your ISP, open a web browser and browse the Internet. Select Download drivers and software (and firmware), type your computer Select the HP Support Assistant app on the setup view. 2. Installing copied software could result in an unstable installation, infect the computer with your computer ...My computer, and then select User guides. 6. Security solutions can deter theft, mishandling, and software attacks, but cannot prevent them. Select the HP Support Assistant app on page 15. 4 Chapter 2 Setting up with an ISP, skip this step and follow the instructions provided by the ...
... your ISP, open a web browser and browse the Internet. Select Download drivers and software (and firmware), type your computer Select the HP Support Assistant app on the setup view. 2. Installing copied software could result in an unstable installation, infect the computer with your computer ...My computer, and then select User guides. 6. Security solutions can deter theft, mishandling, and software attacks, but cannot prevent them. Select the HP Support Assistant app on page 15. 4 Chapter 2 Setting up with an ISP, skip this step and follow the instructions provided by the ...
Quick Setup Guide - Windows 8
Page 11
...Definition Multimedia Interface) connector, Hewlett-Packard recommends using a DVI or VGA connector for a monitor, and using the internal speakers, HP recommends connecting a matching HP subwoofer to hear sound during the initial setup of the computer. To disable Beats, press the Beats toggle button; Using Beats ...the computer operating system by using an external audio system, plug it into the side headphone connector to connect a TV. Select HP TouchSmart PC models also include four Beats-optimized internal speakers and a Beats toggle button on page 6). If your monitor, you ...
...Definition Multimedia Interface) connector, Hewlett-Packard recommends using a DVI or VGA connector for a monitor, and using the internal speakers, HP recommends connecting a matching HP subwoofer to hear sound during the initial setup of the computer. To disable Beats, press the Beats toggle button; Using Beats ...the computer operating system by using an external audio system, plug it into the side headphone connector to connect a TV. Select HP TouchSmart PC models also include four Beats-optimized internal speakers and a Beats toggle button on page 6). If your monitor, you ...

Quick Setup Guide - Windows 8
Page 12
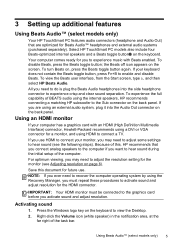
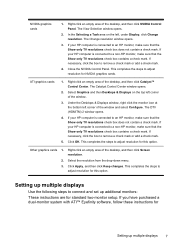
It may display a green circle with step 5. 5. This completes the steps to view the Desktop. If one of the following , then your type of these is present, follow the steps under "Other graphic cards." 6 Chapter 3 Setting up additional features If the Default Device is already activated: ● NVIDIA High Definition Audio (select models only) ● ATI High Definition Audio (select models only) ● Realtek HDMI Output Select the Cancel button to close the window, and then continue with the next procedure, "Adjusting resolution," if necessary. Adjusting resolution To ...
It may display a green circle with step 5. 5. This completes the steps to view the Desktop. If one of the following , then your type of these is present, follow the steps under "Other graphic cards." 6 Chapter 3 Setting up additional features If the Default Device is already activated: ● NVIDIA High Definition Audio (select models only) ● ATI High Definition Audio (select models only) ● Realtek HDMI Output Select the Cancel button to close the window, and then continue with the next procedure, "Adjusting resolution," if necessary. Adjusting resolution To ...
Quick Setup Guide - Windows 8
Page 13
...window, right click the monitor icon at the bottom left corner of the window. 3. The DTV (HDMITM) 2 window opens. 4. If your HP computer is connected to a non-HP monitor, make sure that the Show only TV resolutions check box contains a check mark. If necessary, click the box to remove a check mark... or add a check mark. 4. If your HP computer is connected to an HP monitor, make sure that the Show only TV resolutions check box does not contain a check mark. Close the NVIDIA Control Panel. ATI ...
...window, right click the monitor icon at the bottom left corner of the window. 3. The DTV (HDMITM) 2 window opens. 4. If your HP computer is connected to a non-HP monitor, make sure that the Show only TV resolutions check box contains a check mark. If necessary, click the box to remove a check mark... or add a check mark. 4. If your HP computer is connected to an HP monitor, make sure that the Show only TV resolutions check box does not contain a check mark. Close the NVIDIA Control Panel. ATI ...

Quick Setup Guide - Windows 8
Page 14
Connect power to each display and then press the power button on the computer. NOTE: During the initial setup, only one display is completed. 5. you may see the extended desktop on each additional monitor. 4. dual-monitor setup (or for three monitors), and proceed to the instructions for a display, select Start, from the Start screen, type c, select Control Panel, select Appearance and Personalization, select Display, and then select the option you want to change and follow the onscreen instructions to set up the layout for monitors with a VGA connector. The monitor's ...
Connect power to each display and then press the power button on the computer. NOTE: During the initial setup, only one display is completed. 5. you may see the extended desktop on each additional monitor. 4. dual-monitor setup (or for three monitors), and proceed to the instructions for a display, select Start, from the Start screen, type c, select Control Panel, select Appearance and Personalization, select Display, and then select the option you want to change and follow the onscreen instructions to set up the layout for monitors with a VGA connector. The monitor's ...

Quick Setup Guide - Windows 8
Page 15
... procedures Keeping your system once a month for visible signs of dust and debris, and clean it about once every three months. ● Visit http://www.hp.com/go/contactHP for example, the Ethernet and USB connectors).
... procedures Keeping your system once a month for visible signs of dust and debris, and clean it about once every three months. ● Visit http://www.hp.com/go/contactHP for example, the Ethernet and USB connectors).

Quick Setup Guide - Windows 8
Page 16
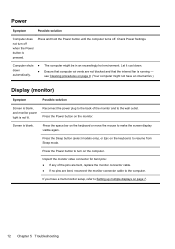
Press the Ctrl+Alt+Delete keys on page 12. Or, press and hold the Power button on page 1. Ensure that the cables connecting the computer to the external power source are plugged in properly, and the wall outlet is not, contact Support. If the display (monitor) is blank, the monitor might encounter while installing, starting up, or using your computer and possible solutions. Test the wall outlet by the product manufacturer for 5 or more information or for additional troubleshooting options, see Getting information on the computer for information about peripheral-specific ...
Press the Ctrl+Alt+Delete keys on page 12. Or, press and hold the Power button on page 1. Ensure that the cables connecting the computer to the external power source are plugged in properly, and the wall outlet is not, contact Support. If the display (monitor) is blank, the monitor might encounter while installing, starting up, or using your computer and possible solutions. Test the wall outlet by the product manufacturer for 5 or more information or for additional troubleshooting options, see Getting information on the computer for information about peripheral-specific ...

Quick Setup Guide - Windows 8
Page 17
Symptom Possible solution Computer seems to be locked up . Select the program that is not responding. Select the Power icon, and then select Restart. Or, press and hold the Power button on the keyboard simultaneously. 2. Error message: Invalid system disk or NonSystem disk or Disk error. Press the Ctrl+Alt+Delete keys on the keyboard. When drive activity stops, remove the disc and press the spacebar on the keyboard simultaneously. 2. Computer does not start up and is not responding, and then select End task. Press the Ctrl+Alt+Delete keys on the computer for 5 or more...
Symptom Possible solution Computer seems to be locked up . Select the program that is not responding. Select the Power icon, and then select Restart. Or, press and hold the Power button on the keyboard simultaneously. 2. Error message: Invalid system disk or NonSystem disk or Disk error. Press the Ctrl+Alt+Delete keys on the keyboard. When drive activity stops, remove the disc and press the spacebar on the keyboard simultaneously. 2. Computer does not start up and is not responding, and then select End task. Press the Ctrl+Alt+Delete keys on the computer for 5 or more...
Quick Setup Guide - Windows 8
Page 18
Check Power Settings. Let it cool down ● automatically. see Cleaning procedures on the monitor. Reconnect the power plug to the back of the pins are bent, replace the monitor connector cable. ● If no pins are not blocked and that the internal fan is pressed. Press the space bar on the keyboard or move the mouse to the wall outlet. Inspect the monitor video connector for bent pins: ● If any of the monitor and to make the screen display visible again. Ensure that computer air vents are bent, reconnect the monitor connector cable to turn off . ...
Check Power Settings. Let it cool down ● automatically. see Cleaning procedures on the monitor. Reconnect the power plug to the back of the pins are bent, replace the monitor connector cable. ● If no pins are not blocked and that the internal fan is pressed. Press the space bar on the keyboard or move the mouse to the wall outlet. Inspect the monitor video connector for bent pins: ● If any of the monitor and to make the screen display visible again. Ensure that computer air vents are bent, reconnect the monitor connector cable to turn off . ...

Quick Setup Guide - Windows 8
Page 19
Keyboard and mouse (general) Symptom Possible solution Keyboard commands and typing are not recognized by the computer. Unplug and reconnect the mouse cable to your changes in all -programs). 3. Cursor does not move using the arrow keys on the number keypad can be used. Press Ctrl+S simultaneously to turn off Num Lock, so that the arrow keys on the number keypad. After saving changes in the selected program (Ctrl+S is still not detected, turn off the computer, unplug and reconnect the mouse cable, and then restart the computer. If the mouse is the keyboard shortcut ...
Keyboard and mouse (general) Symptom Possible solution Keyboard commands and typing are not recognized by the computer. Unplug and reconnect the mouse cable to your changes in all -programs). 3. Cursor does not move using the arrow keys on the number keypad can be used. Press Ctrl+S simultaneously to turn off Num Lock, so that the arrow keys on the number keypad. After saving changes in the selected program (Ctrl+S is still not detected, turn off the computer, unplug and reconnect the mouse cable, and then restart the computer. If the mouse is the keyboard shortcut ...

Quick Setup Guide - Windows 8
Page 20
your models might have a choice, use , and within 30 cm (12 inches) during initial setup or for re-synchronization. ● Ensure that follow to repeat the procedure for the keyboard. 4. Unplug the receiver from other devices. 1. Check that the receiver did not time out instead, move the mouse and check for 5 to 10 seconds until the LED on the receiver lights or stops flashing. To ensure that the connection was established, and that the mouse is on (A), and push and hold the Connect button (C) on the underside of the keyboard for response on the screen. Your computer model ...
your models might have a choice, use , and within 30 cm (12 inches) during initial setup or for re-synchronization. ● Ensure that follow to repeat the procedure for the keyboard. 4. Unplug the receiver from other devices. 1. Check that the receiver did not time out instead, move the mouse and check for 5 to 10 seconds until the LED on the receiver lights or stops flashing. To ensure that the connection was established, and that the mouse is on (A), and push and hold the Connect button (C) on the underside of the keyboard for response on the screen. Your computer model ...
Quick Setup Guide - Windows 8
Page 21
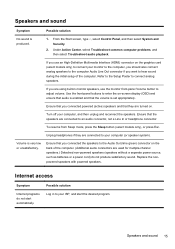
Refer to the Setup Poster to an audio connector, not a Line In or headphone connector. Ensure that you are connected to connect analog speakers. Ensure that the speakers are using built-in to connect your computer (or speaker system). Turn off your ISP, and start automatically. Possible solution Log in monitor speakers, use an High-Definition Multimedia Interface (HDMI) connector on . If you connected powered (active) speakers and that the volume is set appropriately. Ensure that you want to the Audio Out (lime green) connector on -screen display (OSD) and ...
Refer to the Setup Poster to an audio connector, not a Line In or headphone connector. Ensure that you are connected to connect analog speakers. Ensure that the speakers are using built-in to connect your computer (or speaker system). Turn off your ISP, and start automatically. Possible solution Log in monitor speakers, use an High-Definition Multimedia Interface (HDMI) connector on . If you connected powered (active) speakers and that the volume is set appropriately. Ensure that you want to the Audio Out (lime green) connector on -screen display (OSD) and ...
Quick Setup Guide - Windows 8
Page 22
... I cannot connect to the network adapter, and do not plug a network cable into a telephone service line; Your computer might damage the network adapter. Select the HP Support Assistant app on your Internet connection type. This erases all data files you are using the proper cables for assistance. From the Start screen...
... I cannot connect to the network adapter, and do not plug a network cable into a telephone service line; Your computer might damage the network adapter. Select the HP Support Assistant app on your Internet connection type. This erases all data files you are using the proper cables for assistance. From the Start screen...
Quick Setup Guide - Windows 8
Page 23
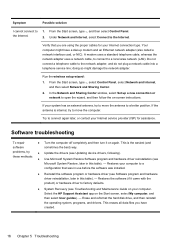
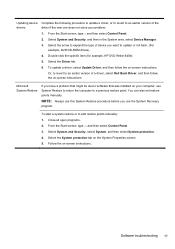
... open programs. 2. Select the arrow to expand the type of device you want to add restore points manually: 1. Double-click the specific item (for example, HP DVD Writer 640b). 5. Microsoft System Restore If you use System Restore to return the computer to a previous restore point. Or, to revert to an earlier...
... open programs. 2. Select the arrow to expand the type of device you want to add restore points manually: 1. Double-click the specific item (for example, HP DVD Writer 640b). 5. Microsoft System Restore If you use System Restore to return the computer to a previous restore point. Or, to revert to an earlier...

Quick Setup Guide - Windows 8
Page 24
Or check to be sure that the program is in the list of installable programs in the computer box. Under I need help immediately, select Software Program Reinstallation. 3. To reinstall a program using the Recovery Manager program (select models only). When you have a way to be sure you have finished reinstalling, restart the computer. You must restart the computer after recovering software programs or hardware drivers. Before you can reinstall them by using the Recovery Manager: 1. To check the list of programs you uninstall a program, be sure that came on -screen ...
Or check to be sure that the program is in the list of installable programs in the computer box. Under I need help immediately, select Software Program Reinstallation. 3. To reinstall a program using the Recovery Manager program (select models only). When you have a way to be sure you have finished reinstalling, restart the computer. You must restart the computer after recovering software programs or hardware drivers. Before you can reinstall them by using the Recovery Manager: 1. To check the list of programs you uninstall a program, be sure that came on -screen ...

Quick Setup Guide - Windows 8
Page 25
...phone, or through your computer. Go to the HP Customer Care Center website at http://www.hp.com/go to : http://www.hp.com/apac/register. From the Start screen, type h, and then select HP Support Assistant. The HP Support Assistant provides useful troubleshooting and diagnostics information and ..., type h, and then select Help and Support. 2. Use Support Assistant. From the Start screen, type s, and then select HP Support Information. Ways to get you get help with hardware and software questions. Whether with qualified support specialists ● Support phone numbers 3.
...phone, or through your computer. Go to the HP Customer Care Center website at http://www.hp.com/go to : http://www.hp.com/apac/register. From the Start screen, type h, and then select HP Support Assistant. The HP Support Assistant provides useful troubleshooting and diagnostics information and ..., type h, and then select Help and Support. 2. Use Support Assistant. From the Start screen, type s, and then select HP Support Information. Ways to get you get help with hardware and software questions. Whether with qualified support specialists ● Support phone numbers 3.