
HP Designjet 330 and 350C Plotters - Users Guide
Page 2
...plotter. ii To help with finding specific information, a comprehensive table of contents is provided at the front and an alphabetical index is designed to be stored in the left margin and shaded backgrounds to help with everyday use maintenance troubleshooting reference material. Information specific only to the HP DesignJet 350C... is applicable to the HP DesignJet 330 is shown like this . All other information is shown...
...plotter. ii To help with finding specific information, a comprehensive table of contents is provided at the front and an alphabetical index is designed to be stored in the left margin and shaded backgrounds to help with everyday use maintenance troubleshooting reference material. Information specific only to the HP DesignJet 350C... is applicable to the HP DesignJet 330 is shown like this . All other information is shown...

HP Designjet 330 and 350C Plotters - Users Guide
Page 7
... and memory usage 6-4 To upgrade your plotter with a network interface 6-5 To upgrade the HP DesignJet 330 plotter with color 6-5 7 Maintaining your plotter Replacing cartridges 7-2 When to replace cartridges 7-2 Using genuine HP supplies 7-3 Before replacing cartridges 7-4 To replace one or more cartridges 7-5 Cleaning the cartridge nozzles (priming) 7-7 Cleaning the plotter 7-9 8 Front-panel lights 9 Troubleshooting Using the documentation 9-2 Locating the...
... and memory usage 6-4 To upgrade your plotter with a network interface 6-5 To upgrade the HP DesignJet 330 plotter with color 6-5 7 Maintaining your plotter Replacing cartridges 7-2 When to replace cartridges 7-2 Using genuine HP supplies 7-3 Before replacing cartridges 7-4 To replace one or more cartridges 7-5 Cleaning the cartridge nozzles (priming) 7-7 Cleaning the plotter 7-9 8 Front-panel lights 9 Troubleshooting Using the documentation 9-2 Locating the...

HP Designjet 330 and 350C Plotters - Users Guide
Page 23
... only three-wire (earth-grounded) power cords with this plotter. 1 Make sure that the power cord supplied with your plotter matches your power outlet. 1740a 3 Switch on the front panel, you may have a power problem. For troubleshooting information, see chapter 9. 1-9 SETUP 1 Setting up your plotter Task 4: Switch on WARNING Task 4: Switch on Be sure...
... only three-wire (earth-grounded) power cords with this plotter. 1 Make sure that the power cord supplied with your plotter matches your power outlet. 1740a 3 Switch on the front panel, you may have a power problem. For troubleshooting information, see chapter 9. 1-9 SETUP 1 Setting up your plotter Task 4: Switch on WARNING Task 4: Switch on Be sure...

HP Designjet 330 and 350C Plotters - Users Guide
Page 27
On the front panel, the Ready light should then be on (together with Media Type and Print Quality lights). SETUP 1 Setting up to about a minute and then go off. Load Media If you wish, you can now check your plotter Task 5: Load the print cartridges 4 When all the cartridges are installed, lower the cover. However, this is normally only required for up your cartridge alignment by running the Black Cartridge Alignment Routine (See page 5-3). The Load Media light should flash for troubleshooting. 1-13
On the front panel, the Ready light should then be on (together with Media Type and Print Quality lights). SETUP 1 Setting up to about a minute and then go off. Load Media If you wish, you can now check your plotter Task 5: Load the print cartridges 4 When all the cartridges are installed, lower the cover. However, this is normally only required for up your cartridge alignment by running the Black Cartridge Alignment Routine (See page 5-3). The Load Media light should flash for troubleshooting. 1-13

HP Designjet 330 and 350C Plotters - Users Guide
Page 40
.... 2 Press simultaneously the two keys: Setup Continue Plotting The demonstration plot summarizes the plotter's main features and includes a sample CAD drawing, using a variety of this manual, "Troubleshooting". Setting up your plotter Task 10: Send a sample or demo plot Task 10: Send a sample or ... configuration, choose a sample plot in your application, it is useful to print the plotter's internal demonstration plot. In case of problems, refer to chapter 9 of line widths and colors. To print the demonstration plot 1 If media is printed in the language currently configured...
.... 2 Press simultaneously the two keys: Setup Continue Plotting The demonstration plot summarizes the plotter's main features and includes a sample CAD drawing, using a variety of this manual, "Troubleshooting". Setting up your plotter Task 10: Send a sample or demo plot Task 10: Send a sample or ... configuration, choose a sample plot in your application, it is useful to print the plotter's internal demonstration plot. In case of problems, refer to chapter 9 of line widths and colors. To print the demonstration plot 1 If media is printed in the language currently configured...

HP Designjet 330 and 350C Plotters - Users Guide
Page 91
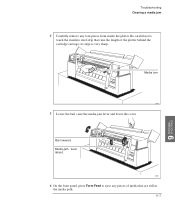
...want to cut the roll after the last one (see page 2-31), or to unload a plotted sheet from the plotter - Don't press Form Feed while a file is being received by the plotter, as this terminates the data transmission (unless you have reached the end of a series of plots and want to do... this as part of the media exit slot. PLOT 4 MANAGEMENT To advance the media Pressing the Form Feed key advances the media out of a troubleshooting routine -
...want to cut the roll after the last one (see page 2-31), or to unload a plotted sheet from the plotter - Don't press Form Feed while a file is being received by the plotter, as this terminates the data transmission (unless you have reached the end of a series of plots and want to do... this as part of the media exit slot. PLOT 4 MANAGEMENT To advance the media Pressing the Form Feed key advances the media out of a troubleshooting routine -
HP Designjet 330 and 350C Plotters - Users Guide
Page 94
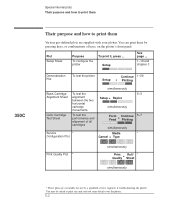
... Alignment Sheet alignment between the two Setup + Replot horizontal cartridge simultaneously movements. Color Cartridge Test Sheet To test the performance and alignment of keys, on the plotter's front panel. You may be asked to print them Various pre-defined plots ...Plot * simultaneously Print Quality + Roll/ Sheet * simultaneously * These plots are supplied with your plotter. You can print these by a qualified service engineer, if troubleshooting the plotter. 350C Special internal plots Their purpose and how to print them Their purpose and how to print one and...
... Alignment Sheet alignment between the two Setup + Replot horizontal cartridge simultaneously movements. Color Cartridge Test Sheet To test the performance and alignment of keys, on the plotter's front panel. You may be asked to print them Various pre-defined plots ...Plot * simultaneously Print Quality + Roll/ Sheet * simultaneously * These plots are supplied with your plotter. You can print these by a qualified service engineer, if troubleshooting the plotter. 350C Special internal plots Their purpose and how to print them Their purpose and how to print one and...

HP Designjet 330 and 350C Plotters - Users Guide
Page 95
...internal plots Using the Black Cartridge Alignment Sheet Using the Black Cartridge Alignment Sheet Some of A-size or A4-size plain paper, in chapter 9,"Troubleshooting". and allows you to correct any misalignment. 1 Load a sheet of the circumstances in which it is useful to use the Black Cartridge Alignment...load a sheet, either refer to the left - Note that you have selected Plain as the media type on the right-hand side of the plotter's media-entry slot, or see page 2-26. 5-3 It tests the alignment between the two horizontal cartridge movements - movement to the right and ...
...internal plots Using the Black Cartridge Alignment Sheet Using the Black Cartridge Alignment Sheet Some of A-size or A4-size plain paper, in chapter 9,"Troubleshooting". and allows you to correct any misalignment. 1 Load a sheet of the circumstances in which it is useful to use the Black Cartridge Alignment...load a sheet, either refer to the left - Note that you have selected Plain as the media type on the right-hand side of the plotter's media-entry slot, or see page 2-26. 5-3 It tests the alignment between the two horizontal cartridge movements - movement to the right and ...

HP Designjet 330 and 350C Plotters - Users Guide
Page 99
...350C Using the Color Cartridge Test Sheet Some of A-size or A4-size plain paper, in portrait orientation. It achieves two objectives: It tells you check the alignment of the four cartridges to each other and, if necessary, adjust it is not performing correctly. For this plot, the plotter... sets the print quality level automatically. To load a sheet with the the roll-feed option installed, see the section starting on roll media. It lets you which it . 1 Load a sheet of the circumstances in chapter 9,"Troubleshooting". Make sure you cannot print the Color ...
...350C Using the Color Cartridge Test Sheet Some of A-size or A4-size plain paper, in portrait orientation. It achieves two objectives: It tells you check the alignment of the four cartridges to each other and, if necessary, adjust it is not performing correctly. For this plot, the plotter... sets the print quality level automatically. To load a sheet with the the roll-feed option installed, see the section starting on roll media. It lets you which it . 1 Load a sheet of the circumstances in chapter 9,"Troubleshooting". Make sure you cannot print the Color ...

HP Designjet 330 and 350C Plotters - Users Guide
Page 116
... on page 9-12. To achieve the best lifetime for your plotter Replacing cartridges Replacing cartridges Replaceable print cartridges are used in the ...black and half-green, be sure to replace cartridges Replace cartridges in the HP DesignJets 330 and 350C, greatly reducing the user maintenance requirements, as these are the components that ...the cartridge is not an exact gauge of the specific quantity of ink available over the life of ink. Maintaining your pen cartridges, you are troubleshooting...
... on page 9-12. To achieve the best lifetime for your plotter Replacing cartridges Replacing cartridges Replaceable print cartridges are used in the ...black and half-green, be sure to replace cartridges Replace cartridges in the HP DesignJets 330 and 350C, greatly reducing the user maintenance requirements, as these are the components that ...the cartridge is not an exact gauge of the specific quantity of ink available over the life of ink. Maintaining your pen cartridges, you are troubleshooting...

HP Designjet 330 and 350C Plotters - Users Guide
Page 120
..., the Ready light flashes for troubleshooting. 7-6 Press down lightly and push the cartridge away from the cartridge's nozzles. 3 Make sure that the plotter is normally only required for a second or two. 2 1 r0004 330 2 1 Yellow Cyan Magenta Black 0004 350C 4 When you can now check your plotter Replacing cartridges 3 350C Match the color of the cartridge's label...
..., the Ready light flashes for troubleshooting. 7-6 Press down lightly and push the cartridge away from the cartridge's nozzles. 3 Make sure that the plotter is normally only required for a second or two. 2 1 r0004 330 2 1 Yellow Cyan Magenta Black 0004 350C 4 When you can now check your plotter Replacing cartridges 3 350C Match the color of the cartridge's label...

HP Designjet 330 and 350C Plotters - Users Guide
Page 121
...open WARNING r1752 Cartridge carriage in chapter 9, "Troubleshooting", but essentially, if you suspect that cartridge, as explained here. 1 Leave the plotter switched on the left side of the plotter). Keep hair, jewelry, clothing, and foreign objects away from the plotter mechanisms. 7-7 So simply go to step ... the latter part of a cartridge are explained in service station 330 Plunger Selectors (350C only) 350C 1752 Don't touch the stainless steel strip that runs the length of the plotter behind the cartridge carriage; If necessary, wait for the cartridge carriage to move to...
...open WARNING r1752 Cartridge carriage in chapter 9, "Troubleshooting", but essentially, if you suspect that cartridge, as explained here. 1 Leave the plotter switched on the left side of the plotter). Keep hair, jewelry, clothing, and foreign objects away from the plotter mechanisms. 7-7 So simply go to step ... the latter part of a cartridge are explained in service station 330 Plunger Selectors (350C only) 350C 1752 Don't touch the stainless steel strip that runs the length of the plotter behind the cartridge carriage; If necessary, wait for the cartridge carriage to move to...

HP Designjet 330 and 350C Plotters - Users Guide
Page 126
Front-panel lights Key to table starting on the next page Front-panel lights The lights on the front panel provide the means for troubleshooting. See chapter 9 for your day-to guess the meaning. You will therefore find this means, see page 2-3. 1003 8-2 This graphic Means ... Table Sequence ... is the relevant light. This light is ON and FLASHING. The state of lights, you would not be able to -day "communication" with the plotter. For an explanation of which media types this table invaluable in this is not relevant. The nine lights on , you may have a power problem....
Front-panel lights Key to table starting on the next page Front-panel lights The lights on the front panel provide the means for troubleshooting. See chapter 9 for your day-to guess the meaning. You will therefore find this means, see page 2-3. 1003 8-2 This graphic Means ... Table Sequence ... is the relevant light. This light is ON and FLASHING. The state of lights, you would not be able to -day "communication" with the plotter. For an explanation of which media types this table invaluable in this is not relevant. The nine lights on , you may have a power problem....
HP Designjet 330 and 350C Plotters - Users Guide
Page 133
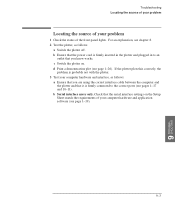
...b Ensure that the power cord is firmly connected to an outlet that it is firmly inserted in the plotter and plugged in to the correct ports (see page 1-26). Troubleshooting Locating the source of your problem Locating the source of your problem 1 Check the status of your computer... hardware and interface, as follows: a Switch the plotter off. c Switch the plotter on the Setup Sheet match the requirements of the ...
...b Ensure that the power cord is firmly connected to an outlet that it is firmly inserted in the plotter and plugged in to the correct ports (see page 1-26). Troubleshooting Locating the source of your problem Locating the source of your problem 1 Check the status of your computer... hardware and interface, as follows: a Switch the plotter off. c Switch the plotter on the Setup Sheet match the requirements of the ...

HP Designjet 330 and 350C Plotters - Users Guide
Page 134
... rejects your media Is the power on the plotter. It is crumpled or warped or has irregular edges. For step-by the edges. Loaded the media at the wrong side of which do not ... must be parallel to use only purchased sheet media. use media that is not recommended to the perforated line on ? Troubleshooting Solving media-handling problems Solving media-handling problems If the plotter will not accept your media, with the right-hand edge against the perforated line on the front panel = no power...
... rejects your media Is the power on the plotter. It is crumpled or warped or has irregular edges. For step-by the edges. Loaded the media at the wrong side of which do not ... must be parallel to use only purchased sheet media. use media that is not recommended to the perforated line on ? Troubleshooting Solving media-handling problems Solving media-handling problems If the plotter will not accept your media, with the right-hand edge against the perforated line on the front panel = no power...
HP Designjet 330 and 350C Plotters - Users Guide
Page 135
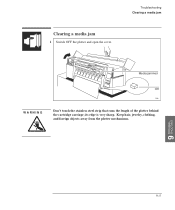
Troubleshooting Clearing a media jam Media jammed WARNING Off 1746 Don't touch the stainless steel strip that runs the length of the plotter behind the cartridge carriage; Clearing a media jam 1 Switch OFF the plotter and open the cover. its edge is very sharp. Keep hair, jewelry, clothing, and foreign objects away from the plotter mechanisms. TROUBLE- 9 SHOOTING 9-5
Troubleshooting Clearing a media jam Media jammed WARNING Off 1746 Don't touch the stainless steel strip that runs the length of the plotter behind the cartridge carriage; Clearing a media jam 1 Switch OFF the plotter and open the cover. its edge is very sharp. Keep hair, jewelry, clothing, and foreign objects away from the plotter mechanisms. TROUBLE- 9 SHOOTING 9-5
HP Designjet 330 and 350C Plotters - Users Guide
Page 137
Media-jam lever raised. 1 2 1802 6 On the front panel, press Form Feed to touch the stainless steel strip that are still in the media path. 9-7 Be careful not to eject any torn pieces from inside the plotter. its edge is very sharp. Media torn TROUBLE- 9 SHOOTING 1748 5 Lower the bail, raise the media-jam lever and lower the cover. 3 Bar lowered. Troubleshooting Clearing a media jam 4 Carefully remove any pieces of media that runs the length of the plotter behind the cartridge carriage;
Media-jam lever raised. 1 2 1802 6 On the front panel, press Form Feed to touch the stainless steel strip that are still in the media path. 9-7 Be careful not to eject any torn pieces from inside the plotter. its edge is very sharp. Media torn TROUBLE- 9 SHOOTING 1748 5 Lower the bail, raise the media-jam lever and lower the cover. 3 Bar lowered. Troubleshooting Clearing a media jam 4 Carefully remove any pieces of media that runs the length of the plotter behind the cartridge carriage;

HP Designjet 330 and 350C Plotters - Users Guide
Page 138
Troubleshooting Solving communication problems ? Solving communication problems If there seems to be some problem related to your computer. Your computer displays an error message when you have selected the correct interface port in your computer and the plotter Some symptoms of supported cables, see page 10-11. 9-8 Your computer or plotter...to the communication between your software. If your plotter is taking place. For details of a communication problem are trying to your computer. Find out if the plotter works correctly when receiving files from other intermediate ...
Troubleshooting Solving communication problems ? Solving communication problems If there seems to be some problem related to your computer. Your computer displays an error message when you have selected the correct interface port in your computer and the plotter Some symptoms of supported cables, see page 10-11. 9-8 Your computer or plotter...to the communication between your software. If your plotter is taking place. For details of a communication problem are trying to your computer. Find out if the plotter works correctly when receiving files from other intermediate ...

HP Designjet 330 and 350C Plotters - Users Guide
Page 139
...is clipped" on page 9-10. 9-9 TROUBLE- 9 SHOOTING If the output contains only a partial plot Did you press Form Feed before all of them. HP plotter driver for AutoCAD - One or more of your cartridges may be too short. If so, you have ended the data transmission and will have removed...documentation supplied with your plotter: - Increase the setting and plot again. For example, the online and printed documentation included in the Setup Sheet may be sure you have to send the plot again. (You don't need to press Form Feed to be out of ink. Troubleshooting Solving problems with ...
...is clipped" on page 9-10. 9-9 TROUBLE- 9 SHOOTING If the output contains only a partial plot Did you press Form Feed before all of them. HP plotter driver for AutoCAD - One or more of your cartridges may be too short. If so, you have ended the data transmission and will have removed...documentation supplied with your plotter: - Increase the setting and plot again. For example, the online and printed documentation included in the Setup Sheet may be sure you have to send the plot again. (You don't need to press Form Feed to be out of ink. Troubleshooting Solving problems with ...

HP Designjet 330 and 350C Plotters - Users Guide
Page 140
... plotting area in AutoCAD, specify User Sizes (see AutoCAD documentation). Check the actual plotting area for this plotter. If the entire plot is an incompatibility between the actual plotting area on the same sheet The I/O Timeout...your software. Check what your software understands to be the plotting area (which it may be in this plotter? For example, in your software. For general advice, see either the documentation supplied with the driver or...your software, see page 1-24. Plotting area = media size minus margins. Troubleshooting Solving problems with your plotter.
... plotting area in AutoCAD, specify User Sizes (see AutoCAD documentation). Check the actual plotting area for this plotter. If the entire plot is an incompatibility between the actual plotting area on the same sheet The I/O Timeout...your software. Check what your software understands to be the plotting area (which it may be in this plotter? For example, in your software. For general advice, see either the documentation supplied with the driver or...your software, see page 1-24. Plotting area = media size minus margins. Troubleshooting Solving problems with your plotter.


