
Reference Guide
Page 1
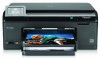
...HP Photosmart Plus series - Notes: • The USB cable may be used during the wireless installation to automatically obtain wireless settings. • Software installation will guide you complete the guided printer setup. • Be sure to follow the animated setup guide because it contains important information on setting up the printer... by the software (Windows users only). 1 Verify box contents 2 Insert the CD for guided printer setup When you insert the CD, animations will proceed after you through the printer setup, including how to install ink cartridges and load paper.
...HP Photosmart Plus series - Notes: • The USB cable may be used during the wireless installation to automatically obtain wireless settings. • Software installation will guide you complete the guided printer setup. • Be sure to follow the animated setup guide because it contains important information on setting up the printer... by the software (Windows users only). 1 Verify box contents 2 Insert the CD for guided printer setup When you insert the CD, animations will proceed after you through the printer setup, including how to install ink cartridges and load paper.

Reference Guide
Page 8
... THE POSSIBILITY OF SUCH DAMAGES. HP printer limited warranty statement HP product Software Media Printer Print or Ink cartridges Printheads (only applies to products with customer replaceable printheads) Accessories Duration of limited warranty 90 days 1 year Until the HP ink is attributable to the use of a non-HP or refilled cartridge or an expired ink cartridge, HP will charge its standard time and...
... THE POSSIBILITY OF SUCH DAMAGES. HP printer limited warranty statement HP product Software Media Printer Print or Ink cartridges Printheads (only applies to products with customer replaceable printheads) Accessories Duration of limited warranty 90 days 1 year Until the HP ink is attributable to the use of a non-HP or refilled cartridge or an expired ink cartridge, HP will charge its standard time and...

User Guide
Page 14
...use only one of ink remaining in order to the front USB port of the product. Also, on your computer, but it will install automatically using the Widcomm stack. Attach an HP Bluetooth Adapter to connect the HP Photosmart. Scanning ...ink cartridges. Chapter 2 For information on printing to the HP Photosmart from a Bluetoothenabled computer without using a cable. Finish setting up the HP Photosmart 12 Finish setting up the HP Photosmart If you have an HP computer with a USB connection. at the bottom of installing the software is to If you can check the printer...
...use only one of ink remaining in order to the front USB port of the product. Also, on your computer, but it will install automatically using the Widcomm stack. Attach an HP Bluetooth Adapter to connect the HP Photosmart. Scanning ...ink cartridges. Chapter 2 For information on printing to the HP Photosmart from a Bluetoothenabled computer without using a cable. Finish setting up the HP Photosmart 12 Finish setting up the HP Photosmart If you have an HP computer with a USB connection. at the bottom of installing the software is to If you can check the printer...

User Guide
Page 70
... the ink cartridges appear. NOTE: You can find cartridge information and order online by visiting www.hp.com/buy/ supplies. Maintain the HP Photosmart 68 Maintain the HP Photosmart In addition, you can also open HP Solution Center, and select the online shopping feature. Remove cartridge. a. In the Print Properties dialog box, click the Features tab, and then click the Printer...
... the ink cartridges appear. NOTE: You can find cartridge information and order online by visiting www.hp.com/buy/ supplies. Maintain the HP Photosmart 68 Maintain the HP Photosmart In addition, you can also open HP Solution Center, and select the online shopping feature. Remove cartridge. a. In the Print Properties dialog box, click the Features tab, and then click the Printer...

User Guide
Page 74
... result • If any of a different color, refer to replace the ink cartridges until print quality becomes unacceptable. 2. Check the ink levels shown on one side, or contain one or more streaks of the color bars are irregularly streaked, lighter on the ...ink cartridge. irregularly streaked or faded bar (top bar) Figure 11-3 Color bars - Print quality typically deteriorates as cartridges run out of the page. Look at the color bars in the middle of ink. NOTE: If the print quality report is not legible, you can check the estimated ink levels from the control panel or HP Photosmart...
... result • If any of a different color, refer to replace the ink cartridges until print quality becomes unacceptable. 2. Check the ink levels shown on one side, or contain one or more streaks of the color bars are irregularly streaked, lighter on the ...ink cartridge. irregularly streaked or faded bar (top bar) Figure 11-3 Color bars - Print quality typically deteriorates as cartridges run out of the page. Look at the color bars in the middle of ink. NOTE: If the print quality report is not legible, you can check the estimated ink levels from the control panel or HP Photosmart...

User Guide
Page 85
... produce great results, time after time. Genuine HP ink cartridges are using a non-HP supply will not be covered under warranty. Step 2: Check the ink levels Solution: Check the estimated ink levels in order, with HP printers to resolve the issue. NOTE: Ink level warnings and indicators provide estimates for service Check cartridges Follow these steps. • Step 1: Make sure...
... produce great results, time after time. Genuine HP ink cartridges are using a non-HP supply will not be covered under warranty. Step 2: Check the ink levels Solution: Check the estimated ink levels in order, with HP printers to resolve the issue. NOTE: Ink level warnings and indicators provide estimates for service Check cartridges Follow these steps. • Step 1: Make sure...

User Guide
Page 94
... as part of messages about your product: • Product messages • File messages • General user messages • Paper messages • Ink cartridge and printhead messages 92 Solve a problem Enlarging a passport photo by your model. For more information on the glass as expected Try the following categories ... not use a soft cloth to make a large copy of a small original, scan the original into the computer, resize the image in the HP scanning software, and then print a copy of an original that was too small. If you want to wipe the glass and the back of ...
... as part of messages about your product: • Product messages • File messages • General user messages • Paper messages • Ink cartridge and printhead messages 92 Solve a problem Enlarging a passport photo by your model. For more information on the glass as expected Try the following categories ... not use a soft cloth to make a large copy of a small original, scan the original into the computer, resize the image in the HP scanning software, and then print a copy of an original that was too small. If you want to wipe the glass and the back of ...
User Guide
Page 102
..., and place it stops. If it is necessary to dry. Ink cartridge and printhead messages The following is a list of printhead and ink cartridge error messages: • Cartridges in wrong slot • General printer error • Incompatible ink cartridges • Incompatible printhead • Ink alert • Ink cartridge problem • Ink service capacity warning 100 Solve a problem Slide the paper forward until...
..., and place it stops. If it is necessary to dry. Ink cartridge and printhead messages The following is a list of printhead and ink cartridge error messages: • Cartridges in wrong slot • General printer error • Incompatible ink cartridges • Incompatible printhead • Ink alert • Ink cartridge problem • Ink service capacity warning 100 Solve a problem Slide the paper forward until...

User Guide
Page 103
... unplug the power cord. Errors 101 Printing cannot occur without one of ink cartridge inserted into the correct slot. Solve a problem • Ink system failure • Check ink cartridges • Install cartridges • Non-HP cartridge • Original HP ink depleted • Previously used genuine HP cartridge • Printhead problem • Problem with printer preparation Cartridges in , and then press the On button to color...
... unplug the power cord. Errors 101 Printing cannot occur without one of ink cartridge inserted into the correct slot. Solve a problem • Ink system failure • Check ink cartridges • Install cartridges • Non-HP cartridge • Original HP ink depleted • Previously used genuine HP cartridge • Printhead problem • Problem with printer preparation Cartridges in , and then press the On button to color...
User Guide
Page 104
... to see if the ink cartridges are compatible • Solution 2: Contact HP support Solution 1: Check to see if the ink cartridges are compatible Solution: Check to install. Cause: The ink cartridges were not intended for use in this product as it appears that came with ink cartridges that you are using ink cartridges that are using the correct ink cartridges for technical support...
... to see if the ink cartridges are compatible • Solution 2: Contact HP support Solution 1: Check to see if the ink cartridges are compatible Solution: Check to install. Cause: The ink cartridges were not intended for use in this product as it appears that came with ink cartridges that you are using ink cartridges that are using the correct ink cartridges for technical support...
User Guide
Page 105
...; Solution 3: Clean the electrical contacts • Solution 4: Replace the ink cartridge • Solution 5: Contact HP support Errors 103 However, the amount of ink might be low enough to install. When you have enough ink to resolve the issue. You do not need to replace the ink cartridges until the issue is ready to cause poor print quality...
...; Solution 3: Clean the electrical contacts • Solution 4: Replace the ink cartridge • Solution 5: Contact HP support Errors 103 However, the amount of ink might be low enough to install. When you have enough ink to resolve the issue. You do not need to replace the ink cartridges until the issue is ready to cause poor print quality...
User Guide
Page 106
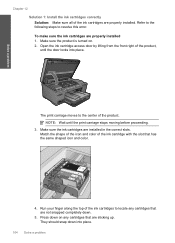
... to resolve this error. Solve a problem Chapter 12 Solution 1: Install the ink cartridges correctly Solution: Make sure all of the ink cartridges are properly installed 1. Refer to the following steps to the center of the ink cartridge with the slot that are not snapped completely down into place. Make sure... the ink cartridges are sticking up. Match the shape of the icon and color of the product. Open the ink cartridge access door by lifting from the front right of the ink cartridges to locate any cartridges that are installed in the correct slots...
... to resolve this error. Solve a problem Chapter 12 Solution 1: Install the ink cartridges correctly Solution: Make sure all of the ink cartridges are properly installed 1. Refer to the following steps to the center of the ink cartridge with the slot that are not snapped completely down into place. Make sure... the ink cartridges are sticking up. Match the shape of the icon and color of the product. Open the ink cartridge access door by lifting from the front right of the ink cartridges to locate any cartridges that are installed in the correct slots...
User Guide
Page 107
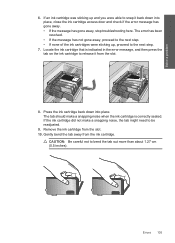
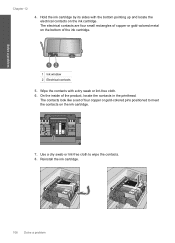
...Errors 105 The tab should make a snapping noise, the tab might need to bend the tab out more than about 1.27 cm (0.5 inches). If an ink cartridge was sticking up , proceed to snap it from the slot. 8. The error has been resolved. • If the message has not gone away, proceed ...you were able to the next step. 7. If the ink cartridge did not make a snapping noise when the ink cartridge is indicated in the error message, and then press the tab on the ink cartridge to release it back down into place, close the ink cartridge access door and check if the error message has gone away...
...Errors 105 The tab should make a snapping noise, the tab might need to bend the tab out more than about 1.27 cm (0.5 inches). If an ink cartridge was sticking up , proceed to snap it from the slot. 8. The error has been resolved. • If the message has not gone away, proceed ...you were able to the next step. 7. If the ink cartridge did not make a snapping noise when the ink cartridge is indicated in the error message, and then press the tab on the ink cartridge to release it back down into place, close the ink cartridge access door and check if the error message has gone away...
User Guide
Page 108
... in order to make sure that the latch securing the printhead is securely closed properly. It should now snap down in incorrectly seated ink cartridges and problems printing. Solution 2: Close the print carriage latch Solution: Lift the latch handle and carefully lower it to correctly install the... ink cartridges. The latch must remain down into place. 12. If this did not solve the issue, try the next solution. Solve a problem Chapter 12 11...
... in order to make sure that the latch securing the printhead is securely closed properly. It should now snap down in incorrectly seated ink cartridges and problems printing. Solution 2: Close the print carriage latch Solution: Lift the latch handle and carefully lower it to correctly install the... ink cartridges. The latch must remain down into place. 12. If this did not solve the issue, try the next solution. Solve a problem Chapter 12 11...
User Guide
Page 109
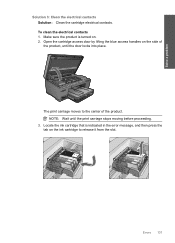
... side of the product. Make sure the product is indicated in the error message, and then press the tab on . 2. Locate the ink cartridge that is turned on the ink cartridge to the center of the product, until the print carriage stops moving before proceeding. 3. NOTE: Wait until the door locks into place. To...
... side of the product. Make sure the product is indicated in the error message, and then press the tab on . 2. Locate the ink cartridge that is turned on the ink cartridge to the center of the product, until the print carriage stops moving before proceeding. 3. NOTE: Wait until the door locks into place. To...
User Guide
Page 110
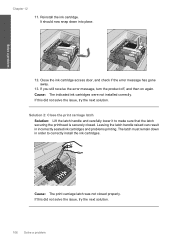
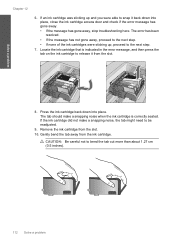
Solve a problem Chapter 12 4. Hold the ink cartridge by its sides with a dry swab or lint-free cloth. 6. The electrical contacts are four small rectangles of copper or gold-colored metal on the ... or gold-colored pins positioned to wipe the contacts. 8. Use a dry swab or lint-free cloth to meet the contacts on the ink cartridge. The contacts look like a set of the ink cartridge. 1 Ink window 2 Electrical contacts 5. On the inside of the product, locate the contacts in the printhead. Wipe the contacts with the bottom...
Solve a problem Chapter 12 4. Hold the ink cartridge by its sides with a dry swab or lint-free cloth. 6. The electrical contacts are four small rectangles of copper or gold-colored metal on the ... or gold-colored pins positioned to wipe the contacts. 8. Use a dry swab or lint-free cloth to meet the contacts on the ink cartridge. The contacts look like a set of the ink cartridge. 1 Ink window 2 Electrical contacts 5. On the inside of the product, locate the contacts in the printhead. Wipe the contacts with the bottom...
User Guide
Page 111
... had a problem. For more information, see : • "Cartridge warranty information" on page 70 • "Replace the cartridges" on again. Go to : www.hp.com/support. If you might have a damaged cartridge. If prompted, choose your cartridge is still under warranty, contact HP support for technical support. Close the ink cartridge door, and check if the error message has...
... had a problem. For more information, see : • "Cartridge warranty information" on page 70 • "Replace the cartridges" on again. Go to : www.hp.com/support. If you might have a damaged cartridge. If prompted, choose your cartridge is still under warranty, contact HP support for technical support. Close the ink cartridge door, and check if the error message has...

User Guide
Page 112
... 1: Install all four ink cartridges • Solution 2: Make sure the ink cartridges are installed correctly • Solution 3: Contact HP support Solution 1: Install all four ink cartridges Solution: Make sure all of the ink cartridges were not installed. Cause: The product has nearly maximized the ink service capacity. Solutions are listed in the message on page 68 Cause: One or more information...
... 1: Install all four ink cartridges • Solution 2: Make sure the ink cartridges are installed correctly • Solution 3: Contact HP support Solution 1: Install all four ink cartridges Solution: Make sure all of the ink cartridges were not installed. Cause: The product has nearly maximized the ink service capacity. Solutions are listed in the message on page 68 Cause: One or more information...

User Guide
Page 113
.... 3. Press down into place. Make sure the ink cartridges are properly installed. They should snap down on . 2. Solve a problem Solution 2: Make sure the ink cartridges are installed correctly Solution: Make sure all of the ink cartridges are installed in the correct slots. Make sure the... product is turned on any cartridges that are properly installed 1. Match the shape of the icon...
.... 3. Press down into place. Make sure the ink cartridges are properly installed. They should snap down on . 2. Solve a problem Solution 2: Make sure the ink cartridges are installed correctly Solution: Make sure all of the ink cartridges are installed in the correct slots. Make sure the... product is turned on any cartridges that are properly installed 1. Match the shape of the icon...
User Guide
Page 114
...ink cartridge from the ink cartridge. Press the ink cartridge back down into place. Gently bend the tab away from the slot. 10. Locate the ink cartridge that is correctly seated. If the ink cartridge did not make a snapping noise when the ink cartridge is indicated in the error message, and then press the tab on the ink cartridge... step. 7. The tab should make a snapping noise, the tab might need to release it back down into place, close the ink cartridge access door and check if the error message has gone away. • If the message has gone away, stop troubleshooting here. ...
...ink cartridge from the ink cartridge. Press the ink cartridge back down into place. Gently bend the tab away from the slot. 10. Locate the ink cartridge that is correctly seated. If the ink cartridge did not make a snapping noise when the ink cartridge is indicated in the error message, and then press the tab on the ink cartridge... step. 7. The tab should make a snapping noise, the tab might need to release it back down into place, close the ink cartridge access door and check if the error message has gone away. • If the message has gone away, stop troubleshooting here. ...


