
Security Features
Page 12
HP DesignJet Printers Security Settings Settings App Inks Entry Access Paper App Access Paper App Load Media Paper App Unload Media Paper App Change Paper Type Paper Widget - Access to access a "locked" menu ... panel is used. Note: In PageWide XL, when the user attempts to be set , you will not able to load/unload paper or replace printheads/ink cartridges without first unlocking the front panel. Intermediate 4 - Maximum 4 - Minimum 1 - Maximum 3 - Intermediate 4 - Intermediate 2 - Minimum 1 - PIN needs to access a "locked" menu, the printer asks for the User...
HP DesignJet Printers Security Settings Settings App Inks Entry Access Paper App Access Paper App Load Media Paper App Unload Media Paper App Change Paper Type Paper Widget - Access to access a "locked" menu ... panel is used. Note: In PageWide XL, when the user attempts to be set , you will not able to load/unload paper or replace printheads/ink cartridges without first unlocking the front panel. Intermediate 4 - Maximum 4 - Minimum 1 - Maximum 3 - Intermediate 4 - Intermediate 2 - Minimum 1 - PIN needs to access a "locked" menu, the printer asks for the User...
Limited Warranty
Page 5
... in materials and workmanship under normal usage during the Limited Warranty Period specified above will be uninterrupted or error-free. 4. d. HP Limited Warranty statement HP product Printer Software Printhead Print or Ink cartridge Limited Warranty Period 1 year 90 days from the date of purchase by the customer Replacement printheads are warranted for one year...
... in materials and workmanship under normal usage during the Limited Warranty Period specified above will be uninterrupted or error-free. 4. d. HP Limited Warranty statement HP product Printer Software Printhead Print or Ink cartridge Limited Warranty Period 1 year 90 days from the date of purchase by the customer Replacement printheads are warranted for one year...
Limited Warranty
Page 6
... attributable to the insertion/connection of electric/ electronics systems/components/boards not provided or supported by the use of a refilled or non-original HP consumable product (ink, printhead, or ink cartridge) does not affect either repair or replace the product which customer self-repair is optional. If, during the applicable warranty period, notice of...
... attributable to the insertion/connection of electric/ electronics systems/components/boards not provided or supported by the use of a refilled or non-original HP consumable product (ink, printhead, or ink cartridge) does not affect either repair or replace the product which customer self-repair is optional. If, during the applicable warranty period, notice of...
User Guide
Page 5
... ...159 Check usage statistics ...159 Check usage statistics for a job ...162 Check cost assignment ...163 12 Handling ink cartridges and printhead ...165 About the ink cartridges ...166 Check the ink cartridges status ...166 Remove an ink cartridge ...166 Insert an ink cartridge ...167 About the printhead ...169 Check the printhead status ...169 Remove the printhead ...170 Insert the printhead ...173...
... ...159 Check usage statistics ...159 Check usage statistics for a job ...162 Check cost assignment ...163 12 Handling ink cartridges and printhead ...165 About the ink cartridges ...166 Check the ink cartridges status ...166 Remove an ink cartridge ...166 Insert an ink cartridge ...167 About the printhead ...169 Check the printhead status ...169 Remove the printhead ...170 Insert the printhead ...173...
User Guide
Page 7
Black horizontal lines on yellow background ...211 Black ink comes off when you touch the print ...211 Edges of objects are stepped or not sharp ...212 Edges of objects are darker than expected ...212 ... Lines are blurred ...218 Line lengths are inaccurate ...218 Image Diagnostics Print ...219 If you still have a problem ...222 18 Troubleshooting ink cartridge and printhead issues ...223 Cannot insert an ink cartridge ...224 Ink cartridge status messages ...224 Cannot insert the printhead ...224 The front-panel display recommends reseating or replacing the printhead 224 Clean the...
Black horizontal lines on yellow background ...211 Black ink comes off when you touch the print ...211 Edges of objects are stepped or not sharp ...212 Edges of objects are darker than expected ...212 ... Lines are blurred ...218 Line lengths are inaccurate ...218 Image Diagnostics Print ...219 If you still have a problem ...222 18 Troubleshooting ink cartridge and printhead issues ...223 Cannot insert an ink cartridge ...224 Ink cartridge status messages ...224 Cannot insert the printhead ...224 The front-panel display recommends reseating or replacing the printhead 224 Clean the...
User Guide
Page 15
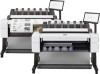
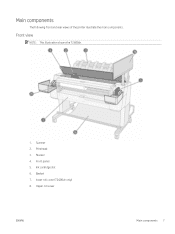
Scanner 2. Basket 7. Upper roll cover ENWW Main components 7 Printhead 3. Front panel 5. Front view NOTE: This illustration shows the T2600dr. 1. Ink cartridge slot 6. lower roll cover (T2600dr only) 8. Main components The following front and rear views of the printer illustrate the main components. Stacker 4.
Scanner 2. Basket 7. Upper roll cover ENWW Main components 7 Printhead 3. Front panel 5. Front view NOTE: This illustration shows the T2600dr. 1. Ink cartridge slot 6. lower roll cover (T2600dr only) 8. Main components The following front and rear views of the printer illustrate the main components. Stacker 4.

User Guide
Page 98
... Coated, Bond, Heavyweight Coated, Glossy Coated, Bond, Heavyweight Coated, Glossy Coated, Heavyweight Coated, Glossy Coated, Heavyweight Coated, Glossy 90 Chapter 5 Printing ENWW ● Check the ink levels remaining in your ink cartridges. ● When you have submitted your print jobs, you are making.
... Coated, Bond, Heavyweight Coated, Glossy Coated, Bond, Heavyweight Coated, Glossy Coated, Heavyweight Coated, Glossy Coated, Heavyweight Coated, Glossy 90 Chapter 5 Printing ENWW ● Check the ink levels remaining in your ink cartridges. ● When you have submitted your print jobs, you are making.
User Guide
Page 173
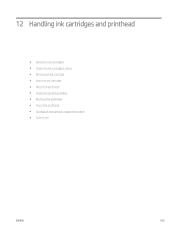
12 Handling ink cartridges and printhead ● About the ink cartridges ● Check the ink cartridges status ● Remove an ink cartridge ● Insert an ink cartridge ● About the printhead ● Check the printhead status ● Remove the printhead ● Insert the printhead ● Storage of anonymous usage information ● Safe mode ENWW 165
12 Handling ink cartridges and printhead ● About the ink cartridges ● Check the ink cartridges status ● Remove an ink cartridge ● Insert an ink cartridge ● About the printhead ● Check the printhead status ● Remove the printhead ● Insert the printhead ● Storage of anonymous usage information ● Safe mode ENWW 165
User Guide
Page 174
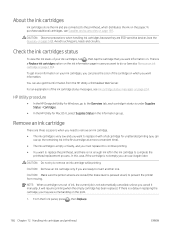
... Status in the Information group. To purchase additional cartridges, see the Glossary on the paper. CAUTION: Observe precautions when handling ink cartridges because they are ESD-sensitive devices (see Supplies and accessories on the print. 1. Avoid touching pins, leads and circuitry. HP Utility procedure ● In the HP DesignJet Utility for Windows, go to the printhead...
... Status in the Information group. To purchase additional cartridges, see the Glossary on the paper. CAUTION: Observe precautions when handling ink cartridges because they are ESD-sensitive devices (see Supplies and accessories on the print. 1. Avoid touching pins, leads and circuitry. HP Utility procedure ● In the HP DesignJet Utility for Windows, go to the printhead...
User Guide
Page 175
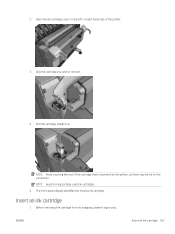
NOTE: Avoid storing partially used ink cartridges. 5. ENWW Insert an ink cartridge 167 Pull the cartridge straight up. The front-panel display identifies the missing ink cartridge. Grip the cartridge you wish to remove. 4. Insert an ink cartridge 1. 2. NOTE: Avoid touching the end of the printer. 3. or right-hand side of the cartridge that is inserted into the printer, as there may be ink on the left- Open the ink cartridge cover on the connection. Before removing the cartridge from its wrapping, shake it vigorously.
NOTE: Avoid storing partially used ink cartridges. 5. ENWW Insert an ink cartridge 167 Pull the cartridge straight up. The front-panel display identifies the missing ink cartridge. Grip the cartridge you wish to remove. 4. Insert an ink cartridge 1. 2. NOTE: Avoid touching the end of the printer. 3. or right-hand side of the cartridge that is inserted into the printer, as there may be ink on the left- Open the ink cartridge cover on the connection. Before removing the cartridge from its wrapping, shake it vigorously.
User Guide
Page 176
Insert the ink cartridge into position. Unwrap the new ink cartridge, find the label identifying the ink color. Check that the cartridge has been inserted. cyan, magenta, and yellow on the left; Push the cartridge into the slot until it snaps into its slot: photo black, gray, and matte black on ...the right. 4. You should hear a beep and see Cannot insert an ink cartridge on the cartridge label. 3. 2. If you have difficulty, see confirmation that the letter or letters (in these illustrations, M for magenta) marking the ...
Insert the ink cartridge into position. Unwrap the new ink cartridge, find the label identifying the ink color. Check that the cartridge has been inserted. cyan, magenta, and yellow on the left; Push the cartridge into the slot until it snaps into its slot: photo black, gray, and matte black on ...the right. 4. You should hear a beep and see Cannot insert an ink cartridge on the cartridge label. 3. 2. If you have difficulty, see confirmation that the letter or letters (in these illustrations, M for magenta) marking the ...
User Guide
Page 177
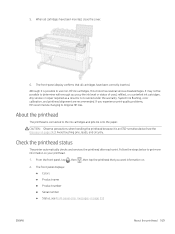
...services the printhead after each print. It may not be possible to use non-HP ink cartridges, this choice has several serious disadvantages. Avoid touching pins, leads, and circuitry. When all cartridges have been inserted, close the cover. 6. Although it is possible to determine with...232 ENWW About the printhead 169 Follow the steps below to the ink cartridges and jets ink onto the paper. The front-panel display confirms that you experience print-quality problems, HP recommends changing to Original HP inks. About the printhead The printhead is not covered under the warranty....
...services the printhead after each print. It may not be possible to use non-HP ink cartridges, this choice has several serious disadvantages. Avoid touching pins, leads, and circuitry. When all cartridges have been inserted, close the cover. 6. Although it is possible to determine with...232 ENWW About the printhead 169 Follow the steps below to the ink cartridges and jets ink onto the paper. The front-panel display confirms that you experience print-quality problems, HP recommends changing to Original HP inks. About the printhead The printhead is not covered under the warranty....
User Guide
Page 178
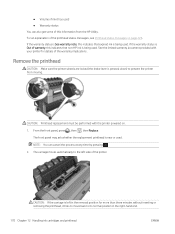
... tries to move back to prevent the printer from the HP Utility. If the warranty status is Out of this indicates that non-HP ink is being used. See the limited warranty document provided with the printer powered on page 226. From the front panel, press , then , then...in the removal position for details of the printer. The carriage moves automatically to the left in the right-hand end. 170 Chapter 12 Handling ink cartridges and printhead ENWW For an explanation of the printhead status messages, see Printhead status messages on . 1. Remove the printhead CAUTION: Make sure ...
... tries to move back to prevent the printer from the HP Utility. If the warranty status is Out of this indicates that non-HP ink is being used. See the limited warranty document provided with the printer powered on page 226. From the front panel, press , then , then...in the removal position for details of the printer. The carriage moves automatically to the left in the right-hand end. 170 Chapter 12 Handling ink cartridges and printhead ENWW For an explanation of the printhead status messages, see Printhead status messages on . 1. Remove the printhead CAUTION: Make sure ...
User Guide
Page 180
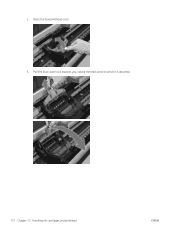
5. Pull the blue cover back towards you, raising the black piece to which it is attached. 172 Chapter 12 Handling ink cartridges and printhead ENWW Raise the blue printhead cover. 6.
5. Pull the blue cover back towards you, raising the black piece to which it is attached. 172 Chapter 12 Handling ink cartridges and printhead ENWW Raise the blue printhead cover. 6.
User Guide
Page 181
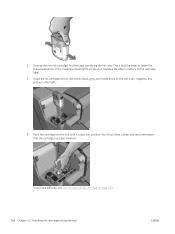
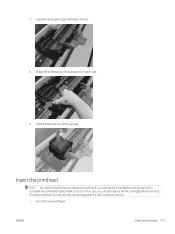
7. Insert the printhead NOTE: You cannot insert a new printhead successfully if a connected ink cartridge has not enough ink to complete the printhead replacement process. Leave the black piece approximately vertical. 8. You can use the old cartridge later if it still contains some ink. 1. Grasp the printhead by the blue pieces on each side. 9. Lift the printhead out of the carriage. Insert the new printhead. In this case, you should replace the ink cartridge before inserting the new printhead. ENWW Insert the printhead 173
7. Insert the printhead NOTE: You cannot insert a new printhead successfully if a connected ink cartridge has not enough ink to complete the printhead replacement process. Leave the black piece approximately vertical. 8. You can use the old cartridge later if it still contains some ink. 1. Grasp the printhead by the blue pieces on each side. 9. Lift the printhead out of the carriage. Insert the new printhead. In this case, you should replace the ink cartridge before inserting the new printhead. ENWW Insert the printhead 173

User Guide
Page 182
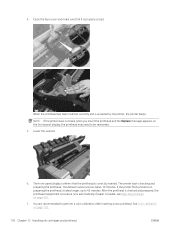
Check that the printhead is correctly aligned with its ink connectors. 174 Chapter 12 Handling ink cartridges and printhead ENWW It may be damaged if you insert it too fast, or at an angle, or if you rotate it as you insert it. 2. CAUTION: Insert the printhead slowly and vertically, straight down.
Check that the printhead is correctly aligned with its ink connectors. 174 Chapter 12 Handling ink cartridges and printhead ENWW It may be damaged if you insert it too fast, or at an angle, or if you rotate it as you insert it. 2. CAUTION: Insert the printhead slowly and vertically, straight down.
User Guide
Page 184
... reinserted. 5. NOTE: If the printer does not beep when you insert the printhead and the Replace message appears on page 132. 176 Chapter 12 Handling ink cartridges and printhead ENWW
... reinserted. 5. NOTE: If the printer does not beep when you insert the printhead and the Replace message appears on page 132. 176 Chapter 12 Handling ink cartridges and printhead ENWW
User Guide
Page 185
... the printing system when operated outside of environmental specifications, and when a used , refilled, or counterfeit ink cartridge is displayed on the memory chip. HP DesignJet printing systems, including original HP inks and printheads, are read and studied in the memory chip. HP is not designed to access the anonymous information on the printer's front panel and by...
... the printing system when operated outside of environmental specifications, and when a used , refilled, or counterfeit ink cartridge is displayed on the memory chip. HP DesignJet printing systems, including original HP inks and printheads, are read and studied in the memory chip. HP is not designed to access the anonymous information on the printer's front panel and by...
User Guide
Page 186
13 Printer maintenance ● Check printer status ● Clean the exterior of the printer ● Maintain the ink cartridges ● Move or store the printer ● Update the firmware ● Update the software ● Printer maintenance kits ● Secure File Erase ● Disk Wipe 178 Chapter 13 Printer maintenance ENWW
13 Printer maintenance ● Check printer status ● Clean the exterior of the printer ● Maintain the ink cartridges ● Move or store the printer ● Update the firmware ● Update the software ● Printer maintenance kits ● Secure File Erase ● Disk Wipe 178 Chapter 13 Printer maintenance ENWW

User Guide
Page 187
... to avoid possible damage to access the Status Center and take action. ● If you start the HP Utility and select your finger across. See also Handling ink cartridges and printhead on the printer. If the stacker seems likely to maintain the best print quality, replace... required. The printer's front panel notifies you clean it reaches its expiration date. Maintain the ink cartridges During the normal lifetime of a cartridge, no paper is idle. 4. Do not remove the ink cartridges or printhead. 2. Make sure that the printer is loaded. 3. If you regularly touch as...
... to avoid possible damage to access the Status Center and take action. ● If you start the HP Utility and select your finger across. See also Handling ink cartridges and printhead on the printer. If the stacker seems likely to maintain the best print quality, replace... required. The printer's front panel notifies you clean it reaches its expiration date. Maintain the ink cartridges During the normal lifetime of a cartridge, no paper is idle. 4. Do not remove the ink cartridges or printhead. 2. Make sure that the printer is loaded. 3. If you regularly touch as...


