
Quick Setup Guide
Page 2
...31616;体中文 CD/DVD CD 或 DVD HP HP http://www.hp.com/go /orderdocuments anfordern. In some countries or regions, HP may provide a printed warranty in qualsiasi momento. • Scollegare l'alimentazione dal monitor scollegando cavo di alimentazione dalla presa elettrica. For countries or...do Brasil Suomi 日本語 WARNING: To reduce the risk of electric shock or damage to HP at all times. • Disconnect power from the monitor by unplugging the power cord from the electrical outlet. W krajach lub regionach, w których ...
...31616;体中文 CD/DVD CD 或 DVD HP HP http://www.hp.com/go /orderdocuments anfordern. In some countries or regions, HP may provide a printed warranty in qualsiasi momento. • Scollegare l'alimentazione dal monitor scollegando cavo di alimentazione dalla presa elettrica. For countries or...do Brasil Suomi 日本語 WARNING: To reduce the risk of electric shock or damage to HP at all times. • Disconnect power from the monitor by unplugging the power cord from the electrical outlet. W krajach lub regionach, w których ...

User Guide
Page 3
WARNING! NOTE: Contains additional information to emphasize or supplement important points of the main text. iii TIP: Provides helpful hints for completing a task. This product incorporates HDMI technology. Indicates a hazardous situation that , if not avoided, could result in minor or moderate injury. CAUTION: Indicates a hazardous situation that , if not avoided, could result in death or serious injury. About This Guide This guide provides information on monitor features, setting up the monitor, and technical specifications.
WARNING! NOTE: Contains additional information to emphasize or supplement important points of the main text. iii TIP: Provides helpful hints for completing a task. This product incorporates HDMI technology. Indicates a hazardous situation that , if not avoided, could result in minor or moderate injury. CAUTION: Indicates a hazardous situation that , if not avoided, could result in death or serious injury. About This Guide This guide provides information on monitor features, setting up the monitor, and technical specifications.
User Guide
Page 5
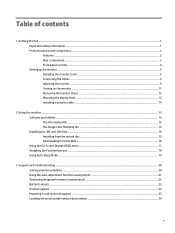
... and components ...2 Features ...2 Rear components ...3 Front bezel controls ...4 Setting up the monitor ...5 Installing the monitor stand ...5 Connecting the cables ...5 Adjusting the monitor ...9 Turning on the monitor ...11 Removing the monitor stand ...12 Mounting the display head ...12 Installing a security cable ...14 2 Using the monitor ...15 Software and utilities ...15 The Information file ...15 The Image Color...
... and components ...2 Features ...2 Rear components ...3 Front bezel controls ...4 Setting up the monitor ...5 Installing the monitor stand ...5 Connecting the cables ...5 Adjusting the monitor ...9 Turning on the monitor ...11 Removing the monitor stand ...12 Mounting the display head ...12 Installing a security cable ...14 2 Using the monitor ...15 Software and utilities ...15 The Information file ...15 The Image Color...
User Guide
Page 6
... Maintenance guidelines ...25 Cleaning the monitor ...25 Shipping the monitor ...25 Appendix A Technical specifications ...26 50.8 cm/20-inch model ...26 54.61 cm/21.5-inch model ...27 58 cm/23-inch model ...27 60....
... Maintenance guidelines ...25 Cleaning the monitor ...25 Shipping the monitor ...25 Appendix A Technical specifications ...26 50.8 cm/20-inch model ...26 54.61 cm/21.5-inch model ...27 58 cm/23-inch model ...27 60....
User Guide
Page 7
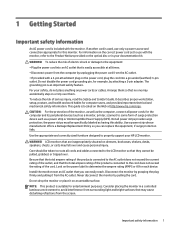
...connection appropriate for the computer and its peripheral devices (such as having this monitor. NOTE: This product is an important safety feature. For your HP LCD monitor. If another cord is easily accessible at http://www.hp.com/ergo. Arrange them so that the total ampere rating of the ...products connected to the equipment: • Plug the power cord into a grounded (earthed) 3-pin outlet. CAUTION: For the protection of the monitor, as well as the computer, ...
...connection appropriate for the computer and its peripheral devices (such as having this monitor. NOTE: This product is an important safety feature. For your HP LCD monitor. If another cord is easily accessible at http://www.hp.com/ergo. Arrange them so that the total ampere rating of the ...products connected to the equipment: • Plug the power cord into a grounded (earthed) 3-pin outlet. CAUTION: For the protection of the monitor, as well as the computer, ...
User Guide
Page 8
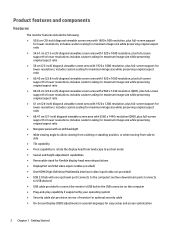
...on the computer ● Plug-and-play capability if supported by your operating system ● Security cable slot provision on rear of monitor for optional security cable ● On-Screen Display (OSD) adjustments in several languages for easy setup and screen optimization 2 Chapter 1... Getting Started Product features and components Features The monitor features include the following: ● 50.8 cm (20-inch) diagonal viewable screen area with 2560 x 1440 resolution (QHD), plus full-...
...on the computer ● Plug-and-play capability if supported by your operating system ● Security cable slot provision on rear of monitor for optional security cable ● On-Screen Display (OSD) adjustments in several languages for easy setup and screen optimization 2 Chapter 1... Getting Started Product features and components Features The monitor features include the following: ● 50.8 cm (20-inch) diagonal viewable screen area with 2560 x 1440 resolution (QHD), plus full-...
User Guide
Page 9
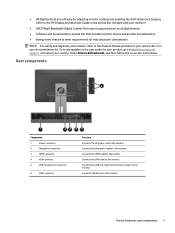
... the AC power cord to the monitor. Connects the HDMI cable to the monitor. Select Drivers & Downloads, and then follow the on your optical disc or in your documentation kit. ● HP Display Assistant software for adjusting monitor settings and enabling the theft deterrence features... (refer to the HP Display Assistant User Guide on the optical disc included with your monitor) ● HDCP (High-Bandwidth Digital Content Protection...
... the AC power cord to the monitor. Connects the HDMI cable to the monitor. Select Drivers & Downloads, and then follow the on your optical disc or in your documentation kit. ● HP Display Assistant software for adjusting monitor settings and enabling the theft deterrence features... (refer to the HP Display Assistant User Guide on the optical disc included with your monitor) ● HDCP (High-Bandwidth Digital Content Protection...
User Guide
Page 10
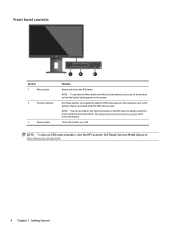
... the buttons so that are activated while the OSD menu is open. NOTE: To view an OSD menu simulator, visit the HP Customer Self Repair Services Media Library at http://www.hp.com/go/sml. 4 Chapter 1 Getting Started See Assigning the Function buttons on or off. NOTE: You can reconfigure the... Function buttons in the OSD menu to the buttons that the button labels appear on the screen. Turns the monitor on page 18 for more ...
... the buttons so that are activated while the OSD menu is open. NOTE: To view an OSD menu simulator, visit the HP Customer Self Repair Services Media Library at http://www.hp.com/go/sml. 4 Chapter 1 Getting Started See Assigning the Function buttons on or off. NOTE: You can reconfigure the... Function buttons in the OSD menu to the buttons that the button labels appear on the screen. Turns the monitor on page 18 for more ...
User Guide
Page 11
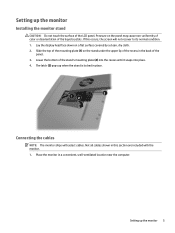
...up when the stand is locked in a convenient, well-ventilated location near the computer. Setting up the monitor 5 Pressure on a flat surface covered by a clean, dry cloth. 2. Place the monitor in place. Lay the display head face down on the panel may cause non-uniformity of color or ...recess in this occurs, the screen will not recover to its normal condition. 1. Connecting the cables NOTE: The monitor ships with the monitor. 1. Setting up the monitor Installing the monitor stand CAUTION: Do not touch the surface of the liquid crystals. Not all cables shown in the back of ...
...up when the stand is locked in a convenient, well-ventilated location near the computer. Setting up the monitor 5 Pressure on a flat surface covered by a clean, dry cloth. 2. Place the monitor in place. Lay the display head face down on the panel may cause non-uniformity of color or ...recess in this occurs, the screen will not recover to its normal condition. 1. Connecting the cables NOTE: The monitor ships with the monitor. 1. Setting up the monitor Installing the monitor stand CAUTION: Do not touch the surface of the liquid crystals. Not all cables shown in the back of ...
User Guide
Page 12
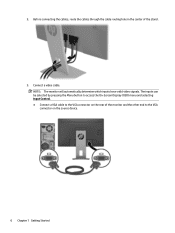
NOTE: The monitor will automatically determine which inputs have valid video signals. The inputs can be selected by pressing the Menu button to access the On-Screen Display (OSD) menu and selecting Input Control. ● Connect a VGA cable to the VGA connector on the rear of the stand. 3. Connect a video cable. 2. Before connecting the cables, route the cables through the cable routing hole in the center of the monitor and the other end to the VGA connector on the source device. 6 Chapter 1 Getting Started
NOTE: The monitor will automatically determine which inputs have valid video signals. The inputs can be selected by pressing the Menu button to access the On-Screen Display (OSD) menu and selecting Input Control. ● Connect a VGA cable to the VGA connector on the rear of the stand. 3. Connect a video cable. 2. Before connecting the cables, route the cables through the cable routing hole in the center of the monitor and the other end to the VGA connector on the source device. 6 Chapter 1 Getting Started
User Guide
Page 13
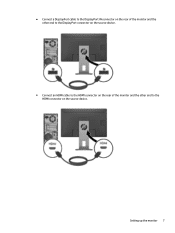
● Connect a DisplayPort cable to the DisplayPort IN connector on the rear of the monitor and the other end to the DisplayPort connector on the source device. ● Connect an HDMI cable to the HDMI connector on the rear of the monitor and the other end to the HDMI connector on the source device. Setting up the monitor 7
● Connect a DisplayPort cable to the DisplayPort IN connector on the rear of the monitor and the other end to the DisplayPort connector on the source device. ● Connect an HDMI cable to the HDMI connector on the rear of the monitor and the other end to the HDMI connector on the source device. Setting up the monitor 7
User Guide
Page 14
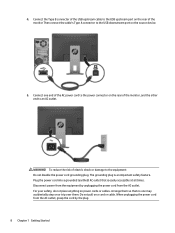
4. To reduce the risk of the monitor, and the other end to an AC outlet. When unplugging the power cord from the AC outlet, grasp the cord by unplugging the power cord ... that is an important safety feature. Connect the Type B connector of the USB upstream cable to the USB upstream port on the rear of the monitor Then connect the cable's Type A connector to the equipment: Do not disable the power cord grounding plug. For your safety, do not place anything on...
4. To reduce the risk of the monitor, and the other end to an AC outlet. When unplugging the power cord from the AC outlet, grasp the cord by unplugging the power cord ... that is an important safety feature. Connect the Type B connector of the USB upstream cable to the USB upstream port on the rear of the monitor Then connect the cable's Type A connector to the equipment: Do not disable the power cord grounding plug. For your safety, do not place anything on...
User Guide
Page 15
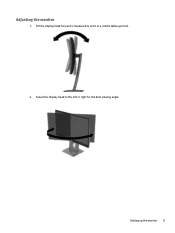
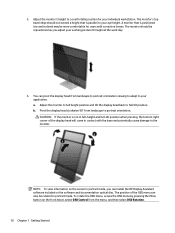
Swivel the display head to a comfortable eye level. 2. Adjusting the monitor 1. Setting up the monitor 9 Tilt the display head forward or backward to set it to the left or right for the best viewing angle.
Swivel the display head to a comfortable eye level. 2. Adjusting the monitor 1. Setting up the monitor 9 Tilt the display head forward or backward to set it to the left or right for the best viewing angle.
User Guide
Page 16
... in portrait mode, you adjust your individual workstation. You can install the HP Display Assistant software included on the front bezel, select OSD Control from the menu, and then select OSD Rotation. 10 Chapter 1 Getting Started Adjust the monitor to full height position and tilt the display head back to portrait mode...
... in portrait mode, you adjust your individual workstation. You can install the HP Display Assistant software included on the front bezel, select OSD Control from the menu, and then select OSD Rotation. 10 Chapter 1 Getting Started Adjust the monitor to full height position and tilt the display head back to portrait mode...
User Guide
Page 17
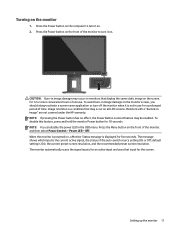
... NOTE: You can disable the power LED in image" are not covered under the HP warranty. Press the Menu button on the monitor 1. default setting is displayed for the screen. The monitor automatically scans the signal inputs for 12 or more consecutive hours of nonuse. Image retention is a condition ...: If pressing the Power button has no effect, the Power Button Lockout feature may occur on the monitor screen, you should always activate a screen saver application or turn off the monitor when it is the current active signal, the status of the auto-switch source setting (On or Off...
... NOTE: You can disable the power LED in image" are not covered under the HP warranty. Press the Menu button on the monitor 1. default setting is displayed for the screen. The monitor automatically scans the signal inputs for 12 or more consecutive hours of nonuse. Image retention is a condition ...: If pressing the Power button has no effect, the Power Button Lockout feature may occur on the monitor screen, you should always activate a screen saver application or turn off the monitor when it is the current active signal, the status of the auto-switch source setting (On or Off...
User Guide
Page 18
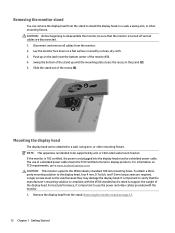
...recess in the panel (2). 5. The use the power and video cables provided with the VESA standard and is compliant with the monitor. 1. CAUTION: This monitor supports the VESA industry standard 100 mm mounting holes. Longer screws must be used because they may damage the display head. ...disconnected. 1. To attach a thirdparty mounting solution to a wall, swing arm, or other mounting fixture. It is important to verify that the monitor is intended to support the weight of the display head. Disconnect and remove all cables are required. Swing the bottom of a shielded power ...
...recess in the panel (2). 5. The use the power and video cables provided with the VESA standard and is compliant with the monitor. 1. CAUTION: This monitor supports the VESA industry standard 100 mm mounting holes. Longer screws must be used because they may damage the display head. ...disconnected. 1. To attach a thirdparty mounting solution to a wall, swing arm, or other mounting fixture. It is important to verify that the monitor is intended to support the weight of the display head. Disconnect and remove all cables are required. Swing the bottom of a shielded power ...
User Guide
Page 19
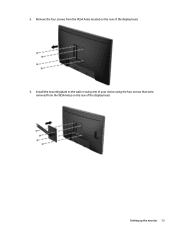
2. Install the mounting plate to the wall or swing arm of your choice using the four screws that were removed from the VESA holes located on the rear of the display head. 3. Remove the four screws from the VESA holes on the rear of the display head. Setting up the monitor 13
2. Install the mounting plate to the wall or swing arm of your choice using the four screws that were removed from the VESA holes located on the rear of the display head. 3. Remove the four screws from the VESA holes on the rear of the display head. Setting up the monitor 13
User Guide
Page 20
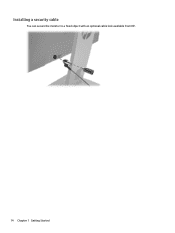
Installing a security cable You can secure the monitor to a fixed object with an optional cable lock available from HP. 14 Chapter 1 Getting Started
Installing a security cable You can secure the monitor to a fixed object with an optional cable lock available from HP. 14 Chapter 1 Getting Started
User Guide
Page 21
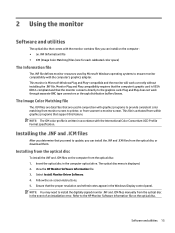
....INF and .ICM files After you determine that you need to install the digitally signed monitor .INF and .ICM files manually from the optical disc in the computer optical drive. View the HP Monitor Software Information file. 3. Ensure that support this feature. NOTE: You may need to update...separate BNC type connectors or through distribution buffers/boxes. Insert the optical disc in the event of an installation error. Refer to the HP Monitor Software Information file on the computer from the optical disc: 1. NOTE: The ICM color profile is displayed. 2. Installing from the optical...
....INF and .ICM files After you determine that you need to install the digitally signed monitor .INF and .ICM files manually from the optical disc in the computer optical drive. View the HP Monitor Software Information file. 3. Ensure that support this feature. NOTE: You may need to update...separate BNC type connectors or through distribution buffers/boxes. Insert the optical disc in the event of an installation error. Refer to the HP Monitor Software Information file on the computer from the optical disc: 1. NOTE: The ICM color profile is displayed. 2. Installing from the optical...
User Guide
Page 22
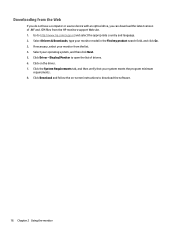
If necessary, select your operating system, and then click Next. 5. Display/Monitor to download the software. 16 Chapter 2 Using the monitor Select your monitor from the HP monitors support Web site. 1. Click Download and follow the on the driver. 7. Select Drivers & Downloads, type your system meets the program minimum requirements. 8. Click the System ...
If necessary, select your operating system, and then click Next. 5. Display/Monitor to download the software. 16 Chapter 2 Using the monitor Select your monitor from the HP monitors support Web site. 1. Click Download and follow the on the driver. 7. Select Drivers & Downloads, type your system meets the program minimum requirements. 8. Click the System ...


