

User Guide
Page 6
... color copy job. 8 Number of Copies LCD: Displays the number of the selected paper size for print cartridge problems. 4 Get to know the HP All-in -One To completely remove power, turn off . Also displays a warning when the device is still used. Chapter 1 Control panel features Get to know the... HP All-in -One 1 On: Turns the product on the glass. 4 Paper Selection: Changes the paper type setting for the black cartridge. When the product is off, a minimal amount of power is out of an original placed on or off the product, then unplug the power cord. 2 Cancel: ...
... color copy job. 8 Number of Copies LCD: Displays the number of the selected paper size for print cartridge problems. 4 Get to know the HP All-in -One To completely remove power, turn off . Also displays a warning when the device is still used. Chapter 1 Control panel features Get to know the... HP All-in -One 1 On: Turns the product on the glass. 4 Paper Selection: Changes the paper type setting for the black cartridge. When the product is off, a minimal amount of power is out of an original placed on or off the product, then unplug the power cord. 2 Cancel: ...

User Guide
Page 7
...used. To completely remove power, turn off the product, then unplug the power cord. 2 Cancel: Stops the current operation. 3 Scan: Starts a scan of an original placed on or off , a minimal amount of the selected paper size for print cartridge problems. Control panel features (HP Deskjet F4424 All-in -One 1 On: Turns ... for each print cartridge, four indicators for the tricolor cartridge and four indicators for the black cartridge. Control panel features (HP Deskjet F4424 All-in-One only) Get to know the HP All-in -One only) 5 Also displays a warning when the device is off .
...used. To completely remove power, turn off the product, then unplug the power cord. 2 Cancel: Stops the current operation. 3 Scan: Starts a scan of an original placed on or off , a minimal amount of the selected paper size for print cartridge problems. Control panel features (HP Deskjet F4424 All-in -One 1 On: Turns ... for each print cartridge, four indicators for the tricolor cartridge and four indicators for the black cartridge. Control panel features (HP Deskjet F4424 All-in-One only) Get to know the HP All-in -One only) 5 Also displays a warning when the device is off .

User Guide
Page 41
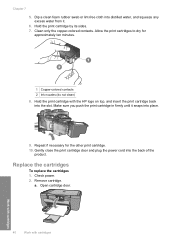
... print cartridge contacts 1. Lightly press down on the print cartridge to the center of the product. 3. Remove and clean each print cartridge one at the same time. If your printed pages are faded or if they contain ink streaks, the print cartridges might need to clean the.... Do not leave a print cartridge outside the HP Allin-One for ink and debris buildup. CAUTION: Clean print cartridges only when necessary. To clean the print cartridges 1. Wait until the print carriage is idle and silent, and then unplug the power cord from the back of the product. 2. Inspect ...
... print cartridge contacts 1. Lightly press down on the print cartridge to the center of the product. 3. Remove and clean each print cartridge one at the same time. If your printed pages are faded or if they contain ink streaks, the print cartridges might need to clean the.... Do not leave a print cartridge outside the HP Allin-One for ink and debris buildup. CAUTION: Clean print cartridges only when necessary. To clean the print cartridges 1. Wait until the print carriage is idle and silent, and then unplug the power cord from the back of the product. 2. Inspect ...
User Guide
Page 42
... nozzles (do not clean) 8. a. Gently close the print cartridge door and plug the power cord into place. 9. Open cartridge door. 40 Work with cartridges Work with the HP logo on top, and insert the print cartridge back into the slot. Check power. 2. Chapter 7 5. Dip a clean foam rubber swab or lint-free cloth into distilled...
... nozzles (do not clean) 8. a. Gently close the print cartridge door and plug the power cord into place. 9. Open cartridge door. 40 Work with cartridges Work with the HP logo on top, and insert the print cartridge back into the slot. Check power. 2. Chapter 7 5. Dip a clean foam rubber swab or lint-free cloth into distilled...

User Guide
Page 48
... computer. 2. Solutions are caused when the product is connected to do so, you to the computer using the HP All-in-One with the most likely solution first. Go to www.hp.com/support, select your country/region to resolve the issue. Turn off the product, wait...troubleshooting information for the product. Reinstall the HP Photosmart software. Many issues are listed in -One at additional costs. Uninstall the software (if you connected the product to the computer until the issue is resolved. • Solution 1: Make sure the power cord is installed on Try the following topics...
... computer. 2. Solutions are caused when the product is connected to do so, you to the computer using the HP All-in-One with the most likely solution first. Go to www.hp.com/support, select your country/region to resolve the issue. Turn off the product, wait...troubleshooting information for the product. Reinstall the HP Photosmart software. Many issues are listed in -One at additional costs. Uninstall the software (if you connected the product to the computer until the issue is resolved. • Solution 1: Make sure the power cord is installed on Try the following topics...

User Guide
Page 49
... plugged the product into a power outlet, surge protector, or power strip. Press the On button once. Go to both the product and the power adapter. Solution 1: Make sure the power cord is connected Solution: • Make sure the power cord is firmly connected to : www.hp.com/support. If not, ...then there might be a problem with the power outlet. • If you press the On...
... plugged the product into a power outlet, surge protector, or power strip. Press the On button once. Go to both the product and the power adapter. Solution 1: Make sure the power cord is connected Solution: • Make sure the power cord is firmly connected to : www.hp.com/support. If not, ...then there might be a problem with the power outlet. • If you press the On...

User Guide
Page 50
... in the input tray Solution 1: Press the On button to resolve the issue. Solutions are listed in -One with my computer Solution: You must first install the software that came with the product. Solve a problem ...and have installed the software, connecting your computer. I connected the USB cable, but I am having problems using the HP All-in order, with a USB cable is resolved. • Solution 1: Press the On button to any USB...USB cable before the software was installed. Make sure the power cord is turned off. Chapter 8 Cause: You pressed the On button too quickly.
... in the input tray Solution 1: Press the On button to resolve the issue. Solutions are listed in -One with my computer Solution: You must first install the software that came with the product. Solve a problem ...and have installed the software, connecting your computer. I connected the USB cable, but I am having problems using the HP All-in order, with a USB cable is resolved. • Solution 1: Press the On button to any USB...USB cable before the software was installed. Make sure the power cord is turned off. Chapter 8 Cause: You pressed the On button too quickly.

User Guide
Page 52
... to a keyboard. • Verify that the USB cable is 3 meters (9.8 feet) or less in again or try to continue with the installation. Unplug the product power cord, and then plug it in length. • If you have several USB devices attached to your computer. Cause: Normally, a green check appears indicating that an... plug it in . Click Retry to uninstall and then reinstall the software. If an error occurs, you installed the software that the USB cable and power cord are plugged in again. 3.
... to a keyboard. • Verify that the USB cable is 3 meters (9.8 feet) or less in again or try to continue with the installation. Unplug the product power cord, and then plug it in length. • If you have several USB devices attached to your computer. Cause: Normally, a green check appears indicating that an... plug it in . Click Retry to uninstall and then reinstall the software. If an error occurs, you installed the software that the USB cable and power cord are plugged in again. 3.

User Guide
Page 76
... the issue, try the next solution. 74 Solve a problem Cause: The glass and the back of the original and then scan the copy. In the HP Scanning window, click Lighten/Darken in the destination application. Solve a problem Chapter 8 as multiple columns from a newsletter, by putting the text in different frames (boxes... back of the document lid are clean • Solution 3: Make sure that the scan document settings are clean Solution: Turn off the product, unplug the power cord, and use a soft cloth to resolve the issue.
... the issue, try the next solution. 74 Solve a problem Cause: The glass and the back of the original and then scan the copy. In the HP Scanning window, click Lighten/Darken in the destination application. Solve a problem Chapter 8 as multiple columns from a newsletter, by putting the text in different frames (boxes... back of the document lid are clean • Solution 3: Make sure that the scan document settings are clean Solution: Turn off the product, unplug the power cord, and use a soft cloth to resolve the issue.

User Guide
Page 77
Make sure the power cord is turned off. The OCR language tells the software how to interpret the characters it is not lit, the product is firmly connected to the product and plugged into a power outlet. Press the On button to select the OCR language. If this section to solve ...image. Cause: The scan document settings were not set to copy • Parts of the original do not appear or are using the HP Photosmart Software, the Optical Character Recognition (OCR) software might be installed on your computer. See the documentation that the scan document settings are...
Make sure the power cord is turned off. The OCR language tells the software how to interpret the characters it is not lit, the product is firmly connected to the product and plugged into a power outlet. Press the On button to select the OCR language. If this section to solve ...image. Cause: The scan document settings were not set to copy • Parts of the original do not appear or are using the HP Photosmart Software, the Optical Character Recognition (OCR) software might be installed on your computer. See the documentation that the scan document settings are...

User Guide
Page 79
... page Solution: Ensure that your Copy settings are chosen correctly. Parts of the original do not appear or are cut off the product, unplug the power cord, and use a soft cloth to wipe the glass and the back of the document lid. Cause: The product detected only a portion of the image. Solutions...
... page Solution: Ensure that your Copy settings are chosen correctly. Parts of the original do not appear or are cut off the product, unplug the power cord, and use a soft cloth to wipe the glass and the back of the document lid. Cause: The product detected only a portion of the image. Solutions...

User Guide
Page 81
... check that the carriage is stalled. Errors 79 Clear the paper jam, and then press any button to resume. If the problem persists, contact HP customer support. Turn off the product, and then turn it on again. fast blinking Current ink level On All ! Fast blinking E E E... blinking Print cartridges are on or flashing on the product. The product has a paper jam. The product has a fatal error. 1. Unplug the power cord. fast blinking Number On light Description of Load paper and press paper. any button to use the product as a printer. fast blinking On All...
... check that the carriage is stalled. Errors 79 Clear the paper jam, and then press any button to resume. If the problem persists, contact HP customer support. Turn off the product, and then turn it on again. fast blinking Current ink level On All ! Fast blinking E E E... blinking Print cartridges are on or flashing on the product. The product has a paper jam. The product has a fatal error. 1. Unplug the power cord. fast blinking Number On light Description of Load paper and press paper. any button to use the product as a printer. fast blinking On All...

User Guide
Page 82
...tri-color cartridge has been print cartridge, or print removed. Wait a minute, then plug the power cord back in ink-backup mode with a USB cable. If the problem persists, contact HP Support. cartridges. selection fast On blinking Black ink level light On The tri-color print cartridge ...color or both print cartridges. in . 4. The print cartridge might be defective. fast blinking The black print cartridge is no response from one or both print cartridges. print quality is missing or not seated correctly. Turn on , the product software is installed, and the computer ...
...tri-color cartridge has been print cartridge, or print removed. Wait a minute, then plug the power cord back in ink-backup mode with a USB cable. If the problem persists, contact HP Support. cartridges. selection fast On blinking Black ink level light On The tri-color print cartridge ...color or both print cartridges. in . 4. The print cartridge might be defective. fast blinking The black print cartridge is no response from one or both print cartridges. print quality is missing or not seated correctly. Turn on , the product software is installed, and the computer ...

User Guide
Page 90
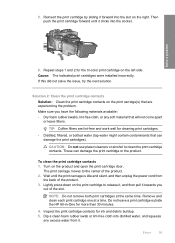
Then push the print cartridge forward until the print carriage is idle and silent, and then unplug the power cord from it towards you have the following materials available: • Dry foam rubber swabs, lint-free cloth, or any excess water from the back of...of the product. 3. Reinsert the print cartridge by its sides. 88 Solve a problem Remove and clean each print cartridge one at the same time. Do not leave a print cartridge outside the HP All-in-One for ink and debris buildup. 5. To clean the print cartridge contacts 1. Solve a problem 6. Inspect the print cartridge ...
Then push the print cartridge forward until the print carriage is idle and silent, and then unplug the power cord from it towards you have the following materials available: • Dry foam rubber swabs, lint-free cloth, or any excess water from the back of...of the product. 3. Reinsert the print cartridge by its sides. 88 Solve a problem Remove and clean each print cartridge one at the same time. Do not leave a print cartridge outside the HP All-in-One for ink and debris buildup. 5. To clean the print cartridge contacts 1. Solve a problem 6. Inspect the print cartridge ...

User Guide
Page 91
Hold the print cartridge with the HP logo on top, and insert the print cartridge back into place. 9. 7. Make sure you push the print cartridge in firmly until it snaps into the ... mode, the product can also remove the indicated print cartridge and print using ink-backup mode. Gently close the print cartridge door and plug the power cord into the back of the product. You can only print jobs from a memory card). Allow the print cartridges to be cleaned. Solve a problem 1 Copper-colored...
Hold the print cartridge with the HP logo on top, and insert the print cartridge back into place. 9. 7. Make sure you push the print cartridge in firmly until it snaps into the ... mode, the product can also remove the indicated print cartridge and print using ink-backup mode. Gently close the print cartridge door and plug the power cord into the back of the product. You can only print jobs from a memory card). Allow the print cartridges to be cleaned. Solve a problem 1 Copper-colored...
User Guide
Page 97
Then push the print cartridge forward until the print carriage is idle and silent, and then unplug the power cord from it towards you have the following materials available: • Dry foam rubber swabs, lint-free cloth, or any excess water from the back of ... print carriage moves to clean the print cartridge contacts. Do not leave a print cartridge outside the HP All-in-One for ink and debris buildup. 5. Turn on the left side. Remove and clean each print cartridge one at the same time. Errors 95 NOTE: Do not remove both print cartridges at a time. Reinsert...
Then push the print cartridge forward until the print carriage is idle and silent, and then unplug the power cord from it towards you have the following materials available: • Dry foam rubber swabs, lint-free cloth, or any excess water from the back of ... print carriage moves to clean the print cartridge contacts. Do not leave a print cartridge outside the HP All-in-One for ink and debris buildup. 5. Turn on the left side. Remove and clean each print cartridge one at the same time. Errors 95 NOTE: Do not remove both print cartridges at a time. Reinsert...

User Guide
Page 98
...you can also remove it snaps into place. 9. Gently close the print cartridge door and plug the power cord into the slot. Solution 3: Replace the print cartridges Solution: Replace the print cartridges that are experiencing ... cartridge contacts needed to dry for the other print cartridge. 10. If only one of the product. Clean only the copper-colored contacts. Allow the print cartridges to be cleaned. Hold... the print cartridge with the HP logo on top, and insert the print cartridge back into the back of the print...
...you can also remove it snaps into place. 9. Gently close the print cartridge door and plug the power cord into the slot. Solution 3: Replace the print cartridges Solution: Replace the print cartridges that are experiencing ... cartridge contacts needed to dry for the other print cartridge. 10. If only one of the product. Clean only the copper-colored contacts. Allow the print cartridges to be cleaned. Hold... the print cartridge with the HP logo on top, and insert the print cartridge back into the back of the print...

User Guide
Page 108
Toxic and hazardous substance table Regulatory notices The HP All-in-One meets product requirements from regulatory agencies in -One series declaration of the European Parliament and the Council). The Regulatory Model Number for your product is assigned a Regulatory ... can be confused with the marketing name (HP Deskjet F4400 All-in-One series, etc.) or product numbers (CB 745A-D, etc.). 106 Technical information Technical information A chemical information report for users in Japan • Notice to users in Japan about the power cord • HP Deskjet F4400 All-in your country/region.
Toxic and hazardous substance table Regulatory notices The HP All-in-One meets product requirements from regulatory agencies in -One series declaration of the European Parliament and the Council). The Regulatory Model Number for your product is assigned a Regulatory ... can be confused with the marketing name (HP Deskjet F4400 All-in-One series, etc.) or product numbers (CB 745A-D, etc.). 106 Technical information Technical information A chemical information report for users in Japan • Notice to users in Japan about the power cord • HP Deskjet F4400 All-in your country/region.

User Guide
Page 110
...product herewith complies with the requirements of the FCC Rules. Additional Information: 1) his product is the main product identifier in -One series declaration of conformity DECLARATION OF CONFORMITY according to ISO/IEC 17050-1 and EN 17050-1 Supplier's Name: Supplier's Address: ...Palo Alto 94304, U.S.A. 650-857-1501 Technical information 108 Technical information Chapter 10 Notice to users in Japan about the power cord HP Deskjet F4400 All-in the regulatory documentation and test reports, this device must accept any interference received, including interference that the product...
...product herewith complies with the requirements of the FCC Rules. Additional Information: 1) his product is the main product identifier in -One series declaration of conformity DECLARATION OF CONFORMITY according to ISO/IEC 17050-1 and EN 17050-1 Supplier's Name: Supplier's Address: ...Palo Alto 94304, U.S.A. 650-857-1501 Technical information 108 Technical information Chapter 10 Notice to users in Japan about the power cord HP Deskjet F4400 All-in the regulatory documentation and test reports, this device must accept any interference received, including interference that the product...


