User Manual
Page 2
... "as an additional warranty. in the express limited warranty statements accompanying such products. under license. Nothing herein should be trademarks of Microsoft Corporation in the U.S. HP iPAQ products are set forth in the U.S.
... "as an additional warranty. in the express limited warranty statements accompanying such products. under license. Nothing herein should be trademarks of Microsoft Corporation in the U.S. HP iPAQ products are set forth in the U.S.
User Manual
Page 3
... 2 Box contents 3 Components Front panel components ...3 Top and bottom panel components ...4 Left and right side components ...5 Back panel components ...6 4 Set up your HP iPAQ Step 1: Remove the battery cover and insert the SIM card 7 Step 2: Install the battery and replace the battery cover 8 Step 3: Charge the battery ...9 ... icons ...14 Use the touch screen display ...14 Use shortcut menus ...15 Use the 5-way optical navigation ...15 Use the main buttons on the HP iPAQ 15 Answer/Send key ...16 End/Power key ...16 Windows key ...16 ok key ...16 Volume up/down keys ...16 Camera key ...16...
... 2 Box contents 3 Components Front panel components ...3 Top and bottom panel components ...4 Left and right side components ...5 Back panel components ...6 4 Set up your HP iPAQ Step 1: Remove the battery cover and insert the SIM card 7 Step 2: Install the battery and replace the battery cover 8 Step 3: Charge the battery ...9 ... icons ...14 Use the touch screen display ...14 Use shortcut menus ...15 Use the 5-way optical navigation ...15 Use the main buttons on the HP iPAQ 15 Answer/Send key ...16 End/Power key ...16 Windows key ...16 ok key ...16 Volume up/down keys ...16 Camera key ...16...

User Manual
Page 4
... on-screen keyboard ...17 Use Key Guard ...18 Know your device ...18 Find information about your HP iPAQ 18 Access programs ...19 View the operating system (OS) information 20 Customize your HP iPAQ ...20 Create a device name ...20 Specify owner information 20 Change the regional settings 21 Adjust...26 Adjust the speed for scrolling through items in a list 26 Use the proximity sensor 26 Protect your HP iPAQ with a password 26 Battery-saving tips ...27 Power Save Mode ...28 6 Use your HP iPAQ Check connection and signal strength 29 Call features ...29 Make a call ...29 Call a contact ......
... on-screen keyboard ...17 Use Key Guard ...18 Know your device ...18 Find information about your HP iPAQ 18 Access programs ...19 View the operating system (OS) information 20 Customize your HP iPAQ ...20 Create a device name ...20 Specify owner information 20 Change the regional settings 21 Adjust...26 Adjust the speed for scrolling through items in a list 26 Use the proximity sensor 26 Protect your HP iPAQ with a password 26 Battery-saving tips ...27 Power Save Mode ...28 6 Use your HP iPAQ Check connection and signal strength 29 Call features ...29 Make a call ...29 Call a contact ......
User Manual
Page 5
Use the speakerphone ...32 Make data calls ...32 Make a call from a hyperlink phone number 32 Dial international numbers 32 Make a conference call ...33 Call history ...33 Make calls using call history 33 View call details ...33 Change the SIM PIN ...33 Change service settings ...34 Forward calls ...34 Call waiting ...35 Configure caller ID ...35 Block calls ...35 Set up Voice mail or text messaging center number 36 Supported frequency bands ...36 Configure channels ...36 7 Contacts Create a contact ...38 Edit the contact information ...38 Delete a contact ...38 Create and assign a ...
Use the speakerphone ...32 Make data calls ...32 Make a call from a hyperlink phone number 32 Dial international numbers 32 Make a conference call ...33 Call history ...33 Make calls using call history 33 View call details ...33 Change the SIM PIN ...33 Change service settings ...34 Forward calls ...34 Call waiting ...35 Configure caller ID ...35 Block calls ...35 Set up Voice mail or text messaging center number 36 Supported frequency bands ...36 Configure channels ...36 7 Contacts Create a contact ...38 Edit the contact information ...38 Delete a contact ...38 Create and assign a ...

User Manual
Page 6
Compose and send e-mail messages 48 Reply to or forward a message 48 Add an attachment to a message 48 Receive attachments ...48 Receive meeting requests 49 Create or change a signature 50 Download messages ...50 Download messages from a server 50 Install an online address book ...51 9 Calendar Create an appointment ...52 Create and assign a category ...52 Change the display of the work week 52 Set a default reminder for all new appointments 53 Update an appointment ...53 Cancel an appointment ...53 10 Tasks Create a task ...54 Create and assign a category ...54 Set the start and due ...
Compose and send e-mail messages 48 Reply to or forward a message 48 Add an attachment to a message 48 Receive attachments ...48 Receive meeting requests 49 Create or change a signature 50 Download messages ...50 Download messages from a server 50 Install an online address book ...51 9 Calendar Create an appointment ...52 Create and assign a category ...52 Change the display of the work week 52 Set a default reminder for all new appointments 53 Update an appointment ...53 Cancel an appointment ...53 10 Tasks Create a task ...54 Create and assign a category ...54 Set the start and due ...
User Manual
Page 7
... 67 Create a Bluetooth partnership 67 End a Bluetooth partnership 68 Accept a Bluetooth partnership 68 Edit a Bluetooth partnership 68 Connect to a computer using Bluetooth 69 Use your HP iPAQ as a wireless modem with Bluetooth 69 Bluetooth device profiles ...69 Access services ...70 Set up an incoming or outgoing Bluetooth communications (COM) port 70...
... 67 Create a Bluetooth partnership 67 End a Bluetooth partnership 68 Accept a Bluetooth partnership 68 Edit a Bluetooth partnership 68 Connect to a computer using Bluetooth 69 Use your HP iPAQ as a wireless modem with Bluetooth 69 Bluetooth device profiles ...69 Access services ...70 Set up an incoming or outgoing Bluetooth communications (COM) port 70...
User Manual
Page 8
... Streaming Player ...82 Customer Feedback ...82 Games ...83 Bubble Breaker ...83 Solitaire ...83 Global Positioning System (GPS) on your HP iPAQ 83 Prepare your HP iPAQ ...83 Verify Internet access ...83 Verify the date and time ...84 Download the GPS Connection Utility data file 84 Verify ... software 85 Google Maps™ for mobile ...86 Google Search ...87 HP Asset Viewer ...87 Certificates ...88 HP Enterprise Mobility Suite ...88 HP iPAQ DataConnect ...88 HP Photosmart Mobile ...89 View the pictures and videos stored on your HP iPAQ or a storage card 89 Attach a voice note to a picture...
... Streaming Player ...82 Customer Feedback ...82 Games ...83 Bubble Breaker ...83 Solitaire ...83 Global Positioning System (GPS) on your HP iPAQ 83 Prepare your HP iPAQ ...83 Verify Internet access ...83 Verify the date and time ...84 Download the GPS Connection Utility data file 84 Verify ... software 85 Google Maps™ for mobile ...86 Google Search ...87 HP Asset Viewer ...87 Certificates ...88 HP Enterprise Mobility Suite ...88 HP iPAQ DataConnect ...88 HP Photosmart Mobile ...89 View the pictures and videos stored on your HP iPAQ or a storage card 89 Attach a voice note to a picture...
User Manual
Page 9
... library ...108 Windows Update ...108 16 Product specifications System specifications ...109 Physical specifications ...110 Operating environment ...110 17 Guidelines for care and maintenance Use your HP iPAQ appropriately ...111 Clean your HP iPAQ ...111 Carry or store your HP iPAQ ...111 Use accessories ...111 ix
... library ...108 Windows Update ...108 16 Product specifications System specifications ...109 Physical specifications ...110 Operating environment ...110 17 Guidelines for care and maintenance Use your HP iPAQ appropriately ...111 Clean your HP iPAQ ...111 Carry or store your HP iPAQ ...111 Use accessories ...111 ix

User Manual
Page 10
18 Frequently asked questions Battery ...112 Connection ...114 Synchronization ...116 Miscellaneous ...116 19 Optional accessories 20 Safety information General precautions ...119 Safety precautions for power cords and accessories 120 Safety precautions for battery packs 120 Safety precautions for docking devices 121 Safety precautions for products with wireless devices 121 Safety precautions for products with modems, telecommunications or local area network accessories ...121 21 Regulatory notices Federal Communications Commission Notice 122 Modifications ...122 Cables ...122 Declaration...
18 Frequently asked questions Battery ...112 Connection ...114 Synchronization ...116 Miscellaneous ...116 19 Optional accessories 20 Safety information General precautions ...119 Safety precautions for power cords and accessories 120 Safety precautions for battery packs 120 Safety precautions for docking devices 121 Safety precautions for products with wireless devices 121 Safety precautions for products with modems, telecommunications or local area network accessories ...121 21 Regulatory notices Federal Communications Commission Notice 122 Modifications ...122 Cables ...122 Declaration...

User Manual
Page 11
Thailand Wireless Notice ...129 22 Quick reference Acronyms ...130 Icons used ...131 Index ...134 xi
Thailand Wireless Notice ...129 22 Quick reference Acronyms ...130 Icons used ...131 Index ...134 xi

User Manual
Page 13
... with the instructions necessary to set up for free support alerts, software updates, and personalized newsletters. After registering your HP iPAQ, you will give you a comprehensive understanding of all countries/regions. 1 This Product Guide will receive an e-mail message about special ...fullest potential. Please read the user instructions contained in your HP iPAQ Data Messenger and enables you to use and enjoy your HP iPAQ Data Messenger! Visit http://www.register.hp.com to register your HP iPAQ or to update your HP iPAQ. This Product Guide provides you can find further ...
... with the instructions necessary to set up for free support alerts, software updates, and personalized newsletters. After registering your HP iPAQ, you will give you a comprehensive understanding of all countries/regions. 1 This Product Guide will receive an e-mail message about special ...fullest potential. Please read the user instructions contained in your HP iPAQ Data Messenger and enables you to use and enjoy your HP iPAQ Data Messenger! Visit http://www.register.hp.com to register your HP iPAQ or to update your HP iPAQ. This Product Guide provides you can find further ...
User Manual
Page 14
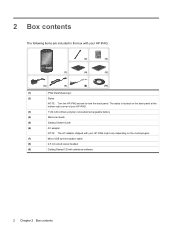
... removable/rechargeable battery (4) Welcome Guide (5) Getting Started Guide (6) AC adapter NOTE: The AC adapter shipped with additional software 2 Chapter 2 Box contents iPAQ iPAQ Data MeWsseelWncogemleWceoremlceome HP iPAQ Data GettiGngettSiGntagertttSeindtagrGtSeutdaidrGteeudidGeuide Messenger AFllorrigdDhistostrinrbeoustetilroevnneddo.onlrym2wa0itk0he8ailMlwW eigwciarnwolds.chooopwfpt.sciCeoM osmroopfboitrhlaeits®i-opsnoo.fwtwearered. device. (1) iPAQ Data Messenger (2) Stylus NOTE: Turn the...
... removable/rechargeable battery (4) Welcome Guide (5) Getting Started Guide (6) AC adapter NOTE: The AC adapter shipped with additional software 2 Chapter 2 Box contents iPAQ iPAQ Data MeWsseelWncogemleWceoremlceome HP iPAQ Data GettiGngettSiGntagertttSeindtagrGtSeutdaidrGteeudidGeuide Messenger AFllorrigdDhistostrinrbeoustetilroevnneddo.onlrym2wa0itk0he8ailMlwW eigwciarnwolds.chooopwfpt.sciCeoM osmroopfboitrhlaeits®i-opsnoo.fwtwearered. device. (1) iPAQ Data Messenger (2) Stylus NOTE: Turn the...

User Manual
Page 15
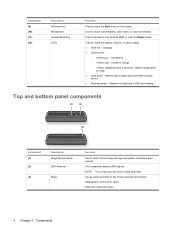
... This component sets the keyboard backlight to end a phone or data call. Use the stylus to phone calls, sounds, and notifications. Scroll by sliding your HP iPAQ to its full potential, identify components and learn about its functions. 3 Components To use , and then locks the screen and turns off the... or dial numbers. NOTE: The keyboard layout might vary depending on the keyboard to view the on the screen. ok Key Press to confirm your HP iPAQ into suspend mode, or to turn on the screen with the 5-way optical Center Select button navigation. Press and hold for 1 second to ...
... This component sets the keyboard backlight to end a phone or data call. Use the stylus to phone calls, sounds, and notifications. Scroll by sliding your HP iPAQ to its full potential, identify components and learn about its functions. 3 Components To use , and then locks the screen and turns off the... or dial numbers. NOTE: The keyboard layout might vary depending on the keyboard to view the on the screen. ok Key Press to confirm your HP iPAQ into suspend mode, or to turn on the screen with the 5-way optical Center Select button navigation. Press and hold for 1 second to ...
User Manual
Page 16
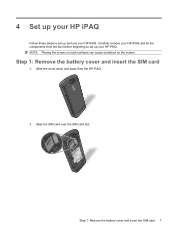
Use for phone conversations, voice notes, or voice commands. View to select elements on the screen. Battery temperature too high ● Solid green - Use to check the battery, network, or device status. ● Solid red - Network not detected or SIM card missing Top and bottom panel components Component (1) (2) (3) Description Ringer/Sound Switch GPS Antenna Stylus Function Use to switch off incoming call , send an SMS, or view the Dialer screen. Charging ● Flashing red ◦ Continuous - Low battery ◦ 3 times only - Unable to remove the stylus. Slide down...
Use for phone conversations, voice notes, or voice commands. View to select elements on the screen. Battery temperature too high ● Solid green - Use to check the battery, network, or device status. ● Solid red - Network not detected or SIM card missing Top and bottom panel components Component (1) (2) (3) Description Ringer/Sound Switch GPS Antenna Stylus Function Use to switch off incoming call , send an SMS, or view the Dialer screen. Charging ● Flashing red ◦ Continuous - Low battery ◦ 3 times only - Unable to remove the stylus. Slide down...

User Manual
Page 17
... slot. Use to the slot. Key Guard will disable buttons and the touchscreen on the screen and input information. Use to select elements on your HP iPAQ to temporarily mute the ringtone and notification sounds. NOTE: Open the protective flap to gain access to connect headphones. Use to launch the camera...
... slot. Use to the slot. Key Guard will disable buttons and the touchscreen on the screen and input information. Use to select elements on your HP iPAQ to temporarily mute the ringtone and notification sounds. NOTE: Open the protective flap to gain access to connect headphones. Use to launch the camera...

User Manual
Page 18
... the speaker to listen to make and receive calls. Insert a Micro Secure Digital (microSD) storage card with the metal contacts facing down to illuminate your HP iPAQ on page 7 and Storage cards on the screen and input information. Slide down to music or as a speakerphone. For more information about installing these...
... the speaker to listen to make and receive calls. Insert a Micro Secure Digital (microSD) storage card with the metal contacts facing down to illuminate your HP iPAQ on page 7 and Storage cards on the screen and input information. Slide down to music or as a speakerphone. For more information about installing these...
User Manual
Page 19
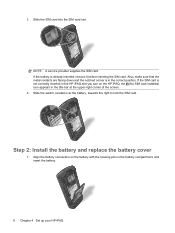
NOTE: Placing the screen on hard surfaces can cause scratches on the screen. Slide the cover down and away from the box before beginning to set up and use your HP iPAQ. Step 1: Remove the battery cover and insert the SIM card 1. 4 Set up your HP iPAQ Follow these steps to set up your HP iPAQ. Align the SIM card over the SIM card slot. Step 1: Remove the battery cover and insert the SIM card 7 Carefully remove your HP iPAQ and all the components from the HP iPAQ. 2.
NOTE: Placing the screen on hard surfaces can cause scratches on the screen. Slide the cover down and away from the box before beginning to set up and use your HP iPAQ. Step 1: Remove the battery cover and insert the SIM card 1. 4 Set up your HP iPAQ Follow these steps to set up your HP iPAQ. Align the SIM card over the SIM card slot. Step 1: Remove the battery cover and insert the SIM card 7 Carefully remove your HP iPAQ and all the components from the HP iPAQ. 2.
User Manual
Page 20
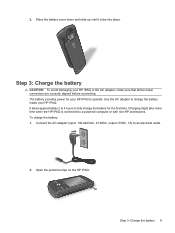
... is in the correct position. Also, make sure that the metal contacts are facing down and the notched corner is not correctly inserted in the HP iPAQ and you turn on the battery with the housing pins in the title bar at the upper-right corner of the screen. 4. Step 2: Install... the battery, towards the right to lock the SIM card. Slide the SIM card into the SIM card slot. Align the battery connectors on the HP iPAQ, the (No SIM card installed) icon appears in the battery compartment, and insert the battery. 8 Chapter 4 Set up your...
... is in the correct position. Also, make sure that the metal contacts are facing down and the notched corner is not correctly inserted in the HP iPAQ and you turn on the battery with the housing pins in the title bar at the upper-right corner of the screen. 4. Step 2: Install... the battery, towards the right to lock the SIM card. Slide the SIM card into the SIM card slot. Align the battery connectors on the HP iPAQ, the (No SIM card installed) icon appears in the battery compartment, and insert the battery. 8 Chapter 4 Set up your...
User Manual
Page 21
... to operate. 2. Connect the AC adapter (input: 100-240VAC, 47-63Hz, output: 5VDC, 1A) to charge the battery inside your HP iPAQ. Step 3: Charge the battery 9 The battery provides power for the first time. Place the battery cover down and slide up until it locks ... to an electrical outlet. 2. It takes approximately 2 to 4 hours to a powered computer or with non-HP accessories. Charging might take more time when the HP iPAQ is connected to fully charge the battery for your HP iPAQ or the AC adapter, make sure that all the metal connectors are correctly aligned before...
... to operate. 2. Connect the AC adapter (input: 100-240VAC, 47-63Hz, output: 5VDC, 1A) to charge the battery inside your HP iPAQ. Step 3: Charge the battery 9 The battery provides power for the first time. Place the battery cover down and slide up until it locks ... to an electrical outlet. 2. It takes approximately 2 to 4 hours to a powered computer or with non-HP accessories. Charging might take more time when the HP iPAQ is connected to fully charge the battery for your HP iPAQ or the AC adapter, make sure that all the metal connectors are correctly aligned before...

User Manual
Page 22
... Use USB Charging check box, select the Fast Charging option, and then tap ok. To enable USB charging on -screen keyboard. Alternatively, you connect your HP iPAQ, tap Start > Settings > System > Power > USB Charging. If the connector does not insert easily, turn on your computer through the Micro-USB ...to use the stylus to a computer that has the software already installed on the screen. NOTE: The HP iPAQ will not be active during this period. You can also use the on your HP iPAQ to tap and select items on the computer. To remove the stylus: 1. The Microsoft® ActiveSync...
... Use USB Charging check box, select the Fast Charging option, and then tap ok. To enable USB charging on -screen keyboard. Alternatively, you connect your HP iPAQ, tap Start > Settings > System > Power > USB Charging. If the connector does not insert easily, turn on your computer through the Micro-USB ...to use the stylus to a computer that has the software already installed on the screen. NOTE: The HP iPAQ will not be active during this period. You can also use the on your HP iPAQ to tap and select items on the computer. To remove the stylus: 1. The Microsoft® ActiveSync...