Legal information
Page 8
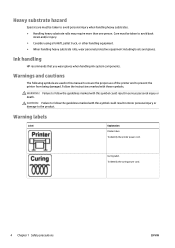
... personal protective equipment including boots and gloves. WARNING! To identify the curing power cord. 4 Chapter 1 Safety precautions ENWW Ink handling HP recommends that you wear gloves when handling ink system components. Warnings and cautions The following symbols are used in serious personal injury or ...death. Follow the instructions marked with this manual to ensure the proper use of the printer and to the product. To identify the printer power cord. Failure to follow ...
... personal protective equipment including boots and gloves. WARNING! To identify the curing power cord. 4 Chapter 1 Safety precautions ENWW Ink handling HP recommends that you wear gloves when handling ink system components. Warnings and cautions The following symbols are used in serious personal injury or ...death. Follow the instructions marked with this manual to ensure the proper use of the printer and to the product. To identify the printer power cord. Failure to follow ...

Site preparation guide Latex 3x5
Page 5
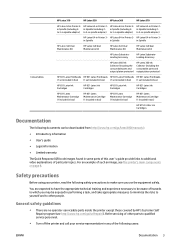
A well prepared site helps to ensure complete compliance with your printer, and can be downloaded from http://www.hp.com/go/ Latex300/manuals/: ● Introductory information ● Limited warranty ● Legal information ● Site preparation guide (this guide) ● ... printer. It is important to power the printer. ENWW Introduction 1 1 Overview Introduction Your printer is installed. Documentation The following manuals are provided with all requirements for the installation of the printer. ● Prepare the building's electrical system to meet the printer...
A well prepared site helps to ensure complete compliance with your printer, and can be downloaded from http://www.hp.com/go/ Latex300/manuals/: ● Introductory information ● Limited warranty ● Legal information ● Site preparation guide (this guide) ● ... printer. It is important to power the printer. ENWW Introduction 1 1 Overview Introduction Your printer is installed. Documentation The following manuals are provided with all requirements for the installation of the printer. ● Prepare the building's electrical system to meet the printer...

Users Guide
Page 3
... spindle ...46 Load a roll into the printer ...50 The ink collector (360 and 370 only) ...53 The loading accessory (360 and 370 only) ...58 Assisted manual load ...61 The edge holders ...63 Load a cut sheet into the printer ...66 Unload a roll from the printer ...66 The take-up reel ...67 Double...
... spindle ...46 Load a roll into the printer ...50 The ink collector (360 and 370 only) ...53 The loading accessory (360 and 370 only) ...58 Assisted manual load ...61 The edge holders ...63 Load a cut sheet into the printer ...66 Unload a roll from the printer ...66 The take-up reel ...67 Double...
Users Guide
Page 9
... such an image, see http://www.hp.com/go /latex300/manuals/: ● Introductory information ● User's guide ● Legal information ● Limited warranty The Quick Response (QR) code images found in Printer 3- Refer servicing of other parts to other people. Consumables HP Latex 310 HP Latex 330 HP Latex 360 HP Latex 370 HP Latex 54-in Printer 2- HP Latex 64-in Spindle (including 2- in...
... such an image, see http://www.hp.com/go /latex300/manuals/: ● Introductory information ● User's guide ● Legal information ● Limited warranty The Quick Response (QR) code images found in Printer 3- Refer servicing of other parts to other people. Consumables HP Latex 310 HP Latex 330 HP Latex 360 HP Latex 370 HP Latex 54-in Printer 2- HP Latex 64-in Spindle (including 2- in...
Users Guide
Page 12
Warnings and cautions The following symbols are used in this manual to ensure the proper use of the printer and to qualified service personnel. WARNING! Failure to follow the guidelines marked with this symbol could result ... more than one person. Refer servicing to prevent the printer from being damaged. Ensure that you wear gloves when handling ink system components. Ink handling HP recommends that the input voltage is located on the e-box. Follow the instructions marked with this symbol could result in serious personal injury or death...
Warnings and cautions The following symbols are used in this manual to ensure the proper use of the printer and to qualified service personnel. WARNING! Failure to follow the guidelines marked with this symbol could result ... more than one person. Refer servicing to prevent the printer from being damaged. Ensure that you wear gloves when handling ink system components. Ink handling HP recommends that the input voltage is located on the e-box. Follow the instructions marked with this symbol could result in serious personal injury or death...
Users Guide
Page 16
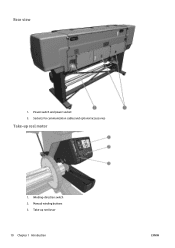
Manual winding buttons 3. Winding-direction switch 2. Power switch and power socket 2. Take-up reel motor 1. Rear view 1. Sockets for communication cables and optional accessories Take-up reel lever 10 Chapter 1 Introduction ENWW
Manual winding buttons 3. Winding-direction switch 2. Power switch and power socket 2. Take-up reel motor 1. Rear view 1. Sockets for communication cables and optional accessories Take-up reel lever 10 Chapter 1 Introduction ENWW
Users Guide
Page 32
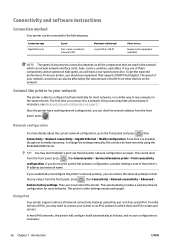
... make full use equipment that are IPv6 routers and servers. Network configuration For more details about the current network configuration, go to change the settings manually; this process may take a few minutes. Using IPv6 Your printer supports almost all the components that supports 1000TX Full Gigabit. varies according to an IPv6...
... make full use equipment that are IPv6 routers and servers. Network configuration For more details about the current network configuration, go to change the settings manually; this process may take a few minutes. Using IPv6 Your printer supports almost all the components that supports 1000TX Full Gigabit. varies according to an IPv6...

Users Guide
Page 33
... IPv6-only. When connected and powered on the network. 3. If no stateless IPv6 addresses can be useful in the printer. You can manually configure the ENWW Advanced network configuration 27 However, you have IPv6 enabled by following the instructions provided with a link speed of shielded I/O ...versions of routable IPv6 addresses will generally find it has only one IPv4 address. For further information on IPv6, see http://h20000.www2.hp.com/bc/docs/support/SupportManual/c00840100/c00840100.pdf. Using the name resolution algorithm in this from the front panel or (more easily)...
... IPv6-only. When connected and powered on the network. 3. If no stateless IPv6 addresses can be useful in the printer. You can manually configure the ENWW Advanced network configuration 27 However, you have IPv6 enabled by following the instructions provided with a link speed of shielded I/O ...versions of routable IPv6 addresses will generally find it has only one IPv4 address. For further information on IPv6, see http://h20000.www2.hp.com/bc/docs/support/SupportManual/c00840100/c00840100.pdf. Using the name resolution algorithm in this from the front panel or (more easily)...
Users Guide
Page 35
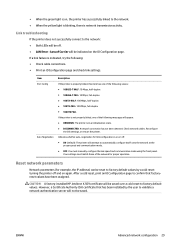
...OFF: You must match those of Carrier will be off and on the IO Configuration page. Check network cables. Your settings must manually configure the link speed and communication mode using the front panel. However, a Certificate Authority (CA) certificate that factoryreset values have ... 1000TX FULL If the printer is in an initialization state. ● DISCONNECTED: A network connection has not been detected. CAUTION: A factory-installed HP Jetdirect X.509 certificate will appear: ● UNKNOWN: The printer is not properly linked, one of the following : ● Check cable connections....
...OFF: You must match those of Carrier will be off and on the IO Configuration page. Check network cables. Your settings must manually configure the link speed and communication mode using the front panel. However, a Certificate Authority (CA) certificate that factoryreset values have ... 1000TX FULL If the printer is in an initialization state. ● DISCONNECTED: A network connection has not been detected. CAUTION: A factory-installed HP Jetdirect X.509 certificate will appear: ● UNKNOWN: The printer is not properly linked, one of the following : ● Check cable connections....

Users Guide
Page 36
... is set to Manual) Configure parameters directly from the printer control panel: IP Address: The unique IP address of the syslog server (n.n.n.n) used for the print server exists. Specifies the method that TCP/IPv4 parameters will be configured on the HP Jetdirect configuration page....Server: The IP address of the printer (n.n.n.n). This name is 270 seconds, 0 disables the timeout). 30 Chapter 1 Introduction ENWW Manual: Use the Manual Settings menu to renew the DHCP lease. No (default): The current DHCP lease is assigned automatically. This menu appears if Config Method...
... is set to Manual) Configure parameters directly from the printer control panel: IP Address: The unique IP address of the syslog server (n.n.n.n) used for the print server exists. Specifies the method that TCP/IPv4 parameters will be configured on the HP Jetdirect configuration page....Server: The IP address of the printer (n.n.n.n). This name is 270 seconds, 0 disables the timeout). 30 Chapter 1 Introduction ENWW Manual: Use the Manual Settings menu to renew the DHCP lease. No (default): The current DHCP lease is assigned automatically. This menu appears if Config Method...

Users Guide
Page 37
...server. Legacy: The address 192.0.0.192 is determined by a router. Precedence table, configured through the embedded Web server. NOTE: This item appears only if Manual configuration is disabled. Specify the IP address (n.n.n.n) of a Primary DNS Server. The router specifies whether the print server obtains its address, its stateful configuration ...from a DHCPv6 server. Auto IP: A link-local IP address 169.254.x.x is enabled. On (default): IPv6 is set , consistent with older HP Jetdirect devices. Enable: Select this item to disable manual configuration.
...server. Legacy: The address 192.0.0.192 is determined by a router. Precedence table, configured through the embedded Web server. NOTE: This item appears only if Manual configuration is disabled. Specify the IP address (n.n.n.n) of a Primary DNS Server. The router specifies whether the print server obtains its address, its stateful configuration ...from a DHCPv6 server. Auto IP: A link-local IP address 169.254.x.x is enabled. On (default): IPv6 is set , consistent with older HP Jetdirect devices. Enable: Select this item to disable manual configuration.

Users Guide
Page 38
... Values and Description Use this item to specify an IPv6 address for a secondary DNS server that contains the current security settings on the HP Jetdirect print server. Yes: Prints a page that the print server should use. Type the port number used by network clients for Internet.... NOTE: The factory default setting depends on the print server model. 32 Chapter 1 Introduction ENWW NOTE: This item will appear only if Manual configuration is accepted. For configuration management, specify whether the embedded Web server will appear as a secure site. HTTP/HTTPS optional: Access using ...
... Values and Description Use this item to specify an IPv6 address for a secondary DNS server that contains the current security settings on the HP Jetdirect print server. Yes: Prints a page that the print server should use. Type the port number used by network clients for Internet.... NOTE: The factory default setting depends on the print server model. 32 Chapter 1 Introduction ENWW NOTE: This item will appear only if Manual configuration is accepted. For configuration management, specify whether the embedded Web server will appear as a secure site. HTTP/HTTPS optional: Access using ...
Users Guide
Page 39
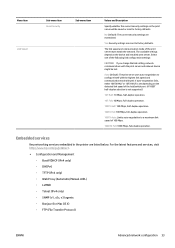
... listed below. Auto (default): The print server uses auto-negotiation to factory defaults. For the latest features and services, visit http://www.hp.com/go/jetdirect. ● Configuration and Management ◦ BootP/DHCP (IPv4 only) ◦ DHCPv6 ◦ TFTP (IPv4 only) ◦ Web Proxy ...(Automatic/Manual cURL) ◦ LLMNR ◦ Telnet (IPv4 only) ◦ SNMP (v1, v2c, v3) agents ◦ Bonjour (for Mac OS X) ◦ FTP (File Transfer...
... listed below. Auto (default): The print server uses auto-negotiation to factory defaults. For the latest features and services, visit http://www.hp.com/go/jetdirect. ● Configuration and Management ◦ BootP/DHCP (IPv4 only) ◦ DHCPv6 ◦ TFTP (IPv4 only) ◦ Web Proxy ...(Automatic/Manual cURL) ◦ LLMNR ◦ Telnet (IPv4 only) ◦ SNMP (v1, v2c, v3) agents ◦ Bonjour (for Mac OS X) ◦ FTP (File Transfer...
Users Guide
Page 42
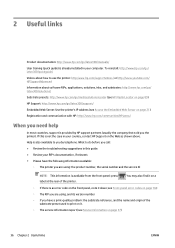
... to you call: ● Review the troubleshooting suggestions in this is provided by telephone. 2 Useful links Product documentation: http://www.hp.com/go /latex300/support/ Embedded Web Server: Use the printer's IP address (see Access the Embedded Web Server on page 21)... software RIPs, applications, solutions, inks, and substrates: http://www.hp.com/go/ latex300/solutions/ Substrate presets: http://www.hp.com/go/mediasolutionslocator (see HP Media Locator on page 89) HP Support: http://www.hp.com/go /latex300/manuals/ User training (quick guide) is already installed in your computer....
... to you call: ● Review the troubleshooting suggestions in this is provided by telephone. 2 Useful links Product documentation: http://www.hp.com/go /latex300/support/ Embedded Web Server: Use the printer's IP address (see Access the Embedded Web Server on page 21)... software RIPs, applications, solutions, inks, and substrates: http://www.hp.com/go/ latex300/solutions/ Substrate presets: http://www.hp.com/go/mediasolutionslocator (see HP Media Locator on page 89) HP Support: http://www.hp.com/go /latex300/manuals/ User training (quick guide) is already installed in your computer....

Users Guide
Page 44
... spindle ● Load a roll into the printer ● The ink collector (360 and 370 only) ● The loading accessory (360 and 370 only) ● Assisted manual load ● The edge holders ● Load a cut sheet into the printer ● Unload a roll from the printer ● The take-up reel ● Double...
... spindle ● Load a roll into the printer ● The ink collector (360 and 370 only) ● The loading accessory (360 and 370 only) ● Assisted manual load ● The edge holders ● Load a cut sheet into the printer ● Unload a roll from the printer ● The take-up reel ● Double...

Users Guide
Page 47
CAUTION: Removing the substrate from the printer manually without using the front panel could damage the printer. Supported substrate categories Substrate category Self-Adhesive Vinyl Textile Substrate types Cast self-adhesive vinyl Calendered ... jam. Do this can cause severe print-quality defects. ● For more substrate tips, see Load a roll into the printer on page 50 and Assisted manual load on page 61.
CAUTION: Removing the substrate from the printer manually without using the front panel could damage the printer. Supported substrate categories Substrate category Self-Adhesive Vinyl Textile Substrate types Cast self-adhesive vinyl Calendered ... jam. Do this can cause severe print-quality defects. ● For more substrate tips, see Load a roll into the printer on page 50 and Assisted manual load on page 61.
Users Guide
Page 56
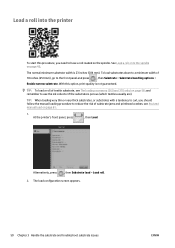
The normal minimum substrate width is not guaranteed. TIP: To load a roll of textile substrate, see Assisted manual load on page 46. Load a roll into the printer To start this option, print quality is 23 inches (584 mm). TIP: When loading very thin...and press , then Substrate > Substrate handling options > Enable narrow substrate. At the printer's front panel, press , then Load. With this procedure, you should follow the manual loading procedure to reduce the risk of 10 inches (254 mm), go to have a roll loaded on page 58; Alternatively, press , then Substrate load > Load...
The normal minimum substrate width is not guaranteed. TIP: To load a roll of textile substrate, see Assisted manual load on page 46. Load a roll into the printer To start this option, print quality is 23 inches (584 mm). TIP: When loading very thin...and press , then Substrate > Substrate handling options > Enable narrow substrate. At the printer's front panel, press , then Load. With this procedure, you should follow the manual loading procedure to reduce the risk of 10 inches (254 mm), go to have a roll loaded on page 58; Alternatively, press , then Substrate load > Load...

Users Guide
Page 57
... you if the skew is over the limit you to insert your choices, instructions are between 1 and 5, default 3. Avoid rewinding the substrate manually, unless the printer asks you have made your fingers inside the printer's substrate path. ENWW Load a roll into the printer 51 See The edge... holders on page 58. ● Assisted manual load. WARNING! See The loading accessory (360 and 370 only) on page 63. Carefully insert the leading edge of the substrate. Take care...
... you if the skew is over the limit you to insert your choices, instructions are between 1 and 5, default 3. Avoid rewinding the substrate manually, unless the printer asks you have made your fingers inside the printer's substrate path. ENWW Load a roll into the printer 51 See The edge... holders on page 58. ● Assisted manual load. WARNING! See The loading accessory (360 and 370 only) on page 63. Carefully insert the leading edge of the substrate. Take care...

Users Guide
Page 64
... enough of the white flaps to help in the Load Configuration screen on page 61. 2. IMPORTANT: Also check the Assisted manual load box, to use the loading accessory. 1. See Assisted manual load on the front panel. The loading accessory (360 and 370 only) The loading accessory is recommended when loading such substrates...
... enough of the white flaps to help in the Load Configuration screen on page 61. 2. IMPORTANT: Also check the Assisted manual load box, to use the loading accessory. 1. See Assisted manual load on the front panel. The loading accessory (360 and 370 only) The loading accessory is recommended when loading such substrates...

Users Guide
Page 65
WARNING! Load the substrate manually, see Safety precautions on page 61. 7. The loading accessory passes through the printer's substrate path with the substrate. ENWW Risk of the substrate together. 6. 4. The ... to cover the leading edge of the substrate. Lift the loading accessory and the leading edge of burns For more safety information, please see Assisted manual load on page 3 The loading accessory (360 and 370 only) 59 Flip the white flaps back to touch the curing zone or the platen, which...
WARNING! Load the substrate manually, see Safety precautions on page 61. 7. The loading accessory passes through the printer's substrate path with the substrate. ENWW Risk of the substrate together. 6. 4. The ... to cover the leading edge of the substrate. Lift the loading accessory and the leading edge of burns For more safety information, please see Assisted manual load on page 3 The loading accessory (360 and 370 only) 59 Flip the white flaps back to touch the curing zone or the platen, which...


