
User Guide
Page 3
... information considered important but not hazard-related (for completing a task. NOTE: Contains additional information to complete a task. About This Guide This guide provides information on monitor features, setting up the monitor, using the software and technical specifications.
... information considered important but not hazard-related (for completing a task. NOTE: Contains additional information to complete a task. About This Guide This guide provides information on monitor features, setting up the monitor, using the software and technical specifications.

User Guide
Page 5
...components ...2 Features ...2 Identifying rear and side components 3 Setting up the monitor ...4 Removing the stand's hinge blocker 4 Connecting the cables ...5 Connecting USB devices ...8 Adjusting the monitor for comfort ...9 Turning on the monitor ...10 Installing a security cable ...11 Storing headphones ...11 Using the ...ambient light ...12 Mounting the display head ...13 Removing the monitor stand 13 Attaching the VESA mounting bracket 14 2 Using the monitor ...15 Software and utilities ...15 Enabling G-SYNC ...15 The Setup Information file ...15 ...
...components ...2 Features ...2 Identifying rear and side components 3 Setting up the monitor ...4 Removing the stand's hinge blocker 4 Connecting the cables ...5 Connecting USB devices ...8 Adjusting the monitor for comfort ...9 Turning on the monitor ...10 Installing a security cable ...11 Storing headphones ...11 Using the ...ambient light ...12 Mounting the display head ...13 Removing the monitor stand 13 Attaching the VESA mounting bracket 14 2 Using the monitor ...15 Software and utilities ...15 Enabling G-SYNC ...15 The Setup Information file ...15 ...

User Guide
Page 6
Locating the serial number and product number 20 4 Maintaining the monitor ...21 Maintenance guidelines ...21 Cleaning the monitor ...21 Shipping the monitor ...21 Appendix A Technical specifications ...22 Preset display resolutions ...23 Entering user modes ...23 Power adapter ...24 Energy saver feature ...24 Appendix B Accessibility ...25 Supported assistive technologies ...25 Contacting support ...25 vi
Locating the serial number and product number 20 4 Maintaining the monitor ...21 Maintenance guidelines ...21 Cleaning the monitor ...21 Shipping the monitor ...21 Appendix A Technical specifications ...22 Preset display resolutions ...23 Entering user modes ...23 Power adapter ...24 Energy saver feature ...24 Appendix B Accessibility ...25 Supported assistive technologies ...25 Contacting support ...25 vi

User Guide
Page 7
...Supply (UPS). NOTE: This product is suitable for example, by unplugging the power cord from the screen. Consider placing the monitor in your HP LCD monitor. IMPORTANT: For the protection of the cord. 1 Getting started Important safety information An AC power adapter and cord may ... power strips provide surge protection; If another cord is easily accessible at http://www.hp.com/ergo. For information on the optical disc or in a controlled luminous environment to the LCD monitor so that no one may accidentally step on dressers, bookcases, shelves, desks, speakers...
...Supply (UPS). NOTE: This product is suitable for example, by unplugging the power cord from the screen. Consider placing the monitor in your HP LCD monitor. IMPORTANT: For the protection of the cord. 1 Getting started Important safety information An AC power adapter and cord may ... power strips provide surge protection; If another cord is easily accessible at http://www.hp.com/ergo. For information on the optical disc or in a controlled luminous environment to the LCD monitor so that no one may accidentally step on dressers, bookcases, shelves, desks, speakers...

User Guide
Page 8
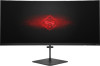
... synchronizing display refresh rates to the GPU in reaction time and a more true-to-life experience - Product features and components Features The monitor features include the following: ● 88.9 cm (35-inch) diagonal viewable area with 3440 × 1440 UWQHD resolution, plus full-screen support for lower resolutions ● Tilt and height... visual experience and a serious competitive edge NOTE: For safety and regulatory information, refer to the Product Notices provided in your product, go to http://www.hp.com/support.
... synchronizing display refresh rates to the GPU in reaction time and a more true-to-life experience - Product features and components Features The monitor features include the following: ● 88.9 cm (35-inch) diagonal viewable area with 3440 × 1440 UWQHD resolution, plus full-screen support for lower resolutions ● Tilt and height... visual experience and a serious competitive edge NOTE: For safety and regulatory information, refer to the Product Notices provided in your product, go to http://www.hp.com/support.

User Guide
Page 9
...features and components 3 If the OSD menu is closed , press to switch to the next input source. (4) Power button Turns the monitor on the optical disc, if one is off . (5) Headphones hook Provides a convenient storage location for headphones. (6) DisplayPort Connects the ...DisplayPort cable to the source device. (7) Service port Used by qualified HP service technicians only. (8) Power connector Connects an AC adapter. (9) Security cable slot Attaches an optional security cable to the monitor. (10) USB 3.0 Type-B port Connects the USB hub cable to the...
...features and components 3 If the OSD menu is closed , press to switch to the next input source. (4) Power button Turns the monitor on the optical disc, if one is off . (5) Headphones hook Provides a convenient storage location for headphones. (6) DisplayPort Connects the ...DisplayPort cable to the source device. (7) Service port Used by qualified HP service technicians only. (8) Power connector Connects an AC adapter. (9) Security cable slot Attaches an optional security cable to the monitor. (10) USB 3.0 Type-B port Connects the USB hub cable to the...
User Guide
Page 10
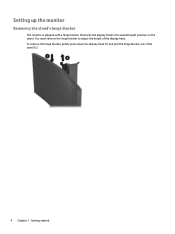
Setting up the monitor Removing the stand's hinge blocker The monitor is shipped with a hinge blocker that locks the display head in the lowest height position on the stand. You must remove the hinge blocker to adjust the height of the stand (2). 4 Chapter 1 Getting started To remove the hinge blocker, gently press down the display head (1) and pull the hinge blocker out of the display head.
Setting up the monitor Removing the stand's hinge blocker The monitor is shipped with a hinge blocker that locks the display head in the lowest height position on the stand. You must remove the hinge blocker to adjust the height of the stand (2). 4 Chapter 1 Getting started To remove the hinge blocker, gently press down the display head (1) and pull the hinge blocker out of the display head.

User Guide
Page 11
... inputs can also be selected by pressing the Menu button on the side of the monitor and selecting Input Control. ● Connect one end of an HDMI cable to the HDMI port on the rear of the monitor and the other end to the HDMI port on the source device. ● Connect... one end of a DisplayPort cable to the DisplayPort port on the rear of the monitor and the other end to the DisplayPort port on the source device. Setting up the monitor 5 NOTE: The monitor will automatically determine which inputs have valid video signals. Connecting the cables NOTE: The...
... inputs can also be selected by pressing the Menu button on the side of the monitor and selecting Input Control. ● Connect one end of an HDMI cable to the HDMI port on the rear of the monitor and the other end to the HDMI port on the source device. ● Connect... one end of a DisplayPort cable to the DisplayPort port on the rear of the monitor and the other end to the DisplayPort port on the source device. Setting up the monitor 5 NOTE: The monitor will automatically determine which inputs have valid video signals. Connecting the cables NOTE: The...

User Guide
Page 12
Connect the Type-B connector on the USB upstream cable to the USB upstream port on the source device (cable not provided). 4. 3. Connect one end of a Mini DisplayPort cable to the DisplayPort port on the rear of the monitor. Then connect the cable's Type-A connector to the Mini DisplayPort port on the rear of the monitor and the other end to the USB downstream port on the source device. 6 Chapter 1 Getting started
Connect the Type-B connector on the USB upstream cable to the USB upstream port on the source device (cable not provided). 4. 3. Connect one end of a Mini DisplayPort cable to the DisplayPort port on the rear of the monitor. Then connect the cable's Type-A connector to the Mini DisplayPort port on the rear of the monitor and the other end to the USB downstream port on the source device. 6 Chapter 1 Getting started

User Guide
Page 13
To reduce the risk of the monitor. Plug the power cord into a grounded (earthed) AC outlet that no one end of the power cord to the ...adapter to the equipment: Do not disable the power cord grounding plug. Do not pull on power cords or cables. Setting up the monitor 7 When unplugging from the AC outlet, grasp the cord by unplugging the power cord from the equipment by the plug. 6. Route...at all times. WARNING! 5. Connect one may accidentally step on the rear of electric shock or damage to the monitor (3). Disconnect power from the electrical outlet. Arrange them .
To reduce the risk of the monitor. Plug the power cord into a grounded (earthed) AC outlet that no one end of the power cord to the ...adapter to the equipment: Do not disable the power cord grounding plug. Do not pull on power cords or cables. Setting up the monitor 7 When unplugging from the AC outlet, grasp the cord by unplugging the power cord from the equipment by the plug. 6. Route...at all times. WARNING! 5. Connect one may accidentally step on the rear of electric shock or damage to the monitor (3). Disconnect power from the electrical outlet. Arrange them .
User Guide
Page 14
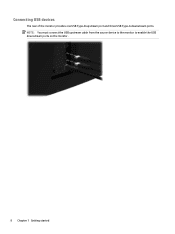
NOTE: You must connect the USB upstream cable from the source device to the monitor to enable the USB downstream ports on the monitor. 8 Chapter 1 Getting started Connecting USB devices The rear of the monitor provides one USB Type-B upstream port and three USB Type-A downstream ports.
NOTE: You must connect the USB upstream cable from the source device to the monitor to enable the USB downstream ports on the monitor. 8 Chapter 1 Getting started Connecting USB devices The rear of the monitor provides one USB Type-B upstream port and three USB Type-A downstream ports.

User Guide
Page 15
Adjust the display head up the monitor 9 Setting up or down to set it to a comfortable eye level. Adjusting the monitor for comfort Tilt the display head forward or backward to set it to a comfortable eye level.
Adjust the display head up the monitor 9 Setting up or down to set it to a comfortable eye level. Adjusting the monitor for comfort Tilt the display head forward or backward to set it to a comfortable eye level.

User Guide
Page 16
... > Off. Image retention is not in image damage may occur on monitors that input for 12 or more consecutive hours of the monitor to turn it on . 2. NOTE: You can disable the power light in image" are not covered under the HP warranty. Press the power button on the source device to turn... it is a condition that may occur on all LCD screens. Press the power button on the side of nonuse. Press the Menu button on the monitor 1. To avoid burn-in image damage on...
... > Off. Image retention is not in image damage may occur on monitors that input for 12 or more consecutive hours of the monitor to turn it on . 2. NOTE: You can disable the power light in image" are not covered under the HP warranty. Press the power button on the source device to turn... it is a condition that may occur on all LCD screens. Press the power button on the side of nonuse. Press the Menu button on the monitor 1. To avoid burn-in image damage on...

User Guide
Page 17
Installing a security cable You can secure the monitor to a fixed object with an optional security cable available from HP. Setting up the monitor 11 Storing headphones The monitor features a headphone hook at the top of the stand for convenient headphones storage.
Installing a security cable You can secure the monitor to a fixed object with an optional security cable available from HP. Setting up the monitor 11 Storing headphones The monitor features a headphone hook at the top of the stand for convenient headphones storage.

User Guide
Page 18
You can change the screen glow to output the average color on the display, expanding the on-screen action beyond the display. 12 Chapter 1 Getting started Using the ambient light The monitor features an ambient light to match LED lighting on computer, keyboard, and mouse. You can adjust the light or turn it off in the OSD. Press the Menu button on the side of the ambient lighting to illuminate a desk top or wall and enhance the gaming experience. You can also change the color of the monitor, and then select Power Control > Ambient Lighting.
You can change the screen glow to output the average color on the display, expanding the on-screen action beyond the display. 12 Chapter 1 Getting started Using the ambient light The monitor features an ambient light to match LED lighting on computer, keyboard, and mouse. You can adjust the light or turn it off in the OSD. Press the Menu button on the side of the ambient lighting to illuminate a desk top or wall and enhance the gaming experience. You can also change the color of the monitor, and then select Power Control > Ambient Lighting.

User Guide
Page 19
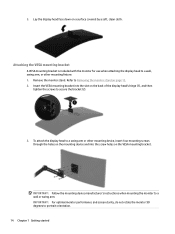
... You can be supported by UL or CSA Listed wall-mount bracket. IMPORTANT: Do not lay the monitor face down when removing the stand. Longer screws must not be sure the monitor is important to a wall, swing arm, or other mounting fixture. To attach a third-party mounting solution to be attached... curvature of the stand's hinge (1), and then slide the display head off and all cables from the stand to support the weight of the monitor display panel. For best performance, it is important to use the power and video cables provided with the VESA standard and is placed face down...
... You can be supported by UL or CSA Listed wall-mount bracket. IMPORTANT: Do not lay the monitor face down when removing the stand. Longer screws must not be sure the monitor is important to a wall, swing arm, or other mounting fixture. To attach a third-party mounting solution to be attached... curvature of the stand's hinge (1), and then slide the display head off and all cables from the stand to support the weight of the monitor display panel. For best performance, it is important to use the power and video cables provided with the VESA standard and is placed face down...
User Guide
Page 20
... holes on the VESA mounting bracket. Refer to secure the bracket (2). 3. Attaching the VESA mounting bracket A VESA mounting bracket is included with the monitor for use when attaching the display head to a wall or swing arm. Lay the display head face down on page 13. 2. IMPORTANT: Follow ...the mounting device manufacturer's instructions when mounting the monitor to a wall, swing arm, or other mounting device, insert four mounting screws through the holes on the mounting device and into the slot on...
... holes on the VESA mounting bracket. Refer to secure the bracket (2). 3. Attaching the VESA mounting bracket A VESA mounting bracket is included with the monitor for use when attaching the display head to a wall or swing arm. Lay the display head face down on page 13. 2. IMPORTANT: Follow ...the mounting device manufacturer's instructions when mounting the monitor to a wall, swing arm, or other mounting device, insert four mounting screws through the holes on the mounting device and into the slot on...

User Guide
Page 21
... work through separate BNC-type connectors or through distribution buffers/boxes. 2 Using the monitor Software and utilities The NVIDIA control panel software must have an optical drive, you can download the files from http://www.hp.com/support. ● .Inf (Information) file ● .Icm (Image Color Matching...) files (one is VESA DDC2- In order to the graphics card. The optical disc, if one for each calibrated color space) Enabling G-SYNC To enable the monitor for G-SYNC: 1. ...
... work through separate BNC-type connectors or through distribution buffers/boxes. 2 Using the monitor Software and utilities The NVIDIA control panel software must have an optical drive, you can download the files from http://www.hp.com/support. ● .Inf (Information) file ● .Icm (Image Color Matching...) files (one is VESA DDC2- In order to the graphics card. The optical disc, if one for each calibrated color space) Enabling G-SYNC To enable the monitor for G-SYNC: 1. ...

User Guide
Page 22
...OSD and make adjustments in select regions) To install the .inf and .icm files on the monitor. 2. After adjusting the function, select OK to save the setting, and then select Exit from the HP monitors support website. 1. Selects the video input signal (DisplayPort or HDMI). Installing from the optical disc... (available in the OSD using the Plus or Minus buttons to http://www.hp.com/support. 2. Select Install Monitor Driver Software. 4. To select an item from the OSD menu, use the Plus or Minus buttons to scroll to and highlight...
...OSD and make adjustments in select regions) To install the .inf and .icm files on the monitor. 2. After adjusting the function, select OK to save the setting, and then select Exit from the HP monitors support website. 1. Selects the video input signal (DisplayPort or HDMI). Installing from the optical disc... (available in the OSD using the Plus or Minus buttons to http://www.hp.com/support. 2. Select Install Monitor Driver Software. 4. To select an item from the OSD menu, use the Plus or Minus buttons to scroll to and highlight...

User Guide
Page 23
... menu settings to open the OSD. Selects the language in the display menu. All performance specifications represent the typical specifications provided by default), the monitor will wake from the Response Time menu: Level 1 Level 2 (Fast) Level 3 (Default) Level 4 Level 5 Level 6 (Fastest)... Information Exit Description Adjusts the on the right side of the monitor to the factory default settings. Selects and displays important information about the monitor. When Deep Sleep mode is enabled (enabled by HP's component manufacturers; Upon entering this reduced power state after 15 ...
... menu settings to open the OSD. Selects the language in the display menu. All performance specifications represent the typical specifications provided by default), the monitor will wake from the Response Time menu: Level 1 Level 2 (Fast) Level 3 (Default) Level 4 Level 5 Level 6 (Fastest)... Information Exit Description Adjusts the on the right side of the monitor to the factory default settings. Selects and displays important information about the monitor. When Deep Sleep mode is enabled (enabled by HP's component manufacturers; Upon entering this reduced power state after 15 ...


